
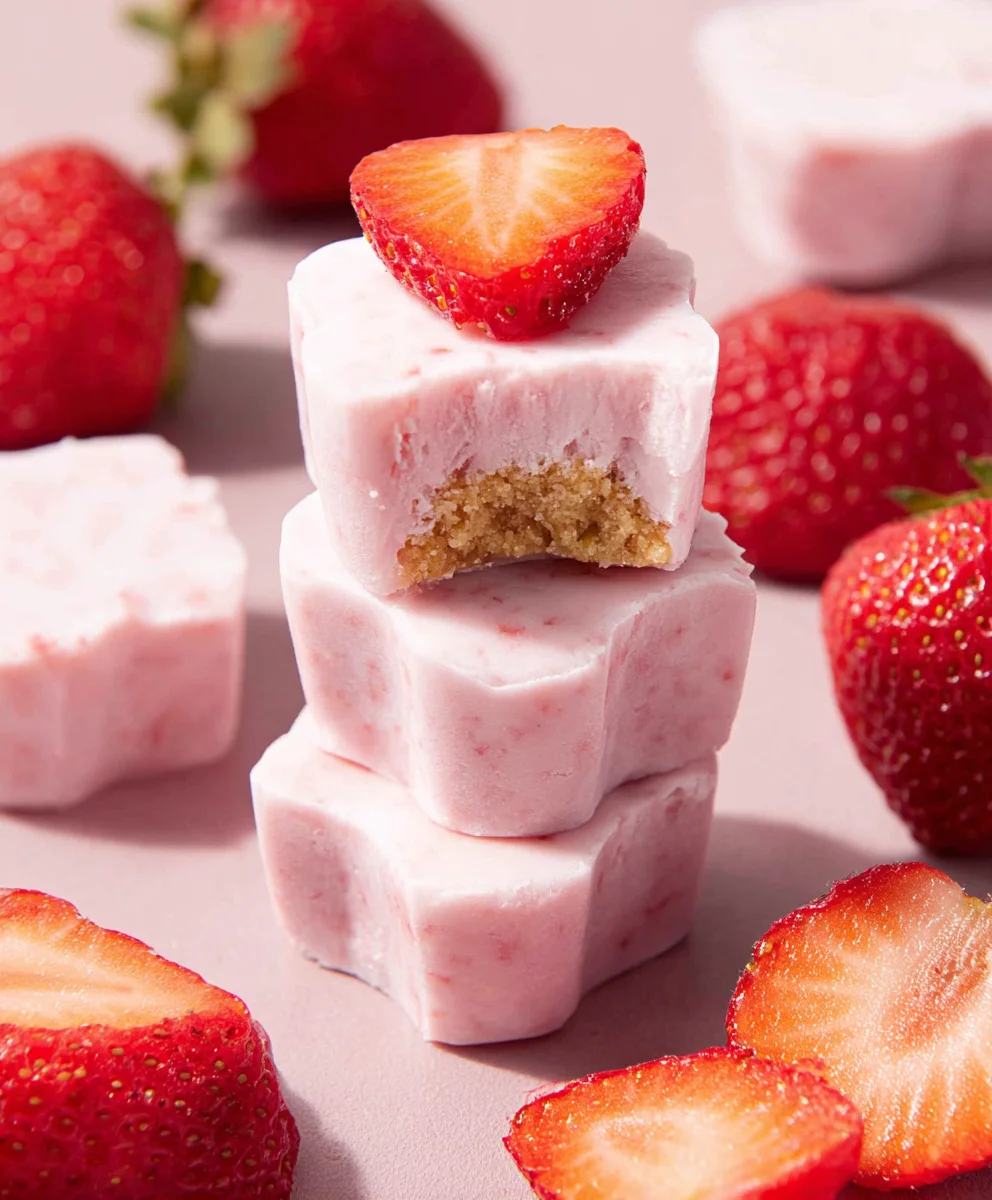
Easy Strawberry Yogurt Bites are a delightful treat that has taken the snacking world by storm, and for good reason! These little gems offer the perfect balance of creamy, tangy yogurt and sweet, vibrant strawberries, all encased in a delightful, bite-sized package. What makes them so incredibly popular is their sheer simplicity, making them a fantastic option for busy parents looking for a healthy, homemade snack for their little ones, or for anyone craving a guilt-free indulgence. The magic of Easy Strawberry Yogurt Bites lies in their versatility; they’re wonderful as a refreshing breakfast component, a post-workout pick-me-up, or a sweet conclusion to any meal. They capture the essence of summer freshness and provide a burst of flavor and nutrients without any fuss. Get ready to fall in love with this incredibly easy and satisfying recipe!

Ingredients:
- 5 large strawberries (washed, hulled, and cut into bite-sized pieces)
- 1 tablespoon honey
- 1 cup plain Greek yogurt (full-fat recommended for best texture)
Preparing the Strawberry Yogurt Bites
Step 1: Prepare the Strawberries
Before we begin extract mixing, let’s get our star ingredient ready. Take your 5 large strawberries. Ensure they are thoroughly washed under cool running water to remove any dirt or residue. Once washed, it’s time to remove the green tops, also known as the hull. You can do this with a small paring knife or a strawberry huller. After hulling, cut each strawberry into manageable, bite-sized pieces. Aim for pieces that are roughly ½ inch to ¾ inch in size. This will make them easy to coat with the yogurt and enjoyable to eat. Set these prepared strawberries aside on a plate or cutting board. The vibrant red of the strawberries will be a beautiful contrast to the creamy yogurt.
Step 2: Sweeten the Yogurt Base
Now, let’s focus on creating our creamy yogurt mixture. In a medium-sized bowl, place the 1 cup of plain Greek yogurt. For the best results and a wonderfully rich texture, I recommend using full-fat Greek yogurt. It has a thicker consistency that holds its shape better and offers a delightful tang that balances the sweetness of the honey. To this yogurt, add the 1 tablespoon of honey. The honey not only adds a natural sweetness but also helps to bind the yogurt slightly, making it easier to coat the strawberries. Using a spoon or a whisk, gently but thoroughly combine the Greek yogurt and honey. Stir until the honey is completely incorporated into the yogurt, ensuring there are no streaks of pure honey remaining. You want a smooth, uniformly sweet yogurt base. Taste a tiny bit at this stage (don’t worry, it’s just yogurt and honey!) to ensure the sweetness is to your liking. You can add a tiny bit more honey if you prefer it sweeter, but remember the strawberries themselves will contribute some natural sweetness.
Step 3: Coat the Strawberries
This is where the magic happens and we bring the elements together. Take your prepared strawberry pieces from Step 1 and add them directly into the bowl with the sweetened Greek yogurt mixture from Step 2. Using a spoon, gently fold the strawberries into the yogurt. The goal here is to coat each strawberry piece evenly with the yogurt mixture. Be careful not to overmix or mash the strawberries; we want them to remain in distinct, recognizable pieces. You can use a folding motion, lifting the yogurt from the bottom of the bowl and gengin extract bringing it over the strawberries, turning the bowl as you go. Ensure every surface of each strawberry piece has a good coating of the creamy yogurt. This coating is what will solidify and create our delightful bite.
Step 4: Portion and Freeze
Once all the strawberries are beautifully coated, it’s time to prepare them for freezing. Line a baking sheet or a plate that fits into your freezer with parchment paper or wax paper. This is crucial to prevent the yogurt bites from sticking to the surface as they freeze. Carefully arrange the yogurt-coated strawberry pieces onto the prepared baking sheet, ensuring they are not touching each other. Giving them a little space will make it easier to separate them once they are frozen. Then, carefully place the baking sheet into your freezer. Allow the strawberry yogurt bites to freeze for at least 2-3 hours, or until they are completely firm and solid. The freezing process is what transforms the creamy yogurt into a firm, almost candy-like coating around the strawberries.
Step 5: Finalizing and Serving
After the initial freezing period, check the strawberry yogurt bites. They should be firm to the touch. If they are still a little soft, return them to the freezer for another hour. Once they are fully frozen and firm, you can either serve them immediately straight from the freezer as a refreshing treat, or you can transfer them to a freezer-safe airtight container or a resealable bag. If you plan on storing them for later, ensure they are well-senon-alcoholic aled to prevent freezer burn and ice crystal formation. When you are ready to enjoy them, simply take them out of the freezer. They are best enjoyed within a few weeks for optimal freshness and texture. These Easy Strawberry Yogurt Bites are a wonderfully healthy and delicious snack, perfect for a warm day or a guilt-free indulgence.
Conclusion:
And there you have it – your guide to creating delicious and incredibly simple Easy Strawberry Yogurt Bites! We’ve walked through each step, ensuring that even if you’re new to the kitchen, you can whip up these delightful treats with confidence. These bites are perfect for a healthy snack, a fun activity to do with kids, or even a light dessert. I encourage you to give them a try; you might be surprised at how satisfying and rewarding it is to make something so wholesome and tasty from scratch.
For serving, these Easy Strawberry Yogurt Bites are fantastic on their own, chilled straight from the freezer. They also make a beautiful addition to a breakfast parfait, layered with granola and fresh fruit, or can be a fun topping for oatmeal. Don’t be afraid to get creative with your toppings or the yogurt base itself – perhaps a swirl of honey or a dash of vanilla extract could elevate them further.
I sincerely hope you enjoy making and savoring these Easy Strawberry Yogurt Bites as much as I do. They truly are a testament to how simple ingredients can create something so special. Happy snacking!
Frequently Asked Questions:
Can I use a different fruit instead of strawberries?
Absolutely! While strawberries are the star of these Easy Strawberry Yogurt Bites, you can easily substitute them with other fruits like blueberries, raspberries, or even small pieces of banana. Just ensure the fruit is mashed or pureed to a consistency that mixes well with the yogurt.
How long can I store Easy Strawberry Yogurt Bites?
These Easy Strawberry Yogurt Bites can be stored in an airtight container in the freezer for up to 2-3 weeks. It’s best to place a piece of parchment paper between layers to prevent them from sticking together. When you’re ready to enjoy them, simply let them sit at room temperature for a few minutes to soften slightly.

Easy Strawberry Yogurt Bites Recipe – Quick & Delicious Treat
A quick, easy, and delicious frozen treat made with fresh strawberries and creamy Greek yogurt.
Ingredients
-
5 large strawberries, washed, hulled, and cut into bite-sized pieces
-
1 tablespoon honey
-
1 cup plain Greek yogurt, full-fat recommended
-
Parchment paper or wax paper for lining the baking sheet
-
Freezer-safe airtight container or resealable bag for storage
Instructions
-
Step 1
Prepare the strawberries: Wash 5 large strawberries, remove the green tops (hull them), and cut them into bite-sized pieces, about ½ to ¾ inch in size. Set aside. -
Step 2
Sweeten the yogurt base: In a medium bowl, combine 1 cup of plain Greek yogurt with 1 tablespoon of honey. Stir until the honey is completely incorporated and the mixture is smooth and uniformly sweet. Taste and adjust sweetness if desired. -
Step 3
Coat the strawberries: Add the prepared strawberry pieces to the sweetened Greek yogurt mixture. Gently fold the strawberries into the yogurt using a spoon, ensuring each piece is evenly coated without mashing the strawberries. -
Step 4
Portion and freeze: Line a baking sheet or plate that fits in your freezer with parchment paper or wax paper. Arrange the yogurt-coated strawberry pieces onto the lined sheet, making sure they are not touching each other. Place the baking sheet in the freezer and freeze for at least 2-3 hours, or until completely firm and solid. -
Step 5
Finalize and serve: Once firm, the strawberry yogurt bites can be served immediately. For storage, transfer them to a freezer-safe airtight container or resealable bag to prevent freezer burn. Enjoy within a few weeks for optimal freshness and texture.
Important Information
Nutrition Facts (Per Serving)
It is important to consider this information as approximate and not to use it as definitive health advice.
Allergy Information
Please check ingredients for potential allergens and consult a health professional if in doubt.


Leave a Comment