
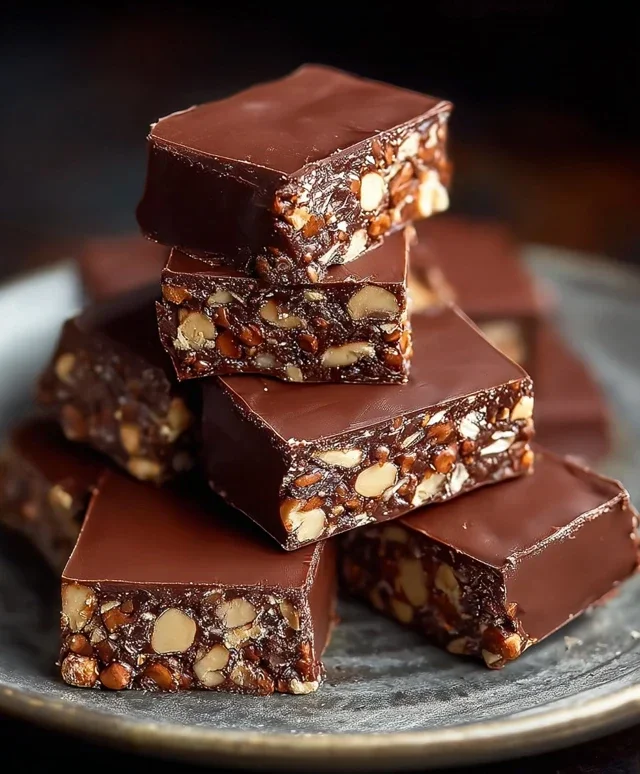
No-Bake Chocolate Biscuit Bars are an absolute lifesaver for anyone craving a decadent treat without the fuss of an oven. If you’re like me, the thought of turning on the oven during warmer months can be daunting, but the craving for something rich, chocolatey, and satisfying never disappears. That’s where these glorious No-Bake Chocolate Biscuit Bars swoop in to save the day! These aren’t just any dessert; they’re a symphony of textures and flavors that have a magical way of bringin extractg smiles to faces. The delightful crunch of biscuits, mingled with the smooth, intense richness of chocolate, creates an irresistible combination. What truly makes these bars special is their sheer simplicity coupled with their remarkable ability to impress. They’re perfect for impromptu gatherings, a sweet afternoon pick-me-up, or simply because you deserve a little indulgence. Get ready to discover your new favorite fuss-free indulgence!

No-Bake Chocolate Biscuit Bars
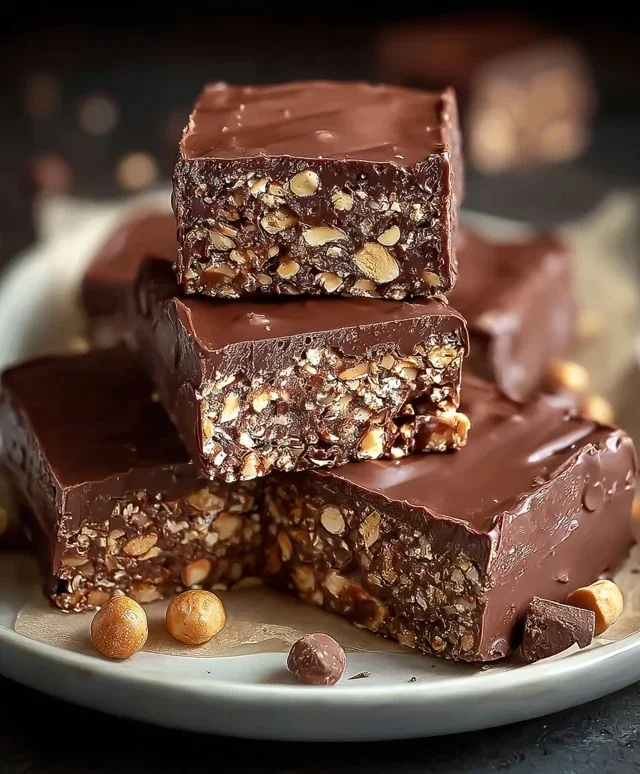
Welcome to a recipe that’s a guaranteed crowd-pleaser and surprisingly simple to whip up – my No-Bake Chocolate Biscuit Bars! These are the perfect treat when you’re craving something rich, chocolatey, and satisfying without turning on the oven. They’re ideal for busy bakers, unexpected guests, or just a spontaneous sweet tooth emergency. The combination of crunchy biscuits, creamy chocolate, and the subtle nuttiness of peanuts creates a delightful texture and flavor profile that’s utterly addictive. What I love most about these bars is their versatility; you can easily adapt them to your liking with different types of biscuits or even by adding a sprinkle of sea salt on top for an extra flavour dimension. So, let’s get started on creating these little squares of chocolate heaven!
Ingredients:
Instructions:
Preparing the Base:
First, let’s get our biscuits ready. Take your digestive biscuits and crush them into fine crum extractbs. You can do this by placing them in a sturdy plastic bag and using a rolling pin to bash them, or if you have a food processor, that’s even quicker. The finer the crum extractbs, the smoother your base will be. In a large mixing bowl, combine the crushed biscuits with the first portion of ground peanuts (1 cup / 85g), the granulated sugar, the optional vanilla sugar, and the cocoa powder. Give everything a good stir with a whisk or a fork to ensure all the dry ingredients are well combined and there are no pockets of cocoa powder. This dry mixture forms the crunchy, chocolatey foundation of our bars.
Melting the Chocolate and Butter Mixture:
Now, let’s create the binding agent for our biscuit base. In a medium saucepan, combine the sweet cream and the cubed butter. Place the saucepan over medium-low heat. Stir gently and continuously until the butter has completely melted and the cream is heated through. You don’t want the cream to boil, just to get nice and warm. This warm cream and butter mixture will help to soften the biscuit crum extractbs and create a cohesive bar. Once the butter is melted and the cream is warm, remove the saucepan from the heat.
Combining the Wet and Dry Ingredients:
This is where everything comes together! Pour the warm cream and butter mixture over the dry biscuit and peanut mixture in the large bowl. Use a sturdy spatula or a wooden spoon to mix everything thoroughly. Keep stirring until all the dry ingredients are moistened and you have a thick, clumpy, but uniform mixture. It should be sticky enough to hold together when pressed. If it seems a little too dry, you can add another tablespoon of cream. If it seems too wet, you can add a few more crushed biscuits. Taste a tiny bit (if you can resist!) to check the sweetness – you can adjust sugar slightly here if needed, but remember the chocolate topping will add more sweetness.
Pressing the Bars into the Pan:
Prepare an 8×8 inch (20×20 cm) baking pan by lining it with parchment paper, leaving some overhang on the sides. This overhang will make it super easy to lift the bars out later. Spoon the chocolate biscuit mixture into the prepared pan. Use your spatula or the back of a spoon (lightly greased if it’s sticking) to press the mixture down firmly and evenly into the pan. You want a compact layer so the bars hold their shape well when cut. Get into the corners and make sure the surface is as flat as possible. This thorough pressing is key to achieving nice, sturdy bars that won’t crum extractble when you serve them.
Making and Applying the Chocolate Topping:
For the irresistible chocolate topping, place the chopped milk chocolate and dark chocolate in a heatproof bowl. In a small saucepan, gently heat the vegetable oil until it’s warm. Pour the warm oil over the chopped chocolate. Let it sit for a minute or two to allow the chocolate to start melting. Then, gently whisk the chocolate and oil mixture until it becomes smooth and glossy. You’re looking for a luxurious, flowing chocolate sauce. This oil helps to create a super smooth and easy-to-spread ganache that will set beautifully.
Assembling and Chilling the Bars:
Once your chocolate topping is smooth, carefully pour it over the pressed biscuit base in the pan. Use your spatula to spread the chocolate evenly to cover the entire surface. Don’t worry if it’s not perfectly smooth; a slightly rustic look is part of the charm. If you’re using the extra ground peanuts for topping, sprinkle them evenly over the melted chocolate while it’s still wet. This will help them adhere nicely. Now comes the hardest part: patience! Place the pan in the refrigerator and chill for at least 2-3 hours, or until the chocolate topping is completely set and firm. This chilling time is crucial for the bars to solidify properly and become sliceable.
Slicing and Serving:
Once the bars are thoroughly chilled and firm, use the parchment paper overhang to carefully lift the entire slab out of the pan onto a cutting board. For the cleanest cuts, I recommend using a sharp knife that has been warmed slightly by running it under hot water and then dried. Make your cuts into desired bar sizes. If the chocolate starts to get soft as you cut, re-warm your knife. Store these delicious No-Bake Chocolate Biscuit Bars in an airtight container in the refrigerator. They’re best enjoyed chilled, offering a delightful contrast between the cool, firm chocolate topping and the chewy, crum extractbly base. Enjoy every decadent bite!
Conclusion:
There you have it – the easiest, most delicious no-bake chocolate biscuit bars you’ll ever make! This recipe is an absolute winner because it requires no oven time, minimal effort, and delivers an incredibly satisfying chocolatey crunch with every bite. It’s the perfect solution for those moments when a serious sweet craving hits but you don’t want to spend hours in the kitchen. Imagin extracte the joy of presenting these decadent bars at a party or simply enjoying them with your afternoon tea or coffee. They truly are a crowd-pleaser and a lifesaver for busy bakers. Don’t hesitate to give these no-bake chocolate biscuit bars a try – I promise you won’t regret it!
These versatile bars are fantastic on their own, but they also shine when served with a scoop of vanilla ice cream, a dollop of whipped cream, or even a sprinkle of extra cocoa powder for added indulgence. For variations, consider adding a handful of chopped nuts like almonds or pistachios for extra texture and flavor, or a scattering of dried cranberries for a tangy contrast. A dash of orange zest in the chocolate mixture can also elevate the taste wonderfully.
Frequently Asked Questions:
Can I use a different type of biscuit?
Absolutely! While digestive biscuits are classic, feel free to experiment with other crum extractbly biscuits like Hobnobs for a nuttier flavor or even shortbread for a richer, buttery base. Just ensure they are firm enough to hold their shape once pressed.
How long do these bars keep?
These no-bake chocolate biscuit bars can be stored in an airtight container in the refrigerator for up to 5 days. The texture might firm up slightly in the fridge, so I recommend letting them sit at room temperature for about 10-15 minutes before serving for the best eating experience.
No-Bake Chocolate Biscuit Bars
Easy and delicious no-bake bars made with crushed biscuits, peanuts, chocolate, and cream. Perfect for a quick treat.
Ingredients
-
350g biscuits, crushed
-
85g ground peanuts
-
85g sugar
-
10g vanilla sugar (optional)
-
45g cocoa powder
-
180ml sweet cream
-
110g butter
-
90g milk chocolate
-
30g dark chocolate
-
30g vegetable oil
-
70g ground peanuts
Instructions
-
Step 1
Line a square baking tin with parchment paper. -
Step 2
In a large bowl, combine crushed biscuits, 85g ground peanuts, sugar, vanilla sugar (if using), and cocoa powder. -
Step 3
Gently heat the sweet cream and butter in a saucepan until the butter has melted and the mixture is smooth. Do not boil. -
Step 4
Pour the warm cream mixture into the dry ingredients and stir until well combined and a thick mixture forms. -
Step 5
Press the mixture evenly into the prepared baking tin. -
Step 6
Melt the milk chocolate, dark chocolate, vegetable oil, and 70g ground peanuts together in a heatproof bowl set over a saucepan of simmering water (bain-marie), stirring until smooth. Alternatively, microwave in short bursts, stirring between each. -
Step 7
Spread the melted chocolate mixture evenly over the biscuit base. -
Step 8
Chill in the refrigerator for at least 2 hours, or until firm. Cut into bars before serving.
Important Information
Nutrition Facts (Per Serving)
It is important to consider this information as approximate and not to use it as definitive health advice.
Allergy Information
Please check ingredients for potential allergens and consult a health professional if in doubt.

Leave a Comment