
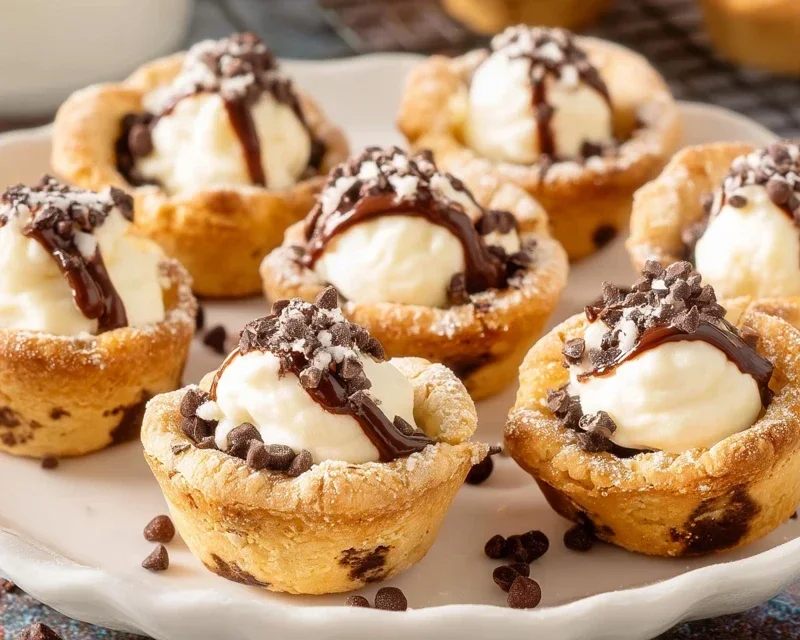
Mini cannoli cups are about to become your new favorite sweet indulgence, and trust me, once you try them, you’ll understand why! There’s something undeniably magical about a perfectly crisp shell giving way to a creamy, dreamy ricotta filling. It’s the delightful contrast in textures and the sweet, subtle hint of citrus that makes classic cannoli so beloved, but we’re taking it to a whole new level of adorable and approachable with these mini cannoli cups. Forget wrestling with pastry bags and deep fryers for the traditional tubes; these mini cannoli cups offer all the authentic flavor and charm in a bite-sized package. They’re perfect for parties, afternoon treats, or simply when you crave a little piece of Italian sunshine. Get ready to impress yourself and everyone around you with these irresistible mini cannoli cups!

Mini Cannoli Cups
Get ready to impress your friends and family with these delightful Mini Cannoli Cups! They capture all the irresistible flavors and textures of traditional cannoli but in an easy-to-make, bite-sized format. No rolling or frying needed – just a few simple steps and you’ll have a stunning dessert that looks and tastes like it came from a gourmet bakery. The crisp, buttery crust, the creamy, sweet ricotta filling, and the burst of citrus and chocolate (or pistachios!) make these a true showstopper. Whether you’re hosting a party, need a sweet treat for a holiday gathering, or simply want to indulge yourself, these mini cannoli cups are sure to be a hit.
Ingredients:
Instructions:
First things first, let’s get that delicious ricotta filling ready. In a medium bowl, combine the well-drained whole-milk ricotta cheese. It’s crucial to drain the ricotta thoroughly; this prevents a watery filling. You can do this by placing the ricotta in a fine-mesh sieve lined with cheesecloth (or a coffee filter) over a bowl in the refrigerator for at least an hour, or even overnight. This step makes a significant difference in the final texture of your filling. To the drained ricotta, add the powdered sugar, granulated sugar, finely grated orange or lemon zest (I personally love the brightness of orange zest, but lemon is equally fantastic!), and vanilla extract. Gently stir everything together until it’s just combined and the filling is smooth and creamy. Don’t overmix, as this can sometimes make the ricotta a bit grainy. Once combined, cover the bowl and pop it into the refrigerator to chill while you prepare the crusts. This allows the flavors to meld beautifully.
Now, let’s get our “cups” ready. Preheat your oven to 375°F (190°C). Lightly grease a mini muffin tin (about 24 cups). Open your softened refrigerated pie crusts. If your crusts are still a little stiff, let them sit at room temperature for a few more minutes, but be careful not to let them get too warm or they’ll be sticky and hard to handle. Carefully unroll one of the pie crusts. Using a 2.5-inch round cookie cutter (or a glass rim), cut out as many circles as you can. You should get about 12 circles from one crust. Repeat with the second pie crust, so you have approximately 24 circles in total. If you have dough scraps, you can gently press them together and re-roll them once to get a few more circles, but try not to overwork the dough.
Gently press each pie crust circle into the greased cups of your mini muffin tin, creating little tart shells. You want the dough to come up the sides of the muffin cup. Be sure to press the dough firmly into the bottom and up the sides to ensure even baking. If the dough tears a little, don’t worry, just gently press it back together. It doesn’t have to be perfect; the filling will hide any minor imperfections!
Before we bake these little beauties, we’re going to give them a sweet and crunchy coating. In a small shallow dish, combine the turbinado sugar and ground cinnamon. This is where the magic happens for that characteristic cannoli crunch! Once you’ve got your crusts pressed into the muffin tin, lightly brush the tops of the crusts with a tiny bit of water or milk. This will help the sugar mixture adhere. Then, dip the sugared tops of each crust into the cinnamon-sugar mixture, pressing gently to coat. This adds a wonderful caramelization and a hint of spice as they bake.
Time to bake! Place the filled mini muffin tin into your preheated oven. Bake for 12-15 minutes, or until the crusts are golden brown and puffed slightly. Keep an eye on them during the last few minutes of baking, as ovens can vary. You’re looking for that beautiful, crisp, golden perfection. Once they’re done, carefully remove the muffin tin from the oven. Let the cups cool in the tin for about 5 minutes before carefully inverting them onto a wire rack to cool completely. This cooling process is important so they don’t get soggy.
Once the pie crust cups are completely cooled, it’s time for the best part: filling them! Spoon or pipe the chilled ricotta filling into each of the cooled cannoli cups. Don’t be shy; fill them generously! Then, comes the final touch to make them truly special. Sprinkle the tops with your chosen topping: miniature semisweet chocolate chips or finely chopped pistachios. For an extra elegant finish, dust them with a little additional powdered sugar just before serving. These mini cannoli cups are best enjoyed the same day they are assembled, but if you have leftovers, they can be stored in an airtight container in the refrigerator for up to a day.
Conclusion:
And there you have it – your guide to creating delightful Mini Cannoli Cups! This recipe is truly a winner because it captures all the classic, beloved flavors of traditional cannoli in a perfectly portioned, incredibly easy-to-make package. The crispy, golden shell paired with the creamy, sweet ricotta filling is an irresistible combination that’s sure to impress. Whether you’re hosting a party, celebrating a special occasion, or simply craving a sweet treat, these mini cannoli cups are the perfect answer.
I love serving these as elegant desserts after dinner, but they also make fantastic additions to any dessert table or a fun afternoon pick-me-up. Don’t be afraid to get creative with your toppings! You can dip them in melted chocolate, sprinkle with chopped nuts like pistachios or almonds, or even add a dusting of colorful sprinkles for a festive touch. For an extra layer of flavor, consider adding a splash of orange zest or a hint of cinnamon to your ricotta filling.
I truly encourage you to give this Mini Cannoli Cups recipe a try. It’s surprisingly straightforward and yields incredibly rewarding results. You’ll be amazed at how professional these little treats look and how delicious they taste!
Frequently Asked Questions:
Can I make the cannoli shells ahead of time?
Yes, you absolutely can! Store cooled cannoli shells in an airtight container at room temperature for up to a week. However, for the best texture, I recommend filling them no more than a few hours before serving to prevent them from becoming soggy.
What if I don’t have ricotta cheese?
While ricotta is traditional and provides that signature texture and mild flavor, you can experiment with alternatives for your filling. Mascarpone cheese is a fantastic substitute, offering a richer and creamier result. You could also try a blend of cream cheese and heavy cream for a different, but still delicious, creamy filling.
How can I make my mini cannoli cups healthier?
For a slightly healthier twist, you can reduce the sugar in the ricotta filling slightly or opt for a sweetener like maple syrup. While the shells are inherently fried, you could explore baking mini pastry cups as an alternative, though the texture will differ significantly from a traditional cannoli.

Mini Cannoli Cups
Delightful mini cannoli cups featuring a creamy ricotta filling and a crisp, spiced pie crust shell. A no-fry, easy-to-make dessert perfect for parties.
Ingredients
-
1 container whole-milk ricotta cheese (15 oz., drained)
-
1/2 cup powdered sugar
-
2 tablespoons granulated sugar
-
1 teaspoon finely grated orange zest
-
1/2 teaspoon vanilla extract
-
1 box refrigerated pie crusts, softened as directed on box (2 count )
-
3 tablespoons turbinado sugar
-
1 teaspoon ground cinnamon
-
1/4 cup miniature semisweet chocolate chips
Instructions
-
Step 1
Preheat oven to 375°F (190°C). Lightly grease muffin tins. -
Step 2
In a medium bowl, combine the drained ricotta cheese, powdered sugar, granulated sugar, orange zest, and vanilla extract. Mix until smooth and well combined. -
Step 3
Unroll the pie crusts. Cut out 24 circles using a 2.5-inch round cookie cutter. Gently press each circle into the muffin tin cups, forming a shell. -
Step 4
In a small bowl, mix together the turbinado sugar and ground cinnamon. -
Step 5
Sprinkle a small amount of the cinnamon-sugar mixture into the bottom of each pie crust shell. -
Step 6
Bake for 10-12 minutes, or until the crusts are golden brown and slightly puffed. -
Step 7
Let the crusts cool in the muffin tin for a few minutes before carefully removing them to a wire rack to cool completely. -
Step 8
Once cooled, spoon or pipe the ricotta filling into each mini cannoli cup. -
Step 9
Garnish the tops with miniature chocolate chips. Dust with additional powdered sugar before serving, if desired.
Important Information
Nutrition Facts (Per Serving)
It is important to consider this information as approximate and not to use it as definitive health advice.
Allergy Information
Please check ingredients for potential allergens and consult a health professional if in doubt.
Leave a Comment