• Skip to primary navigation
  • Skip to main content
  • Skip to primary sidebar
Recipe Fantastic

Recipe Fantastic

Simple, Savory, and Sweet Meals

  • Home
  • Appetizer
  • Breakfast
  • Dinner
  • Lunch
  • Dessert
  • About Us
  • Contact
Recipe Fantastic
  • Home
  • Appetizer
  • Breakfast
  • Dinner
  • Lunch
  • Dessert
  • About Us
  • Contact
Dessert / Easy French Macaron Recipe-Perfect Homemade Delights

Easy French Macaron Recipe-Perfect Homemade Delights

June 18, 2026 by ChloeDessert

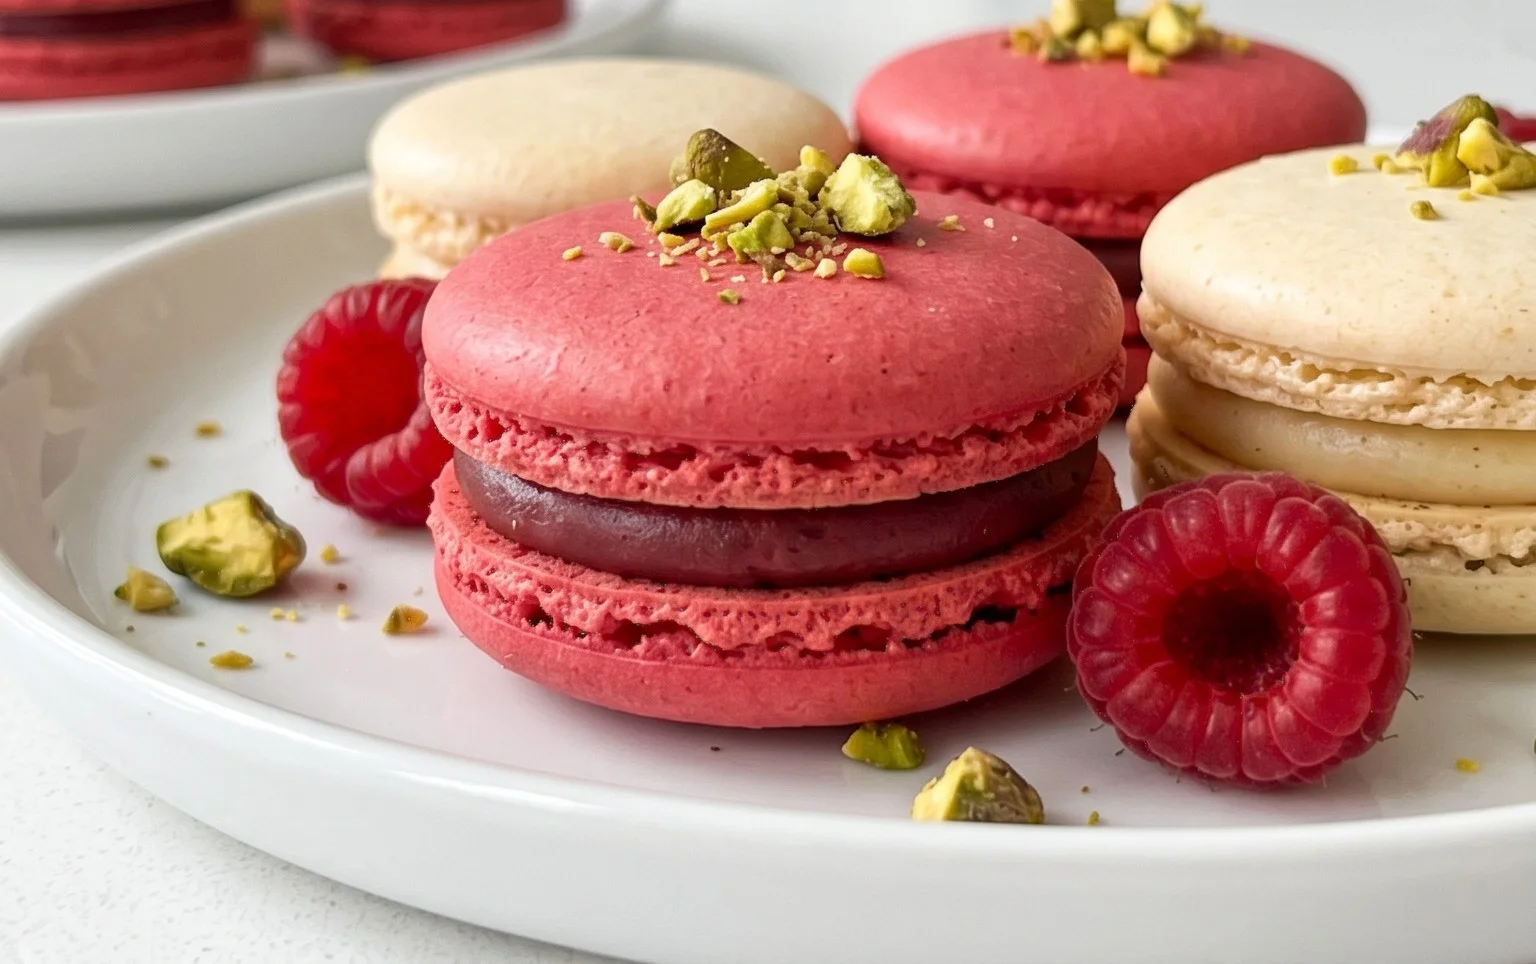
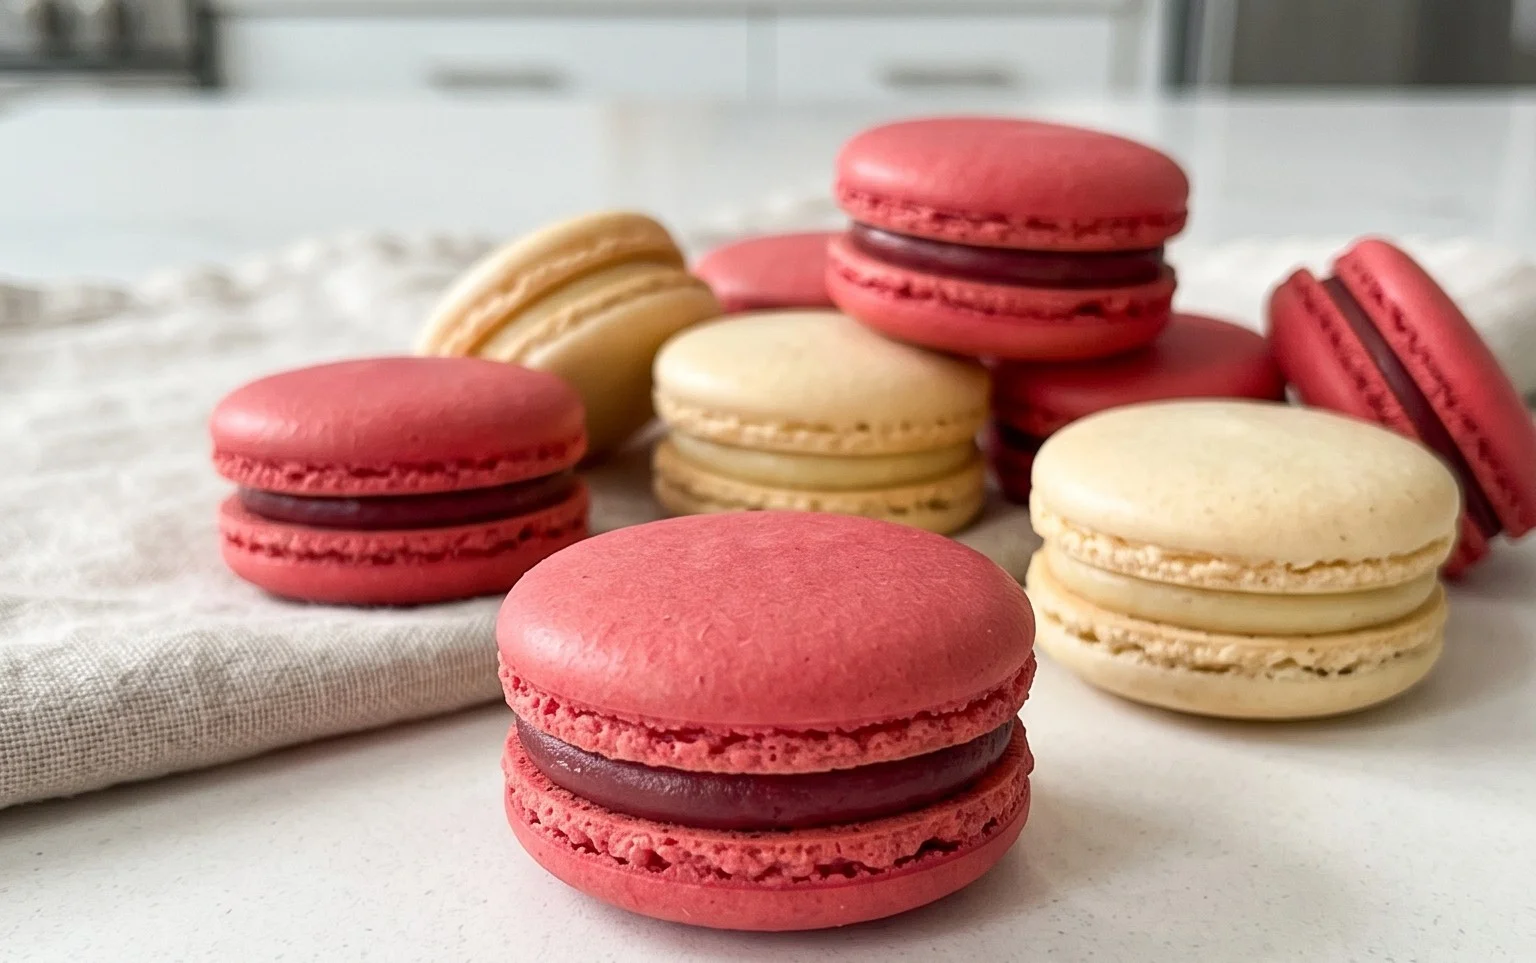
French Macaron Recipe: The delicate, jewel-toned French macaron has long captured the hearts and taste buds of dessert lovers worldwide. These exquisite little cookies, with their crisp outer shell giving way to a chewy interior and luscious filling, are more than just a treat; they’re a miniature work of art. What is it about the French macaron that evokes such delight? It’s the perfect balance of textures, the vibrant colors that brighten any occasion, and the sheer elegance they possess. Learning how to make a French macaron recipe from scratch might seem daunting, but trust me, the reward is incredibly satisfying. Imagin extracte the pride of presenting your own perfectly formed macarons, bursting with your favorite flavors. This recipe will guide you through the nuanced steps to achieve that signature smooth shell and delicate crum extractb, making your own French macaron dreams a delicious reality.

French Macaron Recipe this Recipe

French Macaron Recipe

Ah, the French macaron! Those delicate, ethereal meringue shells sandwiching a creamy, flavorful filling. They’re a testament to patience and precision, but oh-so-worth the effort. For years, I’ve been perfecting my macaron game, and I’m thrilled to share my tried-and-true recipe with you. This recipe focuses on the French meringue method, which is generally considered more approachable for home bakers than the Italian method. Don’t be intimidated; with careful attention to detail, you too can create these exquisite little cookies.

Ingredients:

  • 150 grams sifted super-fine almond flour (measure after sifting *see notes)
  • 180 grams powdered sugar
  • 1/4 teaspoon salt
  • 120 grams large egg whites (at room temperature (about 4 large eggs))
  • 60 grams granulated sugar
  • 4 drops liquid-gel food coloring (or more for a stronger color ** see notes)
  • 1 teaspoon pure vanilla extract
  • Vanilla Buttercream Frosting or your choice of filling.
  • Instructions:

    Phase 1: Preparing the Dry Ingredients (Tant Pour Tant)

    This initial step is crucial for achieving smooth, crack-free macaron shells. The combination of almond flour and powdered sugar is often referred to as “tant pour tant,” meaning “equal parts” (though in this recipe, the ratio is slightly adjusted for optimal results).

  • First, I highly recommend sifting your almond flour. This might seem like an extra step, but it’s non-negotiable for macarons. Use a fine-mesh sieve and sift the almond flour. If you have larger almond pieces that don’t pass through, discard them or save them for another baking project. This ensures a fine, uniform texture.
  • Next, add the powdered sugar to the sifted almond flour. Then, add the 1/4 teaspoon of salt. Sift these together again, or whisk them thoroughly to ensure everything is well combined. The salt helps to balance the sweetness and enhance the flavor of the almond. Set this mixture aside.
  • Phase 2: Making the Meringue

    This is where the magic truly begin extracts. The meringue provides the structure and lightness for your macarons. Using room temperature egg whites is essential; they whip up to a more stable and voluminous foam than cold ones.

  • In a clean, dry bowl of your stand mixer (or a large bowl if using a hand mixer), add the 120 grams of room temperature egg whites. Make sure there is absolutely no trace of yolk in the egg whites, as fat will prevent them from whipping properly.
  • Begin extract whipping the egg whites on medium speed. You’ll want them to become foamy. Once foamy, gradually start adding the 60 grams of granulated sugar, a tablespoon at a time, while the mixer is still running. Continue to beat on medium-high speed until stiff, glossy peaks form. This means that when you lift the whisk, the meringue stands up straight and doesn’t curl over. You should be able to turn the bowl upside down without the meringue falling out. This process can take anywhere from 5 to 10 minutes, depending on your mixer.
  • If you are using food coloring, now is the time to add it. Add your 4 drops of liquid-gel food coloring to the stiff meringue and mix on low speed until the color is evenly distributed. Be cautious not to overmix at this stage, as you don’t want to deflate the meringue. For a deeper color, you can add another drop or two, but it’s better to start with less and add more as needed. Lastly, stir in the 1 teaspoon of pure vanilla extract.
  • Phase 3: Macaronage (Folding the Dry Ingredients into the Meringue)

    This is arguably the most critical step and where the term “macaronage” comes from. It refers to the technique of folding the dry ingredients into the meringue until you reach the correct consistency. This consistency is key to achieving those coveted “feet” (the ruffled base of the macaron) and smooth tops.

  • Now, it’s time to combine your dry ingredients with the meringue. Add about one-third of the sifted almond flour and powdered sugar mixture to the meringue. Using a spatula, gently fold the dry ingredients into the meringue. You want to scrape down the sides of the bowl and then fold the mixture over itself. Repeat this process, adding the remaining dry ingredients in two more additions, folding after each.
  • The macaronage stage is crucial. You are looking for a batter that flows like lava or thick ribbon. To test this, lift your spatula and let the batter fall back into the bowl. It should fall in a continuous, thick ribbon. If it breaks into small pieces, you’ve overmixed. If it’s too stiff and doesn’t flow, you’ve undermixed. You should be able to draw a figure-eight with the falling batter without it breaking. It takes practice to get this right, so don’t be discouraged if your first attempt isn’t perfect.
  • Phase 4: Piping and Baking

    Piping evenly sized macarons is important for consistent baking and aesthetics.

  • Preheat your oven to 300°F (150°C). Line two baking sheets with parchment paper or silicone baking mats. If using parchment paper, you can draw circles on the underside as guides for your macarons.
  • Transfer the macaron batter into a piping bag fitted with a round tip (about 1/2-inch). Pipe small rounds of batter onto your prepared baking sheets, holding the piping bag directly over the sheet and applying even pressure. Leave about 1-inch between each macaron.
  • Once you’ve piped all your macarons, gently tap the baking sheets on the counter a few times. This helps to release any trapped air bubbles and encourages the macarons to spread slightly, creating a smoother surface. You can also use a toothpick to pop any remaining visible air bubbles.
  • Let the piped macarons sit at room temperature for about 30-60 minutes, or until a skin forms on the surface. You should be able to gently touch the surface without any batter sticking to your finger. This skin is essential for the macarons to develop their feet during baking.
  • Bake the macarons for 12-15 minutes, or until the shells are firm to the touch and the feet have developed. The baking time can vary depending on your oven, so keep an eye on them. The macarons should lift easily from the parchment paper when they are done.
  • Let the macarons cool completely on the baking sheets before attempting to remove them. Once cooled, carefully peel them off the parchment paper.
  • Phase 5: Filling and Maturing

    The final step is to fill your beautiful macaron shells and let them mature.

  • Once your macaron shells are completely cooled, pair them up by size.
  • Pipe or spread your Vanilla Buttercream Frosting (or your chosen filling) onto the flat side of one macaron shell. Gently sandwich the other shell on top, pressing down slightly to spread the filling to the edges.
  • This is where patience truly pays off. Place the filled macarons in an airtight container in the refrigerator for at least 24 hours, and up to 48 hours. This “maturing” process allows the filling to soften the shells from the inside, creating that perfect chewy texture that macarons are known for.
  • Enjoy your homemade French macarons! They are a true labor of love.

    *Notes:
    *Measuring almond flour after sifting ensures accuracy.
    **Liquid-gel food coloring is recommended for vibrant colors without adding excess moisture.

    French Macaron Recipe

    Conclusion:

    And there you have it! This French macaron recipe demystifies the art of creating these delicate, delightful treats. We’ve walked through each step, ensuring you understand the nuances of achieving those perfectly smooth shells and satisfying chewy interiors. The beauty of macarons lies in their versatility; they are elegant enough for a special occasion but simple enough to brighten any ordinary afternoon. Their light, airy texture and infinite flavor possibilities make them a truly unique indulgence.

    Imagin extracte serving these vibrant little gems at your next tea party, a birthday celebration, or simply as a thoughtful gift. They pair wonderfully with a strong cup of coffee, a delicate herbal tea, or even a glass of cbeef hampagne. Don’t be afraid to experiment with fillings! Beyond the classic ganache or buttercream, consider lemon curd, fruit jams, or even a subtle cream cheese frosting. The possibilities for flavor combinations are truly endless.

    I wholeheartedly encourage you to give this French macaron recipe a try. While they might seem intimidating at first, with a little patience and attention to detail, you’ll be rewarded with stunning and delicious macarons. Embrace the process, enjoy the sweet reward, and impress yourself and your loved ones with your newfound macaron-making prowess!

    Frequently Asked Questions:

    Why are my macaron shells cracking?

    Cracking is often due to over-whipped egg whites, oven temperature being too high, or not letting the macarons “rest” or form a skin before baking. Ensure your meringue is stiff but not dry, and that you’ve allowed the piped shells to sit at room temperature until they develop a dull, dry surface.

    My macarons are hollow. What went wrong?

    Hollow shells can be caused by a few factors. Under-whipped meringue, over-mixing the batter (which deflates the meringue), or baking at too low a temperature can all contribute to this issue. Proper resting and achieving the correct batter consistency, known as ‘lava-like’, are crucial.


    French Macaron Recipe

    French Macaron Recipe

    A classic recipe for light and airy French macarons with a smooth shell and delightful filling.

    Prep Time
    30 Minutes

    Cook Time
    15 Minutes

    Total Time
    45 Minutes

    Servings
    Approximately 24 macarons

    Ingredients

    • 150 grams sifted super-fine almond flour
    • 180 grams powdered sugar
    • 1/4 teaspoon salt
    • 120 grams large egg whites (at room temperature)
    • 60 grams granulated sugar
    • 4 drops liquid-gel food coloring
    • 1 teaspoon pure vanilla extract
    • Vanilla Buttercream Frosting (or your choice of filling)

    Instructions

    1. Step 1
      In a food processor, pulse together the sifted almond flour and powdered sugar until finely combined. Sift this mixture into a bowl to remove any large lumps. Stir in the salt.
    2. Step 2
      In a clean, dry bowl, whisk the egg whites until frothy. Gradually add the granulated sugar, whisking constantly, until stiff, glossy peaks form. Stir in the food coloring and vanilla extract.
    3. Step 3
      Gently fold about one-third of the almond flour mixture into the meringue. Continue to fold in the remaining almond flour mixture in two more additions until the batter is smooth and flows like lava when lifted.
    4. Step 4
      Pipe small rounds of batter onto baking sheets lined with parchment paper or silicone mats. Let the piped macarons sit at room temperature for 30-60 minutes, or until they form a skin and can be lightly touched without sticking.
    5. Step 5
      Bake in a preheated oven at 300°F (150°C) for 12-15 minutes, or until the shells are firm and have developed small “feet.” Allow to cool completely on the baking sheets before attempting to remove them.
    6. Step 6
      Pair cooled macaron shells and fill with your desired frosting or filling. Store in an airtight container.

    Important Information

    Nutrition Facts (Per Serving)

    It is important to consider this information as approximate and not to use it as definitive health advice.

    Allergy Information

    Please check ingredients for potential allergens and consult a health professional if in doubt.

    « Previous Post
    Moist Zucchini Carrot Bread - Easy Delicious Loaf
    Next Post »
    Lemon Blueberry Cookies-Sweet & Tangy Recipe

    If you enjoyed this…

    Summer Peach Fruit Salad
    Dessert

    Sweet Summer Peach Fruit Salad Recipe

    Dessert

    Oreo Cream Salad: The Ultimate Dessert Recipe

    Dessert

    Gooey S’mores Cookies- Easy Chocolate Marshmallow Treats

    Reader Interactions

    Leave a Comment Cancel reply

    Helpful comments include feedback on the post or changes you made.

    Primary Sidebar

    Browse by Diet

    AppetizerAppetizerBreakfastBreakfastDinnerDinnerLunchLunchDessertDessert
    Lemon Blueberry Baked Oats

    Lemon Blueberry Baked Oats-Easy & Delicious Breakfast

    Lemon Blueberry Cookies Recipe

    Lemon Blueberry Cookies-Sweet & Tangy Recipe

    French Macaron Recipe

    Easy French Macaron Recipe-Perfect Homemade Delights

    • California Consumer Privacy Act (CCPA)
    • DMCA
    • Cookie Privacy Policy
    • Privacy Policy
    • Terms of Use
    • About Us
    • Contact

    © 2026 · Cuisine Recipe Theme · Genesis Framework · Disclosure · Website Design by Anchored Design