
Candy Corn Sugar Cookies are here to brighten your autumn baking! There’s something truly magical about the arrival of fall, isn’t there? The crisp air, the vibrant foliage, and, of course, the delightful anticipation of Halloween. For me, few things capture that festive spirit quite like a beautifully decorated cookie that evokes the season’s iconic treats. This recipe is more than just a sweet indulgence; it’s an edible celebration, a burst of color and flavor that brings smiles to every face.
The iconic candy corn, with its distinctive tri-color layers, has been a staple of autumn and Halloween festivities for over a century, a nostalgic symbol that transports many of us back to our childhood trick-or-treating days. While some might debate its standalone merits, its charm as an inspiration is undeniable. I believe these cookies transform that playful aesthetic into a truly delicious experience, honoring the beloved candy’s visual appeal while offering a much-loved sugar cookie base that’s universally adored.
Why You’ll Adore These Festive Treats
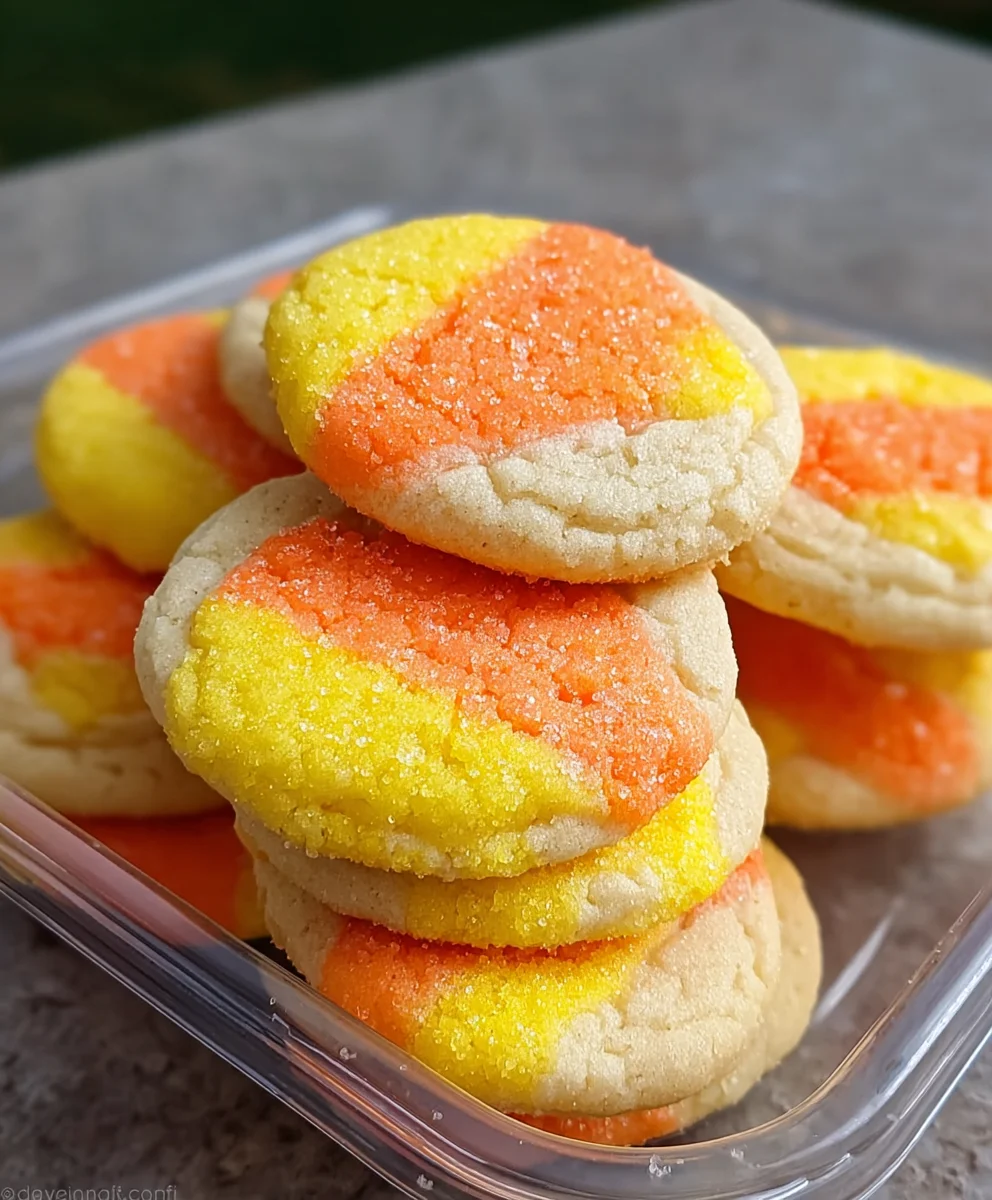
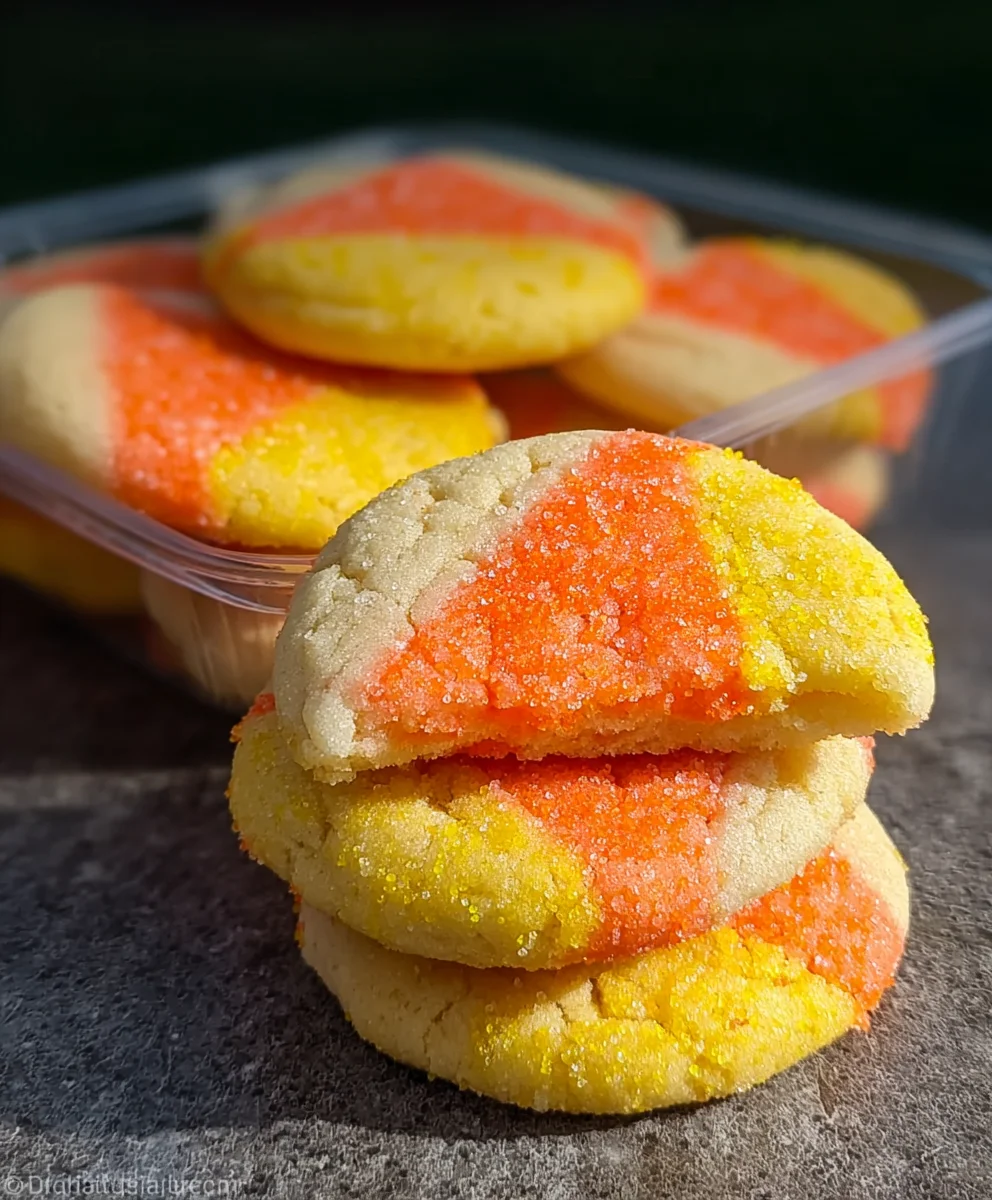
People absolutely adore these cookies for several reasons. Firstly, their stunning visual appeal is a showstopper; the vibrant colors of yellow, orange, and white instantly signal celebration. Beyond their looks, the taste is equally captivating. Imagine a perfectly soft, chewy, and buttery sugar cookie base, baked to golden perfection, then adorned with creamy frosting that melts in your mouth. The combination of classic cookie comfort with a whimsical, seasonal design makes these Candy Corn Sugar Cookies incredibly popular for parties, school events, or simply as a comforting treat on a cozy autumn evening. They are remarkably fun to make, offering a wonderful activity for bakers of all ages, and are guaranteed to bring a cheerful, festive touch to any occasion.

Ingredients:
- For the Candy Corn Sugar Cookies:
- 3 cups (360g) all-purpose flour, plus more for dusting
- 1 teaspoon baking powder
- 1/2 teaspoon salt
- 1 cup (226g) unsalted butter, softened to room temperature
- 1 cup (200g) granulated sugar
- 1 large egg, room temperature
- 1 teaspoon vanilla extract (pure vanilla is best!)
- 1/2 teaspoon almond extract (optional, but adds a lovely depth)
- For the Royal Icing:
- 4 cups (450g) powdered sugar (confectioners’ sugar), sifted
- 3 tablespoons meringue powder (essential for stability)
- 1/2 teaspoon vanilla extract
- 1/4 teaspoon almond extract (optional, to match cookies)
- 6-8 tablespoons warm water, or as needed for consistency
- Gel food coloring: yellow, orange, and a touch of white (if not using bright white icing already)
Making the Candy Corn Sugar Cookie Dough
Get ready to create some absolutely delightful Candy Corn Sugar Cookies! This first phase is all about making a perfectly tender and flavorful dough that’s a joy to work with.
- First things first, let’s prepare our dry ingredients. In a medium bowl, whisk together the 3 cups of all-purpose flour, 1 teaspoon of baking powder, and 1/2 teaspoon of salt. Make sure these are thoroughly combined. The baking powder will give our cookies a slight lift, while the salt balances the sweetness. Set this aside for a moment.
- Now, in a large mixing bowl (I often use my stand mixer with the paddle attachment for this), cream together the softened unsalted butter and granulated sugar. You’ll want to beat these together on medium speed for about 2-3 minutes until the mixture becomes light and fluffy. This creaming process is crucial as it incorporates air, which contributes to the tender texture of our Candy Corn Sugar Cookies.
- Next, we’ll add the wet ingredients. Crack in the large egg, ensuring it’s at room temperature for better emulsification with the butter and sugar. Beat until just combined. Then, stir in the 1 teaspoon of pure vanilla extract and, if you’re using it, the 1/2 teaspoon of almond extract. These extracts are key to the classic sugar cookie flavor that makes our Candy Corn Sugar Cookies so irresistible. Mix until fully incorporated, scraping down the sides of the bowl as needed to ensure everything is evenly blended.
- Now it’s time to slowly add our dry ingredients to the wet. With the mixer on low speed, gradually add the flour mixture to the butter mixture, about a third at a time. Mix only until just combined. Be careful not to overmix! Overmixing can develop too much gluten, resulting in tough cookies, and we want our Candy Corn Sugar Cookies to be perfectly tender. The dough should come together but might still be a little crumbly.
- Once the dough has just come together, remove it from the bowl. Gently shape it into a flat disc. This flat shape will make it easier to roll out later. Wrap the disc tightly in plastic wrap.
- This next step is incredibly important for perfect Candy Corn Sugar Cookies: chilling the dough. Place the wrapped dough in the refrigerator for at least 1 hour, or preferably 2-3 hours. If you’re planning ahead, you can even chill it overnight. Chilling allows the butter to firm up, which prevents the cookies from spreading too much during baking, and it also allows the flavors to meld beautifully. It makes the dough much easier to handle when rolling and cutting too!
Rolling and Cutting the Candy Corn Sugar Cookies
After your dough has had a nice rest in the fridge, we’re ready for the fun part: shaping our festive Candy Corn Sugar Cookies!
- Take your chilled sugar cookie dough out of the refrigerator. If it’s been chilling for a long time, let it sit on the counter for about 10-15 minutes to soften just slightly, making it easier to roll without cracking.
- Lightly flour your work surface and your rolling pin. I always recommend using a good amount of flour, but not so much that it makes your dough dry. You can also roll the dough between two sheets of parchment paper, which eliminates the need for extra flour and makes cleanup a breeze.
- Roll out the dough to an even thickness of about 1/4 inch. Consistency in thickness is vital here; unevenly rolled cookies will bake at different rates, leading to some being overdone and others underbaked. For our Candy Corn Sugar Cookies, a 1/4 inch thickness gives a good sturdy cookie that holds its shape and is perfect for decorating.
- Now, for the shape! Using a candy corn shaped cookie cutter, press firmly into the rolled-out dough to cut out your cookies. If you don’t have a specific candy corn cutter, you can use a simple triangle cutter or even a sharp knife to carefully cut out triangular shapes. Just ensure they are roughly the right proportion for a candy corn.
- Carefully transfer the cut-out Candy Corn Sugar Cookies to baking sheets lined with parchment paper or silicone baking mats. Leaving a little space between each cookie is a good idea to ensure even baking.
- Gather the dough scraps, gently press them back together, re-roll, and cut out more cookies until you’ve used all the dough. You might need to chill the scraps again for 15-20 minutes if the dough becomes too warm and sticky.
- Another helpful tip for shape retention: Once all your cookies are cut and on the baking sheets, place the entire baking sheet into the refrigerator for another 10-15 minutes. This quick chill will help the cookies maintain their sharp candy corn edges during baking. This is a pro-tip for really crisp cookie edges on your Candy Corn Sugar Cookies.
Baking Your Perfect Candy Corn Sugar Cookies
The anticipation builds as our beautiful Candy Corn Sugar Cookies head into the oven! Baking them just right is key to that wonderful texture.
- While your cut cookies are chilling for the second time, preheat your oven to 350°F (175°C). Make sure your oven rack is in the middle position for optimal heat distribution.
- Once the oven is preheated and your cookies are sufficiently chilled, transfer the baking sheets directly from the refrigerator to the hot oven.
- Bake for 8-12 minutes. The exact baking time will depend on the thickness of your cookies and your specific oven. You’ll know they are done when the edges are just barely set and starting to turn a very light golden brown. The centers should still look soft and slightly pale. You definitely don’t want to overbake these Candy Corn Sugar Cookies, as that will make them dry and crumbly instead of tender.
- As soon as they’re done, remove the baking sheets from the oven. Let the cookies cool on the baking sheet for about 5 minutes. They will be delicate when hot.
- After 5 minutes, carefully transfer the partially cooled Candy Corn Sugar Cookies to a wire cooling rack to cool completely. It’s absolutely crucial that the cookies are completely cool before you even think about decorating them with royal icing. Warm cookies will melt the icing, and all your hard work will be for naught! This can take anywhere from 30 minutes to an hour, depending on your room temperature.
Preparing the Royal Icing for Candy Corn Sugar Cookies
Now for the magical transformation! Royal icing is what gives our Candy Corn Sugar Cookies their signature smooth, glossy finish and vibrant colors.
- In a very large bowl, combine the 4 cups of sifted powdered sugar and 3 tablespoons of meringue powder. Whisk them together thoroughly to ensure there are no lumps and the meringue powder is evenly distributed. Meringue powder is essential for creating a stable, quick-drying royal icing.
- Add the 1/2 teaspoon of vanilla extract and 1/4 teaspoon of almond extract (if using).
- Gradually add the warm water, starting with 6 tablespoons. Mix on low speed with an electric mixer (handheld or stand mixer with whisk attachment) until combined. Then, increase the speed to medium-high and beat for 5-7 minutes, until the icing is very thick, glossy, and holds stiff peaks. You want a consistency that’s thick enough to hold its shape when piped, but thin enough to flow smoothly. If it’s too thick, add a tiny bit more water (1/2 teaspoon at a time). If it’s too thin, add a little more sifted powdered sugar.
- Once you have your base white royal icing, divide it into three separate bowls. This is where we’ll create our iconic candy corn colors for our Candy Corn Sugar Cookies.
- In the first bowl, add a few drops of yellow gel food coloring. Mix well until you achieve a vibrant, uniform yellow.
- In the second bowl, add orange gel food coloring. Mix until you have a beautiful, bright orange.
- The third bowl will remain white. If your white icing isn’t as bright as you’d like, you can add a tiny bit of white gel food coloring to brighten it up.
- Now, we need to achieve two different consistencies for each color: a “flood” consistency and a “pipe” or “outline” consistency.
- Outline consistency: This should be thick enough to hold its shape when piped, acting as a dam for the flood icing. When you lift your spoon or spatula, a ribbon of icing should fall and hold its shape for a few seconds before slowly melting back into the main bowl. If it’s too thick, add water a tiny drop at a time.
- Flood consistency: This should be thinner, allowing it to spread and fill in the outlined areas smoothly. To test, take a spoonful and let it fall back into the bowl; it should fully disappear and smooth over within 10-15 seconds. If it’s too thick, add water by the 1/4 teaspoon. If it’s too thin, add more sifted powdered sugar.
You will need outline and flood consistency for all three colors (white, orange, and yellow). Transfer each consistency of each color into separate piping bags fitted with small round tips (I often use PME #1.5 or #2 tips for outlining and slightly larger PME #3 or #4 for flooding, or simply snip the end of the bag for flooding). Make sure to secure the tops of your piping bags with a twist tie or rubber band.
Decorating Your Festive Candy Corn Sugar Cookies
This is where your Candy Corn Sugar Cookies truly come to life! Patience and a steady hand will result in beautifully professional-looking cookies.
- Ensure your Candy Corn Sugar Cookies are completely cooled before you begin. This cannot be stressed enough!
- We’ll work with one color section at a time. Start with the white icing for the tip of the candy corn. Using your piping bag with white outline consistency, carefully draw a line across the top third of the triangular cookie, creating the top section of the candy corn. Then, outline the very tip of the cookie.
- Immediately after outlining, switch to your white flood consistency icing. Fill in the outlined white section. Use a scribe tool, toothpick, or a clean paintbrush to gently spread the icing to the edges and pop any air bubbles. Work quickly, as royal icing begins to set relatively fast.
- Allow the white section to dry and crust over for at least 15-20 minutes. If you try to add the next color too soon, the colors might bleed into each other, ruining the crisp candy corn lines. For best results, I sometimes even let it dry for an hour.
- Once the white section is set, move on to the orange middle section. Using your orange outline consistency icing, draw a line directly below the white section, following the contour of the cookie, and then another line about two-thirds of the way down the cookie. Outline the sides of this middle section.
- Immediately fill the outlined orange section with your orange flood consistency icing, spreading it evenly with your scribe tool or toothpick. Again, allow this orange layer to dry and crust over for at least 15-20 minutes, or longer if you prefer.
- Finally, for the yellow base of our Candy Corn Sugar Cookies. With your yellow outline consistency icing, outline the remaining bottom section of the cookie, connecting it to the orange middle.
- Fill this last section with your yellow flood consistency icing, spreading it out smoothly. This completes the classic candy corn look!
- Now, for the hardest part: letting them dry completely! Royal icing needs time to fully harden. For a truly durable, stackable finish on your Candy Corn Sugar Cookies, let them air dry for at least 6-8 hours, or even overnight (12-24 hours) in a cool, dry place. Resist the urge to touch them until they are completely hard to the touch. Placing them in front of a fan can speed up the drying process slightly, but don’t rush it too much.
- Once fully dry, your beautiful Candy Corn Sugar Cookies are ready to be admired, shared, or devoured! Store them in an airtight container at room temperature for up to two weeks, or freeze them for longer storage. They make wonderful gifts or additions to any fall-themed celebration.
<h2>Conclusion:</h2>
<p>As we wrap up our delicious journey through this recipe, I truly hope you’re feeling inspired and excited to get into your kitchen. What we’ve created here is more than just a cookie; it’s a delightful centerpiece, a conversation starter, and a comforting treat rolled into one. I genuinely believe that these aren’t just any sugar cookies; they are a testament to how simple ingredients, combined with a little creativity and love, can transform into something truly special and memorable. <strong>They strike that perfect balance between being incredibly easy to make and wonderfully impressive to serve</strong>, making them an absolute must-try for bakers of all skill levels. The buttery, tender crumb of these cookies, combined with the sweet, playful frosting, creates a harmonious flavor profile that is utterly irresistible. Each bite offers a satisfying chew, followed by a melt-in-your-mouth experience that will leave you reaching for another, and another.</p>
<h4>Why These Cookies Are Your Next Baking Obsession</h4>
<p>You might be thinking, “Just another sugar cookie recipe?” But let me assure you, these stand out. <strong>The Candy Corn Sugar Cookies are an epitome of festive charm and gourmet taste without the gourmet effort.</strong> They bring a vibrant splash of autumnal joy to any table, effortlessly capturing the spirit of the season. Imagine the smiles when you present a platter of these beauties – their bright, iconic colors instantly evoke warmth and cheer. They’re robust enough to handle transportation to a potluck or party, yet delicate enough to feel like a truly indulgent treat. Moreover, the satisfaction of creating something so visually appealing and delicious from scratch is unparalleled. I’ve seen firsthand how these cookies disappear rapidly from any gathering, often eliciting compliments and requests for the recipe, which is always a wonderful feeling for any home baker.</p>
<h4>Beyond the Basic Bake: Serving Suggestions and Creative Variations</h4>
<p>Now that you have your perfectly baked batch, let’s talk about how to elevate your experience even further. These cookies are absolutely divine on their own, perhaps with a tall glass of cold milk, a steaming mug of coffee, or a comforting cup of hot chocolate, especially on a crisp autumn evening. <strong>They make exquisite additions to any fall-themed dessert spread</strong> for Halloween parties, Thanksgiving gatherings, or simply a cozy family night in. Consider packaging a few in a pretty box with a ribbon as a thoughtful homemade gift for friends, neighbors, or teachers; they convey warmth and appreciation beautifully. For those who love to experiment, the possibilities are endless!</p>
<p>Feel free to get creative with your serving. You could crumble a few over a scoop of vanilla ice cream for a delightful seasonal sundae, or even use them as a charming garnish for a simple pumpkin pie. For variations, don’t hesitate to play with the cookie dough itself. <strong>A touch of almond extract instead of vanilla can introduce a subtle new dimension</strong>, or a pinch of cinnamon could lean into a spicier, more autumnal profile. If you’re feeling adventurous, try using different cookie cutters for other holiday themes – think leaves, pumpkins, or even ghosts for a fun Halloween twist, adapting the frosting colors accordingly. You could also experiment with adding a touch of orange zest to the cookie dough for a brighter, citrusy undertone. For those with dietary restrictions, consider substituting the all-purpose flour with a high-quality gluten-free flour blend and using a dairy-free butter alternative; many readers have found success with such adjustments, ensuring everyone can enjoy these delightful treats. Another fun idea is to turn them into sandwich cookies by spreading a thin layer of cream cheese frosting or even a fruit preserve between two unfrosted cookies – a simple way to create an entirely new indulgence.</p>
<h4>Your Turn to Create and Share!</h4>
<p>This recipe is designed to bring joy, and I truly hope it does just that for you. <strong>I wholeheartedly encourage you to roll up your sleeves, gather your ingredients, and give these incredible Candy Corn Sugar Cookies a try.</strong> You’ll be amazed at how simple it is to achieve such impressive results. Don’t be afraid to personalize them, add your own flair, and make them truly yours. Baking should be a fun, enriching experience, and this recipe offers plenty of room for both precision and playful spontaneity. I can almost taste them already, and I’m confident that you’re going to fall in love with them just as much as I have. <strong>Once you’ve baked your batch, I would absolutely love to hear about your experience!</strong> Did you make any variations? What did your family and friends think? Share your successes, your learning moments, and even your photos! Your feedback and shared joy are what make this baking community so vibrant and inspiring. Happy baking, my friends!</p>
Candy Corn Sugar Cookies
These delightful Candy Corn Sugar Cookies capture the festive spirit of autumn and Halloween. Featuring a soft, chewy, and buttery sugar cookie base adorned with vibrant, smooth royal icing, they’re a treat for the eyes and the palate.
Ingredients
-
3 cups (360g) all-purpose flour
-
1 teaspoon baking powder
-
1/2 teaspoon salt
-
1 cup (226g) unsalted butter, softened
-
1 cup (200g) granulated sugar
-
1 large egg, room temperature
-
1 teaspoon vanilla extract
-
1/2 teaspoon almond extract (optional)
-
4 cups (450g) powdered sugar, sifted
-
3 tablespoons meringue powder
-
1/2 teaspoon vanilla extract (for icing)
-
1/4 teaspoon almond extract (optional, for icing)
-
6-8 tablespoons warm water, or as needed
-
Gel food coloring: yellow, orange, white
Instructions
-
Step 1
Prepare Dough: Whisk flour, baking powder, salt. In a large bowl, cream softened butter and granulated sugar until light and fluffy (2-3 min). Beat in egg, vanilla, and almond extract (if using). Gradually add dry ingredients to wet, mixing until just combined. Shape dough into a flat disc, wrap, and chill for at least 1-3 hours. -
Step 2
Roll & Cut Cookies: Lightly flour your work surface and rolling pin. Roll chilled dough to an even 1/4 inch thickness. Cut out candy corn shapes using a cookie cutter or knife. Transfer cut cookies to parchment-lined baking sheets. Gather scraps, re-roll, and cut more. Chill cut cookies on baking sheets for 10-15 minutes. -
Step 3
Bake Cookies: Preheat oven to 350°F (175°C). Bake chilled cookies for 8-12 minutes, until edges are lightly golden and centers are pale. Let cool on baking sheets for 5 minutes, then transfer to a wire rack to cool completely. Cookies must be completely cool before decorating. -
Step 4
Prepare Royal Icing: In a large bowl, whisk sifted powdered sugar and meringue powder. Add vanilla, almond extract (if using), and 6-8 tbsp warm water. Beat with an electric mixer on medium-high for 5-7 minutes until very thick, glossy, and stiff peaks form. Adjust consistency with water (for thinner) or powdered sugar (for thicker) as needed. -
Step 5
Color & Bag Icing: Divide white icing into three bowls. Color one yellow, one orange, and keep one white (brighten with white food coloring if desired). For each color, prepare two consistencies: “outline” (thick, holds shape for a few seconds) and “flood” (thinner, smooths within 10-15 seconds). Transfer each consistency of each color into separate piping bags with small round tips. -
Step 6
Decorate Cookies: Ensure cookies are completely cool. Start with the white icing for the tip: outline the top third of the cookie, then immediately fill with white flood icing. Let dry for at least 15-20 minutes (preferably 1 hour). -
Step 7
Next, for the orange middle section: outline below the white and about two-thirds down the cookie. Immediately fill with orange flood icing. Let dry for at least 15-20 minutes. -
Step 8
Finally, for the yellow base: outline the remaining bottom section and fill with yellow flood icing. -
Step 9
Dry & Store: Allow decorated cookies to air dry completely for at least 6-8 hours, or preferably overnight (12-24 hours) in a cool, dry place until fully hardened. Store in an airtight container at room temperature for up to two weeks, or freeze for longer storage.
Important Information
Nutrition Facts (Per Serving)
It is important to consider this information as approximate and not to use it as definitive health advice.
Allergy Information
Please check ingredients for potential allergens and consult a health professional if in doubt.


Leave a Comment