
World’s Easiest Yeast Bread recipe – Artisan, NO KNEAD. If you’ve ever dreamt of pulling a perfectly golden, crackling crust loaf from your oven, but felt intimidated by the idea of complex bread-making, then prepare for a revelation. This is not just a recipe; it’s your gateway to effortless, bakery-quality bread, right in your own kitchen. What’s not to love about a bread that requires absolutely no kneading, minimal hands-on time, and still delivers that incredible artisan texture? People rave about this dish because it demystifies yeast bread, proving that stunning results can come from the simplest methods. The magic lies in the slow fermentation, which develops incredible flavor and that signature airy crum extractb, all while you’re free to go about your day. Get ready to impress yourself and everyone you share it with!

Ingredients:
- 3 cups (450g) flour (bread flour is ideal for a chewier crust, but all-purpose works beautifully too)
- 2 teaspoons instant or rapid rise yeast (if using active dry yeast, you’ll need to activate it first as per Note 2 in the origin extractal recipe)
- 2 teaspoons cooking or kosher salt (important: do not use table salt, as it’s finer and can affect the texture and flavor)
- 1 ½ cups (375 ml) very warm tap water (aim for water that feels comfortably warm to the touch, around 55°C or 130°F. Too hot will kill the yeast, too cool won’t activate it properly)
- 1 ½ tablespoons flour, for dusting the work surface and your hands
Preparing the Dough
Mixing the Simple Ingredients
This recipe truly lives up to its “World’s Easiest” title. The beauty of this no-knead bread is that it requires minimal effort and absolutely no tricky kneading techniques. We’re going to start by combining all of our dry ingredients in a large bowl. So, into your biggest mixing bowl, add the 3 cups of flour, the 2 teaspoons of instant yeast, and the 2 teaspoons of kosher salt. Give these a good whisk together to ensure the yeast and salt are evenly distributed throughout the flour. This initial step is crucial for consistent rising and flavor development.
Incorporating the Water
Now for the liquid. Measure out your 1 ½ cups of very warm tap water. I like to use water that feels comfortably warm when I run my hand under it, or I use a thermometer to check it’s around 55°C (130°F). You want it warm enough to wake up the yeast but not so hot that it cooks them! Pour this warm water directly into the bowl with your dry ingredients. Using a sturdy spoon or a spatula, mix everything together until just combined. You’ll notice it forms a very shaggy, wet dough. Don’t worry if it looks a bit lumpy or sticky; that’s exactly what we’re aiming for at this stage. The key here is to stop mixing as soon as there are no dry streaks of flour visible. Overmixing at this point is unnecessary and can actually make the dough tougher.
The Magical Rise
First Rise – Patience is Key
Once your dough is mixed, cover the bowl tightly with plastic wrap or a damp kitchen towel. Find a warm, draft-free spot in your kitchen for the dough to rest and rise. The ideal environment is around 70-75°F (21-24°C). This can be on top of your refrigerator, or near a slightly warm (but not hot!) oven. Let the dough rise for at least 12 to 18 hours. Yes, you read that right! This long, slow fermentation is what develops the incredible flavor and the open, airy crum extractb that makes this bread so special. It might seem like a long time, but the hands-on work is minimal. You’ll know it’s ready when the dough has more than doubled in size and is covered in bubbles. It will look pillowy and have a distinctly yeasty aroma.
Shaping and Second Rise
After its long rest, the dough will be beautifully risen and ready for shaping. Generously dust your work surface with some of the 1 ½ tablespoons of flour. Gently scrape the dough out of the bowl onto the floured surface. It will be very wet and sticky, so don’t be afraid to use a little extra flour on your hands and the dough itself to prevent sticking. You don’t need to knead it. Instead, gently fold the edges of the dough towards the center a few times to create a rough ball. Think of it like gently tucking it in. Try not to deflate all the air that has been so carefully developed. Once shaped into a loose round, you’ll need to let it rest again.
Carefully transfer the shaped dough to a piece of parchment paper that’s slightly larger than the dough itself. This parchment paper will make transferring the bread into the hot oven much easier. Cover the dough loosely with plastic wrap or a light kitchen towel and let it rest for another 30 to 60 minutes while you preheat your oven. This second rise is shorter and helps the dough relax and puff up slightly before baking.
Baking the Bread
Preheating and Dutch Oven Magic
Now it’s time to preheat your oven. This is a crucial step for achieving that signature artisan crust. Place a large, oven-safe pot with a lid (a Dutch oven is perfect for this) into your oven and preheat it to 450°F (230°C). Let the Dutch oven heat up for at least 30 minutes. This ensures the pot is screaming hot, which is essential for creating the steamy environment that gives this bread its wonderful crust.
The Final Bake
Once the oven and Dutch oven are fully preheated, it’s time to bake. Very carefully remove the hot Dutch oven from the oven. You can use oven mitts or even pot holders to lift the lid. Using the parchment paper as a sling, gently lower your risen dough into the hot Dutch oven. Place the lid back on the pot. This traps the steam released from the dough during the initial baking phase, which is what creates that beautiful, crackly crust. Place the Dutch oven back into the hot oven and bake for 30 minutes with the lid on.
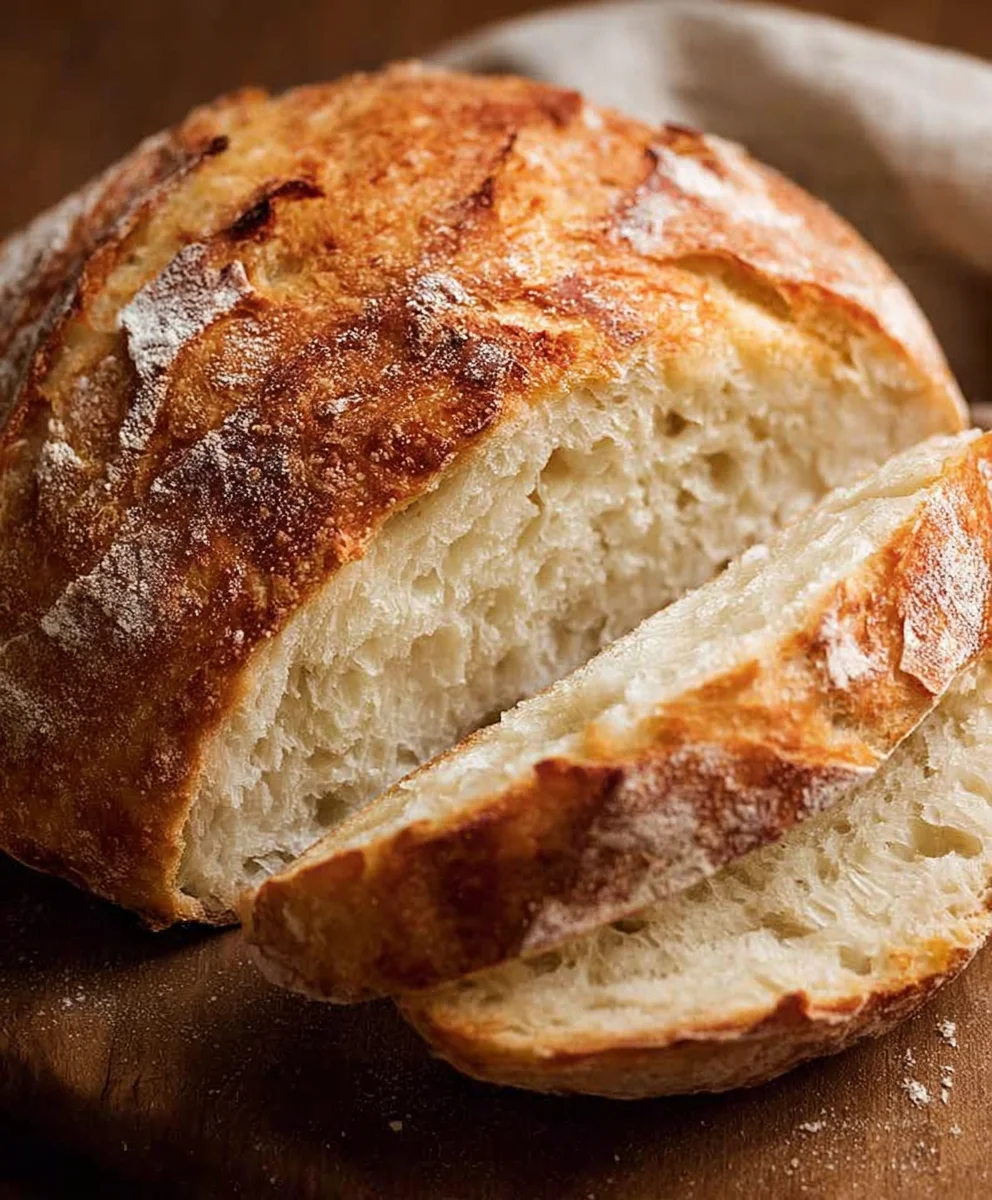
After 30 minutes, carefully remove the lid from the Dutch oven. The bread will have risen considerably and will look pnon-alcoholic ale but puffed. Continue baking for another 15 to 25 minutes, or until the crust is a deep golden brown and sounds hollow when tapped on the bottom. The exact time will depend on your oven and the size of your loaf. Resist the urge to cut into it immediately; the internal structure needs to set. Let the bread cool on a wire rack for at least an hour before slicing and enjoying.

Conclusion:
And there you have it – the World’s Easiest Yeast Bread recipe – Artisan, NO KNEAD! We’ve journeyed through a remarkably simple process to create a truly impressive loaf, proving that delicious, crusty artisan bread is well within your reach, even for the busiest baker. This recipe is a testament to the magic of time and patience, allowing the yeast to do all the heavy lifting. The result is a beautifully airy crum extractb with a wonderfully crisp crust, perfect for any occasion.
This versatile bread is a cbeef hampion for all sorts of culinary adventures. It’s absolutely divine served warm with a generous smear of butter or dipped into your favorite soup. For an elevated experience, try it toasted and topped with avocado and a sprinkle of red pepper flakes, or transform it into the ultimate grilled cheese. Don’t be afraid to experiment with toppings on your next loaf – consider a sprinkle of rosemary and sea salt before baking for an extra herbaceous note, or swirl in some garlic butter for a savory twist. Most importantly, have fun with it! Baking should be a joyous and rewarding experience, and this recipe is designed to deliver just that.
Frequently Asked Questions:
What if my dough doesn’t double in size after the first rise?
Don’t panic! Yeast activity can vary depending on the temperature of your kitchen and the age of your yeast. As long as you see some signs of bubbling and expansion, it’s likely still working. You can try moving the bowl to a warmer spot (like a slightly preheated oven that’s turned off) to encourage further rising. If after several hours there’s absolutely no activity, your yeast might be dead, and you may need to start again with fresh yeast.
Can I use this dough for other types of bread?
Absolutely! While this recipe is specifically designed for a rustic, no-knead loaf, the basic dough can be adapted. For example, you could try shaping it into smaller rolls or a flatter pizza crust after the initial rise. Just be mindful of baking times, as smaller or flatter shapes will bake much faster than a large boule.
Easiest No-Knead Artisan Bread – Quick & Delicious
A simple and incredibly easy recipe for delicious no-knead artisan bread with a chewy crust and airy crumb. Perfect for beginners!
Ingredients
-
3 cups (450g) flour (bread or plain/all purpose)
-
2 teaspoons instant or rapid rise yeast
-
2 teaspoons cooking or kosher salt (do not use table salt)
-
1 ½ cups (375 ml) very warm tap water (around 55°C or 130°F)
-
1 ½ tablespoons flour, for dusting
Instructions
-
Step 1
In a large bowl, whisk together the flour, instant yeast, and salt until evenly distributed. -
Step 2
Pour in the very warm water and mix with a spoon or spatula until just combined, forming a shaggy, wet dough with no dry streaks. -
Step 3
Cover the bowl tightly and let the dough rise in a warm, draft-free spot for 12 to 18 hours, or until doubled in size and bubbly. -
Step 4
Generously dust a work surface with flour. Gently scrape the dough onto the surface. Using lightly floured hands, gently fold the edges towards the center to form a rough ball. Transfer the shaped dough to a piece of parchment paper. -
Step 5
Cover the dough loosely and let it rest for 30 to 60 minutes while you preheat your oven. -
Step 6
Place a Dutch oven with its lid into your oven and preheat to 450°F (230°C) for at least 30 minutes. -
Step 7
Carefully remove the hot Dutch oven from the oven. Using the parchment paper, gently lower the dough into the Dutch oven. Place the lid back on. -
Step 8
Bake for 30 minutes with the lid on. Then, carefully remove the lid and bake for an additional 15 to 25 minutes, or until the crust is deep golden brown and sounds hollow when tapped. -
Step 9
Let the bread cool on a wire rack for at least an hour before slicing and enjoying.
Important Information
Nutrition Facts (Per Serving)
It is important to consider this information as approximate and not to use it as definitive health advice.
Allergy Information
Please check ingredients for potential allergens and consult a health professional if in doubt.


Leave a Comment