
Teriyaki Salmon Bowl is more than just a meal; it’s a vibrant symphony of flavors that has captivated palates worldwide. I find this dish to be the quintessential answer for anyone seeking a nutritious, delicious, and incredibly satisfying option that’s also surprisingly simple to prepare.
The concept of ‘teriyaki’ itself, originating in Japan, refers to a cooking method where food is broiled or grilled with a glaze of soy sauce, mirin, and sugar. While traditionally applied to fish and chicken, its evolution into a convenient bowl format speaks to modern culinary preferences, elegantly blending timeless tradition with contemporary ease.
I truly believe the allure lies in how the rich, umami-packed teriyaki glaze beautifully caramelizes the tender, flaky salmon, creating an irresistible depth of flavor. This dish offers a delightful contrast of textures – from the perfectly cooked, succulent salmon to the crisp-tender medley of fresh vegetables, all nestled atop a bed of fluffy rice. It’s incredibly satisfying, packed with beneficial omega-3s, and remarkably easy to customize with your favorite additions.
The sheer convenience of a complete, balanced meal in one inviting bowl makes the Teriyaki Salmon Bowl a firm favorite for busy weeknights or a healthy, delicious lunch.

Ingredients:
Creating a truly magnificent Teriyaki Salmon Bowl begins with selecting the freshest ingredients. Here’s everything you’ll need to bring this incredibly satisfying dish to life in your kitchen:
- For the Salmon:
- 4 (6-ounce) skin-on or skinless salmon fillets. I always opt for wild-caught Atlantic or Pacific salmon if possible, for its rich flavor and vibrant color. Make sure they are about 1 to 1.5 inches thick for even cooking.
- 1 tablespoon olive oil or avocado oil, for pan-searing.
- Salt and freshly ground black pepper, to taste. I like to be generous with the seasoning on the salmon itself, as it complements the sweet and savory sauce beautifully.
- For the Homemade Teriyaki Sauce:
- ½ cup low-sodium soy sauce. Using low-sodium allows us to control the saltiness better.
- ¼ cup mirin. This Japanese sweet rice wine is essential for that authentic teriyaki flavor and a beautiful glaze.
- 2 tablespoons sake (optional, but highly recommended for depth of flavor). If you don’t have sake, you can substitute with chicken or vegetable broth, or simply omit it and add an extra tablespoon of mirin.
- ¼ cup packed light brown sugar or honey. I often use a combination of both for a more complex sweetness.
- 2 cloves garlic, minced. Freshly minced garlic really makes a difference here.
- 1 tablespoon fresh ginger, grated. The pungent, spicy kick of fresh ginger is a must for any good teriyaki.
- 1 tablespoon cornstarch. This will help thicken our sauce to a lovely, spoonable consistency.
- 2 tablespoons cold water. To create a slurry with the cornstarch.
- For the Rice:
- 1 ½ cups sushi rice or jasmine rice. Sushi rice is my personal favorite for its slightly sticky texture, which is perfect for bowls. Jasmine rice is a great alternative if you prefer a fluffier grain.
- 2 cups cold water (or according to package directions for your chosen rice).
- For the Roasted Vegetables:
- 1 head of broccoli, cut into florets. Aim for similar sizes so they cook evenly.
- 2 medium carrots, peeled and sliced into ¼-inch thick rounds or julienned for a more elegant look.
- 1 red bell pepper, deseeded and sliced into thin strips.
- ½ cup shelled edamame, frozen (no need to thaw beforehand if roasting).
- 1 tablespoon olive oil.
- ½ teaspoon salt.
- ¼ teaspoon black pepper.
- For Garnishing (Optional but Highly Recommended):
- 2 tablespoons toasted sesame seeds. These add a wonderful crunch and nutty flavor.
- 2 green onions, thinly sliced. For freshness and a mild oniony bite.
- A drizzle of sriracha mayo or a squeeze of fresh lime juice, if you like a little extra zing or heat in your Teriyaki Salmon Bowl.
Phase 1: Crafting Your Signature Teriyaki Sauce
While store-bought teriyaki sauce can be convenient, I truly believe that making your own from scratch elevates this Teriyaki Salmon Bowl to another level. It’s surprisingly simple and allows you to control the sweetness and saltiness to your exact preference.
- Combine the Liquids and Aromatics: In a small saucepan, combine the low-sodium soy sauce, mirin, sake (if using), brown sugar or honey, minced garlic, and grated ginger. Give it a good whisk to ensure the sugar starts to dissolve.
- Simmer to Infuse Flavors: Place the saucepan over medium heat. Bring the mixture to a gentle simmer, stirring occasionally. Once it starts to bubble, reduce the heat to low and let it simmer for about 5-7 minutes. This allows all those wonderful flavors from the garlic and ginger to really meld together and for the sugar to fully dissolve. You’ll notice the aroma filling your kitchen—that’s when you know it’s working its magic!
- Prepare the Cornstarch Slurry: While the sauce is simmering, whisk together the cornstarch and cold water in a small bowl until absolutely smooth. This is a crucial step for a lump-free sauce. Make sure the water is cold; hot water will cause the cornstarch to clump immediately.
- Thicken the Sauce: Pour the cornstarch slurry into the simmering teriyaki sauce in a slow, steady stream while continuously whisking. Continue to whisk gently for another 1-2 minutes until the sauce has thickened to a consistency that coats the back of a spoon. It should be glossy and rich. If you prefer a thicker sauce, you can make a little more slurry and add it gradually. If it becomes too thick, a tiny splash of water or broth will thin it out.
- Taste and Adjust: Remove the sauce from the heat. Now is your chance to taste it and adjust. Do you want it a little sweeter? Add a pinch more brown sugar or honey. A little saltier? A tiny splash more soy sauce. More ginger or garlic zing? Stir in a little more fresh grated ginger or minced garlic. Remember, this is your Teriyaki Salmon Bowl, so make the sauce perfect for you! Set the sauce aside. It can be made in advance and stored in the refrigerator for up to a week.
Phase 2: Achieving Perfectly Cooked Rice
The foundation of any great bowl is the rice. Getting it just right is key to a cohesive and enjoyable Teriyaki Salmon Bowl. My go-to method is simple and yields fluffy, perfectly cooked grains every time.
- Rinse the Rice Thoroughly: Place the rice in a fine-mesh sieve and rinse it under cold running water until the water runs clear. This usually takes about 1-2 minutes of gentle swirling. Don’t skip this step! Rinsing removes excess starch, which prevents the rice from becoming too sticky or gummy. For sushi rice, this step is particularly important to get that ideal, slightly chewy texture without being overly gluey.
- Cook the Rice:
- Stovetop Method: Transfer the rinsed rice to a medium saucepan with a tight-fitting lid. Add the cold water. Bring the water to a rolling boil over medium-high heat. Once boiling, immediately reduce the heat to the lowest setting, cover the pot tightly, and let it simmer undisturbed for 15 minutes. Resist the urge to lift the lid! Peeking lets out the steam, which is crucial for even cooking.
- Rice Cooker Method: If you have a rice cooker, simply add the rinsed rice and the specified amount of water (usually a 1:1 ratio for sushi rice or 1 cup rice to 1.25 cups water for jasmine) to the cooker and press the “cook” button. This is often the most foolproof method.
- Rest and Fluff: Once the cooking time is up (for stovetop), remove the pot from the heat and let it sit, still covered, for an additional 10 minutes. This resting period allows the steam to redistribute and ensures all the moisture is absorbed, resulting in perfectly tender, individual grains. After resting, gently fluff the rice with a fork. You’ll see how beautifully separated and yet slightly sticky (if using sushi rice) it is. Keep it covered to stay warm while you prepare the other components of your Teriyaki Salmon Bowl.
Phase 3: Preparing and Roasting Vibrant Vegetables
Adding a medley of colorful, tender-crisp vegetables not only boosts the nutritional value but also adds fantastic texture and freshness to your Teriyaki Salmon Bowl. Roasting is my preferred method as it brings out a wonderful natural sweetness and a slight caramelization.
- Preheat Oven and Prep Pan: Preheat your oven to 400°F (200°C). Line a large baking sheet with parchment paper for easy cleanup. This also helps prevent sticking.
- Chop and Combine Vegetables: Ensure your broccoli is cut into bite-sized florets, carrots are sliced or julienned, and bell pepper is cut into thin strips. In a large bowl, combine the broccoli florets, sliced carrots, red bell pepper strips, and the frozen shelled edamame.
- Season and Toss: Drizzle the vegetables with olive oil, then sprinkle evenly with salt and black pepper. Toss everything together really well using your hands or a large spoon, making sure every piece is lightly coated. Even seasoning is key for delicious roasted veggies!
- Spread on Baking Sheet: Spread the seasoned vegetables in a single layer on the prepared baking sheet. Avoid overcrowding the pan! If the vegetables are too close together, they will steam instead of roast, leading to a softer, less caramelized texture. If necessary, use two baking sheets.
- Roast to Perfection: Roast the vegetables in the preheated oven for 15-20 minutes, or until they are tender-crisp and slightly caramelized at the edges. I like them with a bit of a bite, not mushy. Halfway through the cooking time (around 10 minutes), give them a good stir to ensure even cooking and browning.
- Keep Warm: Once done, remove the vegetables from the oven and set them aside. They can stay on the baking sheet to keep warm while you cook the salmon.
Phase 4: Mastering the Teriyaki Salmon
This is the star of our show, the glorious Teriyaki Salmon Bowl! Achieving perfectly cooked, flaky salmon with a beautiful glaze is simpler than you might think. I’ll walk you through my favorite pan-searing method, which yields incredibly crispy skin and tender flesh.
- Prepare the Salmon: Pat the salmon fillets thoroughly dry with paper towels. This step is paramount for crispy skin! Excess moisture will steam the skin instead of searing it. Season both sides of the fillets generously with salt and black pepper.
- Heat the Pan: Place a large, oven-safe skillet (cast iron or stainless steel works best) over medium-high heat. Allow it to heat up for about 2-3 minutes until it’s hot, but not smoking. You want a good, strong heat to get that sear.
- Add Oil: Add the olive oil or avocado oil to the hot pan. Swirl to coat the bottom. The oil should shimmer, indicating it’s ready.
- Sear Skin-Side Down: Carefully place the salmon fillets, skin-side down (if using skin-on), into the hot pan. Listen for that satisfying sizzle! Immediately reduce the heat to medium. Press down gently on each fillet with a spatula for the first 30 seconds to ensure even contact with the pan and to prevent the skin from curling. This helps achieve an even, crispy skin.
- Cook Through: Cook the salmon for 4-6 minutes on the skin side, undisturbed. During this time, the skin will become golden brown and crispy, and you’ll see the flesh of the salmon gradually change color from translucent to opaque, working its way up the fillet. Once the salmon is cooked about two-thirds of the way up from the bottom (meaning you see the opaque color reaching about two-thirds of the way through the fish), it’s time to flip.
- Flip and Finish: Carefully flip the salmon fillets. At this point, the internal temperature should be around 125-130°F (52-54°C). Cook on the second side for another 2-4 minutes, depending on the thickness of your fillets and your desired doneness. For medium-rare, I aim for about 135°F (57°C) internal temperature. For medium, 140°F (60°C). Do not overcook the salmon, as it will become dry. It should still be slightly pink in the very center when you flake it.
- Glaze with Teriyaki Sauce: During the last minute of cooking, generously spoon or brush your homemade teriyaki sauce over the cooked salmon fillets. Let it bubble and caramelize slightly, creating a beautiful glaze. You might need to add a tablespoon or two of water to the sauce if it has thickened too much while sitting.
- Rest the Salmon: Transfer the glazed salmon fillets to a plate and let them rest for 2-3 minutes. This allows the juices to redistribute, ensuring a more tender and flavorful fish. While they rest, the internal temperature will continue to rise slightly.
-
Alternative Cooking Method: Baking the Salmon
If you prefer a hands-off approach, baking is a fantastic alternative for your Teriyaki Salmon Bowl. Preheat your oven to 400°F (200°C). Line a baking sheet with parchment paper. Place the seasoned salmon fillets on the baking sheet. Bake for 12-15 minutes, or until the salmon is cooked through and flakes easily with a fork. During the last 5 minutes of baking, brush the salmon generously with your teriyaki sauce, allowing it to glaze and caramelize beautifully. This method is especially great for meal prepping multiple portions at once.
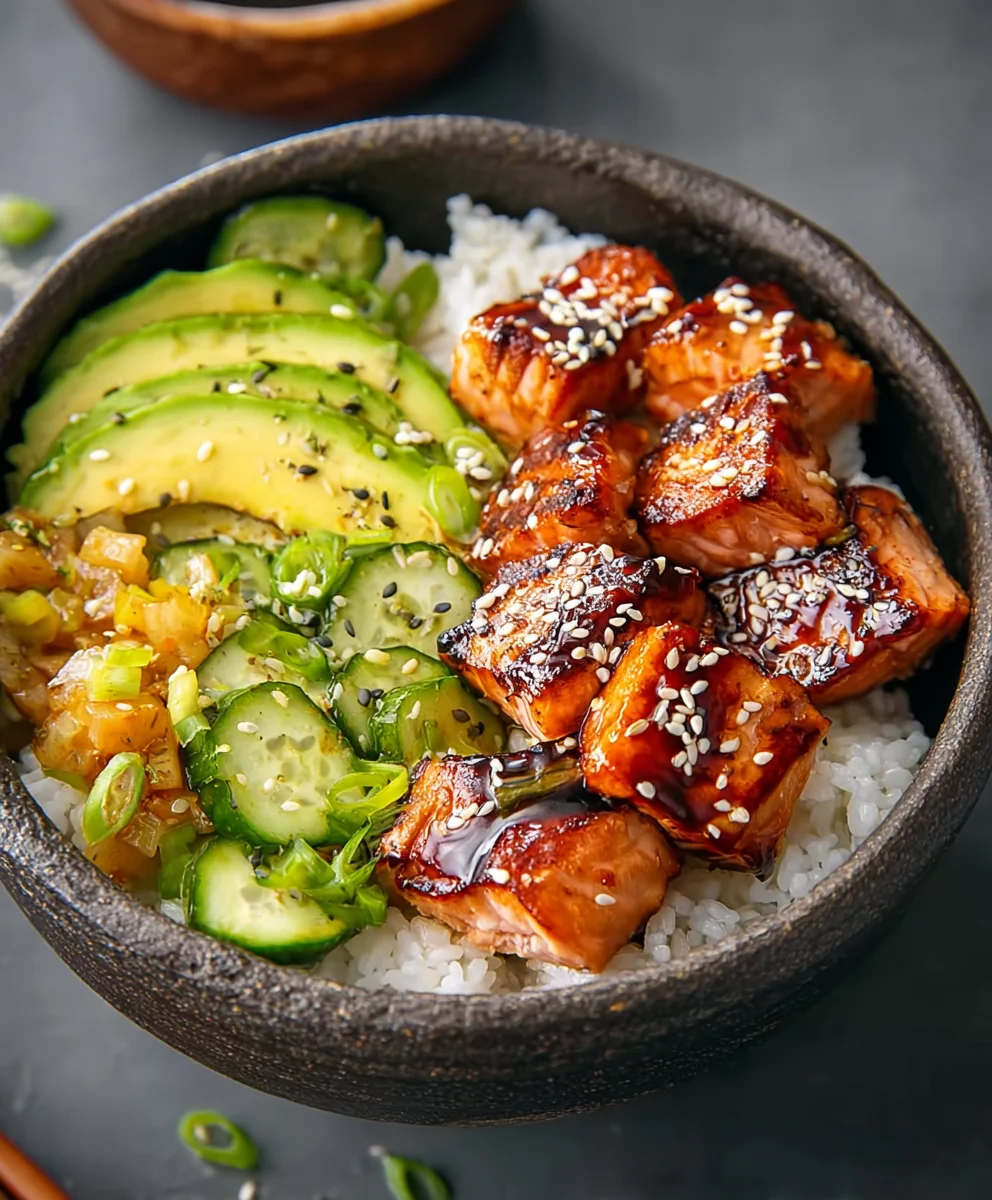
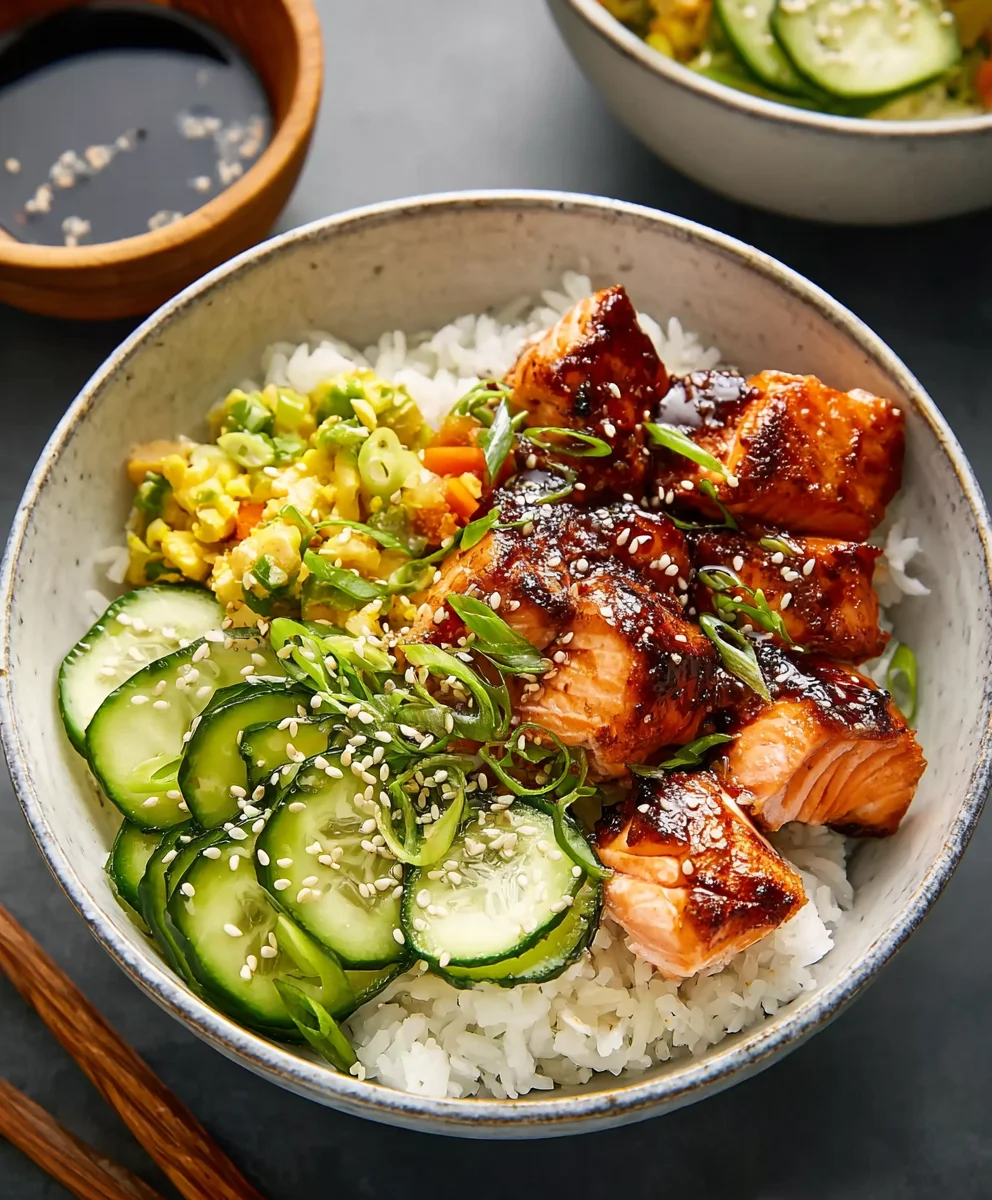
Phase 5: Assembling Your Perfect Teriyaki Salmon Bowl
Now for the grand finale! Bringing all the perfectly cooked components together into a harmonious and visually appealing Teriyaki Salmon Bowl is truly the best part. Get ready to enjoy the fruits of your labor!
- Prepare Your Bowls: Grab four large, shallow serving bowls. This recipe is designed to make individual, satisfying portions that are perfect for a weeknight dinner or a special lunch.
- Layer with Rice: Divide the warm, fluffy rice evenly among the four bowls. Create a bed of rice in the center of each bowl, making a slight indentation to nestle the other components. The rice serves as the comforting base for all the vibrant flavors to come.
- Add Roasted Vegetables: Arrange a generous portion of the roasted broccoli, carrots, edamame, and bell pepper alongside the rice in each bowl. Try to distribute the colors evenly for an attractive presentation. The slight char and sweetness from the roasting process will contrast wonderfully with the savory salmon.
- Place the Teriyaki Salmon: Carefully place one glazed teriyaki salmon fillet on top of or next to the rice and vegetables in each bowl. Make sure to capture any extra caramelized sauce from the pan and drizzle it over the salmon. That flavorful residue is pure gold!
- Generously Sauce and Garnish: Now, for the final touch. Drizzle any remaining teriyaki sauce over the salmon and vegetables in each bowl. Don’t be shy; this sauce ties everything together. Then, sprinkle generously with toasted sesame seeds and freshly sliced green onions. The sesame seeds add a delightful crunch and nutty aroma, while the green onions provide a fresh, pungent bite that cuts through the richness.
-
Optional Enhancements for Your Teriyaki Salmon Bowl:
If you love a little extra kick, a drizzle of sriracha mayo can add a creamy, spicy element. Simply mix mayonnaise with a bit of sriracha to your desired heat level. A squeeze of fresh lime juice can also brighten up the entire dish, adding a zesty counterpoint to the rich teriyaki flavor. Sometimes, I even add a few slices of fresh avocado for extra creaminess and healthy fats. This truly makes the Teriyaki Salmon Bowl a complete and customizable meal.
- Serve Immediately: Your magnificent Teriyaki Salmon Bowl is now ready to be enjoyed! Serve it warm and savor every bite. The combination of flaky, sweet and savory salmon, tender-crisp vegetables, and perfectly cooked rice is absolutely heavenly. It’s a meal that feels both comforting and incredibly fresh.
Conclusion:
And there you have it, my friends! We’ve journeyed through the simple steps to create a truly spectacular meal, and I can honestly say, this recipe isn’t just another dish; it’s a culinary experience waiting to happen in your very own kitchen. I’ve poured my heart into perfecting this version, and I genuinely believe it stands out as a must-try for so many reasons. It’s a perfect storm of flavor, health, and convenience that truly delivers on all fronts. The delicate, flaky salmon, glistening with that irresistible homemade (or even high-quality store-bought!) teriyaki glaze, combined with the vibrant freshness of your chosen vegetables and the comforting base of fluffy rice – it all comes together in a symphony for your taste buds. This isn’t just a meal; it’s a moment of pure, unadulterated deliciousness that you can feel good about. It’s quick enough for a busy weeknight, yet elegant enough to impress guests at a casual dinner party. Trust me, once you taste that savory, sweet, umami-rich salmon, you’ll understand exactly why I’m so enthusiastic about it.
What I adore most about this particular rendition is its incredible versatility. While the core flavors of the Teriyaki Salmon Bowl are undeniably stellar on their own, there’s a whole world of possibilities to explore when it comes to serving and variations. For your grain base, feel free to swap out white rice for brown rice, quinoa, or even cauliflower rice for a lower-carb option – each brings its own unique texture and nutritional profile to the party. When it comes to vegetables, don’t limit yourself! Steamed broccoli florets and crisp snap peas are fantastic, but imagine adding roasted asparagus spears, sautéed bell peppers, or even blanched bok choy. A sprinkle of toasted sesame seeds is a classic touch, but a dash of chili flakes can add a delightful kick, and a squeeze of fresh lime juice just before serving brightens everything up beautifully. If you’re feeling adventurous, try adding a few slices of creamy avocado for extra richness, or a sprinkle of chopped cilantro for a fresh, herbaceous note. For those who enjoy a bit of crunch, a handful of thinly sliced almonds or cashews can be a wonderful textural addition. You could even transform this into a deconstructed bowl for a potluck, offering different components for guests to assemble their own perfect plate.
And here’s where the fun truly begins: I’m inviting you, wholeheartedly, to dive in and make this recipe your own. Don’t be shy about experimenting with the ingredients or tweaking the seasoning to suit your personal preferences. Maybe you like your teriyaki a little sweeter, or perhaps you prefer a bolder ginger kick – the kitchen is your playground! I truly believe that the best recipes are those that inspire creativity and bring joy. So, please, gather your ingredients, set aside a little time, and treat yourself to this incredible meal. I promise you won’t regret it. Once you’ve had a chance to savor your homemade Teriyaki Salmon Bowl, I would absolutely love to hear about your experience! Did you stick to the recipe, or did you add your own unique twist? What were your favorite parts? Did it become an instant family favorite? Share your triumphs, your photos, and any clever variations you came up with in the comments below. Your insights and culinary adventures not only inspire me but also help our growing community of food lovers discover new ways to enjoy delicious, homemade meals. Let’s cook, share, and celebrate good food together!
Teriyaki Salmon Bowl
A vibrant symphony of flavors, this Teriyaki Salmon Bowl is a nutritious, delicious, and incredibly satisfying meal. Featuring tender, flaky salmon glazed in a rich homemade teriyaki sauce, crisp-tender roasted vegetables, and fluffy rice, it’s surprisingly simple to prepare and packed with beneficial omega-3s. Perfect for busy weeknights or a healthy lunch, and easily customizable.
Ingredients
-
4 (6-ounce) salmon fillets
-
1 tbsp olive oil or avocado oil (for salmon)
-
Salt and freshly ground black pepper, to taste
-
½ cup low-sodium soy sauce
-
¼ cup mirin
-
2 tbsp vegetable broth (non-alcohol substitute for sake)
-
¼ cup packed light brown sugar or honey
-
2 cloves garlic, minced
-
1 tbsp fresh ginger, grated
-
1 tbsp cornstarch
-
2 tbsp cold water (for slurry)
-
1 ½ cups sushi rice or jasmine rice
-
2 cups cold water (for rice)
-
1 head broccoli, cut into florets
-
2 medium carrots, peeled and sliced
-
1 red bell pepper, deseeded and sliced
-
½ cup shelled edamame, frozen
-
1 tbsp olive oil (for vegetables)
-
½ tsp salt (for vegetables)
-
¼ tsp black pepper (for vegetables)
-
2 tbsp toasted sesame seeds (optional garnish)
-
2 green onions, thinly sliced (optional garnish)
-
Sriracha mayo or fresh lime juice (optional)
Instructions
-
Step 1
In a small saucepan, combine soy sauce, mirin, vegetable broth, brown sugar or honey, minced garlic, and grated ginger. Whisk well. Bring to a gentle simmer over medium heat, then reduce to low and simmer for 5-7 minutes. In a small bowl, whisk cornstarch and 2 tbsp cold water to create a smooth slurry. Slowly pour slurry into simmering sauce while continuously whisking. Cook 1-2 minutes until thickened and glossy. Remove from heat, taste, and adjust seasoning. Set aside. -
Step 2
Rinse rice under cold running water until clear. For stovetop: Combine rinsed rice and 2 cups cold water in a saucepan with a tight lid. Bring to a boil, then reduce heat to lowest, cover, and simmer for 15 minutes. Remove from heat, let rest covered for 10 minutes. Fluff with a fork. For rice cooker: Add rinsed rice and water to cooker and press ‘cook’. -
Step 3
Preheat oven to 400°F (200°C). Line a large baking sheet with parchment paper. In a large bowl, combine broccoli florets, sliced carrots, red bell pepper strips, and frozen edamame. Drizzle with 1 tbsp olive oil, sprinkle with ½ tsp salt and ¼ tsp black pepper. Toss well. Spread vegetables in a single layer on the prepared baking sheet; avoid overcrowding. Roast for 15-20 minutes, or until tender-crisp and slightly caramelized. Stir halfway. -
Step 4
Pat salmon fillets dry. Season generously with salt and pepper. Heat 1 tbsp olive oil in a large oven-safe skillet over medium-high heat until shimmering. Place salmon skin-side down (if applicable) in the hot pan. Reduce heat to medium. Press gently for 30 seconds. Cook undisturbed for 4-6 minutes on the skin side until two-thirds opaque. Flip salmon, cook for 2-4 minutes until desired doneness (internal temp 135-140°F). During the last minute, spoon or brush teriyaki sauce over salmon to glaze. Transfer glazed salmon to a plate and let rest for 2-3 minutes. Alternative: Bake at 400°F (200°C) for 12-15 minutes, brushing with teriyaki sauce during the last 5 minutes. -
Step 5
Divide warm rice evenly among four serving bowls. Arrange a generous portion of roasted vegetables alongside the rice. Place one glazed teriyaki salmon fillet on top of or next to the rice and vegetables. Drizzle any extra caramelized sauce from the pan. Drizzle remaining teriyaki sauce over the components. Garnish with toasted sesame seeds and sliced green onions. Optional: Add a drizzle of sriracha mayo or a squeeze of fresh lime juice. Serve immediately.
Important Information
Nutrition Facts (Per Serving)
It is important to consider this information as approximate and not to use it as definitive health advice.
Allergy Information
Please check ingredients for potential allergens and consult a health professional if in doubt.


Leave a Comment