
“?tp_image_id=2740&pin_title=q3jpc3b5iehhbsamienozwvzzsobqdwzmifbhc3ryesbtdgfja3m%3d”
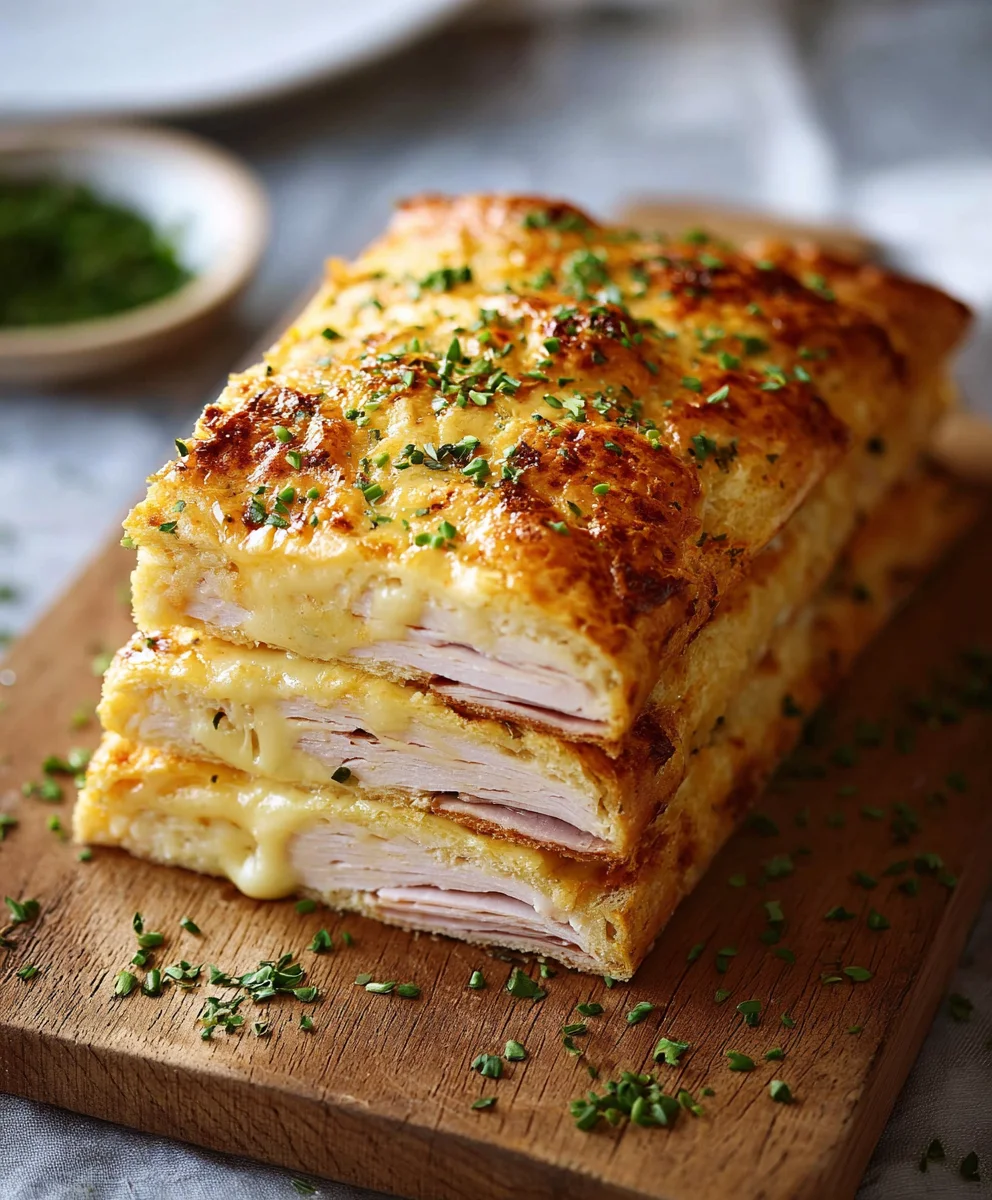
I find there’s something undeniably magical about the combination of flaky pastry, savory ham, and melted, bubbling cheese. These Crispy Ham & Cheese Puff Pastry Stacks are a true testament to this timeless trio, offering a delightful culinary experience that is both sophisticated and incredibly comforting. Puff pastry itself boasts a rich history, with origins often traced back to French culinary innovation, transforming simple flour and butter into hundreds of delicate, airy layers. This classic ingredient serves as the perfect canvas for our dish today, elevating the humble ham and cheese concept into an elegant appetizer or a superb brunch centerpiece.
Why I Believe Everyone Loves These Stacks
What truly makes these Crispy Ham & Cheese Puff Pastry Stacks irresistible, in my opinion, is their incredible texture and flavor profile. Imagine biting into a golden-brown, shattering crust, immediately followed by the rich, salty notes of quality ham and the warm, gooey embrace of melted cheese. They strike a perfect balance between a crispy exterior and a soft, savory interior, making them an instant crowd-pleaser for any occasion. Whether you’re hosting a gathering or simply craving a sophisticated yet easy-to-make treat, I assure you these stacks deliver satisfaction with every glorious bite.

Ingredients:
- 2 sheets (approximately 17.3 oz or 500g total) store-bought puff pastry, thawed: I always recommend using a good quality all-butter puff pastry if you can find it. The difference in flavor and flakiness is truly remarkable. Make sure it’s fully thawed in the refrigerator according to package directions, usually overnight or for a few hours at room temperature, but keep it cold enough to work with. Handling cold pastry is key to preventing it from becoming sticky and difficult to manage, which can lead to a less flaky result.
- 8 oz (about 225g) thinly sliced ham: Prosciutto cotto, Black Forest ham, or even a good quality deli ham will work wonderfully here. The key is to select thin slices so they crisp up nicely within the pastry and don’t overwhelm the delicate texture of the puff pastry. Thinness also helps with even layering and ensures a harmonious bite.
- 6 oz (about 170g) cheese, grated or thinly sliced: I absolutely adore a classic Gruyère for its nutty, melt-in-your-mouth quality, but Swiss cheese, Comté, or even a sharp white cheddar would be delicious. The choice of cheese profoundly impacts the final flavor. If using slices, make sure they are thin enough to distribute evenly and melt quickly. Freshly grated cheese almost always melts better than pre-shredded, which often contains starches to prevent caking.
- 1 large egg: This will be for our magical egg wash, giving our pastries that beautiful golden-brown, glossy finish. The egg wash is essential for both color and providing a slight sealing effect for the pastry layers.
- 1 tablespoon milk or water: To whisk with our egg for the perfect egg wash consistency. Milk tends to give a slightly richer, more opaque color, while water makes it a bit lighter and shinier. Either works perfectly well for achieving that desirable golden crust.
- 2 tablespoons Dijon mustard (optional, but highly recommended for a tangy kick): A thin layer of good quality Dijon mustard spread on the pastry before adding the ham and cheese really elevates the flavor profile. It adds a subtle tang that beautifully cuts through the richness of the ham and cheese, providing an unexpected depth.
- 1/2 teaspoon freshly ground black pepper: To season our layers. You can add a pinch of salt too, but remember that ham and most cheeses are already quite salty, so go easy and taste as you go! Freshly ground pepper offers a more potent and aromatic flavor than pre-ground.
- Optional garnishes:
- 1 tablespoon fresh chives, finely chopped: For a delicate oniony freshness after baking. Chives add a vibrant green color and a mild, fresh flavor that complements the richness.
- 1 tablespoon fresh thyme leaves, picked: Adds a lovely aromatic touch if you’re a fan of earthy herbs. Thyme pairs wonderfully with both ham and cheese, adding an element of sophistication.
- A tiny bit of olive oil or non-stick spray: For greasing your parchment paper, ensuring absolutely no sticking. This little preparatory step can save a lot of frustration when handling the delicate baked stacks.
Preparing the Puff Pastry and Fillings for Your Crispy Ham and Cheese Puff Pastry Stacks
- Preheat your oven and prepare your baking sheets: First things first, let’s get that oven ready! Preheat your oven to a robust 400°F (200°C). While it’s heating up, retrieve two large baking sheets. Line each of these sheets with a sheet of parchment paper. To ensure nothing sticks and for even easier handling once baked, I like to lightly brush or spray the parchment paper with a tiny bit of olive oil or non-stick cooking spray. This small but crucial step creates an extra layer of non-stick protection, especially important if any cheese happens to ooze out a little during baking. Make sure your oven rack is positioned in the middle or upper-middle position for optimal and even baking.
- Prepare your egg wash: In a small bowl, crack the large egg. Add 1 tablespoon of milk or water to the egg. Using a fork or a small whisk, whisk the mixture vigorously until the egg yolk and white are thoroughly combined and the mixture is smooth and uniform in color. This is your trusty egg wash, which will give our puff pastry stacks that irresistible golden sheen and help seal the layers. Set this aside for now, it will be used later in the assembly process.
- Prepare your cheese: If you’re using a block of cheese, now is the ideal time to grate it. I find that freshly grated cheese melts much more beautifully and evenly than pre-shredded varieties, which often contain anti-caking agents that can interfere with a smooth melt. Aim for fine to medium shreds for best results. If you’re using thinly sliced cheese, just ensure it’s separated and ready to lay out, perhaps fanning them out slightly so they are easy to grab.
- Unroll and cut the puff pastry: Carefully unroll one sheet of thawed puff pastry. You can do this onto a lightly floured surface or, for less mess and easier transfer, directly onto one of your prepared parchment-lined baking sheets. Using a sharp knife or a pizza cutter (which is excellent for clean, straight cuts), gently trim any uneven edges to create a neat, perfect rectangle. Now, cut this rectangle into six equal squares. Depending on the brand and initial size of your pastry sheet, you might get slightly larger or smaller squares, but aim for roughly 4×4 inch (10×10 cm) squares. The exact dimensions aren’t critical, but consistency across all squares is helpful. Repeat this precise cutting process with the second sheet of puff pastry, so you’ll end up with a total of twelve perfectly portioned squares.
- Gently score the pastry squares (optional but recommended for a ‘picture-perfect’ result): For a truly professional and aesthetically pleasing touch, take each pastry square and, using the very tip of your sharp knife, lightly score a smaller square about 1/2 inch (1.5 cm) in from the edge of each pastry square. It’s vital here to be careful and make sure you do not cut all the way through the pastry! This scoring creates a border that helps the outer edges of the pastry puff up even higher and more consistently during baking, creating a beautiful, defined frame for your delicious filling. While it’s not strictly necessary for the taste or texture of the final product, it definitely makes the finished Crispy Ham and Cheese Puff Pastry Stacks look more elegant and bakery-worthy.
- Apply Dijon mustard (if using): If you’re opting for that delightful tangy kick that I so highly recommend, now is the time to spread a very thin, even layer of good quality Dijon mustard. Do this over the center of half of your pastry squares – so six squares in total. Use approximately 1/2 teaspoon of mustard per square, carefully spreading it evenly within the scored border. This subtle layer adds a wonderful depth of flavor that complements the richness of the ham and cheese beautifully without being overpowering. It’s a game-changer!
Assembling Your Crispy Ham and Cheese Puff Pastry Stacks
This is where the magic really starts to happen, transforming simple, humble ingredients into something truly special and inviting. Precision in layering here helps ensure each bite is perfectly balanced and bursting with flavor.
- Layer the ham and cheese on the mustard-spread squares: On each of the six pastry squares that have been graced with a thin layer of Dijon mustard (or if you’re skipping the mustard, just choose any six squares to be your base), begin the layering process. Carefully place one slice of ham first, folding or tearing it slightly as needed to fit neatly within the scored border. The goal is to cover the surface of the pastry without overlapping too much or going over the very edge, which could lead to filling leakage during baking.
- Add the cheese layer: Now, generously sprinkle or lay a portion of your grated or thinly sliced cheese over the ham layer. Aim for an even distribution across the ham. I usually find that about 1 ounce (approximately 28g) of cheese per square is a good starting point, but feel absolutely free to adjust this quantity according to your personal cheesy preference! Again, ensure that the cheese stays primarily within the confines of the scored lines to prevent too much melt-out during baking, which could make your stacks adhere stubbornly to the parchment paper.
- Add a second ham layer: Follow the cheese with another slice of ham, carefully placing it over the cheese layer. This thoughtful layering creates a delightful ham-cheese-ham sandwich effect within the pastry, ensuring a good distribution of savory flavors and pleasant textures in every single bite you take.
- Season with black pepper: Lightly sprinkle some freshly ground black pepper over the top ham layer on each of your assembled squares. A little touch of pepper goes a long way to enhance the savory notes of the ham and cheese. Remember my earlier advice: avoid adding extra salt at this stage, as both the ham and most cheeses are already quite salty on their own.
- Top with remaining pastry squares: Take the remaining six plain pastry squares (the ones without the mustard or any filling) and carefully place one on top of each of your assembled ham and cheese bases. Gently align the edges of the top pastry square with the bottom one, striving for as neat a stack as possible.
- Seal the edges: Now, using the gentle pads of your fingertips, press down very lightly but firmly around the edges of each assembled pastry stack. This subtle pressure helps to seal the two pastry squares together, which is crucial. This sealing encourages them to puff up as one cohesive, beautiful unit rather than separating into two distinct layers during baking. You want a gentle press, not a squish, to maintain the integrity and flakiness of the delicate puff pastry.
- Egg wash the assembled stacks: Using a clean pastry brush, generously brush the tops and all visible sides of each assembled pastry stack with your prepared egg wash. This step is absolutely crucial for achieving that gorgeous, enviable golden-brown color and a lovely, subtle sheen on your finished Crispy Ham and Cheese Puff Pastry Stacks. Make sure to get the egg wash into the scored lines if you made them, as this helps the edges puff up even more beautifully and consistently.
- Pierce the tops (a crucial step for beautiful puff): This step is often overlooked by amateur bakers but is incredibly important for the overall success and visual appeal of your Crispy Ham and Cheese Puff Pastry Stacks. Using a standard dinner fork, gently pierce the top layer of each pastry stack several times, making sure to stay within the boundaries of the scored border. This strategic piercing allows steam to escape from the center of the pastry while it bakes, which in turn prevents the top from puffing up excessively and separating completely from the delectable filling. Instead, it encourages the outer, scored edges to rise dramatically while keeping the center relatively flatter, creating that lovely “well” effect for the filling.
Baking Your Crispy Ham and Cheese Puff Pastry Stacks to Golden Perfection
The baking process is where these simple components truly transform into those mouthwatering, golden, and crispy delights we’re aiming for. It’s a dance of heat and time that results in incredible texture.
- Transfer to the oven: Carefully transfer your baking sheets, laden with the raw, egg-washed stacks, to your preheated 400°F (200°C) oven. If you’re baking two sheets at once, place one on the middle oven rack and the other on the upper-middle rack to allow for good air circulation and even heat distribution. It’s often a good practice to prepare for rotating them halfway through the entire baking process for the most consistent and even browning across all your pastries.
- Initial bake at high temperature: Bake the stacks for an initial period of 15 minutes. During this crucial initial phase, the relatively high heat of the oven causes the puff pastry to rapidly expand. This expansion is what creates those beautiful, airy, and flaky layers that are the hallmark of well-baked puff pastry. You’ll observe the pastry rising impressively and starting to develop a light golden color. Keep a watchful eye on them, as oven temperatures can vary significantly from one appliance to another.
- Reduce temperature and continue baking: After the initial 15 minutes have passed, gently reduce the oven temperature to 375°F (190°C). Continue to bake for an additional 10-15 minutes, or until the pastry is deeply, richly golden brown, beautifully puffed up, and the cheese inside is visibly melted, bubbly, and perhaps even slightly caramelized around the edges. The exact baking time will vary depending on your specific oven and the precise amount of filling you’ve used. The key indicator of absolute doneness is the color – you are aiming for a rich, dark golden hue, not just a pale yellow, to ensure maximum crispiness, flakiness, and thorough cooking of the pastry. If they still look pale, they likely won’t achieve that ideal flaky texture or be as satisfyingly crispy.
- Monitor and rotate for evenness: If you’re utilizing two baking sheets simultaneously, it’s absolutely essential to remember to swap their positions (moving the top sheet to the bottom rack and vice-versa, and also rotating them front to back) halfway through this second baking phase. This simple act of rotation ensures that all your Crispy Ham and Cheese Puff Pastry Stacks receive even heat exposure, preventing some from becoming overdone or overly browned while others are still undercooked or pale. Consistency is key for a perfect batch.
- Remove from oven: Once they’ve reached that perfect, enviable deep golden brown color and are beautifully puffed to perfection, carefully remove the baking sheets from the oven. The incredible aroma filling your kitchen right now should be absolutely intoxicating and a testament to the deliciousness that awaits!
Serving Your Crispy Ham and Cheese Puff Pastry Stacks and Enjoying the Moment
These savory stacks are an absolute delight and are, without a doubt, best enjoyed warm, right out of the oven, when the pastry is at its peak crispiness and the cheese inside is delightfully gooey and molten.
- Allow to cool slightly: While the urge to dive in immediately will be almost unbearable, it’s incredibly tempting but prudent to allow the Crispy Ham and Cheese Puff Pastry Stacks to cool on the baking sheets for a brief period, approximately 5-10 minutes. This short cooling period serves a couple of important purposes: it allows the molten cheese to set ever so slightly, preventing it from oozing out excessively and making a mess when you take your very first bite, and crucially, it helps the puff pastry firm up to its maximum, glorious crispness, ensuring a perfect texture.
- Garnish (optional): If you’ve chosen to use fresh chives or fresh thyme leaves, now is the absolutely perfect time to sprinkle them generously over the warm stacks. The residual heat from the freshly baked pastries will gently release their aromatic oils, adding a wonderful, fresh, and herbaceous counterpoint to the rich, savory flavors of the ham and cheese. This final touch also adds a lovely pop of vibrant color, making them even more visually appealing and irresistible.
- Serve warm: Once cooled slightly and garnished (if desired), carefully transfer the stacks from the parchment paper to a beautiful serving platter. They are truly delightful served as a sophisticated appetizer at a gathering, a charming addition to a brunch spread, or even as a light and satisfying lunch when paired with a fresh, crisp side salad. Their individual portion size makes them an ideal and elegant option for entertaining guests or simply treating yourself.
- Storage and reheating: While these glorious pastries are undoubtedly best enjoyed fresh from the oven, any leftovers can be stored quite successfully. Place them in an airtight container and refrigerate for up to 2-3 days. To reheat and restore some of their magnificent crispiness, avoid the microwave at all costs – it will inevitably lead to a soggy pastry. Instead, place them on a clean baking sheet and reheat them in a preheated oven at 300°F (150°C) for approximately 8-12 minutes, or until they are thoroughly warmed through and the pastry has crisped up beautifully once again.
- Creative variations for future endeavors: Don’t be afraid to let your culinary imagination soar and experiment with these!
- Cheese blends: Try a dynamic mix of sharp Parmesan and melty mozzarella for a different, yet equally delicious, flavor profile. A smoky provolone could also be a fantastic choice.
- Different meats: Experiment with thinly sliced smoked turkey, delicate prosciutto, or even finely shredded, cooked chicken breast could replace the ham for a delightful twist.
- Veggies: Consider adding a very thin layer of sweet caramelized onions, earthy sautéed mushrooms (ensure they are very dry), or a small amount of blanched and thoroughly squeezed spinach for added flavor, texture, and a touch of vibrancy.
- Herbs and spices: A tiny pinch of smoked paprika, a whisper of garlic powder mixed into the cheese layer, or a sprinkle of dried Italian herbs can be absolutely fantastic additions, elevating the flavor even further.
- Sweet option (completely different recipe, but for inspiration!): If you’re feeling incredibly adventurous with puff pastry another time, you could even explore making sweet versions. Think warm fruit compotes, sweetened cream cheese, or even a simple sprinkle of cinnamon sugar. But for today, we are unequivocally celebrating the savory, golden, crispy glory of our magnificent Crispy Ham and Cheese Puff Pastry Stacks!

Conclusion:
Well, my friends, we’ve reached the end of our culinary journey for today, but the real adventure is just beginning for you in your own kitchen! I genuinely hope you’re feeling inspired and excited to try out what I believe is one of the most delightful and effortlessly impressive recipes I’ve had the pleasure of sharing. These aren’t just any snacks; these crispy ham and cheese puff pastry stacks are a true game-changer, promising to elevate your snack game, breakfast routine, or appetizer spread with minimal fuss and maximum flavor. What makes them an absolute must-try, you ask? It’s that perfect symphony of textures and tastes: the golden, flaky layers of puff pastry shattering with every bite, giving way to the savory, salty goodness of perfectly cooked ham, all cradled by a luscious, melty blanket of cheese. It’s comforting, it’s elegant, and it’s surprisingly simple to achieve.
There’s a unique satisfaction that comes from pulling a tray of these golden beauties from the oven, the aroma alone is enough to get stomachs rumbling and smiles appearing. The visual appeal is undeniable – those beautifully puffed layers, slightly browned edges, and the tempting peek of cheese and ham are a testament to the magic that can happen with just a few humble ingredients. They truly embody everything I love about home cooking: it’s accessible, it’s rewarding, and it results in something incredibly delicious that you’ll be proud to serve. Whether you’re a seasoned chef or just starting your culinary exploration, this recipe offers an approachable path to creating something truly memorable.
Now, let’s talk about how you can enjoy these wonderful creations. While they are absolutely fantastic on their own, fresh out of the oven, still warm and inviting, their versatility is one of their strongest suits. For a casual brunch, pair them with a vibrant, fresh fruit salad and a mimosa or a steaming cup of coffee. They make a fantastic, light lunch when served alongside a crisp green salad tossed in a simple vinaigrette, adding that satisfying crunch and savory punch. Thinking about appetizers for your next gathering? These stacks are perfect! Arrange them artfully on a platter, perhaps with a small bowl of honey mustard or a spicy sriracha mayo for dipping, and watch them disappear in mere minutes. Don’t forget about a quick and satisfying snack during the day; they reheat surprisingly well in a toaster oven, regaining much of their original crispness.
But don’t stop there; let your culinary imagination run wild with variations! While the classic ham and cheese combination is undeniably delicious, feel free to experiment with different cheeses. Imagine the richness of Gruyère, the tang of sharp cheddar, the creamy melt of provolone, or even a hint of smoky Gouda. If you’re looking to switch up the meat, thinly sliced prosciutto offers a saltier, more delicate alternative, while cooked crumbled bacon adds an irresistible crunch and depth of flavor. For a vegetarian twist, sautéed spinach and mushrooms or caramelized onions make fantastic fillings, perhaps with a sprinkle of feta or goat cheese for extra zing. Don’t be afraid to add a pinch of fresh herbs like chives or parsley to the filling, or a dash of black pepper for a subtle kick. The beauty of puff pastry is its adaptability, making it the perfect canvas for your creative endeavors. Each small modification can lead to a whole new flavor experience, allowing you to tailor this recipe perfectly to your taste or what you have on hand.
So, what are you waiting for? Head to your kitchen, grab those ingredients, and give these delightful stacks a try. I promise you won’t regret it. The joy of creating something so delicious and seeing the happy faces of those who taste it is truly priceless. And please, please, please, when you do make them, come back and tell me all about your experience! I absolutely adore hearing your feedback, seeing your beautiful photos, and learning about any creative twists or substitutions you came up with. Your insights not only inspire me but also help our wonderful community of home cooks. Let’s share the love for easy, delicious, and utterly satisfying recipes. Happy baking, everyone!
Crispy Roast Beef & Cheese Puff Pastry Stacks
Indulge in these sophisticated yet comforting stacks featuring flaky puff pastry, savory roast beef, and gooey melted cheese. Perfect as an elegant appetizer or a superb brunch centerpiece.
Ingredients
-
2 sheets (approx. 500g) store-bought puff pastry, thawed
-
8 oz (225g) thinly sliced roast beef
-
6 oz (170g) cheese, grated or thinly sliced (e.g., Gruyère, Swiss, Comté)
-
1 large egg
-
1 tbsp milk or water
-
2 tbsp Dijon mustard (optional)
-
1/2 tsp black pepper, freshly ground
-
1 tbsp fresh chives, finely chopped (optional)
-
1 tbsp fresh thyme leaves (optional)
-
Olive oil or non-stick spray
Instructions
-
Step 1
Preheat oven to 400°F (200°C). Line two baking sheets with greased parchment paper. Whisk 1 egg with 1 tbsp milk/water for egg wash; set aside. -
Step 2
Grate cheese if needed. Unroll puff pastry sheets, trim, and cut each into 6 squares (total 12 squares). -
Step 3
Optional: Lightly score a 1/2-inch border on each square (do not cut through). Optional: Spread 1/2 tsp Dijon mustard on 6 squares. -
Step 4
On 6 squares, layer 1 slice of roast beef, then cheese (approx. 1 oz), then another slice of roast beef. Season with black pepper. -
Step 5
Top with the remaining 6 plain pastry squares, aligning edges. Gently press edges to seal. -
Step 6
Brush tops and sides of stacks generously with egg wash. Pierce tops several times with a fork within the scored border. -
Step 7
Bake for 15 minutes at 400°F (200°C). Reduce oven to 375°F (190°C) and bake for an additional 10-15 minutes, or until deep golden brown and cheese is bubbly. Rotate sheets halfway if using two. -
Step 8
Remove from oven and cool on baking sheets for 5-10 minutes. Optional: Garnish with fresh chives or thyme. -
Step 9
Serve warm. Store leftovers in an airtight container in the fridge for 2-3 days; reheat in a 300°F (150°C) oven for 8-12 minutes.
Important Information
Nutrition Facts (Per Serving)
It is important to consider this information as approximate and not to use it as definitive health advice.
Allergy Information
Please check ingredients for potential allergens and consult a health professional if in doubt.


Leave a Comment