
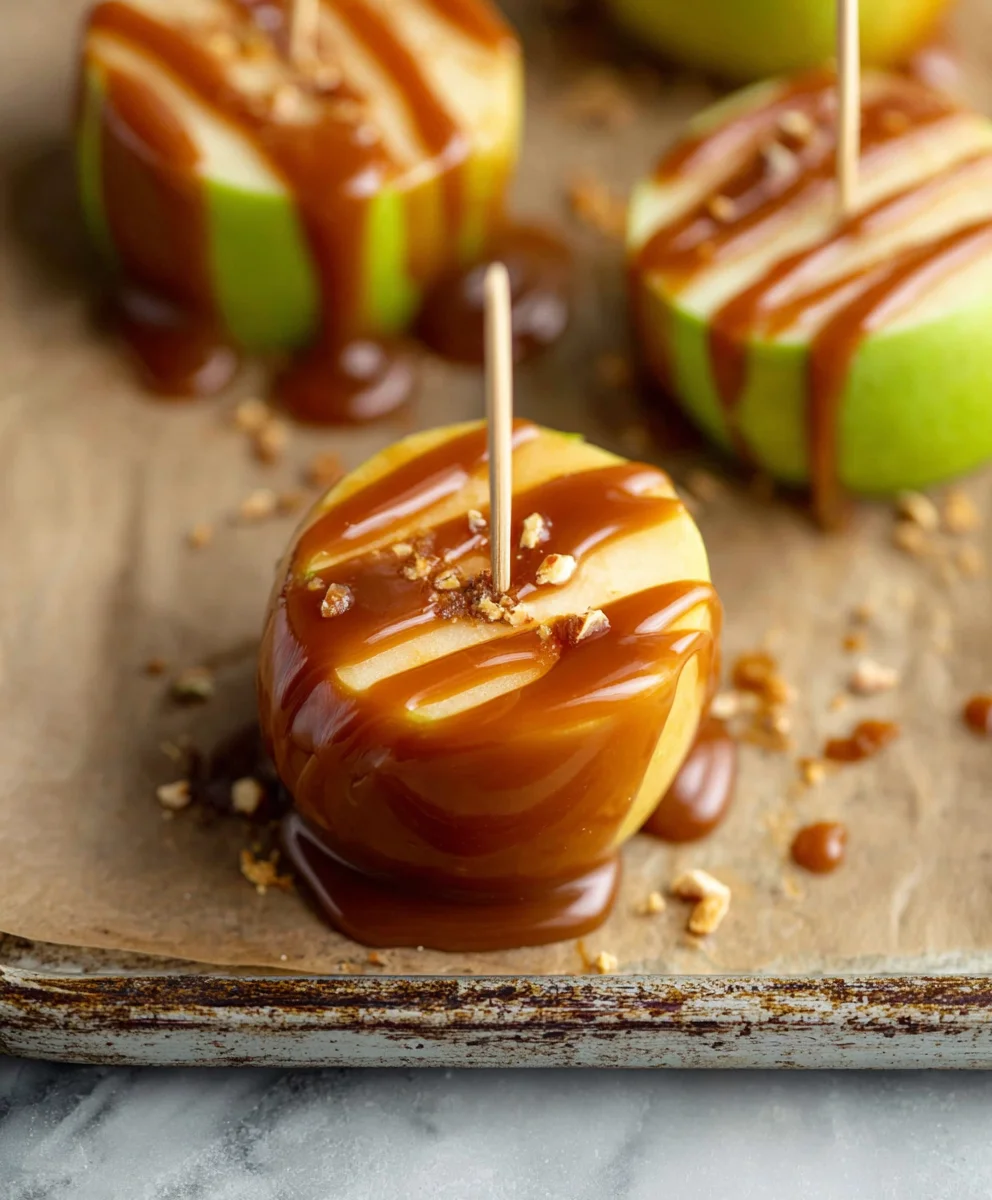
Caramel Apple Slices are more than just a dessert; they are a delightful invitation to autumn, a symphony of crisp, juicy apple enveloped in a rich, buttery caramel. I find few treats evoke the same warmth and nostalgia as this classic combination. For generations, the traditional caramel apple has been a beloved staple of fall festivals, pumpkin patches, and Halloween celebrations, an iconic symbol of the harvest season. However, biting into a whole caramel apple can often be a wonderfully messy endeavor, leading many to seek a more elegant, yet equally satisfying, experience. This is precisely where the magic of Caramel Apple Slices truly shines, offering all the charm with added convenience.
I believe this dish is adored for its perfect marriage of textures and flavors. The vibrant tartness of a fresh, crisp apple provides a wonderful counterpoint to the deep, sweet creaminess of the homemade caramel. Each bite offers that satisfying crunch, followed by a luscious chewiness, making it an incredibly addictive treat. Furthermore, serving apples in pre-portioned slices makes this timeless classic incredibly convenient, whether you’re hosting a gathering or simply enjoying an afternoon treat. It’s a delightful way to experience the beloved flavors of autumn without the fuss, proving that sometimes, the simplest pleasures are truly the best.

Ingredients:
- For the Caramel Apple Slices:
- 6 medium-sized firm apples (such as Granny Smith, Honeycrisp, or Fuji), washed and thoroughly dried. Granny Smith offers a lovely tart contrast to the sweet caramel, while Honeycrisp provides a crisp bite and balanced sweetness.
- 1 cup (2 sticks) unsalted butter, cut into 8 pieces. Using unsalted butter gives you control over the final saltiness of your caramel.
- 2 cups granulated sugar. This is the base for our rich, homemade caramel.
- ½ cup light corn syrup. This essential ingredient helps prevent crystallization, ensuring a smooth and glossy caramel.
- 1 cup heavy cream, warmed slightly. Warming the cream helps prevent the mixture from seizing when added to the hot sugar.
- 1 teaspoon pure vanilla extract. Adds depth and warmth to the caramel flavor profile.
- ½ teaspoon sea salt, plus extra for sprinkling (optional). A pinch of salt perfectly balances the sweetness and enhances all the other flavors.
- Wooden skewers or popsicle sticks (6-12, depending on how you plan to slice the apples).
- For the Toppings (Optional, but highly recommended for an amazing experience):
- 1 cup semi-sweet or dark chocolate chips, melted. For drizzling, adding a beautiful contrast and an extra layer of flavor.
- ½ cup white chocolate chips, melted. For additional drizzling and decorative flair.
- 1 cup chopped pecans, walnuts, or peanuts. Toasted nuts add incredible crunch and earthy notes.
- ½ cup sprinkles (various colors and shapes). For a fun, festive touch, especially if making these for a celebration.
- ½ cup crushed Oreos or graham crackers. Adds a delightful texture and familiar flavor.
- Flaky sea salt (such as Maldon) for finishing. A final sprinkle elevates the taste and presentation of your Caramel Apple Slices.
- Essential Equipment:
- Heavy-bottomed saucepan (3-quart or larger). A heavy bottom ensures even heating and prevents scorching of the sugar.
- Candy thermometer. Absolutely crucial for achieving the perfect caramel consistency; don’t skip this!
- Silicone baking mats or parchment paper. For cooling your dipped apple slices without sticking.
- Baking sheets. To place your parchment-lined mats for easy transfer to the refrigerator.
- Sharp chef’s knife. For safely and cleanly slicing the apples.
- Small bowls or dishes. For holding your various toppings.
- Pastry brush (optional). For brushing down sugar crystals from the sides of the saucepan.
- Wire rack (optional). For cooling chocolate-dipped items.
Preparing Your Workspace and Apples for Caramel Apple Slices
Before we dive into the magic of homemade caramel, let’s get our kitchen ready. A little preparation goes a long way in ensuring a smooth and enjoyable cooking process, especially when working with hot caramel.
- Gather and Prep Your Ingredients and Equipment: Lay out all your ingredients so they are easily accessible. This is called “mise en place” and it’s a chef’s best friend, particularly when time-sensitive steps are involved. Line two baking sheets with parchment paper or silicone baking mats. Have your chosen toppings ready in separate small bowls or dishes. Ensure your candy thermometer is clean and ready to clip onto your saucepan. Having everything prepped will make the assembly of your Caramel Apple Slices much easier.
- Prepare the Apples: Wash and thoroughly dry your apples. Any residual moisture can prevent the caramel from adhering properly. Using your sharp chef’s knife, carefully slice each apple into ½-inch to ¾-inch thick rounds. You’ll likely get 4-5 good slices from each apple, discarding the top and bottom pieces that are mostly peel. Gently use a small round cookie cutter or a paring knife to remove the core from the center of each slice, creating a donut-like shape. Immediately insert a wooden skewer or popsicle stick into the bottom of each apple slice, pushing it about halfway through for stability. Place the prepared apple slices on your lined baking sheets. You might want to pop them into the refrigerator for 10-15 minutes while you make the caramel; a slightly chilled apple helps the caramel set faster upon contact.
Crafting the Perfect Homemade Caramel for Your Caramel Apple Slices
Making caramel from scratch might seem intimidating, but I promise you, with a little patience and a candy thermometer, you’ll achieve a wonderfully rich, chewy caramel that far surpasses any store-bought version. This is the heart of our Caramel Apple Slices!
-
Begin the Sugar Melt: In your heavy-bottomed saucepan, combine the granulated sugar and light corn syrup. Add ½ cup of water to the mixture. Stir gently with a heat-proof spatula or wooden spoon until the sugar is moistened. Attach your candy thermometer to the side of the saucepan, making sure the tip doesn’t touch the bottom.
Place the saucepan over medium heat. Bring the mixture to a boil without stirring. If you see sugar crystals forming on the sides of the pan, dip a clean pastry brush in water and gently brush them down into the mixture. This prevents the caramel from becoming grainy. Allow the sugar mixture to boil until it reaches 250°F (121°C). At this point, the mixture will be clear and bubbling.
- Incorporate the Butter: Once the sugar mixture reaches 250°F (121°C), slowly add the pieces of unsalted butter to the saucepan. Continue to cook, stirring constantly with your heat-proof spatula, until all the butter has melted and is fully incorporated. The mixture will turn a beautiful golden color as it cooks. Keep an eye on the thermometer and continue to stir to prevent scorching. This stage is crucial for building the flavor base of your caramel.
- Add the Warm Cream and Vanilla: Carefully and slowly pour the slightly warmed heavy cream into the caramel mixture, stirring constantly. Be very careful here, as the mixture will bubble up vigorously. The warmth of the cream helps to minimize the temperature shock, which can cause the caramel to seize. Keep stirring until the cream is fully incorporated and the mixture is smooth again. Now, remove the saucepan from the heat and stir in the pure vanilla extract and ½ teaspoon of sea salt. The vanilla adds an incredible aroma and flavor depth, while the salt balances the sweetness, enhancing the overall taste of your future Caramel Apple Slices.
- Cook to Perfection: Return the saucepan to medium-low heat. Continue to cook, stirring constantly to prevent sticking and burning. This is where your candy thermometer becomes your best friend. We need to cook the caramel until it reaches a temperature of 245°F (118°C) – this is the “firm ball” stage. Do not rush this step. Cooking it too quickly can result in a burnt taste, and not cooking it long enough will yield a caramel that is too soft and won’t set properly on your apples. The caramel will thicken significantly and take on a rich, amber hue. When it reaches 245°F, immediately remove the saucepan from the heat.
- Cool the Caramel Slightly: Allow the caramel to cool in the saucepan for about 10-15 minutes, stirring occasionally, until it thickens slightly and is easier to work with. It should still be warm and pourable, but not scorching hot. This resting period allows the bubbles to subside and the caramel to achieve the perfect dipping consistency for your Caramel Apple Slices.
Assembling Your Delicious Caramel Apple Slices
Now comes the fun part! This is where our beautiful apples meet our luscious homemade caramel, transforming into the delightful Caramel Apple Slices we’ve been working towards. Get ready for some delicious stickiness!
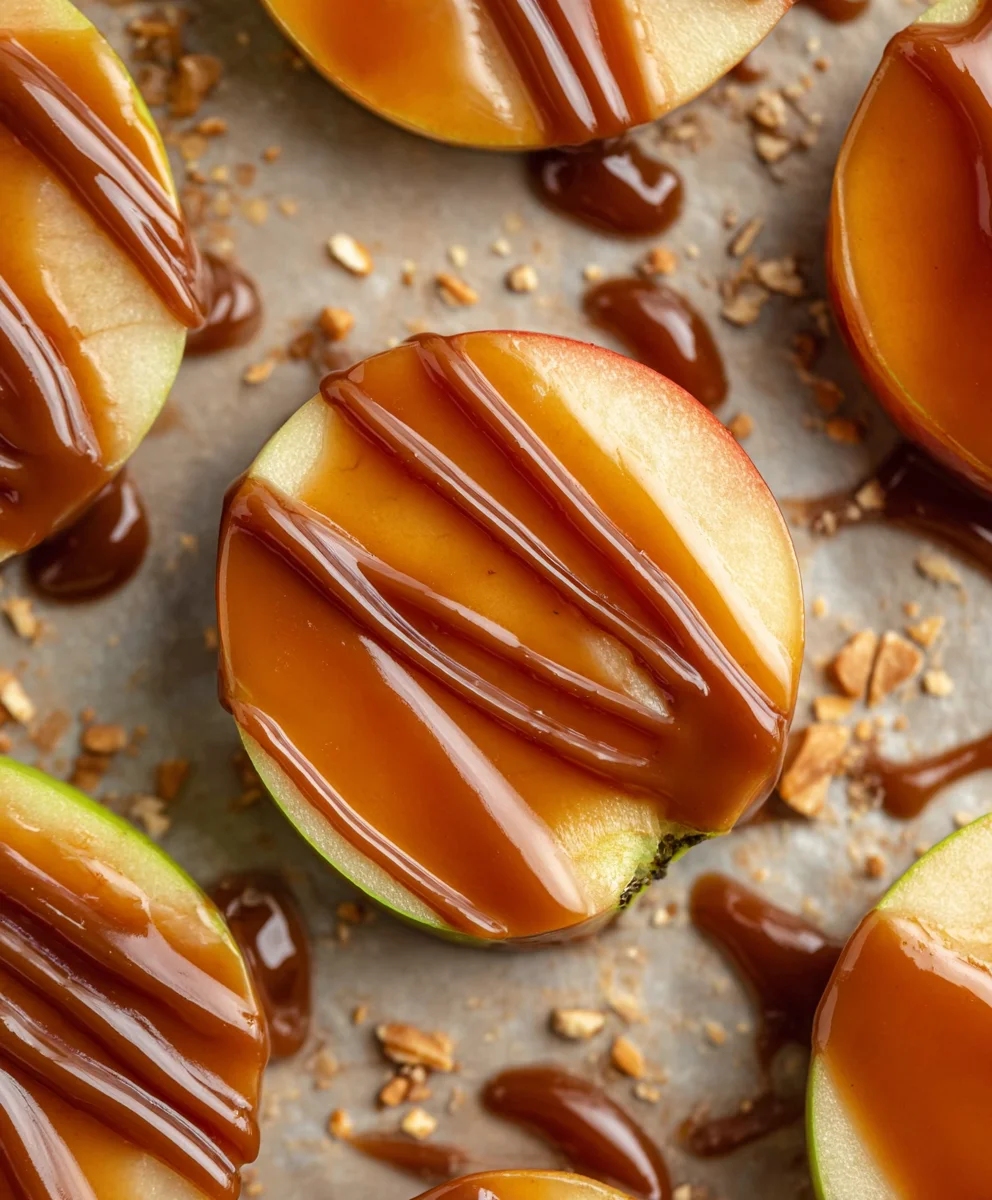
- Dip the Apple Slices: Holding an apple slice by its skewer, dip it into the warm caramel, rotating it to coat evenly. You can dip it fully, or just partially, leaving a bit of apple exposed if you prefer. Allow any excess caramel to drip off back into the saucepan. You can gently scrape the bottom against the rim of the pan to remove any large drips. Be mindful not to let the caramel get too cool, as it will become too thick to dip. If it starts to thicken too much, you can gently warm it over very low heat for a minute or two, stirring constantly, until it’s dippable again.
- Add Initial Toppings (if desired): Immediately after dipping each apple slice, gently press it into your chosen toppings – chopped nuts, crushed cookies, or sprinkles. You can roll the edges, or sprinkle toppings directly onto the caramel. This needs to be done quickly while the caramel is still warm and sticky enough for the toppings to adhere. Place each topped Caramel Apple Slice back onto your prepared baking sheets.
- Cool and Set: Once all your apple slices are coated and topped, transfer the baking sheets to the refrigerator. Allow them to chill for at least 30-60 minutes, or until the caramel is completely set and firm to the touch. This chilling process is essential for the caramel to fully solidify, ensuring your Caramel Apple Slices hold their shape beautifully.
Decorating and Finishing Your Caramel Apple Slices
Once the caramel is perfectly set, we can move on to adding the final flourishes. These decorative steps not only make your Caramel Apple Slices look incredible but also add additional layers of flavor and texture, truly making them a showstopper.
- Melt the Chocolate (if using): If you plan to drizzle with chocolate, melt your chocolate chips now. You can do this using a double boiler method (a heatproof bowl set over a saucepan of simmering water, ensuring the bowl doesn’t touch the water) or carefully in the microwave. For the microwave, heat in 30-second intervals, stirring well after each, until smooth and completely melted. Be careful not to overheat the chocolate, as it can seize. You can also melt white chocolate separately for contrasting drizzles.
- Drizzle and Add Final Toppings: Once the chocolate is melted, you have a few options for drizzling. You can use a spoon to artfully drizzle the chocolate back and forth over the cooled Caramel Apple Slices. For more control, transfer the melted chocolate to a piping bag with a very small tip, or even a Ziploc bag with a tiny corner snipped off. Drizzle in a zigzag pattern, straight lines, or any design you like. While the chocolate is still wet, you can add another sprinkle of flaky sea salt, more chopped nuts, or a few colorful sprinkles for extra pizzazz. This step really elevates the visual appeal and adds another delicious dimension to your Caramel Apple Slices.
-
Final Setting and Serving: After decorating, return the Caramel Apple Slices to the refrigerator for another 15-20 minutes, or until the chocolate drizzles have completely set. Once firm, they are ready to be served! These delightful treats are best enjoyed at room temperature, which allows the caramel to soften slightly and become wonderfully chewy.
Store any leftover Caramel Apple Slices in an airtight container in the refrigerator for up to 3-4 days. For the best texture, let them sit at room temperature for about 10-15 minutes before enjoying. Every bite will be a perfect balance of crisp apple, rich, buttery caramel, and your chosen delightful toppings. Enjoy the fruits of your labor!
Conclusion:
And there you have it! We’ve journeyed through the simple steps to creating what I believe is truly one of the most delightful and comforting treats you can imagine. These aren’t just any dessert; they are a celebration of classic flavors brought to life with a homemade touch that simply cannot be replicated by store-bought alternatives. Why are these particular Caramel Apple Slices an absolute must-try? It boils down to that exquisite harmony of textures and tastes: the refreshing, crisp snap of a perfectly ripe apple giving way to the rich, buttery, and utterly decadent chewiness of homemade caramel. Each bite delivers a vibrant burst of fruit tempered by a sweet, luxurious coating, often kissed with a delicate hint of sea salt that truly elevates the entire experience. I promise you, once you taste the profound difference that fresh ingredients and a little bit of love make, you’ll find yourself reaching for this recipe again and again. It’s surprisingly straightforward to prepare, yet it always manages to present itself as a sophisticated and impressive offering, making it perfect for any occasion – from a cozy, casual family evening to a vibrant holiday gathering or a potluck where you truly want to shine.
But the fun doesn’t stop once your glorious batch of Caramel Apple Slices is ready! There are so many wonderful ways to enjoy them and even more opportunities to make them uniquely yours. For an unparalleled sensory experience, I highly recommend serving them slightly warm, allowing the caramel to be at its most gooey and inviting. Imagine pairing them with a generous scoop of premium vanilla bean ice cream, watching it slowly melt and mingle with the golden caramel, creating an extra layer of creamy delight. Alternatively, a fluffy dollop of freshly whipped cream, perhaps subtly infused with a whisper of cinnamon or nutmeg, makes for a light yet luxurious accompaniment. To add an extra dimension of texture and a touch of visual appeal, consider sprinkling your finished slices with toasted pecans, walnuts, or even some finely chopped almonds just before serving. For the truly indulgent, a delicate drizzle of melted dark chocolate or a sprinkle of flaky sea salt can transform these already magnificent treats into an even more sophisticated dessert. If you’re feeling adventurous in the kitchen, don’t hesitate to experiment with different varieties of apples; while a tart Granny Smith provides a wonderful counterpoint to the sweet caramel, a crisp Honeycrisp offers fantastic crunch and natural sweetness, or a Fuji for a milder, universally appealing flavor profile. You could also infuse your homemade caramel with a pinch of aromatic cardamom, a dash of high-quality bourbon for an adult twist, or even a hint of espresso powder for a unique depth of flavor. Beyond nuts, think about toppings like mini chocolate chips, crunchy toffee bits, shredded coconut, or even a sprinkle of granola for a breakfast-inspired treat. For a truly interactive experience, arrange your Caramel Apple Slices artfully on a large platter and offer a selection of dips and sprinkles, turning dessert into a delightful build-your-own adventure!
Your Culinary Journey Awaits!
I genuinely hope that reading through this recipe has sparked a creative flame within you and that you feel genuinely inspired to bring these truly wonderful Caramel Apple Slices to life in your very own kitchen. They are so much more than just a dessert; they are an experience, a little piece of edible joy and comfort that you can proudly create with your own hands. There’s an immense satisfaction that comes from crafting something so delicious and wholesome from scratch, and I truly believe this recipe encapsulates that joy perfectly. So, please, don’t hesitate – dive in and embrace the simple pleasure of making these delightful treats! I am incredibly eager to hear all about your culinary adventures. Did you add a unique ingredient or a clever twist that made them extra special? What was your favorite moment in the process, or the most surprising flavor combination you discovered? Please, feel free to share your thoughts, your triumphant photos, and your delicious stories with me. Your creativity and your experiences truly inspire me, and I absolutely cannot wait to see the wonderful memories and incredible flavors you create in your own home.
Caramel Apple Slices: Easy & Delicious Treat!
Caramel Apple Slices are a delightful invitation to autumn, offering all the charm of traditional caramel apples with added convenience. Each bite provides a perfect marriage of crisp, tart apple and rich, buttery homemade caramel, making it an incredibly addictive and elegant treat.
Ingredients
-
1 ½ cups granulated sugar
-
½ cup water
-
¼ teaspoon kosher salt
-
¾ cup heavy cream
-
1 tablespoon cold unsalted butter
-
6 oz dark chocolate chips
-
1 tablespoon oil
-
6 medium apples, washed and sliced
-
½ cup chopped nuts of choice (optional)
Instructions
-
Step 1
Line two baking sheets with parchment paper or silicone mats. Have toppings ready. Wash and thoroughly dry apples. Slice each apple into ½-inch to ¾-inch thick rounds, discarding ends. Use a small cookie cutter or paring knife to remove cores, creating donut shapes. Insert a wooden skewer or popsicle stick into the bottom of each slice. Place on lined baking sheets and chill for 10-15 minutes. -
Step 2
In a heavy-bottomed saucepan, combine 1 ½ cups granulated sugar, ½ cup water, and ¼ teaspoon kosher salt. Stir gently. Clip a candy thermometer to the pan, ensuring it doesn’t touch the bottom. Cook over medium heat, without stirring, until the mixture reaches 250°F (121°C). Brush down any sugar crystals from the sides with a wet pastry brush if needed. -
Step 3
Once at 250°F, slowly add 1 tablespoon cold unsalted butter, stirring constantly until fully melted and incorporated. Carefully and slowly pour in ¾ cup heavy cream, stirring constantly. The mixture will bubble vigorously. Continue stirring until smooth. -
Step 4
Return saucepan to medium-low heat. Continue to cook, stirring constantly, until the caramel reaches 245°F (118°C) (firm ball stage) on the candy thermometer. Immediately remove from heat and allow to cool in the saucepan for 10-15 minutes, stirring occasionally, until slightly thickened and easier to work with. -
Step 5
Holding an apple slice by its skewer, dip into the warm caramel, rotating to coat evenly. Allow excess caramel to drip off. Immediately press into chosen toppings (like ½ cup chopped nuts). Place each topped slice back onto the prepared baking sheets. Once all slices are coated, transfer to the refrigerator for 30-60 minutes, or until the caramel is completely set. -
Step 6
Melt 6 oz dark chocolate chips with 1 tablespoon oil using a double boiler or microwave (in 30-second intervals, stirring). Drizzle the melted chocolate over the cooled Caramel Apple Slices using a spoon, piping bag, or Ziploc bag with a snipped corner. Add any final toppings like flaky sea salt or sprinkles while chocolate is wet. -
Step 7
Return decorated Caramel Apple Slices to the refrigerator for another 15-20 minutes, or until chocolate drizzles are completely set. Serve at room temperature for the best chewy caramel texture. Store leftovers in an airtight container in the refrigerator for up to 3-4 days; let sit at room temperature for 10-15 minutes before enjoying.
Important Information
Nutrition Facts (Per Serving)
It is important to consider this information as approximate and not to use it as definitive health advice.
Allergy Information
Please check ingredients for potential allergens and consult a health professional if in doubt.


Leave a Comment