
Homemade Hummus Platter – the very phrase conjures images of vibrant colors, rich textures, and the inviting aroma of Mediterranean hospitality. There’s something profoundly satisfying about preparing this classic dip from scratch, transforming simple chickpeas into a luxuriously creamy masterpiece right in your own kitchen. While hummus, an ancient dish with roots deep in Middle Eastern culinary history, has been a staple for thousands of years, its enduring popularity today speaks volumes about its timeless appeal. From the bustling souks of Beirut to modern kitchens worldwide, its simple elegance and wholesome goodness have captivated palates across generations.
I believe people are drawn to hummus not just for its incredible, nuanced taste and silky-smooth mouthfeel, but also for its remarkable versatility and inherent health benefits. It’s the ultimate canvas for culinary creativity, allowing for endless customization with various toppings and fresh accompaniments. What truly makes a Homemade Hummus Platter special is the care and attention poured into its creation, resulting in a fresher, more flavorful experience that store-bought alternatives simply cannot match. It’s perfect for casual gatherings, elegant appetizers, or even a healthy, satisfying meal, inviting everyone to dip, scoop, and savor. Join me as we uncover the simple secrets to crafting your own unforgettable hummus experience.

Ingredients:
-
For the Creamy Homemade Hummus:
- Chickpeas: 2 cans (15 ounces/425g each) chickpeas, drained and thoroughly rinsed, or 1.5 cups cooked chickpeas (from about 0.5 cup dried chickpeas). I always recommend peeling the chickpeas for the ultimate creamy texture, which I’ll detail in the instructions.
- Tahini: 1/2 cup (120ml) good quality tahini (sesame paste). The quality of your tahini makes a significant difference, so choose wisely!
- Fresh Lemon Juice: 1/4 cup (60ml) freshly squeezed lemon juice (from about 1-2 medium lemons). Don’t skimp on fresh lemon!
- Garlic: 2-3 small cloves garlic, peeled and roughly chopped. Adjust to your preference; I love a good garlicky kick!
- Extra Virgin Olive Oil: 1/4 cup (60ml) plus more for drizzling. This adds richness and flavor.
- Cold Water or Ice Cubes: 1/4 cup (60ml) very cold water or 2-3 ice cubes. My secret for that super fluffy, light texture!
- Ground Cumin: 1/2 teaspoon ground cumin. A classic, earthy addition.
- Salt: 1/2 teaspoon sea salt, or to taste. Always taste and adjust!
-
For the Homemade Hummus Platter Components:
- Pita Bread: 3-4 large pita breads, warmed and cut into wedges, or pita chips. Freshly warmed pita is unbeatable.
- Assorted Fresh Vegetables:
- 1 large cucumber, sliced into rounds or sticks.
- 2-3 carrots, peeled and cut into sticks.
- 1-2 bell peppers (any color), cored and sliced.
- 1 pint cherry tomatoes, halved or left whole.
- 4-5 radishes, thinly sliced.
- Optional: Celery sticks, snap peas, blanched asparagus spears.
- Olives: 1/2 cup mixed olives (e.g., Kalamata, green olives), pitted. A briny counterpoint is essential.
- Crumbled Feta Cheese: 1/4 cup (optional). Adds a lovely salty tang.
- Fresh Parsley: 2 tablespoons fresh flat-leaf parsley, chopped, for garnish. Adds freshness and color.
- Paprika or Sumac: For dusting, for color and a hint of flavor. Sumac offers a beautiful tangy note.
- Additional Extra Virgin Olive Oil: For a final generous drizzle over the finished Homemade Hummus Platter.
Making the Creamy Homemade Hummus
-
Prepare the Chickpeas for Ultimate Creaminess:
This is arguably the most crucial step for achieving that incredibly smooth, restaurant-quality hummus that makes your Homemade Hummus Platter truly stand out. If you’re using canned chickpeas, drain and rinse them thoroughly under cold water. Now comes the peeling! Yes, I know it sounds tedious, but trust me, it’s a game-changer. Gently pinch each chickpea between your thumb and forefinger, and the thin skin will slip right off. Discard the skins. This process usually takes me about 10-15 minutes for two cans, and I often put on some music or a podcast to make the time fly by. If you’re starting from dried chickpeas, soak about 0.5 cup overnight, then cook them until they are incredibly soft – soft enough to easily mash between your fingers. A little trick: add 1/2 teaspoon of baking soda to the cooking water; it helps break down the chickpea fibers for an even creamier result. Once cooked, drain and cool them slightly before peeling, if desired, though cooking them very thoroughly often eliminates the need for extensive peeling.
-
Begin with Tahini and Lemon:
In the bowl of a food processor, combine the 1/2 cup of good quality tahini and the 1/4 cup of fresh lemon juice. Process for about 1-2 minutes, scraping down the sides occasionally, until the mixture becomes pale, thick, and almost fluffy. It might seize up a bit at first, but keep going; it will eventually emulsify into a light, airy paste. This initial blending step is vital for creating a light and ethereal hummus texture. It ensures that the tahini’s richness is perfectly balanced by the bright acidity of the lemon right from the start, preventing a dense or oily final product. This foundational step sets the stage for a truly magnificent Homemade Hummus Platter.
-
Introduce the Garlic and a Touch of Olive Oil:
Add the 2-3 chopped garlic cloves to the tahini-lemon mixture and process for another 30 seconds until the garlic is finely minced and thoroughly incorporated. Then, slowly drizzle in the 1/4 cup of olive oil while the food processor is running. Continue to process for another minute. The olive oil will further help in emulsifying the mixture, adding a silky smoothness and depth of flavor that is essential for a high-quality hummus. I find that using excellent extra virgin olive oil here makes a noticeable difference in the final taste profile.
-
Add the Peeled Chickpeas and Seasonings:
Now, add your peeled (or super soft cooked) chickpeas, 1/2 teaspoon of ground cumin, and 1/2 teaspoon of salt to the food processor. Process for 3-4 minutes, scraping down the sides every minute or so. At this stage, the mixture will be quite thick and possibly a little clumpy. Don’t worry, we’re about to transform it! Ensure everything is well combined and the chickpeas are breaking down significantly.
-
The Icy Water Secret for Fluffiness:
With the food processor still running, slowly drizzle in the 1/4 cup of very cold water or drop in the 2-3 ice cubes, one at a time. Continue to process for another 3-5 minutes, or until the hummus is incredibly smooth, creamy, and light. The cold water or ice cubes do a fantastic job of aerating the hummus, making it exceptionally fluffy and almost whipped in texture. It also helps to lighten the color. This is one of my favorite tricks for achieving that desirable light and airy consistency that makes a Homemade Hummus Platter so delightful. Keep processing until you reach your desired level of smoothness. The longer you process, the smoother it will become.
-
Taste and Adjust:
Stop the food processor and taste your hummus. This is your chance to make it perfect! Does it need more salt? A bit more lemon juice for brightness? Perhaps another pinch of cumin for depth? Adjust the seasonings to your liking. If it’s too thick, you can add another tablespoon of cold water and process briefly. If it’s too thin, you’ve likely added too much liquid; unfortunately, there’s no easy fix for that, so always add liquids incrementally. Once you’re satisfied with the flavor and consistency, transfer the hummus to a serving bowl or directly onto your platter. Cover it and let it rest in the refrigerator for at least 30 minutes. This resting period allows the flavors to meld and develop even further, resulting in an even more delicious dip for your Homemade Hummus Platter.
Preparing the Homemade Hummus Platter Components
-
Warm and Prepare the Pita Bread:
There’s nothing quite like warm, soft pita bread with fresh hummus. I like to preheat my oven to 350°F (175°C) and warm the pita breads for about 5-7 minutes, until they are soft and pliable. You can also lightly toast them in a dry skillet on the stovetop for a minute per side, or even microwave them briefly (though I find the oven or skillet yields a better texture). Once warmed, stack them and cut them into triangular wedges, making them perfect for dipping. If you prefer, you can also use store-bought pita chips or even bake your own by brushing pita with olive oil and baking until crispy. Remember, the dippers are just as important as the dip itself for a complete Homemade Hummus Platter experience.
-
Wash and Chop the Fresh Vegetables:
Thoroughly wash all your selected vegetables. For the cucumber, you can slice it into rounds or cut it into long, thin sticks. Carrots should be peeled and cut into appealing sticks that are easy to grab. Bell peppers can be cored, deseeded, and sliced into strips. Cherry tomatoes can be left whole or halved for easier eating. Radishes should be thinly sliced. The key here is to make sure your vegetables are fresh, crisp, and beautifully presented. I often choose a variety of colors to make the platter visually appealing – bright red tomatoes, vibrant green cucumber, sunny yellow bell peppers, etc. A colorful array of fresh veggies elevates any Homemade Hummus Platter.
-
Prepare Other Accoutrements:
Drain your mixed olives and pat them dry. If they’re not already pitted, you might want to pit them for easier eating on the platter. If you’re using feta cheese, crumble it gently. Roughly chop the fresh flat-leaf parsley. Have your additional extra virgin olive oil ready for drizzling, and a small sieve or shaker with paprika or sumac ready for dusting. Consider adding other elements like pickled turnip, roasted red peppers (jarred works great!), or even some sun-dried tomatoes for extra flavor dimensions.
Assembling Your Magnificent Homemade Hummus Platter
-
Create the Hummus Centerpiece:
Transfer your chilled, creamy homemade hummus to a beautiful, shallow serving bowl or directly onto the center of a large platter. Use the back of a spoon to spread the hummus outwards, creating a gentle swirl pattern or a small well in the center. This well is perfect for holding a generous pool of olive oil and any other small toppings you might want to add. I always aim for a rustic, inviting look rather than something too perfect.
-
Drizzle and Dust with Care:
Pour a generous swirl of your best extra virgin olive oil over the top of the hummus, letting it pool in the well you created. This not only adds incredible flavor but also a beautiful sheen. Then, lightly dust the hummus with paprika for a warm, earthy flavor and a pop of color, or sumac for a lovely tangy note. Sometimes I even use a combination of both! This finishing touch is crucial for both taste and presentation, making your Homemade Hummus Platter truly irresistible.
-
Artfully Arrange the Dippers:
Now, arrange your warmed pita wedges and fresh chopped vegetables around the hummus. I like to group similar items together and alternate colors for visual interest. For instance, place a fan of cucumber slices next to a pile of carrot sticks, then some bell pepper strips, and so on. Make sure everything is easily accessible for dipping. Don’t be afraid to make it look abundant and inviting; a slightly overflowing platter always looks more appealing!
-
Incorporate the Extras:
Scatter the pitted olives and crumbled feta cheese (if using) around the platter, either directly on the hummus or nestled among the vegetables. These elements add crucial flavor and texture contrasts that elevate the entire platter. If you have any other small additions like roasted red peppers or sun-dried tomatoes, intersperse them thoughtfully for bursts of flavor.
-
The Final Fresh Garnish:
Finally, sprinkle the fresh chopped parsley generously over the entire Homemade Hummus Platter. This adds a burst of vibrant green color and a fresh, herbaceous aroma that truly completes the dish. Take a step back and admire your handiwork! It’s amazing how a few simple ingredients can come together to create such a stunning and delicious spread.
Serving Suggestions and Enhancing Your Homemade Hummus Platter Experience
Once your magnificent Homemade Hummus Platter is assembled, it’s ready to be the star of your table! I love serving this as an appetizer for gatherings, a light lunch, or even a healthy snack throughout the day. Its versatility is truly one of its greatest assets. You’ll find it pairs beautifully with almost any meal.
Ideas for Presentation and Accompaniments:
- For a Mediterranean Feast: If you’re hosting a larger meal, consider expanding your platter with other traditional Mediterranean elements. Think crispy falafel, grilled halloumi cheese, dolmades (stuffed grape leaves), or even some skewers of grilled chicken or lamb. These additions turn a simple snack into a hearty meal.
- Bread Options Beyond Pita: While pita is classic, don’t limit yourself! Try serving your hummus with crusty artisan bread, warm naan bread, or even gluten-free crackers for those with dietary restrictions. Vegetable sticks are always a fantastic, healthy option.
- Seasonal Variations: Embrace the seasons! In the summer, I might add fresh cherry tomatoes, thinly sliced zucchini, or even grilled corn kernels. In the fall, roasted root vegetables like sweet potato or parsnip sticks make an interesting dipper.
- Garnish Creativity: Beyond paprika and sumac, consider other garnishes. Toasted pine nuts add a lovely crunch, chili flakes provide a subtle heat, or even a sprinkle of za’atar for an authentic Middle Eastern flavor profile. A few sprigs of fresh mint can also add a delightful aroma and freshness.
Tips for Storage and Leftovers:
If by some miracle you have any leftover hummus, transfer it to an airtight container and store it in the refrigerator. It will typically stay fresh for 3-5 days. The flavors often deepen overnight, making it even more delicious the next day! You might find the olive oil has solidified slightly on top; just give it a good stir before serving. The vegetables can be stored separately in airtight containers to maintain their crispness.
Exploring Hummus Flavor Variations:
This basic recipe for a Homemade Hummus Platter is wonderfully adaptable. Once you’ve mastered the classic, don’t hesitate to experiment with different flavor infusions:
- Roasted Red Pepper Hummus: Roast a red bell pepper until soft and charred, peel it, and blend it in with the chickpeas for a sweet and smoky flavor.
- Spicy Hummus: Add a pinch of cayenne pepper, a dash of hot sauce, or a small roasted jalapeño to the food processor for a fiery kick.
- Herb Hummus: Blend in a handful of fresh cilantro, mint, or basil along with the parsley for a distinctly herbaceous profile.
- Pesto Hummus: Swirl a tablespoon or two of your favorite pesto into the finished hummus for an Italian-inspired twist.
The beauty of a Homemade Hummus Platter lies in its simplicity, nutritional value, and incredible versatility. It’s naturally gluten-free (when served with appropriate dippers) and vegan, making it an excellent choice for diverse dietary needs. Preparing it yourself ensures you know exactly what goes into it, avoiding any unwanted preservatives or additives. Plus, the satisfaction of presenting a platter made with love and fresh ingredients is truly unparalleled. Whether you’re entertaining guests or simply enjoying a quiet evening at home, a well-made Homemade Hummus Platter is always a delightful and nourishing choice. Enjoy every creamy, flavorful bite!
Conclusion:
So, there you have it – my tried-and-true recipe for what I truly believe is the absolute best homemade hummus you’ll ever make. I know I might sound a little biased, but trust me, once you experience the creamy, rich texture and the vibrant, fresh flavors that come from preparing it yourself, you’ll understand completely. This isn’t just another dip; it’s a culinary revelation that will elevate your snacking, entertaining, and meal prep to a whole new level. Forget those store-bought tubs that often disappoint with their blandness or overly acidic notes. My recipe ensures a silky-smooth consistency and a bright, garlicky, lemony zest that is simply incomparable. It’s incredibly satisfying to create something so delicious from scratch, knowing exactly what ingredients went into it – all natural, wholesome, and packed with goodness. I promise you, the minimal effort involved yields maximum flavor and a sense of accomplishment that is truly rewarding. This isn’t just about food; it’s about creating a moment, a shared experience around a bowl of something genuinely wonderful. You’re not just making hummus; you’re crafting a centerpiece that will undoubtedly garner rave reviews.
Elevate Your Culinary Creations: More Than Just a Dip!
Now, let’s talk about how to truly make this amazing hummus shine, beyond just a simple dip. While a bowl of this creamy goodness with some warm pita bread is always a winner, there are countless ways to enjoy and present it. For a truly impressive spread, I wholeheartedly recommend assembling a spectacular Homemade Hummus Platter. Imagine an array of vibrant colors and textures: alongside your glorious hummus, arrange a medley of crisp vegetables like cucumber slices, carrot sticks, vibrant red and yellow bell pepper strips, crunchy celery, and even radishes for a peppery bite. Don’t forget some Kalamata olives, perhaps a sprinkle of crumbled feta cheese, and a generous drizzle of good quality extra virgin olive oil over the hummus, finished with a dusting of paprika or sumac and a scattering of fresh parsley or cilantro. Add some warmed pita bread, pita chips, or even some artisanal crackers, and you’ve got an appetizer that’s both stunning and incredibly satisfying – perfect for any gathering, big or small.
But the versatility doesn’t stop there! Think outside the snack bowl. This hummus makes an incredible spread for sandwiches and wraps, offering a healthier, tastier alternative to mayonnaise. It’s fantastic slathered onto toast for a quick, savory breakfast or light lunch, perhaps topped with sliced avocado and a sprinkle of chili flakes. Consider serving it as a delightful side alongside grilled chicken, falafel, or even roasted vegetables. For those who love to experiment, feel free to get creative with flavor variations! You could blend in roasted red peppers for a smoky sweetness, sun-dried tomatoes for an intense umami punch, a handful of fresh spinach for a vibrant green hue and earthy flavor, or even a swirl of pesto for an Italian twist. A dash of your favorite hot sauce or a few slices of jalapeño can transform it into a spicy kick-starter, while blending in roasted garlic cloves (instead of raw) offers a deeper, mellower garlic flavor. The beauty of homemade is that you are the chef, the artist, and the creator – you can tailor it precisely to your palate and mood. Whether it’s a casual weeknight dinner or a festive celebration, this hummus will adapt and impress.
Your Kitchen Adventure Awaits!
I genuinely hope you feel inspired to try this recipe. It’s more than just a recipe; it’s an invitation to experience the joy of cooking and the delight of sharing truly delicious food. Don’t be intimidated; the process is straightforward, and the results are incredibly rewarding. I’m confident that once you whip up your first batch, you’ll wonder why you ever bought it from the store. So, gather your ingredients, fire up your food processor, and prepare to be amazed. The payoff in flavor, freshness, and sheer deliciousness is immense, making every second spent in the kitchen absolutely worthwhile. And when you do make it, please, please, please share your experience with me! I’d absolutely love to hear about your culinary adventures. What did you serve it with? Did you try any exciting variations? What was your favorite part of making it? Your insights and creativity truly inspire me and the rest of our community. Tag me on social media or drop a comment below – let’s celebrate the deliciousness together! Happy cooking, and get ready to enjoy the most delightful hummus you’ve ever tasted.

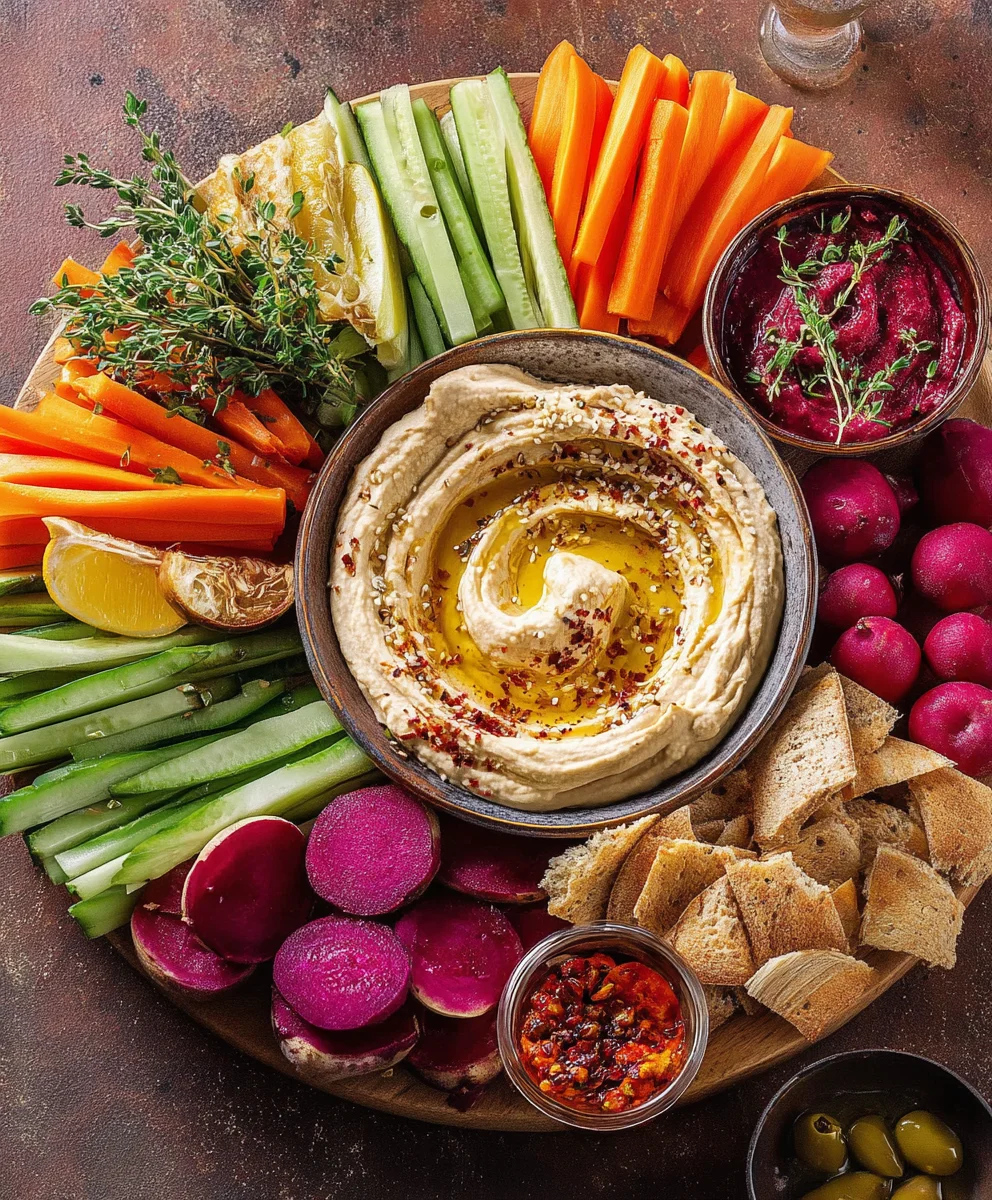
Homemade Hummus Platter
A vibrant and customizable Homemade Hummus Platter featuring three types of hummus, an array of fresh vegetables, and various dippers. Perfect as an appetizer for gatherings or a healthy, satisfying snack.
Ingredients
-
1 cup Plain Hummus (store-bought or homemade)
-
1 cup Pine Nut Hummus (store-bought or homemade)
-
1 cup Beet Hummus (store-bought or homemade)
-
1 Red Bell Pepper, sliced
-
1 Yellow Bell Pepper, sliced
-
2 Orange Carrots, halved
-
2 Yellow Carrots, halved
-
2 Purple Carrots, halved
-
1 bunch Radishes, halved
-
1 cup Snap Peas, halved lengthwise
-
2 Persian Cucumbers, quartered lengthwise
-
2 Celery stalks, trimmed and halved
-
1 pint Cherry Tomatoes on the vine
-
6-8 Mini Pitas, warmed and cut into wedges
-
1 bag (8 oz) Pita Chips
-
2 tbsp Extra Virgin Olive Oil, for drizzling (optional)
-
1 tsp Paprika or Sumac, for dusting (optional)
-
2 tbsp Fresh Parsley, chopped, for garnish (optional)
Instructions
-
Step 1
Arrange the Plain, Pine Nut, and Beet hummuses in separate sections or small bowls on a large serving platter. -
Step 2
Wash and prepare all vegetables: slice bell peppers, halve carrots, radishes, snap peas, and quarter cucumbers. Trim celery and leave cherry tomatoes on the vine. Artfully arrange the prepared vegetables around the hummus on the platter. -
Step 3
Warm the mini pitas and cut into triangular wedges. Place the pita wedges and pita chips on the platter, alongside the fresh vegetables. -
Step 4
For an enhanced presentation, drizzle extra virgin olive oil generously over the hummus. Lightly dust with paprika or sumac, and sprinkle with fresh chopped parsley. Serve your magnificent Homemade Hummus Platter immediately.
Important Information
Nutrition Facts (Per Serving)
It is important to consider this information as approximate and not to use it as definitive health advice.
Allergy Information
Please check ingredients for potential allergens and consult a health professional if in doubt.

Leave a Comment