
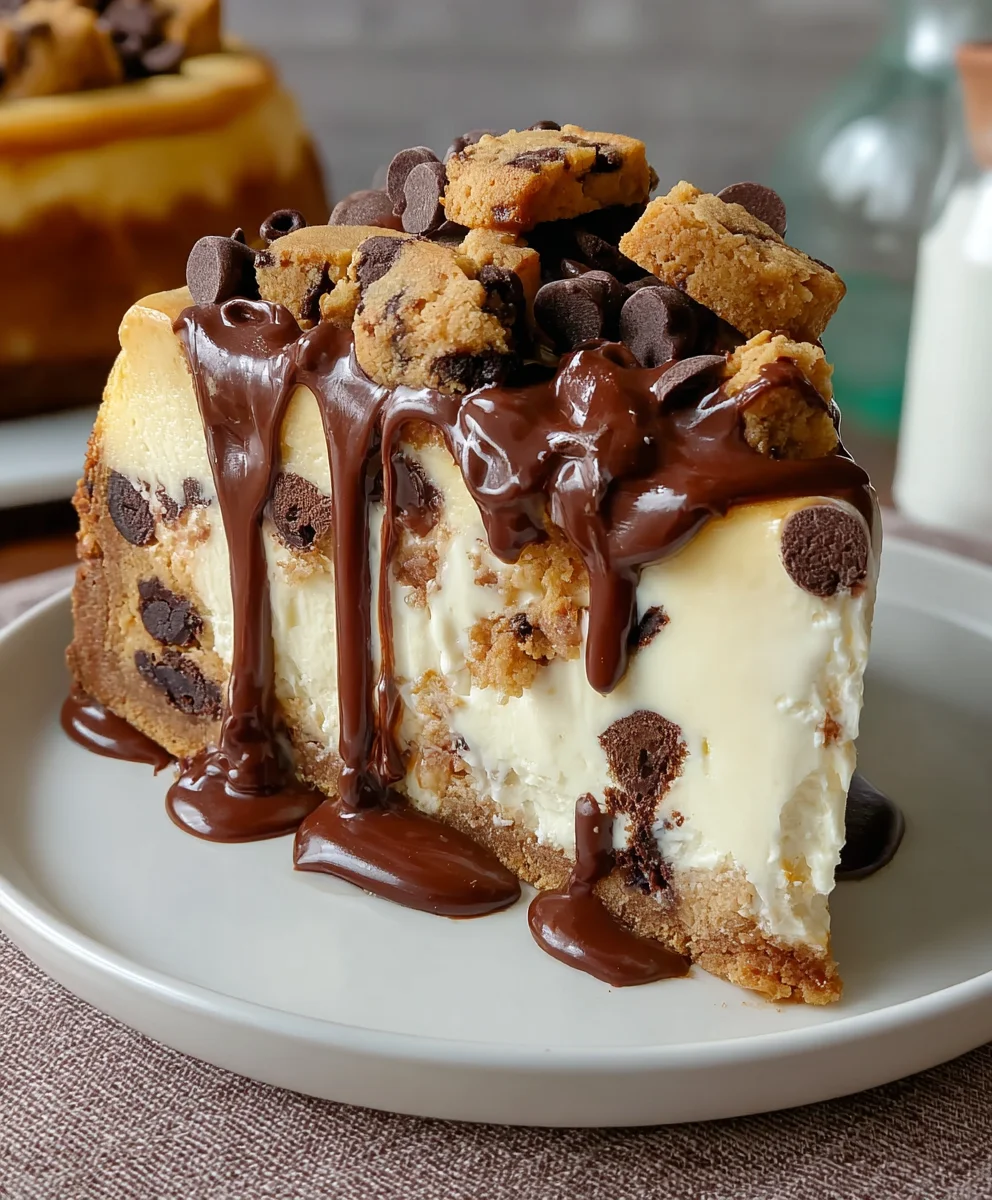
Cookie Dough Cheesecake. Just uttering those three words is enough to make any dessert lover’s heart skip a beat. I’ve always believed that some of the greatest culinary creations arise from combining two already beloved classics, and this particular recipe is a magnificent testament to that philosophy.
Imagine the rich, velvety smoothness of a classic cheesecake meeting the playful, nostalgic chunks of raw cookie dough. It’s a dessert that perfectly marries the sophisticated elegance of a baked cheesecake with the joyful, comforting indulgence of sneaking a spoonful of unbaked cookie dough from the bowl. While the precise origins of combining these two powerhouses might be a modern innovation born from a desire for ultimate indulgence, it taps into a universal love for both creamy decadence and childhood sweetness.
What makes this dish so universally adored? It’s the incredible textural interplay and the sheer depth of flavor. Every bite of this homemade Cookie Dough Cheesecake offers a delightful journey, from the crisp graham cracker crust to the luscious cream cheese filling, punctuated by irresistible morsels of edible cookie dough. I find that people are drawn to this dessert not only for its incredible taste but also for the sheer excitement it brings – it’s a showstopper that promises to impress and satisfy even the most discerning palates.

Ingredients:
- For the Graham Cracker Crust:
- 1 ½ cups (about 180g) finely crushed graham cracker crumbs (from about 12-14 full graham cracker sheets). I like to use a food processor for a super fine crumb, which helps the crust hold together beautifully.
- ¼ cup (50g) granulated sugar. This adds a touch of sweetness and helps with caramelization.
- ½ cup (113g) unsalted butter, melted. Make sure it’s fully melted so it can properly bind the crumbs together.
- For the Eggless Cookie Dough (Edible & Safe!):
- ½ cup (113g) unsalted butter, softened to room temperature. This is crucial for a smooth, creamy dough.
- ½ cup (100g) granulated sugar.
- ¼ cup (50g) packed light brown sugar. The brown sugar adds that classic chewiness and depth of flavor we love in cookie dough.
- 1 teaspoon pure vanilla extract. Don’t skimp on the good vanilla here!
- 1 ¾ cups (210g) all-purpose flour. I always recommend heat-treating your flour for edible raw cookie dough. To do this, spread the flour on a baking sheet and bake at 300°F (150°C) for 5-7 minutes, then let it cool completely. This kills any potential bacteria.
- ¼ teaspoon salt. Balances the sweetness.
- 2-3 tablespoons milk (dairy or non-dairy), as needed. Start with 2 tablespoons and add more if the dough is too dry. This replaces the moisture an egg would provide.
- ¾ cup (130g) mini semi-sweet chocolate chips. Mini chips are perfect here as they distribute evenly and don’t create huge lumps in the cheesecake.
- For the Cheesecake Filling:
- 3 (8-ounce) packages (680g total) full-fat cream cheese, softened to room temperature. This is absolutely non-negotiable for a creamy cheesecake! Cold cream cheese will result in a lumpy filling.
- 1 ½ cups (300g) granulated sugar.
- ½ cup (120g) sour cream, at room temperature. Sour cream adds a lovely tang and extra creaminess, helping to prevent cracks.
- 1 ½ teaspoons pure vanilla extract.
- 4 large eggs, at room temperature. Just like the cream cheese, room temperature eggs emulsify better into the batter.
- For the Chocolate Ganache Topping:
- ½ cup (120ml) heavy cream.
- 1 cup (170g) semi-sweet chocolate chips. High-quality chocolate makes a difference here!
- For Garnish (Optional):
- Extra mini chocolate chips or small pieces of the reserved cookie dough.
Preparing the Eggless Cookie Dough
Let’s kick things off by making our star ingredient, the edible eggless cookie dough. This is a crucial step for our magnificent Cookie Dough Cheesecake!
- In a large bowl, using an electric mixer (handheld or stand mixer with a paddle attachment), cream together the softened unsalted butter, granulated sugar, and packed light brown sugar on medium speed until the mixture is light, fluffy, and well combined. This usually takes about 2-3 minutes. I love watching it transform into this beautiful, creamy base.
- Beat in the pure vanilla extract until fully incorporated. Scrape down the sides of the bowl to ensure everything is mixed evenly.
- In a separate medium bowl, whisk together your heat-treated all-purpose flour and salt. Remember to heat-treat your flour! Safety first when consuming raw ingredients.
- Gradually add the dry flour mixture to the wet ingredients, mixing on low speed until just combined. Be careful not to overmix at this stage; we don’t want tough cookie dough.
- Pour in 2 tablespoons of milk and mix until the dough comes together. If the dough still seems too dry or crumbly, add the remaining tablespoon of milk, a little at a time, until you achieve a soft, pliable cookie dough consistency. It should be firm enough to roll into balls but still moist.
- Stir in the mini semi-sweet chocolate chips by hand using a spatula until they are evenly distributed throughout the dough.
- Reserve about ½ cup of this delicious cookie dough for crumbling and decorating the top later. This is important for the final presentation of your Cookie Dough Cheesecake.
- Divide the remaining cookie dough into small, roughly ½-inch to ¾-inch pieces. You can roll them into little balls, or just pinch off irregular shapes – whatever you prefer! Place these pieces on a plate or small baking sheet lined with parchment paper.
- Cover the plate with plastic wrap and refrigerate these cookie dough pieces for at least 30 minutes, or even better, an hour. Chilling them will prevent them from sinking too much into the cheesecake batter during baking.
Crafting the Graham Cracker Crust
Every great cheesecake starts with a solid foundation, and for our Cookie Dough Cheesecake, that means a perfect graham cracker crust!
- Preheat your oven to 350°F (175°C).
- In a medium bowl, combine the finely crushed graham cracker crumbs and the granulated sugar. Give them a good stir to ensure they’re evenly mixed.
- Pour in the melted unsalted butter and mix well with a fork or your hands until all the crumbs are moistened and resemble wet sand. It should hold together when you pinch it.
- Press the crumb mixture evenly into the bottom of a 9-inch springform pan. I like to use the bottom of a flat glass or a measuring cup to really pack it down tightly, creating a firm and sturdy crust. You can also bring it up slightly on the sides, about ½ inch, if you prefer a side crust.
- Bake the crust in the preheated oven for 8-10 minutes. This step helps to set the crust and makes it nice and crisp, preventing it from getting soggy later.
- Remove the crust from the oven and let it cool completely on a wire rack while you prepare the cheesecake filling. You can also pop it in the freezer for about 10-15 minutes to speed up the cooling process.
- Prepare your water bath (Bain-Marie): This is an optional but highly recommended step for a perfect, crack-free cheesecake. Wrap the bottom and sides of your springform pan tightly with several layers of heavy-duty aluminum foil. Make sure there are no gaps for water to seep in! You’ll place the foil-wrapped springform pan into a larger roasting pan before adding water.
Whipping Up the Rich Cheesecake Filling
Now for the creamy, dreamy heart of our dessert – the cheesecake filling! This is where we create that signature smooth texture that makes a Cookie Dough Cheesecake truly irresistible.
- In a very large bowl, using your electric mixer (stand mixer with paddle attachment is ideal here), beat the softened cream cheese on medium speed for about 2-3 minutes until it is completely smooth and creamy, with no lumps whatsoever. This step is paramount! Any lumps now will be lumps in your final cheesecake. Scrape down the sides of the bowl frequently.
- Gradually add the granulated sugar to the cream cheese, beating on medium-low speed until it is fully incorporated and the mixture is light and fluffy, another 2-3 minutes. Continue to scrape down the bowl as needed. The mixture should feel smooth, not grainy.
- Beat in the room temperature sour cream and vanilla extract until just combined. Mix on low speed, just until blended. Overmixing at this stage can incorporate too much air, which can lead to cracks.
- Add the eggs one at a time, mixing on very low speed just until each egg is incorporated before adding the next. Do NOT overmix! Mixing eggs too vigorously incorporates air, leading to a “soufflé-like” rise and then a sad fall and cracks. We want a dense, creamy texture. Scrape down the bowl one final time to ensure everything is perfectly blended.
- Gently fold in about two-thirds of your chilled, prepared cookie dough pieces into the cheesecake batter. I like to do this by hand with a spatula to avoid breaking them up too much and ensure even distribution. Make sure not to overmix, as we want those distinct cookie dough pockets.
- Pour the cheesecake batter evenly over the cooled graham cracker crust in the prepared springform pan.
- If using a water bath, carefully place the foil-wrapped springform pan into your larger roasting pan. Then, place the roasting pan into the preheated oven. Once in the oven, carefully pour hot water into the roasting pan around the springform pan, until the water comes about halfway up the sides of the springform pan. This water bath provides a moist, even heat that is a secret weapon for preventing cracks and ensuring a silky smooth texture in your Cookie Dough Cheesecake.
Baking and Cooling Your Cookie Dough Cheesecake
Patience is a virtue, especially when baking cheesecake! This phase is critical for achieving that perfectly set, creamy texture in your Cookie Dough Cheesecake.
- Bake the cheesecake in the preheated oven (with the water bath, if using) for 60-75 minutes. The baking time can vary, so keep an eye on it.
- You’ll know it’s done when the edges are set, but the center (about 2-3 inches in diameter) still has a slight jiggle to it when you gently tap the pan. It will continue to set as it cools. Resist the urge to open the oven door too often! Sudden temperature changes are a crack’s best friend.
- Once baked, turn off the oven, but leave the cheesecake inside with the oven door slightly ajar (you can prop it open with a wooden spoon) for 1 hour. This slow cooling process is another fantastic crack-prevention technique.
- After 1 hour, carefully remove the cheesecake from the oven and the water bath (if used). Remove the foil wrapping from the springform pan.
- Let the cheesecake cool completely on a wire rack at room temperature for another 1-2 hours.
- Once at room temperature, cover the springform pan with plastic wrap and transfer the cheesecake to the refrigerator. Chill for at least 6-8 hours, but preferably overnight. This extended chilling time is absolutely essential for the cheesecake to firm up properly, develop its full flavor, and slice beautifully. Trying to slice a warm or insufficiently chilled cheesecake is a recipe for a messy disaster!
Making the Silky Chocolate Ganache and Assembling
The final touches make all the difference, bringing together the delicious layers of your Cookie Dough Cheesecake with a decadent chocolate topping.
- Once your cheesecake is fully chilled and set, it’s time to make the ganache. In a small saucepan, heat the heavy cream over medium-low heat until it just begins to simmer around the edges (don’t let it boil vigorously). Alternatively, you can heat it in a microwave-safe bowl in the microwave until hot but not boiling.
- Place the chocolate chips in a heatproof bowl. Pour the hot cream over the chocolate chips. Let it sit undisturbed for 5 minutes. This allows the hot cream to melt the chocolate evenly.
- After 5 minutes, gently whisk the mixture starting from the center and working your way out until the ganache is completely smooth, shiny, and lump-free. It should have a beautiful, pourable consistency.
- Let the ganache cool for 10-15 minutes at room temperature, stirring occasionally, until it has slightly thickened but is still pourable. You don’t want it too hot, or it will melt the cheesecake surface.
- Carefully remove the sides of the springform pan from the chilled cheesecake. I sometimes run a thin knife around the edge first to ensure a clean release.
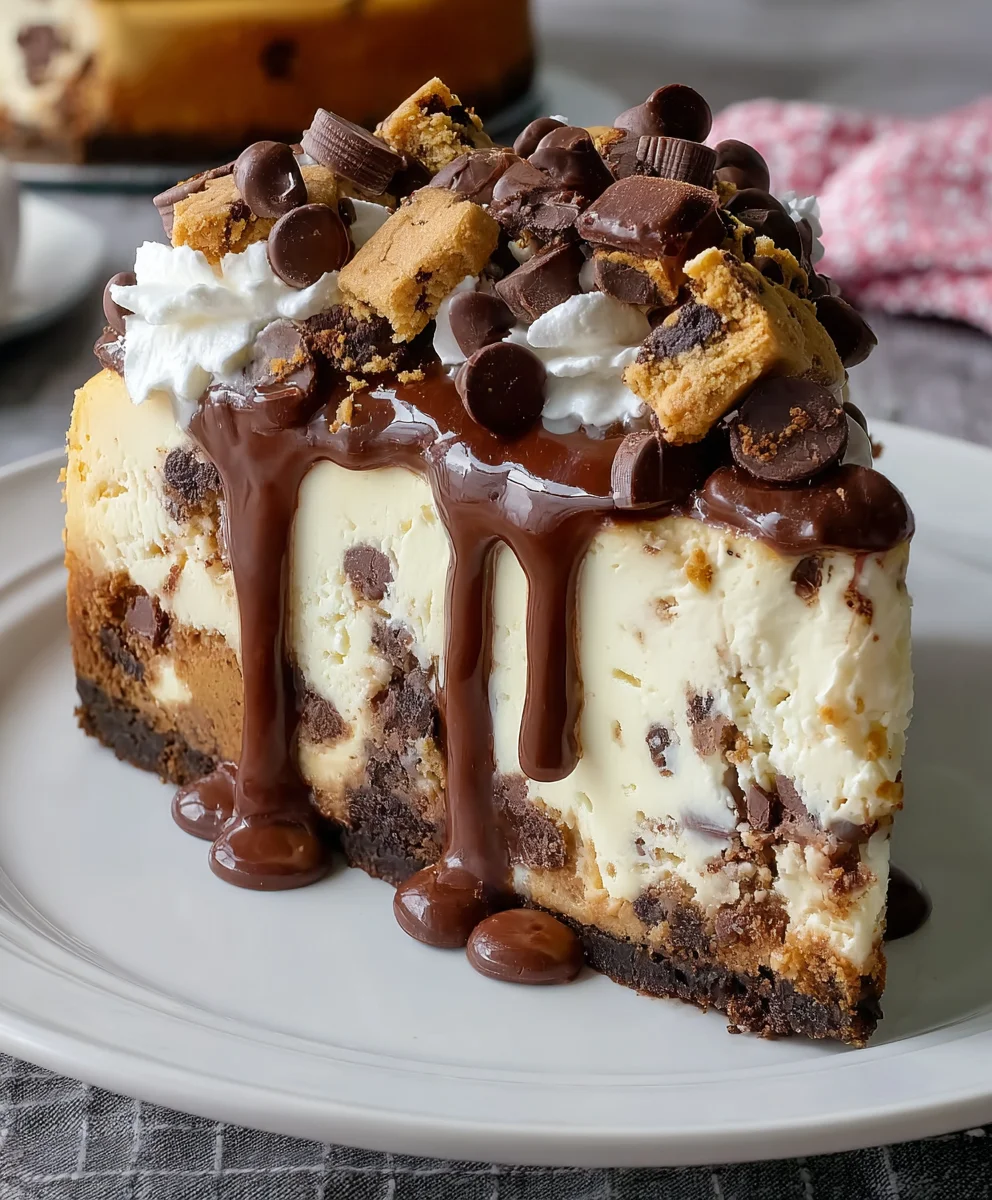
- Pour the slightly cooled ganache over the top of the cheesecake. Gently spread it to the edges with an offset spatula or the back of a spoon, allowing some to drip artfully down the sides, if desired.
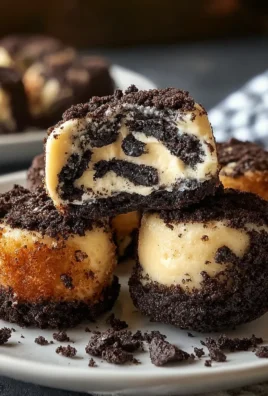
- Immediately after pouring the ganache, take your reserved ½ cup of eggless cookie dough. Crumble it generously over the top of the ganache. You can also add some extra mini chocolate chips if you wish. This is the perfect moment to really highlight the “cookie dough” aspect of your amazing Cookie Dough Cheesecake!
- Return the cheesecake to the refrigerator for at least another 30 minutes to allow the ganache to set.
- When you’re ready to serve, slice the Cookie Dough Cheesecake with a sharp, warm knife for the cleanest cuts. You can run your knife under hot water and wipe it clean between each slice. This makes a huge difference in presentation!
- Store any leftover cheesecake covered in the refrigerator for up to 5-7 days. Enjoy every single delicious bite of your homemade masterpiece!
Conclusion:
And so, we arrive at the culmination of our baking journey together, a journey that I truly hope has inspired you to preheat your ovens and gather your ingredients. This isn’t just another dessert recipe; it’s an experience, a fusion of two timeless classics that, when brought together, create something truly extraordinary. If you’ve been looking for a dessert that marries the nostalgic comfort of raw cookie dough with the sophisticated indulgence of a rich, creamy cheesecake, then your search, my friend, officially ends here. This isn’t merely a suggestion; it’s a heartfelt recommendation from me to you. This Cookie Dough Cheesecake stands out as a true masterpiece of dessert innovation. It’s the kind of treat that doesn’t just satisfy a sweet tooth but actually elicits gasps of delight and requests for second, and perhaps even third, servings. Its beauty lies in its magnificent contrast: the smooth, velvety texture of the cheesecake base, baked to absolute perfection, provides the ideal canvas for pockets of tender, chewy, unbaked cookie dough that burst with chocolatey goodness in every single bite. The interplay of textures – the firm yet yielding cheesecake, the slightly gritty and utterly delicious cookie dough – is simply divine, a symphony for your palate that you won’t soon forget.
But the adventure doesn’t have to end once the final slice has been cut. One of the many joys of this particular recipe is its incredible versatility and the endless possibilities for personalization. While it is undeniably spectacular served plain, allowing its inherent flavors to shine, I absolutely encourage you to experiment with various serving suggestions and exciting variations. For a simple yet elegant touch, consider a generous dollop of freshly whipped cream, perhaps lightly sweetened with vanilla bean paste, or a delicate dusting of cocoa powder. If you’re feeling a little more adventurous, a drizzle of warm chocolate fudge sauce or a luscious salted caramel glaze can elevate each slice to new heights of decadence, adding another layer of complex flavor that complements the richness beautifully. Don’t shy away from adding some extra mini chocolate chips or even chopped nuts (pecans or walnuts work wonderfully) right before serving for an added textural crunch that will surprise and delight your guests.
Beyond toppings, think about how you might customize the cheesecake itself. Imagine a swirl of raspberry purée baked into the cheesecake batter for a vibrant, fruity counterpoint, or perhaps a hint of espresso powder added to the cookie dough for a mocha-inspired twist. For those special holiday occasions, a sprinkle of crushed peppermint candy canes on top, or a touch of peppermint extract in the cookie dough, could transform this into a festive marvel. And for the crust? While a classic graham cracker crust is always a winner, consider using crushed Oreo cookies for a darker, more intense chocolate flavor, or even shortbread crumbs for a buttery, less sweet foundation. You could also transform this into adorable individual mini cheesecakes, perfect for parties or portion control, simply by using a muffin tin with liners. The presentation possibilities are as boundless as your imagination, making each iteration of this dessert uniquely yours.
I genuinely believe that baking should be a joyful and rewarding experience, and this recipe delivers on all fronts. There’s an immense sense of satisfaction that comes from creating something so utterly delicious from scratch, especially when it’s met with such enthusiastic reviews. So, please, don’t let any perceived complexity deter you. Take the leap, gather your ingredients, and immerse yourself in the delightful process of bringing this incredible dessert to life. I promise you, the effort is truly worth every single bite. I am incredibly eager to hear about your culinary adventures with this recipe. Did you try a unique topping? Did you experiment with a different type of cookie dough? What was the reaction of your family and friends when they tasted your masterpiece? I absolutely love hearing from you all and seeing your creations!
Please, share your experiences, your photos, and your invaluable feedback in the comments below. Your stories inspire me and help build our wonderful community of home bakers. Let’s celebrate the joy of baking together. Thank you for joining me on this delicious journey. Happy baking, my friends!
Cookie Dough Cheesecake
A decadent baked cookie dough cheesecake featuring a crisp graham cracker crust, a rich, creamy cheesecake filling studded with edible cookie dough pieces, and topped with a silky chocolate ganache and more cookie dough. This recipe marries classic baked cheesecake with the nostalgic joy of raw cookie dough.
Ingredients
-
1 ½ cups (180g) graham cracker crumbs
-
¼ cup (50g) granulated sugar
-
½ cup (113g) unsalted butter, melted
-
½ cup (113g) unsalted butter, softened
-
½ cup (100g) granulated sugar
-
¼ cup (50g) packed light brown sugar
-
1 teaspoon pure vanilla extract
-
1 ¾ cups (210g) all-purpose flour, heat-treated
-
¼ teaspoon salt
-
2-3 tablespoons milk
-
¾ cup (130g) mini semi-sweet chocolate chips
-
3 (8-ounce) packages (680g) full-fat cream cheese, softened
-
1 ½ cups (300g) granulated sugar
-
½ cup (120g) sour cream, room temperature
-
1 ½ teaspoons pure vanilla extract
-
4 large eggs, room temperature
-
½ cup (120ml) heavy cream
-
1 cup (170g) semi-sweet chocolate chips
-
Extra mini chocolate chips (optional)
-
Reserved cookie dough pieces (optional)
Instructions
-
Step 1
Prepare Edible Cookie Dough: In a large bowl, cream ½ cup softened unsalted butter, ½ cup granulated sugar, and ¼ cup packed light brown sugar until light and fluffy (2-3 minutes). Beat in 1 tsp vanilla extract. -
Step 2
In a separate bowl, whisk 1 ¾ cups heat-treated all-purpose flour and ¼ tsp salt. Gradually add to wet ingredients, mixing on low speed until just combined. Add 2-3 tbsp milk until the dough is soft and pliable. -
Step 3
Stir in ¾ cup mini semi-sweet chocolate chips. Reserve about ½ cup of the cookie dough for topping. Divide the remaining dough into small, ½-¾ inch pieces or balls. Refrigerate for 30-60 minutes. -
Step 4
Make Crust: Preheat oven to 350°F (175°C). In a medium bowl, combine 1 ½ cups graham cracker crumbs, ¼ cup granulated sugar, and ½ cup melted unsalted butter. Press mixture evenly into the bottom of a 9-inch springform pan. -
Step 5
Bake the crust for 8-10 minutes. Let cool completely on a wire rack. Prepare a water bath by wrapping the bottom and sides of the springform pan tightly with several layers of heavy-duty aluminum foil. -
Step 6
Whip Cheesecake Filling: In a very large bowl, beat 3 (8-ounce) packages softened full-fat cream cheese on medium speed for 2-3 minutes until completely smooth and lump-free. -
Step 7
Gradually add 1 ½ cups granulated sugar, beating on medium-low speed until fully incorporated and the mixture is light and fluffy (2-3 minutes). Beat in ½ cup room temperature sour cream and 1 ½ tsp vanilla extract until just combined. -
Step 8
Add 4 large room temperature eggs one at a time, mixing on very low speed just until each egg is incorporated. Do NOT overmix. Gently fold in about two-thirds of the chilled cookie dough pieces into the batter. -
Step 9
Pour the cheesecake batter evenly over the cooled graham cracker crust in the prepared springform pan. Place the foil-wrapped springform pan into a larger roasting pan. Carefully pour hot water into the roasting pan until it comes halfway up the sides of the springform pan. -
Step 10
Bake & Cool: Bake in the preheated oven for 60-75 minutes. The cheesecake is done when the edges are set, but the center (2-3 inches) still has a slight jiggle. -
Step 11
Turn off the oven, prop the door slightly ajar, and let the cheesecake cool inside the oven for 1 hour. Remove from oven and water bath. Remove foil and cool completely on a wire rack at room temperature for another 1-2 hours. -
Step 12
Cover the springform pan with plastic wrap and transfer the cheesecake to the refrigerator. Chill for at least 6-8 hours, preferably overnight, for proper setting. -
Step 13
Assemble with Ganache: Once cheesecake is fully chilled, heat ½ cup heavy cream until it just simmers. Place 1 cup semi-sweet chocolate chips in a heatproof bowl. Pour hot cream over chocolate and let sit undisturbed for 5 minutes. -
Step 14
Gently whisk the mixture until the ganache is completely smooth and shiny. Let cool for 10-15 minutes, stirring occasionally, until slightly thickened but still pourable. -
Step 15
Carefully remove the sides of the springform pan from the cheesecake. Pour the slightly cooled ganache over the top, spreading to the edges. Immediately crumble the reserved ½ cup eggless cookie dough generously over the ganache. Optional: add extra mini chocolate chips. -
Step 16
Return the cheesecake to the refrigerator for at least another 30 minutes to allow the ganache to set. Slice with a sharp, warm knife for clean cuts. Store any leftover cheesecake covered in the refrigerator for up to 5-7 days.
Important Information
Nutrition Facts (Per Serving)
It is important to consider this information as approximate and not to use it as definitive health advice.
Allergy Information
Please check ingredients for potential allergens and consult a health professional if in doubt.
Leave a Comment