
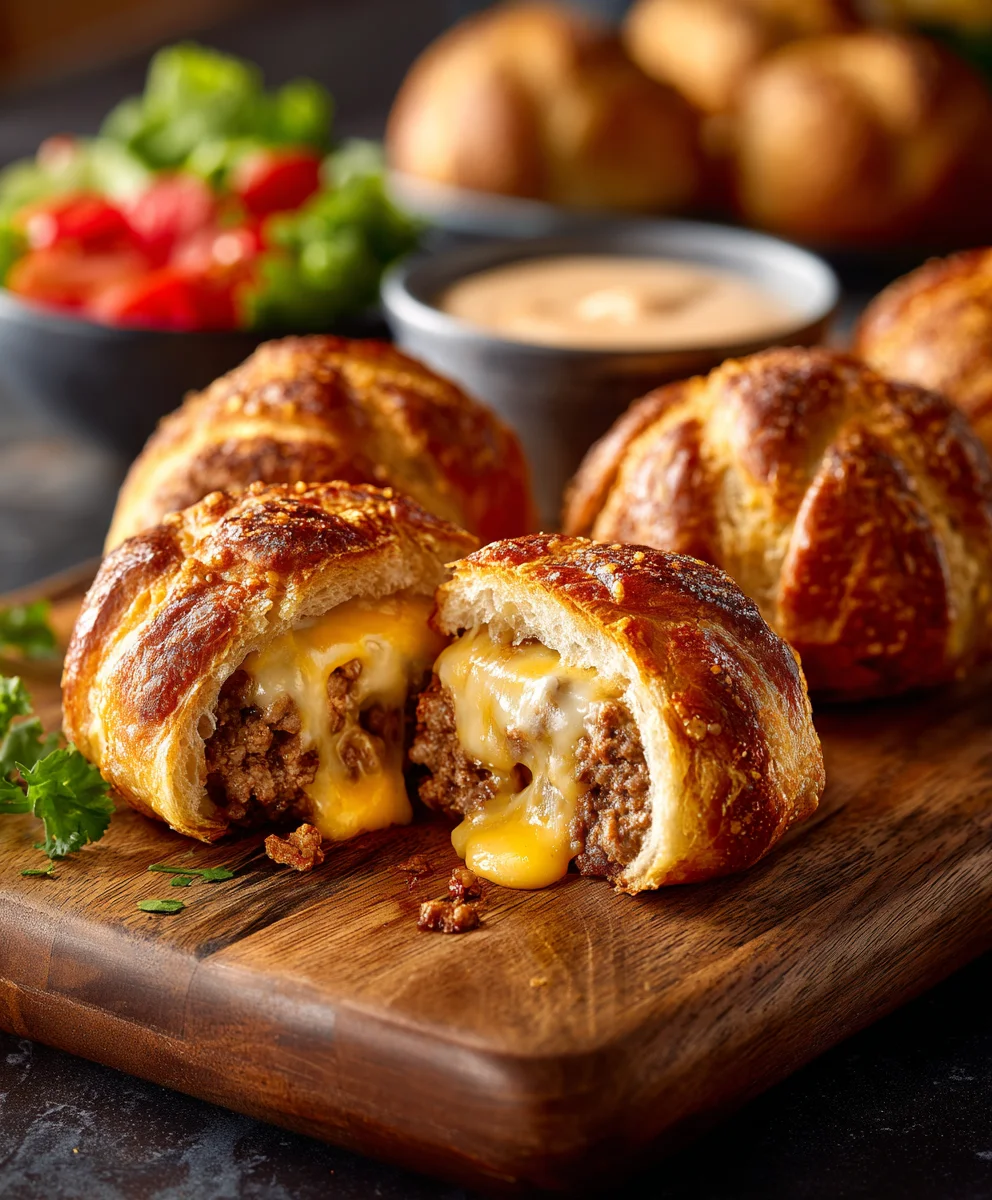
Cheeseburger Pretzel Bombs are about to become your new favorite obsession, a culinary stroke of genius that masterfully combines two beloved comfort foods into one irresistible, bite-sized delight! Imagine the satisfying crunch of a warm, golden-brown pretzel exterior giving way to a savory explosion of perfectly seasoned ground beef and melted, gooey cheese. It’s the ultimate handheld treat, designed for maximum flavor and minimal fuss, perfect for any gathering or a fun family meal.
Unpacking the irresistible appeal of these clever creations, it’s clear why they’re so beloved.
The classic cheeseburger, a quintessential American staple, has evolved significantly since its humble beginnings, and this recipe marks an exciting new chapter in its story. While the traditional pretzel boasts a rich German heritage and a long history as a beloved snack, its innovative marriage with the iconic American cheeseburger in these ingenious bombs creates a truly unforgettable fusion of flavors and textures. I find that people absolutely adore these for their undeniable taste, the fantastic textural contrast between the soft interior and chewy exterior, and their incredible convenience. They’re ideal for game day gatherings, a relaxed family dinner, or simply as an impressive appetizer that disappears in mere minutes. Get ready to elevate your snack game and delight everyone with these exceptional Cheeseburger Pretzel Bombs!

Ingredients:
-
For the Pretzel Dough:
-
1 packet (2 ¼ teaspoons) active dry yeast: This is the leavening agent that will give our pretzel dough its wonderful, airy-but-chewy texture. Freshness is key here, so make sure your yeast hasn’t expired!
-
1 ½ cups warm water (105-115°F / 40-46°C): The perfect temperature to awaken and activate our yeast. Too hot, and you’ll kill it; too cold, and it won’t activate properly. Think of it like a warm bath for your yeast.
-
1 tablespoon granulated sugar: A little food for our yeast to get it bubbling and happy. It also contributes to the browning of the crust.
-
2 teaspoons salt (fine sea salt or table salt): Essential for flavor in the dough itself. Don’t skip this, as it balances the sweetness and enhances the overall taste of our “Cheeseburger Pretzel Bombs.”
-
4 ½ to 5 cups all-purpose flour: The backbone of our dough. We’ll add it gradually to achieve the perfect consistency – a soft, pliant, and slightly tacky dough.
-
¼ cup unsalted butter, melted: Adds richness and tenderness to the dough, making it even more delightful to bite into.
-
-
For the Cheeseburger Filling:
-
1 pound lean ground beef (80/20 preferred): The heart of our cheeseburger experience. 80/20 offers a great balance of flavor and moisture without being overly greasy. This will be the savory core of our “Cheeseburger Pretzel Bombs.”
-
½ cup finely diced yellow onion: Provides a subtle sweetness and aromatic depth to the beef filling, truly mimicking that classic burger taste.
-
1 clove garlic, minced: A pungent kick that elevates the savoriness of the beef. If you’re a garlic lover, feel free to add a little more!
-
¼ cup ketchup: Adds that familiar tangy and sweet tomato base that is quintessential to any good burger.
-
2 tablespoons yellow mustard: Introduces a sharp, tangy note that perfectly complements the beef and cheese.
-
1 teaspoon Worcestershire sauce: A secret weapon for umami flavor, adding complexity and depth to the ground beef. It really makes the filling sing.
-
½ teaspoon black pepper: For a touch of warmth and spice. Adjust to your preference.
-
½ teaspoon salt (or to taste): To season our beef filling appropriately. Remember, the cheese will also add some saltiness.
-
8 slices American cheese or 4 ounces sharp cheddar, cut into small cubes (about 16-20 pieces): The “cheese” in our cheeseburger! American cheese melts beautifully and brings that classic diner burger flavor, while sharp cheddar offers a more robust, tangy profile. We’ll cube it so it melts evenly inside our bombs.
-
-
For the Pretzel Bath and Topping:
-
10 cups water: The base for our alkaline bath, crucial for achieving that signature deep brown crust and chewy texture.
-
⅔ cup baking soda: This is what gives pretzels their distinct flavor and helps the crust brown beautifully. Do not substitute with baking powder; it won’t yield the same results.
-
1 large egg, beaten (for egg wash): Provides a glossy finish and helps the salt adhere to the pretzel bombs. It’s the final touch for that perfect golden hue.
-
2 tablespoons coarse sea salt or pretzel salt: For that iconic salty pretzel crunch. This is non-negotiable for authentic “Cheeseburger Pretzel Bombs.”
-
Preparing the Pretzel Dough
-
First things first, let’s get our yeast ready to work its magic. In a large mixing bowl (or the bowl of a stand mixer fitted with the dough hook attachment), combine the 1 ½ cups warm water and 1 tablespoon granulated sugar. Sprinkle the 1 packet of active dry yeast over the top. Give it a gentle stir and then let it sit for about 5 to 10 minutes. You’re looking for a foamy, frothy layer to form on the surface – that tells you your yeast is alive and well! If it doesn’t foam, your water might have been too hot or too cold, or your yeast might be old. In that case, start over with fresh yeast and accurately tempered water.
-
Once your yeast is bubbling happily, add the 2 teaspoons salt and the ¼ cup melted unsalted butter to the bowl. Stir them in briefly to combine. The butter should be cooled slightly, not piping hot, so it doesn’t shock the yeast.
-
Now, it’s time to add the flour. Gradually add the 4 ½ to 5 cups all-purpose flour, one cup at a time, mixing thoroughly after each addition. If you’re using a stand mixer, start on low speed until the flour is incorporated, then increase to medium-low. If you’re mixing by hand, use a sturdy spoon or spatula until the dough becomes too stiff to stir.
-
Once most of the flour is incorporated and a shaggy dough forms, turn the dough out onto a lightly floured surface. Now comes the kneading! Knead the dough for about 8 to 10 minutes. If using a stand mixer, continue kneading with the dough hook on medium-low speed for the same duration. The goal is to develop the gluten, which will give our “Cheeseburger Pretzel Bombs” their wonderful chewy texture. You’ll know the dough is ready when it becomes smooth, elastic, and bounces back slowly when you gently poke it with your finger. It might be slightly tacky but shouldn’t stick excessively to your hands or the counter.
-
Lightly grease a clean large bowl with a little oil or cooking spray. Place the kneaded dough into the bowl, turning it once to coat the entire surface. This prevents it from drying out. Cover the bowl tightly with plastic wrap or a clean kitchen towel. Find a warm, draft-free spot in your kitchen and let the dough rise for about 1 to 1 ½ hours, or until it has roughly doubled in size. This first rise is crucial for flavor development and a light texture in our finished “Cheeseburger Pretzel Bombs.”
Preparing the Cheeseburger Filling
-
While our pretzel dough is leisurely rising, let’s get cracking on the incredibly flavorful cheeseburger filling. Grab a large skillet and place it over medium-high heat. Add the 1 pound lean ground beef. Break it up with a spoon or spatula as it cooks. You want to brown the beef thoroughly, ensuring there’s no pink left. This typically takes about 5 to 7 minutes. As you cook, keep breaking the beef into small, uniform crumbles, which will make filling our “Cheeseburger Pretzel Bombs” much easier later.
-
Once the beef is fully browned, carefully drain off any excess grease. This is important to prevent our pretzel bombs from becoming soggy. You can use a slotted spoon to transfer the beef to a paper towel-lined plate, or simply tilt the pan and spoon out the grease.
-
Return the drained beef to the skillet (or use a fresh pan if you prefer). Reduce the heat to medium. Add the ½ cup finely diced yellow onion to the beef. Sauté the onion with the beef for about 3-4 minutes, or until the onion softens and becomes translucent. This step mellows the onion’s raw bite and integrates its sweetness into the beef.
-
Next, stir in the 1 clove minced garlic. Cook for just 1 minute more, stirring constantly, until the garlic becomes fragrant. Be careful not to burn the garlic, as burnt garlic can taste bitter. The kitchen should start to smell wonderfully savory at this point, giving a hint of the delicious “Cheeseburger Pretzel Bombs” to come.
-
Now, let’s add the signature burger seasonings and sauces. Stir in the ¼ cup ketchup, 2 tablespoons yellow mustard, 1 teaspoon Worcestershire sauce, ½ teaspoon black pepper, and ½ teaspoon salt. Mix everything together thoroughly until the beef crumbles are evenly coated in the rich, savory sauce. Let it simmer gently for another 2 to 3 minutes, allowing the flavors to meld and deepen. Taste and adjust seasoning if needed – maybe a little more salt or pepper to your liking.
-
Once your cheeseburger filling is perfectly seasoned and saucy, remove the skillet from the heat. This next step is crucial for successful assembly: transfer the filling to a shallow bowl or plate and spread it out. Allow the filling to cool completely to room temperature. This is incredibly important! If the filling is still warm when you try to stuff it into the dough, it can make the dough difficult to handle, potentially cause tears, and even start cooking the dough prematurely, resulting in gummy “Cheeseburger Pretzel Bombs.” You can even pop it in the fridge for about 15-20 minutes to speed up the cooling process.
Assembling the Cheeseburger Pretzel Bombs
-
Once your dough has doubled in size and your filling is completely cool, it’s time for the fun part: assembling our delightful “Cheeseburger Pretzel Bombs!” Gently punch down the risen dough to release the air. Turn the dough out onto a lightly floured surface. Knead it briefly for about 30 seconds to work out any remaining air bubbles.
-
Using a bench scraper or a sharp knife, divide the dough into two equal portions. Work with one portion at a time, keeping the other covered to prevent it from drying out. Roll out one portion of dough into a large rectangle, roughly 12×16 inches, aiming for about ¼-inch thickness. Try to keep the edges as straight as possible, as this will help when you cut the squares.
-
Now, cut the dough rectangle into 8 to 10 equal squares. The size of your squares will determine the final size of your “Cheeseburger Pretzel Bombs.” A good starting point is around 4×4 inches for each square. Repeat this process with the second portion of dough, yielding a total of 16 to 20 squares.
-
For each dough square, place about 1 ½ to 2 tablespoons of the cooled cheeseburger filling in the center. Don’t overfill, or they will be difficult to seal. On top of the beef filling, place one or two of your cubed cheese pieces. The cheese acts as a delicious, melty surprise inside each bomb.
-
To seal each bomb, carefully bring all four corners of the dough square up over the filling, meeting them in the center. Pinch the seams tightly together, working your way around the edges to fully enclose the filling. Ensure there are no gaps where the filling could escape during baking. Once sealed, gently roll the filled dough into a smooth, round ball in the palm of your hand. Think of it like making a small, neat dumpling. This tight seal is paramount to ensure your “Cheeseburger Pretzel Bombs” don’t burst open during the baking process.
-
Place the assembled “Cheeseburger Pretzel Bombs” on a parchment-lined baking sheet, leaving about an inch of space between each one. Cover them lightly with a clean kitchen towel and let them rest for 15-20 minutes while you prepare the pretzel bath. This brief rest helps the dough relax and slightly re-puff, contributing to a better texture.
The Pretzel Bath and Baking
-
Preheat your oven to 425°F (220°C). Line two large baking sheets with parchment paper or silicone baking mats. This step is important for easy cleanup and preventing sticking.
-
Now for the magical pretzel bath! In a large, wide pot or Dutch oven, combine the 10 cups water and ⅔ cup baking soda. Bring this mixture to a rolling boil over high heat. The baking soda creates an alkaline solution that is responsible for giving pretzels their characteristic chewy crust, deep brown color, and distinct flavor. Be careful as the baking soda reacts with the water and can cause it to foam up significantly; use a large pot to prevent boil-overs.
-
Once the baking soda bath is boiling, reduce the heat slightly to maintain a gentle simmer. Using a slotted spoon or spider skimmer, carefully drop 2-3 “Cheeseburger Pretzel Bombs” into the boiling solution at a time. Do not overcrowd the pot. Let them simmer for 30 seconds on one side, then flip them gently and simmer for another 30 seconds on the other side. You’ll notice they start to puff up slightly and take on a pale, almost translucent appearance.
-
Carefully remove the “Cheeseburger Pretzel Bombs” from the bath using your slotted spoon, allowing any excess liquid to drip off. Place them back onto your prepared baking sheets, making sure to leave some space between each one. Repeat this process with the remaining bombs, working in batches until all of them have had their bath.
-
In a small bowl, whisk the 1 large egg to create an egg wash. Brush the tops and sides of each pretzel bomb generously with the egg wash. This will help them achieve a beautiful golden-brown color and a lovely sheen during baking. Immediately after brushing, sprinkle each bomb with a generous amount of coarse sea salt or pretzel salt. The egg wash acts as glue, ensuring the salt adheres perfectly.
-
Transfer the baking sheets to your preheated oven. Bake for 18 to 22 minutes, or until the “Cheeseburger Pretzel Bombs” are deeply golden brown and look absolutely irresistible. The exact baking time may vary depending on your oven, so keep a close eye on them. You want that classic pretzel crust and a fully heated, melty interior. The aroma filling your kitchen right now will be incredible!
-
Once baked to perfection, remove the “Cheeseburger Pretzel Bombs” from the oven. Let them cool on the baking sheets for about 5 minutes before transferring them to a wire rack to cool slightly further. While they are delicious warm, giving them a few minutes to cool down allows the cheese inside to set slightly and prevents you from burning your mouth on molten cheese. These are truly best enjoyed fresh from the oven, when the pretzel crust is crisp and the cheeseburger filling is piping hot and gooey.
Serving Suggestions and Variations
These Cheeseburger Pretzel Bombs are a meal in themselves, or a fantastic appetizer for game day, parties, or just a fun family dinner. The combination of the savory beef and cheese filling encased in that perfectly chewy, salty pretzel dough is truly a match made in culinary heaven. You’ll find yourself reaching for just one more, and then another!
-
Dipping Sauces:
While phenomenal on their own, these bombs are also fantastic with a variety of dipping sauces. Consider serving them with classic ketchup and mustard for that authentic burger experience. A tangy “secret sauce” (mayonnaise, ketchup, relish, and a touch of hot sauce) would also be an incredible pairing. Even a simple ranch dressing or a spicy sriracha mayo could elevate the experience. Don’t be afraid to experiment with your favorites!
-
Make-Ahead Tips:
You can prepare the cheeseburger filling a day in advance and store it in an airtight container in the refrigerator. This will save you significant time on the day of assembly. You can also assemble the “Cheeseburger Pretzel Bombs” up to the point of the pretzel bath, then freeze them on a baking sheet until solid. Once frozen, transfer them to a freezer-safe bag. When ready to bake, thaw them slightly, give them the baking soda bath, and then bake as directed, perhaps adding a few extra minutes to the baking time.
-
Flavor Variations:
Want to mix things up? Consider adding a pinch of smoked paprika to the beef filling for a smoky note. A tablespoon of finely chopped pickled jalapeños can give a nice kick for those who enjoy a bit of spice. For a different cheese experience, try pepper jack for an extra zing, or provolone for a milder, creamier melt. You could even incorporate a tiny bit of crispy bacon bits into the filling for a bacon cheeseburger pretzel bomb!
-
Serving Presentation:
Arrange the freshly baked Cheeseburger Pretzel Bombs on a rustic wooden board or in a charming basket lined with parchment paper. This adds to the appeal and makes them look even more inviting. A small bowl of your chosen dipping sauce nestled among them will complete the presentation. These are definitely conversation starters and crowd-pleasers! Get ready for compliments, because everyone loves a good cheeseburger, especially when it’s wrapped in a delicious pretzel!
Conclusion:
Well, my friends, we’ve reached the end of our culinary journey, and I genuinely hope you’re as excited as I am about what we’ve just created. I truly believe these Cheeseburger Pretzel Bombs are destined to become a staple in your kitchen, a go-to recipe for everything from casual family dinners to your most anticipated game day gatherings. Why is this recipe a must-try, you ask? It’s simple: it marries two beloved comfort foods into one utterly irresistible package. Imagine the best parts of a juicy cheeseburger – the seasoned ground beef, the melted cheese, the tangy pickles – all encased in a warm, chewy, perfectly salted pretzel dough. It’s not just a snack; it’s an experience, a delightful explosion of flavors and textures in every single bite. The savory, beefy goodness harmonizes beautifully with the slight chewiness and characteristic salty crust of the pretzel, creating a handheld sensation that’s both familiar and excitingly new. Forget choosing between a burger and a pretzel; with this recipe, you get to have both, in a format that’s incredibly fun to eat and surprisingly easy to prepare, making it a culinary stroke of genius in my humble opinion.
Elevate Your Cheeseburger Pretzel Bomb Experience: Serving Suggestions and Creative Variations
Part of the joy of cooking is making a dish your own, and these delightful bombs offer a fantastic canvas for creativity. While they are absolutely phenomenal on their own, a few thoughtful additions can take them to the next level. For dipping, you simply cannot go wrong with the classics. A rich, tangy ketchup provides that essential burger condiment experience, while a spicy brown mustard or a creamy honey mustard can add a delightful kick. Don’t stop there, though! Consider whipping up a batch of homemade “special sauce” – a blend of mayo, ketchup, relish, and a dash of hot sauce – to truly emulate that fast-food burger vibe. For an extra layer of decadence, a warm, gooey cheese sauce, perhaps a sharp cheddar or a smooth Monterey Jack, makes for an incredibly luxurious dip that cheese lovers will adore. A fiery sriracha mayo can also add a vibrant, zesty punch, cutting through the richness of the beef and cheese beautifully. Think about texture too; a crisp, cool coleslaw or a simple side salad can offer a refreshing contrast, turning these bombs from an appetizer into a more substantial meal.
Unleash Your Inner Chef: Customizing Your Bombs
But the fun doesn’t stop at dips! The beauty of this recipe lies in its adaptability. Don’t be afraid to experiment with the fillings to suit your personal preferences or what you have on hand. For a leaner option, ground turkey or even plant-based crumbles can be used instead of beef, without sacrificing flavor, especially if seasoned well. The type of cheese is another easy swap; try pepper jack for a spicy kick, provolone for a milder, creamier melt, or a smoky gouda for a deeper flavor profile. Want to add more to the interior? Crispy bacon bits folded into the meat mixture provide an undeniable smoky crunch. Finely diced jalapeños can infuse a touch of heat, while caramelized onions offer a sweet, savory depth. Even finely chopped pickles can be mixed in with the meat for an extra layer of that classic burger tang right inside the bomb. For the pretzel exterior, while coarse salt is traditional and delicious, consider an “everything bagel” seasoning blend for an additional savory, garlicky crunch, or even a sprinkle of sesame seeds for a subtle nutty note. The possibilities are truly endless, allowing you to tailor each batch to your mood or occasion. This adaptability ensures that your experience with Cheeseburger Pretzel Bombs is always fresh and exciting.
So, what are you waiting for? I’ve shared my passion for this recipe with you, and now it’s your turn to bring it to life in your own kitchen. Gather your ingredients, roll up your sleeves, and prepare to impress yourself and everyone lucky enough to try these incredible creations. I am absolutely confident that once you take that first bite, you’ll understand exactly why I’m so enthusiastic about them. And please, when you do make them, I’d absolutely love to hear all about your experience! Did you stick to the original recipe, or did you venture into some delicious variations of your own? What were your favorite dips? Share your photos, your triumphs, and even any clever tips you discovered along the way in the comments below. Your feedback and creativity inspire me and the entire community. Happy cooking, and get ready to enjoy some truly spectacular bites!

Cheeseburger Pretzel Bombs: The Ultimate Party Snack!
Cheeseburger Pretzel Bombs are about to become your new favorite obsession, a culinary stroke of genius that masterfully combines two beloved comfort foods into one irresistible, bite-sized delight! Imagine the satisfying crunch of a warm, golden-brown pretzel exterior giving way to a savory explosion of perfectly seasoned ground beef and melted, gooey cheese. It’s the ultimate handheld treat, designed for maximum flavor and minimal fuss, perfect for any gathering or a fun family meal.
Ingredients
-
1 packet (2 ¼ tsp) active dry yeast
-
1 ½ cups warm water
-
1 tbsp granulated sugar
-
2 tsp salt
-
4 ½ to 5 cups all-purpose flour
-
¼ cup unsalted butter, melted
-
1 lb lean ground beef
-
½ cup finely diced yellow onion
-
1 clove garlic, minced
-
¼ cup ketchup
-
2 tbsp yellow mustard
-
1 tsp Worcestershire sauce
-
½ tsp black pepper
-
½ tsp salt
-
8 slices American cheese or 4 oz sharp cheddar, cubed
-
10 cups water
-
⅔ cup baking soda
-
1 large egg, beaten
-
2 tbsp coarse sea salt or pretzel salt
Instructions
-
Step 1
In a large bowl, combine 1 ½ cups warm water, 1 tbsp granulated sugar, and 1 packet active dry yeast. Stir and let sit 5-10 minutes until foamy. -
Step 2
Add 2 tsp salt and ¼ cup melted unsalted butter to the yeast mixture; stir. Gradually add 4 ½ to 5 cups all-purpose flour, mixing until a shaggy dough forms. -
Step 3
Turn dough onto a lightly floured surface and knead 8-10 minutes until smooth and elastic. Lightly grease a large bowl, place dough, cover, and let rise in a warm spot for 1-1 ½ hours until doubled in size. -
Step 4
Brown 1 lb lean ground beef in a large skillet over medium-high heat, breaking it into small crumbles. Drain excess grease. -
Step 5
Return drained beef to skillet. Add ½ cup finely diced yellow onion and sauté 3-4 minutes until softened. Stir in 1 clove minced garlic and cook for 1 minute until fragrant. -
Step 6
Stir in ¼ cup ketchup, 2 tbsp yellow mustard, 1 tsp Worcestershire sauce, ½ tsp black pepper, and ½ tsp salt. Mix well and simmer 2-3 minutes. Remove skillet from heat. Transfer filling to a shallow bowl and cool completely to room temperature. -
Step 7
Gently punch down risen dough and knead briefly for 30 seconds on a lightly floured surface. Divide dough in half. Roll one portion into a 12×16 inch, ¼-inch thick rectangle. Cut into 8-10 equal 4×4 inch squares. Repeat with remaining dough for 16-20 total squares. -
Step 8
Place 1 ½ to 2 tbsp cooled cheeseburger filling and 1-2 cubed cheese pieces in the center of each dough square. Bring all four corners of the dough square up over the filling, pinch seams tightly to enclose, and gently roll into a smooth, round ball. -
Step 9
Place assembled bombs on a parchment-lined baking sheet, leaving space. Cover lightly and let rest 15-20 minutes. -
Step 10
Preheat oven to 425°F (220°C). Line two large baking sheets with parchment paper. In a large pot, combine 10 cups water and ⅔ cup baking soda. Bring to a rolling boil, then reduce to a gentle simmer. -
Step 11
Carefully drop 2-3 bombs into the simmering solution. Simmer for 30 seconds per side. Remove with a slotted spoon, allowing excess liquid to drip, and place on prepared baking sheets. Repeat for all bombs. -
Step 12
Whisk 1 large egg for an egg wash. Brush tops and sides of each bomb generously with egg wash, then immediately sprinkle with 2 tbsp coarse sea salt. -
Step 13
Bake for 18-22 minutes, or until bombs are deeply golden brown. Remove from oven. Cool on baking sheets for 5 minutes, then transfer to a wire rack to cool slightly further. Serve warm.
Important Information
Nutrition Facts (Per Serving)
It is important to consider this information as approximate and not to use it as definitive health advice.
Allergy Information
Please check ingredients for potential allergens and consult a health professional if in doubt.


Leave a Comment