
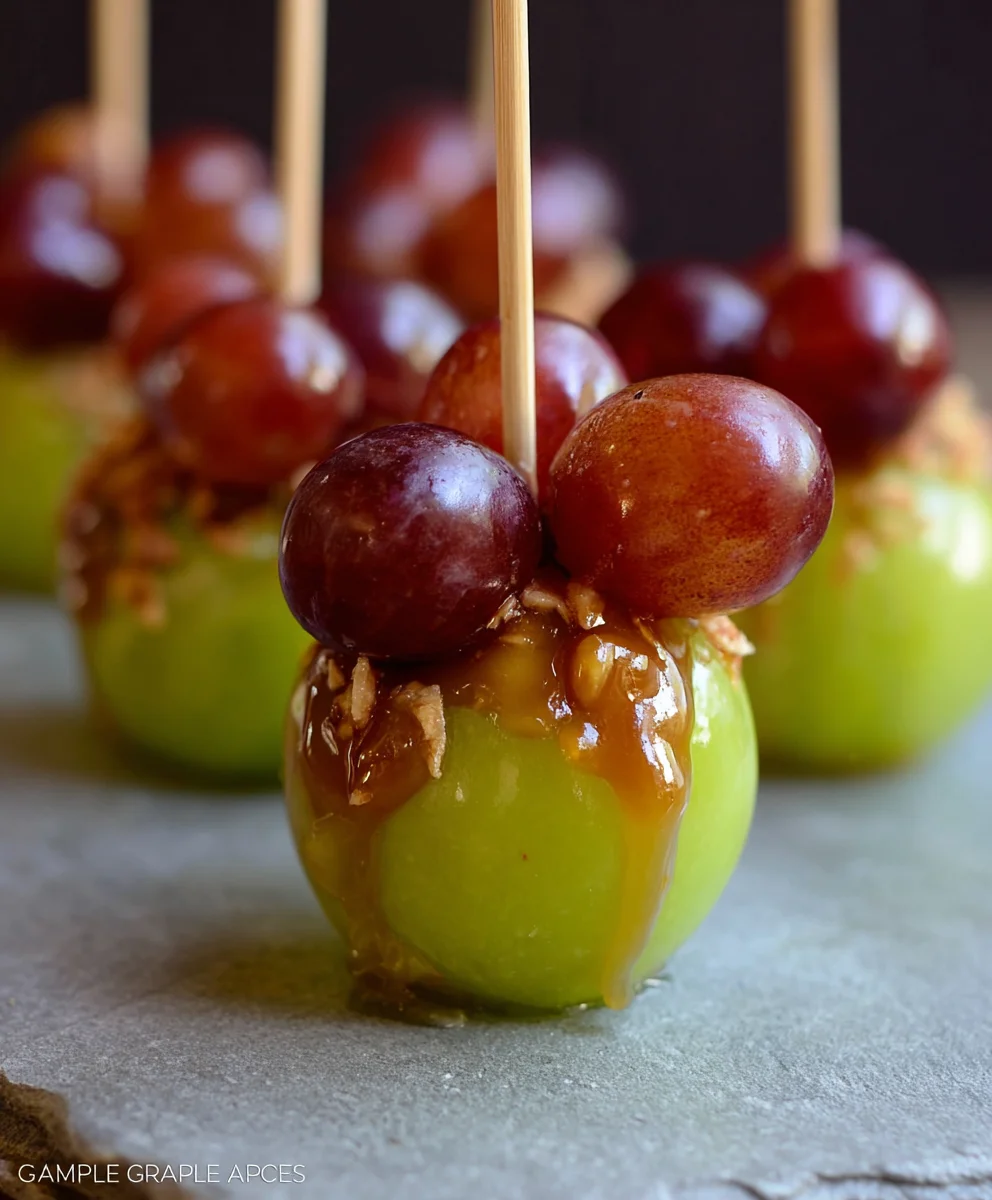
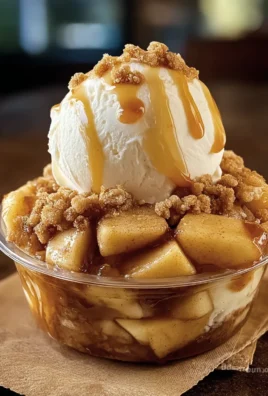
Caramel Apple Grapes are poised to revolutionize your autumn snacking experience, offering a truly delightful and innovative twist on a beloved seasonal classic. Imagine all the nostalgic flavors of a crisp, tart apple dipped in rich, buttery caramel, but in a remarkably convenient, bite-sized package. For generations, the caramel apple has been a quintessential symbol of fall festivals, Halloween parties, and cozy harvest gatherings, evoking cherished memories with every sticky bite. However, let’s be honest, the traditional version can be quite a commitment – often messy and a little challenging to eat gracefully, especially for younger enthusiasts or while mingling at a party.
That’s precisely where this ingenious creation shines! People adore this dish for its brilliant fusion of textures and tastes: the satisfying snap of a juicy grape, encased in a luscious, smooth caramel coating that melts in your mouth. The natural tartness of the grape beautifully cuts through the sweetness of the caramel, creating a perfectly balanced flavor profile that keeps you reaching for more without the fuss. These Caramel Apple Grapes offer unparalleled ease of enjoyment, making them the ideal stress-free dessert or party favor. Prepare to impress everyone with this unexpectedly simple yet utterly irresistible treat!

Ingredients:
- Two pounds (approximately 900g) of fresh, seedless green or red grapes. I personally prefer green grapes for a more authentic “apple” look, but red grapes offer a lovely visual contrast. Make sure they are firm and unblemished.
- One (1) 11-ounce bag (approximately 310g) of individually wrapped soft caramel candies (like Kraft Caramels). Alternatively, you can use a 14-ounce tub of pre-made caramel apple dip, though I find the bag of candies often yields a slightly firmer and more authentic coating for our Caramel Apple Grapes.
- Two (2) tablespoons of whole milk or heavy cream. This helps achieve the perfect dipping consistency for your caramel.
- One (1) to two (2) teaspoons of green apple candy flavoring or extract. This is where the magic happens, giving our Caramel Apple Grapes that unmistakable Granny Smith tang! Start with one teaspoon and add more to taste.
- Optional Toppings:
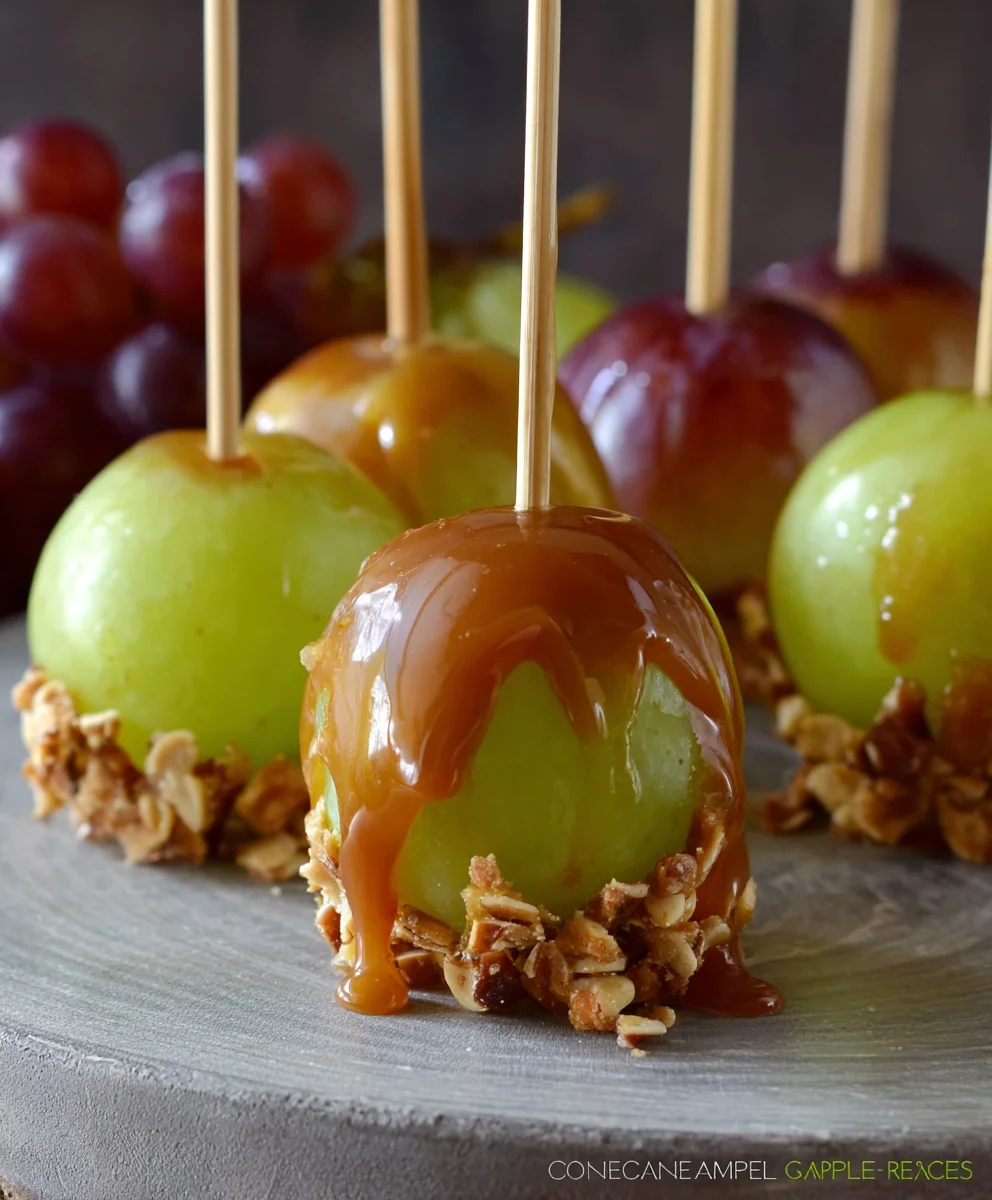
- Half a cup (approximately 60g) of finely crushed roasted peanuts, pecans, or walnuts.
- Half a cup (approximately 100g) of mini chocolate chips or finely chopped chocolate.
- Quarter cup (approximately 40g) of festive sprinkles.
- Quarter cup (approximately 30g) of shredded coconut.
- Approximately 50-60 small lollipop sticks or sturdy toothpicks. These are essential for easy dipping and serving your beautiful Caramel Apple Grapes.
- Parchment paper or wax paper. You’ll need this to line your baking sheets for cooling.
- Baking sheets. Two large ones should suffice.
Preparing Your Grapes for the Best Caramel Apple Grapes
The first step in creating these delightful Caramel Apple Grapes is to ensure your foundation is perfect. Trust me, the preparation of the grapes is critical for a successful outcome. You want that caramel to cling beautifully, not slide off!
- Wash and Dry Thoroughly: Begin by carefully washing your grapes under cool running water. I like to remove them from their stems first, giving each grape a good rinse. This ensures any dirt or residue is gone. Once washed, the most important step for making amazing Caramel Apple Grapes is to dry them. And I mean DRY them. Lay your grapes out on clean kitchen towels or paper towels and gently pat them until every single grape is completely dry. Any lingering moisture will prevent the caramel from adhering properly, leading to a runny mess. You might even want to let them air dry for an additional 15-20 minutes after patting, just to be absolutely sure. This attention to detail will pay off when you see that perfectly coated Caramel Apple Grape.
- Chill for Optimal Adhesion: Once thoroughly dry, place your grapes in a single layer on a plate or baking sheet and pop them into the refrigerator for at least 30 minutes, or even better, an hour. Chilling the grapes helps the warm caramel set more quickly upon contact, creating a nice, firm coating. This simple trick is a game-changer for achieving that satisfying crunch when you bite into your Caramel Apple Grapes.
- Prepare for Dipping: While your grapes are chilling, take this time to insert the lollipop sticks or toothpicks. For each grape, carefully insert a stick into the stem end (or where the stem was attached). Push it in far enough so it feels secure, but not so far that it pierces through to the other side. This stick will be your handle for dipping and enjoying your Caramel Apple Grapes, making them super easy to manage.
- Line Your Workspace: Get your baking sheets ready by lining them with parchment paper or wax paper. This will be the landing pad for your dipped Caramel Apple Grapes, preventing them from sticking as they cool and set. Having this prepped before you start dipping will make the process much smoother and less messy.
- Prepare Optional Toppings: If you’re using any optional toppings, now is the time to get them ready. Place your crushed nuts, sprinkles, or chocolate chips in shallow bowls. Having these organized and easily accessible will make the dipping and decorating phase a breeze, allowing you to quickly roll your Caramel Apple Grapes in their chosen adornments before the caramel sets.
Crafting the Perfect Green Apple Caramel for Your Caramel Apple Grapes
Now for the heart of the recipe: making that luscious, green apple-flavored caramel! This is where your Caramel Apple Grapes truly come to life with their signature taste.
- Unwrap the Caramels: If you’re using individually wrapped caramels, unwrap them all and place them in a medium-sized, microwave-safe bowl. This step might take a few minutes, but it’s worth the effort. Make sure your bowl is large enough to comfortably stir the caramel and eventually dip the grapes without spilling.
- Add Milk or Cream: Pour the two tablespoons of milk or heavy cream over the unwrapped caramels. The milk is crucial here; it helps to thin out the caramel just enough to make it dippable, while also keeping it smooth and preventing it from becoming too stiff or chewy once cooled. It truly makes a difference in the texture of your finished Caramel Apple Grapes.
- Melt the Caramel (Microwave Method): Place the bowl of caramels and milk into the microwave. Heat in 30-second intervals, stirring thoroughly after each interval. It’s imperative to stir well each time to ensure even melting and prevent the caramel from scorching. Continue this process until the caramel is completely melted and smooth, with no lumps remaining. This usually takes about 2 to 3 minutes total, but microwave wattages vary, so keep a close eye on it. You’re looking for a thick, pourable consistency, similar to warm honey.
- Melt the Caramel (Stovetop Method – Alternative): If you prefer not to use a microwave, or if you want more control, you can melt the caramels using a double boiler. Place the caramels and milk in a heatproof bowl set over a saucepan of simmering water (make sure the bottom of the bowl doesn’t touch the water). Stir constantly until the caramels are completely melted and smooth. This method is slower but offers very gentle, even heating, which some chefs prefer for caramel. Whichever method you choose, achieving a silky-smooth caramel is key for perfectly coated Caramel Apple Grapes.
- Incorporate the Green Apple Flavoring: Once your caramel is beautifully melted and smooth, stir in one to two teaspoons of green apple candy flavoring or extract. Start with one teaspoon, stir it in completely, and then carefully taste a tiny bit (be cautious, it will be hot!). If you desire a stronger apple flavor, add the second teaspoon. The green apple flavoring is what transforms these from plain caramel grapes into authentic Caramel Apple Grapes, mimicking the classic fall treat. Mix it thoroughly until the flavor is evenly distributed throughout the caramel. The aroma alone will transport you!
- Maintain Caramel Warmth: It’s important to keep your caramel warm and pliable while you’re dipping. If it starts to thicken too much during the dipping process, you can pop it back into the microwave for 10-15 seconds, or place the bowl back over the simmering water if using the stovetop method, and stir until it’s back to the ideal dipping consistency. A consistently warm caramel ensures a smooth, even coating on every single one of your Caramel Apple Grapes.
Dipping and Decorating Your Delicious Caramel Apple Grapes
This is arguably the most fun part – transforming your plain grapes into delightful Caramel Apple Grapes! Get ready for some sticky, sweet, and satisfying work.
- Dip Each Grape: Take one chilled, stick-inserted grape. Dip it into the warm green apple caramel, rotating it to fully coat the grape. I like to gently swirl it to ensure an even layer. Don’t be shy; you want a good, thick coating for that authentic caramel apple experience.
- Remove Excess Caramel: Once coated, lift the grape out of the caramel. Gently twirl it over the bowl, allowing any excess caramel to drip back down. You can also lightly scrape the bottom of the grape against the edge of the bowl to remove drips, creating a neater finish for your Caramel Apple Grapes. You want a generous coating, but not so much that it pools excessively on your parchment paper.
- Add Toppings (Optional but Recommended!): If you’re using toppings, immediately after removing the excess caramel, roll the coated grape in your chosen topping. Whether it’s crushed nuts, sprinkles, or chocolate chips, press gently to ensure they adhere to the warm caramel. This is the moment to get creative and customize your Caramel Apple Grapes!
- Place on Prepared Baking Sheet: Carefully place the dipped and optionally topped Caramel Apple Grapes onto your parchment-lined baking sheet. Make sure they are not touching each other, as they will stick together if they do. You might need to use two baking sheets depending on how many grapes you’ve prepared.
- Repeat the Process: Continue dipping and topping the remaining grapes, working efficiently while the caramel remains warm and dippable. If the caramel starts to get too thick, refer back to step 10 to warm it gently. This meticulous process ensures each of your Caramel Apple Grapes is perfectly coated and ready for chilling.
Chilling and Serving Your Homemade Caramel Apple Grapes
The final steps are all about setting your beautiful Caramel Apple Grapes and getting them ready for their grand debut!
- Chill to Set: Once all your grapes are dipped and placed on the baking sheets, transfer the sheets to the refrigerator. Allow the Caramel Apple Grapes to chill for at least 30 to 60 minutes, or until the caramel coating is completely firm to the touch. This firming process is crucial for the caramel to hold its shape and for the toppings to be securely attached. Don’t rush this step; patience will be rewarded with perfectly set Caramel Apple Grapes.
- Gentle Removal: Once the caramel is fully set, carefully peel the Caramel Apple Grapes off the parchment paper. They should come off fairly easily due to the parchment paper, but be gentle to avoid cracking the caramel coating. If any caramel has pooled at the bottom, you can trim it with a sharp knife if you wish, for a perfectly round bottom.
- Storing Your Caramel Apple Grapes: These delightful treats are best enjoyed the same day they are made. However, if you have any leftovers, you can store them in an airtight container in the refrigerator for up to 2-3 days. Layer them between sheets of parchment paper to prevent sticking. While they will still be delicious, the grapes might release a tiny bit of moisture over time, which can slightly soften the caramel. For the absolute best texture and taste, fresh is always superior when it comes to Caramel Apple Grapes.
- Serving Suggestions: Serve your Caramel Apple Grapes chilled, straight from the refrigerator. They make a fantastic dessert, a fun snack, or a unique party favor. They’re especially popular at fall gatherings, Halloween parties, or simply as a refreshing sweet treat during any season. You can arrange them artfully on a platter, or even place them in small decorative cups for individual servings. Watching friends and family enjoy these little bites of caramelized apple goodness is truly the most rewarding part of making Caramel Apple Grapes!
- Experimentation is Key: Don’t be afraid to experiment with different types of grapes, caramel brands, or even additional flavorings. A touch of cinnamon or nutmeg in the caramel could add a warm, autumnal twist. You could also try a mix of dark and white chocolate chips for toppings. The beauty of making Caramel Apple Grapes at home is the endless possibility for customization to suit your taste buds.
Enjoy every single bite of your homemade Caramel Apple Grapes!
Conclusion:
Well, friends, we’ve reached the sweet finale of our culinary adventure, and I truly hope you’re feeling inspired to dive headfirst into making what I consider to be one of the most delightful, innovative, and utterly irresistible treats you’ll ever whip up in your kitchen. This isn’t just another recipe; it’s an experience, a revelation for your taste buds, and a guaranteed crowd-pleaser that will have everyone asking for your secret. I’ve poured my heart into sharing this with you because I genuinely believe it has the power to transform a simple snack into something truly extraordinary. It’s that perfect marriage of textures and flavors – the crisp, juicy pop of a fresh grape, enveloped in a creamy, buttery caramel, often with a delightful crunchy coating, all culminating in a fun, bite-sized explosion of pure joy.
Why This Recipe for Caramel Apple Grapes is an Absolute Must-Try!
Let me reiterate why this particular recipe stands out in a sea of dessert options. First and foremost, it’s the ingenious simplicity combined with the surprisingly sophisticated flavor profile. You get all the nostalgic warmth and rich sweetness of a classic caramel apple, but in a far more manageable, less messy, and frankly, more addictive form. Forget sticky fingers and awkward biting into a whole apple; these are elegant, pop-in-your-mouth morsels of bliss. The natural tartness and refreshing coolness of the grapes cut through the richness of the caramel beautifully, creating a perfectly balanced bite that leaves you craving another, and another, and another. It’s an instant mood booster, a perfect pick-me-up, and a sophisticated snack that belies its easy preparation. Imagine serving these at a gathering – the initial surprise, then the delighted smiles, and finally, the rapid disappearance of the entire platter. That’s the power of these incredible treats! They are surprisingly light, making them a fantastic alternative to heavier desserts, yet they satisfy that sweet tooth craving completely. The contrast between the cool, firm fruit and the soft, yielding caramel, often accentuated by a crunchy topping, is what makes them truly unforgettable.
Elevate Your Experience: Serving Suggestions and Creative Variations
Now, let’s talk about how you can make these already fantastic treats even more spectacular, or tailor them to any occasion or preference. While they are phenomenal straight off the plate, there are so many ways to serve and personalize your Caramel Apple Grapes. For an elegant party appetizer, arrange them artfully on a chilled platter, perhaps alongside some small cheese cubes or a selection of nuts for a contrasting savory element. They’re also absolutely perfect for a casual movie night, a delightful addition to a school lunchbox (they hold up surprisingly well!), or simply as a well-deserved treat for yourself after a long day. These bite-sized wonders are excellent for picnics, potlucks, or even as a unique dessert option at a themed autumn party, truly showcasing their versatility.
But here’s where the real fun begins: variations! Don’t be afraid to experiment. While the green grapes offer that signature tartness that mimics an apple so well, try making a batch with red grapes for a sweeter, slightly different flavor profile, or even black grapes for a deeper, more robust fruit note. The type of caramel you use can also make a huge difference. While a good quality store-bought caramel sauce is quick and convenient, a homemade salted caramel can elevate these to a gourmet level, adding that irresistible salty-sweet complexity. You could even swirl in a touch of cinnamon or a pinch of nutmeg into your caramel for a subtle autumnal spice, enhancing that classic “apple pie” feel. For those who love a bit of tang, a tiny dash of lemon zest added to the caramel before dipping can brighten the flavors beautifully.
And let’s not forget the toppings! Oh, the toppings! This is where you can truly unleash your creativity. Beyond the classic crushed peanuts, consider finely chopped pecans or walnuts for an earthy crunch. For a chocolate lover’s dream, a drizzle of melted dark chocolate or a sprinkle of mini chocolate chips would be divine. Want to add a touch of festive cheer? Colorful sprinkles or edible glitter can transform them into a celebratory treat. Shredded coconut, toasted or plain, adds a wonderful texture and tropical hint. For something truly unique, try crushed graham cracker crumbs for a “pie crust” effect, or even a light dusting of sea salt flakes over the caramel before it sets for an extra pop of flavor. Imagine a batch with crushed pretzels for a salty-sweet crunch, or even a coating of finely crushed cornflakes for an unexpected crispiness. The possibilities are truly endless, and each variation offers a slightly different, equally delightful experience. Prepare a “topping bar” at your next gathering and let guests customize their own! The visual appeal alone, with all the different colors and textures, will make your dessert table pop.
Your Culinary Adventure Awaits!
So, what are you waiting for? I wholeheartedly encourage you to set aside some time this week, gather your ingredients, and embark on this simple yet incredibly rewarding culinary journey. There’s a special kind of satisfaction that comes from creating something so delicious with your own hands, and I promise you, these treats deliver that feeling in spades. Don’t be intimidated; the process is straightforward, and the results are consistently spectacular. This recipe is a testament to the fact that you don’t need complicated techniques or exotic ingredients to create something truly memorable. It’s about bringing joy and deliciousness to your life and the lives of those you share it with.
Once you’ve made them, I would absolutely love to hear all about your experience! Did you stick to the classic recipe, or did you get adventurous with your toppings and variations? What was the reaction from your family and friends? Did they guess the “secret” ingredient before you told them? Your feedback, your photos, and your stories are what truly bring this recipe to life for me and for future readers. Please, don’t hesitate to share your triumphs, your clever twists, and any questions you might have in the comments section below. Tag me on social media if you post pictures – I genuinely can’t wait to see your amazing creations! Let’s spread the joy of these fantastic treats far and wide. Happy cooking, and even happier eating!
Caramel Apple Grapes: Sweet & Tangy Fall Treat!
A delightful, easy-to-eat twist on traditional caramel apples, these Caramel Apple Grapes offer the sweet and tangy flavors of a classic fall treat in a convenient, bite-sized form. Perfect for parties, they feature juicy grapes coated in smooth caramel and rolled in chopped peanuts.
Ingredients
-
1 bag green grapes (choose larger-size grapes)
-
1 (11 oz) bag caramel bits
-
2 tablespoons heavy cream or water
-
1 1/2 cups chopped peanuts
-
Toothpicks
Instructions
-
Step 1
Wash and thoroughly dry grapes. Insert a toothpick into the stem end of each grape. Chill grapes in the refrigerator for at least 30 minutes. -
Step 2
Line a baking sheet with parchment paper. Place chopped peanuts in a shallow bowl for easy dipping. -
Step 3
Combine caramel bits and heavy cream (or water) in a medium microwave-safe bowl. Microwave in 30-second intervals, stirring thoroughly after each, until the caramel is completely melted and smooth. Alternatively, melt in a double boiler over simmering water, stirring constantly. -
Step 4
Take one chilled grape by its toothpick. Dip it into the warm caramel, rotating to coat fully. Gently twirl to remove any excess caramel. Immediately roll the caramel-coated grape in the chopped peanuts, pressing gently to adhere. -
Step 5
Place the dipped and decorated grape onto the prepared parchment-lined baking sheet, ensuring grapes do not touch. Repeat for all remaining grapes, gently rewarming caramel for 10-15 seconds if it thickens too much during dipping. Transfer the baking sheet to the refrigerator and chill for 30-60 minutes, or until the caramel coating is completely firm. -
Step 6
Once firm, carefully peel the Caramel Apple Grapes off the parchment paper. Serve chilled. Store any leftovers in an airtight container in the refrigerator for up to 2-3 days, layered with parchment paper to prevent sticking.
Important Information
Nutrition Facts (Per Serving)
It is important to consider this information as approximate and not to use it as definitive health advice.
Allergy Information
Please check ingredients for potential allergens and consult a health professional if in doubt.
Leave a Comment