
Indulgent Burnt Basque Cheesecake in a Loaf Pan You’ll Love isn’t just a dessert; it’s an experience. Have you ever craved that perfectly crackled, slightly caramelized crust that hints at the rich, creamy goodness within? This recipe delivers precisely that, but with an ingenious twist that makes it accessible for any home baker. Forget the springform pan and the worry of water baths; we’re taking the magic of the Burnt Basque Cheesecake and making it even easier to achieve, fitting beautifully into the familiar shape of a loaf pan. This is the dessert that steals the show at gatherings, disappearing faster than you can say “second slice,” and it’s no wonder. Its rustic charm, coupled with its unbelievably smooth and velvety interior, creates a symphony of textures and flavors that’s simply irresistible. Whether you’re a seasoned baker or just starting your culinary journey, this adaptation is designed to bring pure joy and a touch of elegance to your kitchen.
Why This Loaf Pan Cheesecake Reigns Supreme
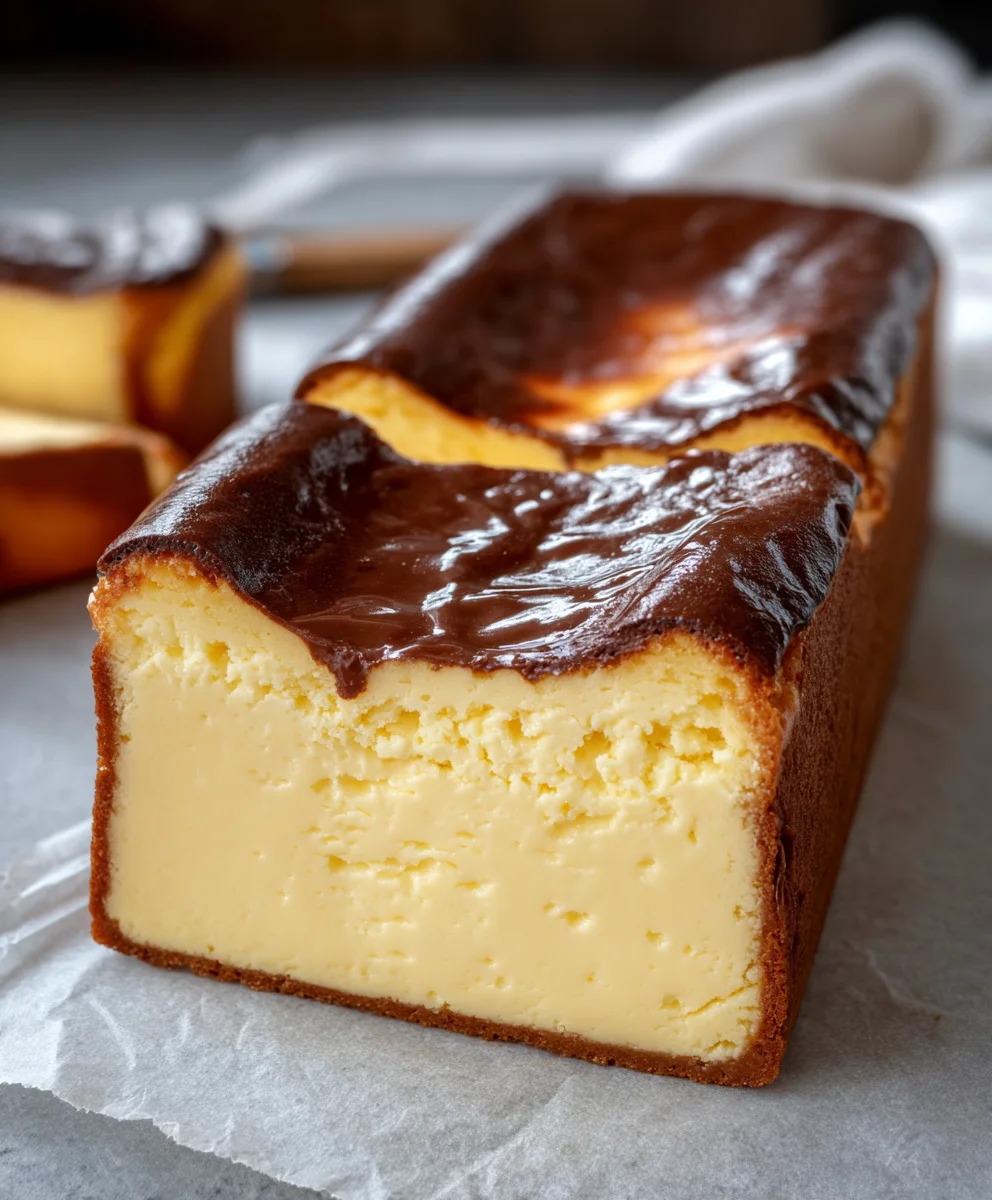
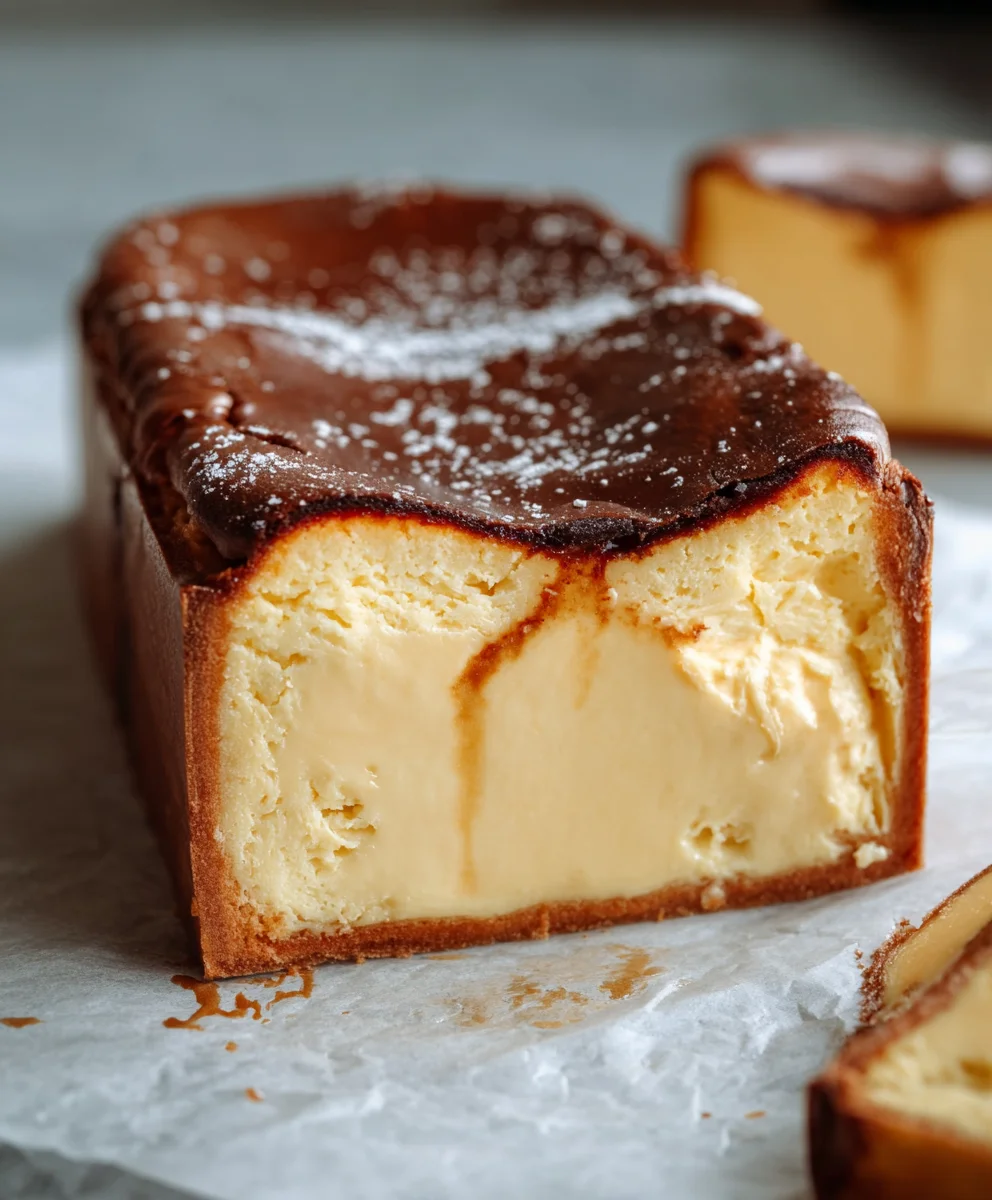
The Allure of the “Burnt” Crust
What truly sets the Indulgent Burnt Basque Cheesecake in a Loaf Pan You’ll Love apart is its signature deeply caramelized, almost burnt, exterior. This isn’t accidental charring; it’s a deliberate development of flavor, adding a sophisticated, slightly bitter counterpoint to the sweet, creamy filling. The beauty lies in its imperfection; the cracks and dark spots are badges of honor, promising an explosion of taste with every bite. Unlike traditional cheesecakes that demand meticulous attention to prevent cracking, this style embraces it, making it wonderfully forgiving. The result is a dessert that is as visually striking as it is delicious, a testament to simple ingredients transformed into something truly extraordinary. Prepare to wow your friends and family with this surprisingly straightforward yet profoundly satisfying treat.

Ingredients:
- 16 oz Full-Fat Cream Cheese (softened to room temperature)
- 3/4 cup Granulated Sugar
- 3 large Eggs (at room temperature)
- 1 cup Heavy Cream
- 1/4 cup All-Purpose Flour
- 1/4 teaspoon Salt
- 1 cup Whipped Cream (for serving)
- 1 cup Fresh Berries (for serving)
- 1/2 cup Caramel Sauce (for drizzling)
Getting Started: Preparing for Your Loaf Pan Cheesecake
Preheat and Prep
The foundation of any great bake is proper preparation, and our Indulgent Burnt Basque Cheesecake in a Loaf Pan is no exception. Preheat your oven to a blazing 425°F (220°C). This high heat is crucial for achieving that signature, beautifully caramelized, almost-burnt crust that makes Basque cheesecake so irresistible. While the oven heats up, you’ll want to prepare your loaf pan. Grease it generously with butter or non-stick cooking spray. For easier removal and a cleaner presentation, I highly recommend lining the loaf pan with parchment paper. Cut a piece of parchment that fits the bottom of the pan and two long strips that will line the sides, allowing them to overhang slightly. This creates makeshift “handles” that will help you lift the cheesecake out of the pan once it’s baked and cooled. Ensure the parchment paper is pressed down smoothly against the pan’s contours to avoid air pockets.
Creaming the Foundation
Now, let’s build the creamy heart of our cheesecake. In a large mixing bowl, combine the softened full-fat cream cheese and the granulated sugar. It’s imperative that your cream cheese is at room temperature; cold cream cheese will result in a lumpy batter. You can achieve this by leaving it on the counter for at least an hour, or by carefully microwaving it for short intervals. Beat these two ingredients together with an electric mixer (a stand mixer with a paddle attachment is ideal, but a hand mixer will work just fine) on medium speed until the mixture is incredibly smooth and creamy, with no lumps of cream cheese remaining. Scrape down the sides of the bowl frequently to ensure everything is incorporated. This step is vital for a velvety-smooth cheesecake texture.
Building the Cheesecake Batter
Incorporating Eggs and Cream
Once you have a perfectly smooth cream cheese and sugar mixture, it’s time to introduce the eggs. Add the three large eggs, one at a time, beating well after each addition until just incorporated. Over-mixing at this stage can introduce too much air into the batter, which can lead to cracking. You want a smooth, homogeneous mixture. Next, gradually pour in the heavy cream while the mixer is on low speed. Continue to mix until everything is just combined. The batter should look rich and luscious. Remember, room temperature eggs are essential here as well, as they emulsify more readily with the fats in the cream cheese and butter, contributing to a smoother batter.
Adding the Dry Ingredients
The final touch to our cheesecake batter involves the dry ingredients. In a separate small bowl, whisk together the all-purpose flour and the salt. Sifting these ingredients beforehand is a good practice, but whisking thoroughly will also ensure no clumps. Now, add this dry mixture to the wet ingredients in your mixing bowl. Mix on low speed until just combined and no streaks of flour are visible. Be careful not to overmix; a light hand here preserves the delicate texture we’re aiming for. The flour acts as a binder, giving the cheesecake structure and preventing it from becoming too runny. The salt, though small in quantity, plays a crucial role in balancing the sweetness and enhancing the overall flavor profile of the cheesecake.
Baking and Cooling Your Masterpiece
The Baking Process
Pour the luxurious cheesecake batter into your prepared loaf pan, spreading it evenly. The batter will fill the pan about two-thirds of the way. Now, carefully place the loaf pan onto the center rack of your preheated 425°F (220°C) oven. Bake for approximately 30 to 40 minutes. You are looking for that signature burnt Basque cheesecake look: a deeply caramelized, almost blackened top and edges, while the center should still jiggle slightly when you gently shake the pan. This jiggle indicates that the cheesecake is cooked through but still retains its creamy, almost molten center. Don’t be alarmed by the dark color; that’s precisely what we want! If the edges are browning too quickly, you can loosely tent the top with foil.
Cooling and Chilling
Once the baking time is up, remove the cheesecake from the oven. It will look very soft in the center and that’s perfectly normal. Let it cool in the loaf pan on a wire rack for about 15 to 20 minutes. This initial cooling period allows the cheesecake to begin extract setting. After this, carefully lift the cheesecake out of the loaf pan using the parchment paper overhangs and place it directly onto the wire rack to cool completely to room temperature. Once it has reached room temperature, cover the cheesecake loosely with plastic wrap and refrigerate for at least 4 hours, or preferably overnight. Chilling is essential for the cheesecake to fully set and for its flavors to meld. The texture will transform from a soft custard to a dense, creamy slice of heaven.
Serving Your Indulgent Creation
The Grand Finnon-alcoholic ale
When you’re ready to serve your Indulgent Burnt Basque Cheesecake in a Loaf Pan, remove it from the refrigerator. Gently peel away the parchment paper. Slice the cheesecake into thick portions using a sharp knife that has been dipped in hot water and wiped dry between each cut for clean slices. Serve each slice with a generous dollop of freshly whipped cream, a scattering of vibrant fresh berries, and a luscious drizzle of caramel sauce. The combination of the rich, tangy cheesecake, the light sweetness of the whipped cream, the bright burst of the berries, and the decadent caramel sauce creates a symphony of flavors and textures that is truly unforgettable. This cheesecake is perfect for any occasion, from a casual gathering to a more formal dessert.
Conclusion:
There you have it! Your very own Indulgent Burnt Basque Cheesecake in a Loaf Pan You’ll Love. This recipe truly delivers on its promise of a rich, creamy, and beautifully caramelized dessert, all made with the surprising ease of a loaf pan. The slightly charred exterior, a signature of the Basque style, adds a delightful depth of flavor that perfectly contrasts with the smooth, tangy interior. Don’t be intimidated by the “burnt” appearance; it’s precisely what makes this cheesecake so special and delicious. We’ve simplified the process, making it accessible even for novice bakers, while still achieving a restaurant-quality result.
This cheesecake is incredibly versatile. Serve it chilled with a simple dusting of powdered sugar, a swirl of fresh berries, or a dollop of whipped cream for an elegant finish. It also makes a fantastic base for more adventurous toppings like a tart fruit compote or a drizzle of salted caramel. Don’t hesitate to experiment with adding a splash of vanilla extract or even a touch of citrus zest to the batter for a subtle flavor variation. Most importantly, enjoy the process and savor every decadent bite of your homemade Indulgent Burnt Basque Cheesecake in a Loaf Pan You’ll Love. You’ve earned it!
Frequently Asked Questions about Indulgent Burnt Basque Cheesecake in a Loaf Pan You’ll Love:
What does “burnt” mean in a Burnt Basque Cheesecake?
The “burnt” aspect of this cheesecake refers to the intentionally caramelized, almost blackened top and edges. This charring is achieved by baking at a high temperature, and it’s not a sign of being overcooked but rather a deliberate technique that develops a complex, slightly bitter flavor which beautifully complements the sweet, creamy interior. The key is to char it without burning it to a crisp.
Can I make this Indulgent Burnt Basque Cheesecake in a Loaf Pan You’ll Love ahead of time?
Absolutely! This cheesecake is an excellent candidate for making ahead. In fact, chilling it overnight allows the flavors to meld and the texture to set perfectly. Once cooled and chilled, it can be stored in the refrigerator for up to 3-4 days. This makes it a perfect dessert for entertaining, as you can prepare it a day in advance and focus on other preparations on the day of your event.
Burnt Basque Cheesecake Loaf Pan Recipe – Pure Indulgence
Indulge in a rich, creamy, and perfectly caramelized cheesecake baked in a convenient loaf pan.
Ingredients
-
16 oz Full-Fat Cream Cheese, softened to room temperature
-
3/4 cup Granulated Sugar
-
3 large Eggs, at room temperature
-
1 cup Heavy Cream
-
1/4 cup All-Purpose Flour
-
1/4 teaspoon Salt
-
1 cup Whipped Cream, for serving
-
1 cup Fresh Berries, for serving
-
1/2 cup Caramel Sauce, for drizzling
Instructions
-
Step 1
Preheat oven to 425°F (220°C). Generously grease a loaf pan and line with parchment paper, allowing for overhang. -
Step 2
In a large bowl, beat softened cream cheese and granulated sugar until smooth and creamy. -
Step 3
Add eggs one at a time, beating well after each addition. Gradually mix in heavy cream on low speed until just combined. -
Step 4
In a separate bowl, whisk together all-purpose flour and salt. Add to the wet ingredients and mix on low speed until just combined. -
Step 5
Pour batter into the prepared loaf pan and bake for 30-40 minutes, or until the top is deeply caramelized and the center jiggles slightly. -
Step 6
Let cool in the pan for 15-20 minutes, then lift out using parchment paper and cool completely on a wire rack. -
Step 7
Chill for at least 4 hours or overnight. Serve slices topped with whipped cream, fresh berries, and caramel sauce.
Important Information
Nutrition Facts (Per Serving)
It is important to consider this information as approximate and not to use it as definitive health advice.
Allergy Information
Please check ingredients for potential allergens and consult a health professional if in doubt.


Leave a Comment