
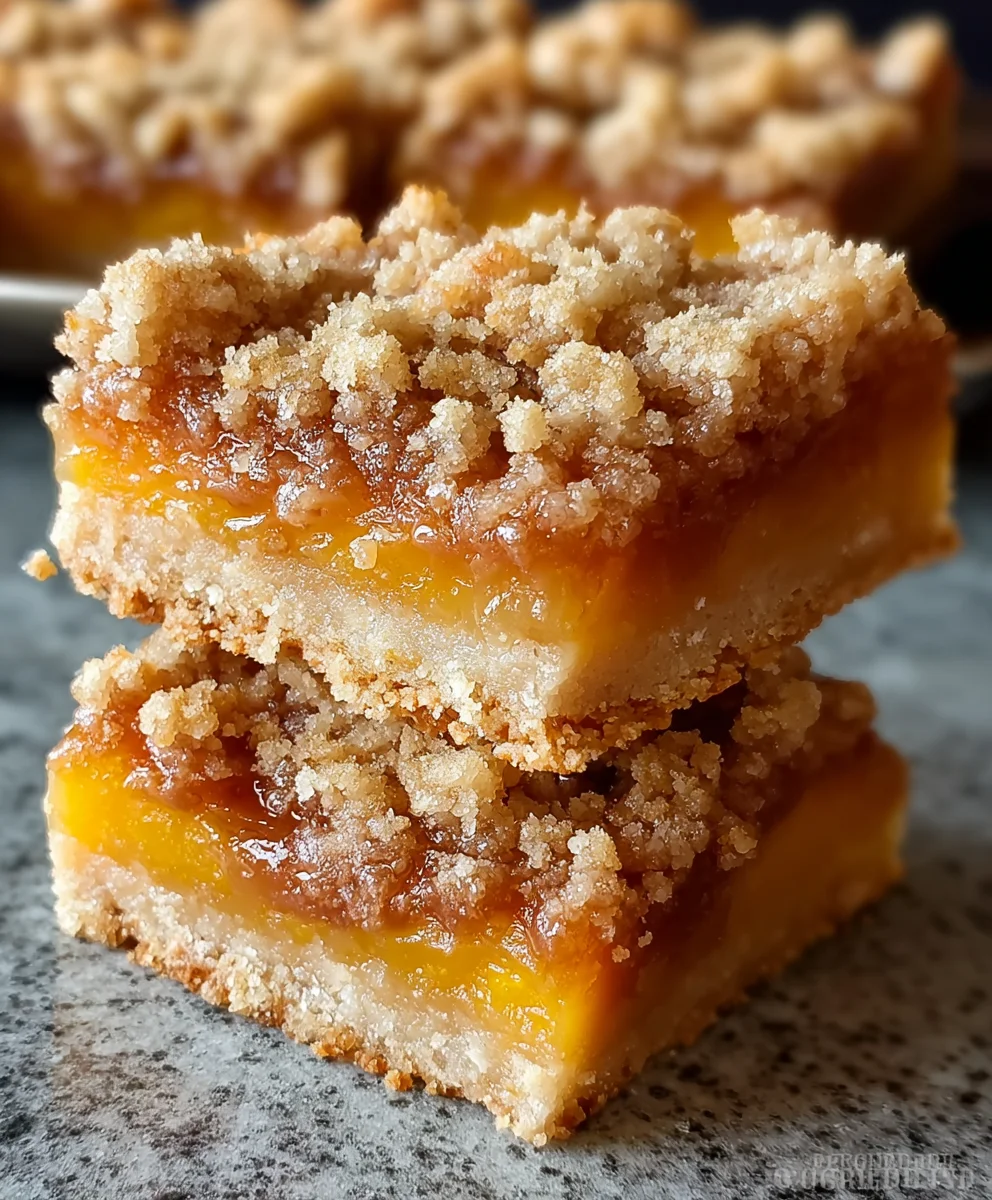
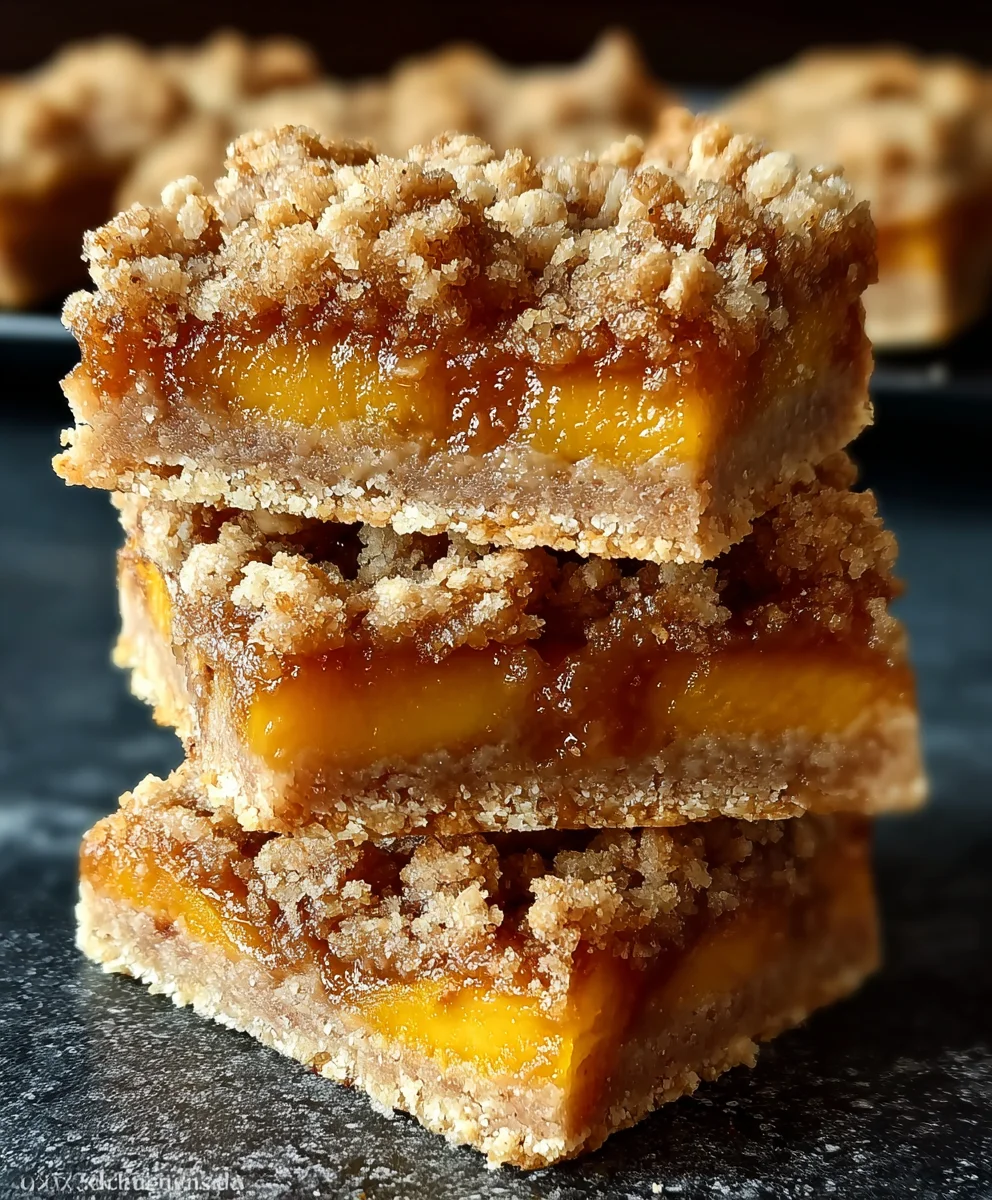
Peach Crumble Bars are more than just a dessert; they are a veritable bite of pure summer sunshine, meticulously crafted into a comforting, buttery square. I find myself consistently drawn to these delightful treats, especially when I yearn for something sweet yet profoundly satisfying, offering that perfect balance between indulgence and wholesome goodness. Their inherent portability is a game-changer, making them an ideal choice for impromptu picnics, cherished potlucks, or simply as a comforting afternoon companion to a warm cup of coffee or tea.
Imagine a golden, tender shortbread base, generously piled high with sweet, succulent peaches bursting with flavor, all crowned with an irresistible, crumbly oat topping that provides a delightful textural contrast. Each bite delivers a harmonious blend of juicy fruit, a sturdy, buttery crust, and that wonderfully textured, spiced crumble. While the classic fruit crumble boasts deep roots in British baking tradition, these bar-style renditions brilliantly marry the comforting warmth of their traditional cousin with the undeniable convenience of a grab-and-go snack. They effortlessly evoke cherished memories of homemade goodness and simpler times, making them a truly special addition to any recipe collection.
Crafting the Perfect Peach Crumble Bars
That’s precisely why mastering the art of creating the perfect Peach Crumble Bars has become a true culinary passion of mine. They truly encapsulate everything wonderful about home-baked delights, and I am absolutely thrilled to share my meticulously tested recipe with you, ensuring you can recreate this magic in your own kitchen.

Ingredients:
Before you begin, a quick and crucial note about your peaches: If using frozen peaches, it is absolutely essential to thaw and drain them thoroughly before adding to the filling. This critical step helps prevent excess moisture in your filling, ensuring your Peach Crum extractble Bars achieve that perfect, non-soggy texture we all crave!
For the Irresistible Crumble Base and Topping:
- 2 ½ cups (300g) All-Purpose Flour: I find this gives the bars just the right structure, holding everything together beautifully.
- ¾ cup (150g) Granulated Sugar: For a delightful sweetness that complements the tartness of the peaches.
- ¾ cup (150g) Packed Light Brown Sugar: This adds a deeper, molasses-rich flavor and a lovely chewiness to the crumble.
- 1 teaspoon Baking Powder: Just enough to give the crust a little lift and tenderness.
- ½ teaspoon Salt: A pinch of salt is vital for balancing the sweetness and enhancing all the other flavors. Don’t skip it!
- 1 cup (226g) Unsalted Butter, very cold and cubed: Cold butter is key for a crumbly, tender texture. I like to cut mine into small pieces and pop it back in the fridge until I’m ready to use it.
- 1 large Egg: This acts as a binder, helping the crust hold its shape and preventing it from becoming too dry.
- 1 teaspoon Pure Vanilla Extract: For that warm, comforting aroma and flavor that ties everything together.
For the Luscious Peach Filling:
- 4-5 cups (about 1.5 lbs or 680g) Sliced Fresh or Thawed Frozen Peaches: As mentioned above, if using frozen, ensure they are fully thawed and drained. For fresh, ripe but firm peaches work best – I usually peel them, but it’s optional!
- ½ cup (100g) Granulated Sugar: You can adjust this slightly depending on the sweetness of your peaches.
- 2 tablespoons Cornstarch: This is our secret weapon for a perfectly thick and gooey filling that won’t run out when you cut the bars.
- 1 tablespoon Fresh Lemon Juice: A splash of lemon juice brightens the peach flavor and prevents browning.
- 1 teaspoon Ground Cinnamon: The classic pairing with peaches, adding warmth and spice.
- ¼ teaspoon Ground Nutmeg: A subtle hint of nutmeg truly elevates the flavor profile.
Equipment You’ll Need:
- 9×13 inch Baking Pan: A standard size that’s perfect for a generous batch of bars.
- Parchment Paper: Absolutely essential for easy removal and clean-up. I always make sure to leave an overhang!
- Large Mixing Bowls (2): One for the crumble mixture, one for the peach filling.
- Pastry Blender or Fork: For cutting butter into the dry ingredients. Your fingers work too, if you have cool hands!
- Rubber Spatula: For mixing and scraping.
- Measuring Cups and Spoons: Accuracy is important for baking success.
- Sharp Knife and Cutting Board: For preparing your peaches and slicing the finished bars.
- Wire Cooling Rack: Allowing the bars to cool completely is non-negotiable for clean slices.
Instructions:
Preparation – Getting Started
- Preheat Your Oven and Prepare Your Pan: First things first, let’s get that oven ready! I always set mine to 375°F (190°C) to ensure it’s at the correct temperature when my bars are ready to bake. Next, prepare your 9×13 inch baking pan. The trick for easy removal of your Peach Crum extractble Bars is to line the pan with parchment paper, allowing a generous overhang on the long sides. This creates “slings” that will help you lift the entire slab of bars out of the pan once they’re cooled. I even like to lightly grease the pan before laying down the parchment, just to make sure it sticks in place and doesn’t shift around while I’m pressing in the crust.
- Ensure Peaches are Ready (If Using Frozen): If you’re opting for the convenience of frozen peaches, this is where that critical instruction comes into play. I typically place the frozen peaches in a colander set over a bowl and let them thaw in the refrigerator overnight. Once thawed, I press them gently to encourage any lingering moisture to drain. You want them as dry as possible without mashing them. This small effort makes a huge difference in preventing a soggy filling, guaranteeing those perfect Peach Crum extractble Bars.
Crafting the Crumble Base and Topping
- Combine Dry Ingredients for the Crumble: In a large mixing bowl, I whisk together the all-purpose flour, granulated sugar, light brown sugar, baking powder, and salt. Make sure there are no lumps of brown sugar and that everything is thoroughly combined. This even distribution of dry ingredients is essential for a consistent flavor and texture throughout your crumble.
- Cut in the Cold Butter: Now for the fun part! Add the very cold, cubed unsalted butter to your dry ingredients. Using a pastry blender, two forks, or even your fingertips, work the butter into the flour mixture until it resembles coarse crumbs. Some pieces of butter can be pea-sized, but generally, you’re aiming for a sandy texture with visible flecks of butter throughout. The key here is to work quickly so the butter stays as cold as possible; this is what creates that wonderful crumbly texture. If your hands are warm, a pastry blender is your best friend.
- Add Wet Ingredients to Form the Dough: Create a well in the center of your crumbly mixture. Crack in the large egg and pour in the pure vanilla extract. Using a fork or your hands, gently mix these wet ingredients into the dry mixture until a shaggy dough forms. Be careful not to overmix; you want it just combined enough that it holds together. This will be the base and the topping for our Peach Crum extractble Bars!
- Divide the Crumble Mixture: I like to divide this mixture roughly into two-thirds and one-third. The larger portion (about two-thirds) will be for our base, and the remaining one-third will be reserved for the delectable crumble topping.
- Press in the Base Layer: Carefully transfer the larger portion of the crumble mixture into your prepared 9×13 inch baking pan. Using your fingertips or the bottom of a flat glass, press the mixture firmly and evenly into the bottom of the pan to form a solid crust. Take your time to ensure it reaches all the corners and has a uniform thickness. This sturdy base is crucial for holding our Peach Crum extractble Bars together. Once pressed, I often pop the pan into the fridge for about 10-15 minutes while I prepare the filling; this helps prevent the crust from shrinking too much during baking.
Preparing the Luscious Peach Filling
- Combine Peach Filling Ingredients: In your second large mixing bowl, combine the sliced peaches (remembering that critical thawing and draining step for frozen peaches!), granulated sugar, cornstarch, fresh lemon juice, ground cinnamon, and ground nutmeg.
- Gently Toss to Coat: Using a rubber spatula, gently toss the ingredients together until the peaches are evenly coated with the sugar and spice mixture. The cornstarch will help thicken the peach juices during baking, creating that perfectly gooey, fruit-forward filling without making the bars runny. I try to be gentle here to keep the peach slices relatively intact.
Assembling Your Peach Crum extractble Bars
- Spread the Peach Filling: Retrieve your pan with the pressed-in crust from the refrigerator. Carefully spoon the peach filling evenly over the crust layer. I like to spread it right to the edges, ensuring every bite of our Peach Crum extractble Bars gets a generous helping of sweet, spiced peaches.
- Add the Crumble Topping: Now, take the remaining one-third of the crumble mixture that you reserved earlier. Gently sprinkle this mixture evenly over the peach filling. You don’t need to press this layer down; just let it fall naturally. This creates that wonderfully textured, golden-brown crumble top that gives these bars their signature appeal.
Baking to Golden Perfection
- Bake the Bars: Place the assembled pan into your preheated 375°F (190°C) oven. Bake for 40-50 minutes. The exact baking time can vary depending on your oven, so keep an eye on them. I look for a few key indicators: the crumble topping should be beautifully golden brown, the edges of the bars should be set and slightly pulling away from the sides of the pan, and if you gently jiggle the pan, the peach filling in the center should appear bubbly and thickened, not watery. The aroma of warm peaches and cinnamon will also fill your kitchen, which is always a good sign!
- Check for Doneness: If you’re unsure, you can also gently insert a thin knife or skewer into the peach filling in the center. If it comes out clean or with only a little sticky residue, it’s a good sign that the cornstarch has activated and the filling is cooked through.
Cooling and Serving Suggestions
- Cool Completely (This is CRUCIAL!): Once baked, remove the pan from the oven and place it on a wire cooling rack. This is perhaps the most challenging, yet most important, step for perfectly shaped Peach Crum extractble Bars. You absolutely must let the bars cool completely in the pan before attempting to cut them – I usually allow at least 3-4 hours, or even better, chill them in the refrigerator for an hour or two after they’ve reached room temperature. If you try to cut them while warm, the filling will be too runny, and the bars will fall apart. Patience is truly a virtue here!
- Lift and Slice: Once fully cooled and firm, use the parchment paper overhangs to carefully lift the entire slab of Peach Crum extractble Bars out of the pan and transfer it to a cutting board. This parchment paper sling makes removal incredibly easy and mess-free.
- Cut into Bars: Using a sharp knife, carefully cut the slab into your desired bar size. I usually aim for 24 bars (6×4 grid), but you can make them larger or smaller to suit your preference. Wipe your knife clean between cuts for the neatest edges.
- Serve and Enjoy: These Peach Crum extractble Bars are absolutely delightful on their own, but they’re also fantastic served slightly warm with a scoop of vanilla bean ice cream or a dollop of fresh whipped cream. The contrast of the warm, spiced peaches with cold creaminess is simply heavenly.
- Storage: Store any leftover Peach Crum extractble Bars in an airtight container at room temperature for up to 3 days, or in the refrigerator for up to a week. They also freeze beautifully for up to 3 months; just thaw them at room temperature before serving. I find they taste just as good, if not better, the next day once the flavors have had a chance to meld.
<h2>Conclusion:</h2>
<p>And there you have it, my friends! We’ve reached the sweet finale of our culinary journey, and I genuinely hope you’re feeling inspired, perhaps even a little giddy, at the prospect of bringing these incredible Peach Crum extractble Bars to life in your own kitchen. This isn’t just another dessert recipe; it’s an invitation to experience pure joy, a sensory delight that encapsulates everything wonderful about homemade treats. From the moment those golden-brown peaches begin to soften and caramelize beneath a buttery, crumbly topping, filling your home with an intoxicating aroma, you’ll understand why this recipe is truly a must-try.</p>
<p>What makes these bars so irresistibly good? It’s the perfect symphony of textures and flavors. Imagine: a tender, slightly crisp shortbread base, providing a delightful foundation. Layered generously on top are juicy, ripe peaches, bursting with natural sweetness, perhaps with a hint of cinnamon or vanilla, cooked down to a syrupy perfection. And then, the crown jewel – a golden, crunchy crumble, offering that satisfying textural contrast that makes every bite an adventure. It’s comforting, it’s vibrant, and it perfectly balances richness with the refreshing zest of summer peaches. This isn’t just a dessert; it’s a mood, a celebration, a little slice of sunshine you can enjoy any time of year, though it truly shines when peaches are at their peak.</p>
<p>Now, for the best part: enjoying your freshly baked masterpiece! While these bars are absolutely divine on their own, a simple serving suggestion can elevate them to an extraordinary experience. My personal favorite way to savor them is slightly warm, perhaps just out of the oven, with a generous scoop of vanilla bean ice cream melting languidly over the top. The cold cream against the warm, fruity bar is pure bliss. A dollop of freshly whipped cream, perhaps infused with a touch of bourbon or almond extract, also makes for a luxurious pairing. If you’re feeling extra decadent, a drizzle of homemade caramel sauce or a sprinkle of toasted pecans or walnuts can add another layer of flavor and texture that’s simply unforgettable. </p>
<p>But don’t stop there! These bars are wonderfully versatile. Feel free to get creative with variations. If peaches aren’t in season, or if you simply fancy a change, consider substituting them with other fruits. Mixed berries (strawberries, blueberries, raspberries) make for a vibrant, tart-sweet alternative. Apples or pears, perhaps with a touch of nutmeg or ginger, would transform these into a cozy autumn treat. You could even combine fruits – peaches and blueberries are a classic pairing for a reason! For the crumble topping, experiment with adding different spices, like cardamom or allspice, or incorporate rolled oats for an even chewier texture. If you’re catering to dietary needs, a simple swap to a gluten-free flour blend for both the base and crumble, and a dairy-free butter substitute, can easily make this recipe accessible to everyone without sacrificing flavor. They even make a surprisingly delightful breakfast treat alongside your morning coffee or yogurt!</p>
<p>I’ve poured my heart into sharing this recipe with you, and now it’s your turn. I truly encourage you to roll up your sleeves, gather your ingredients, and give these Peach Crum extractble Bars a try. You won’t regret it. The process of baking, the incredible aroma that fills your kitchen, and finally, that first glorious bite – it’s an experience from start to finish. Once you’ve made them, I’d be absolutely thrilled to hear about your experience. Did you make any variations? What did your family and friends think? Please, share your stories, your tips, and especially your photos! Tag me on social media or leave a comment below. Your baking adventures inspire me, and I can’t wait to see your delicious creations. Happy baking, and enjoy every single crumb!</p>
<h3>FAQs (Frequently Asked Questions)</h3>
<h4>Can I use frozen peaches for these bars?</h4>
<p><strong>Absolutely!</strong> Frozen peaches are a fantastic alternative when fresh peaches aren’t in season. There’s no need to thaw them beforehand; you can use them directly from the freezer. Just be aware that they might release a bit more liquid as they bake. To counteract this, you might want to increase the amount of cornstarch or flour in the peach filling by an extra teaspoon or two to ensure the filling sets up nicely and isn’t too watery.</p>
<h4>How should I store these Peach Crum Bars?</h4>
<p>Once cooled completely, store the bars in an <strong>airtight container</strong> at room temperature for up to 2-3 days. For longer storage, you can keep them in the refrigerator for up to a week. If refrigerating, you might want to gently warm them up in the microwave or oven before serving to restore their optimal texture and flavor, especially if serving with ice cream!</p>
<h4>Can I make these bars ahead of time?</h4>
<p><strong>Yes, you certainly can!</strong> These bars are excellent for making ahead. You can bake them completely, let them cool, and then store them as directed above. They hold up beautifully. If you want to prepare even further in advance, you can prepare the shortbread base and the crumble topping separately and store them in the fridge or freezer. Then, simply assemble and bake when you’re ready.</p>
<h4>What if my crumble topping isn’t crunchy?</h4>
<p>Several factors can affect the crunchiness of your crumble. Ensure you use <strong>cold butter</strong> and don’t overmix the topping; you want a coarse, crumbly texture, not a uniform paste. Also, make sure your oven temperature is accurate and that the bars bake long enough for the topping to turn golden brown and crisp. If it seems to be browning too quickly, you can loosely tent the pan with foil for the last portion of baking.</p>
<h4>Can I make this recipe gluten-free?</h4>
<p><strong>Absolutely!</strong> To make these Peach Crum Bars gluten-free, simply substitute the all-purpose flour in both the shortbread base and the crumble topping with a high-quality 1:1 gluten-free baking flour blend. Make sure your blend contains xanthan gum, or add 1/4 teaspoon per cup of flour, to ensure the right texture. The rest of the recipe can remain the same!</p>
<h4>My bars are a bit soggy after cooling. What went wrong?</h4>
<p>Sogginess can occur if the peach filling releases too much liquid or if the bars aren’t baked long enough. Ensure your peaches are <strong>drained well</strong> if they’re very juicy (especially frozen ones), and don’t skimp on the cornstarch or flour mixed with the peaches – this helps absorb excess moisture. Also, ensure the bars bake until the peach filling is visibly bubbling and the crumble is golden brown, indicating they are fully cooked through.</p>
Best Ever Peach Crumble Bars – A Must-Try Dessert!
Delicious Peach Crumble Bars featuring a buttery crumble base, a luscious spiced peach filling, and a crispy crumble topping. This recipe highlights the importance of properly draining peaches for a perfect, non-soggy texture.
Ingredients
-
2 ½ cups (300g) All-Purpose Flour
-
¾ cup (150g) Granulated Sugar
-
¾ cup (150g) Packed Light Brown Sugar
-
1 teaspoon Baking Powder
-
½ teaspoon Salt
-
1 cup (226g) Unsalted Butter, very cold and cubed
-
1 large Egg
-
1 teaspoon Non-Alcoholic Vanilla Extract
-
4-5 cups (about 1.5 lbs or 680g) Sliced Fresh or Thawed Frozen Peaches (thoroughly thawed and drained if frozen)
-
½ cup (100g) Granulated Sugar
-
2 tablespoons Cornstarch
-
1 tablespoon Fresh Lemon Juice
-
1 teaspoon Ground Cinnamon
-
¼ teaspoon Ground Nutmeg
Instructions
-
Step 1
Preheat oven to 375°F (190°C). Line a 9×13 inch baking pan with parchment paper, allowing a generous overhang on the long sides, and lightly grease the pan before laying the parchment. -
Step 2
If using frozen peaches, ensure they are fully thawed and thoroughly drained to remove any excess moisture. This step is crucial for a non-soggy filling. -
Step 3
In a large mixing bowl, whisk together all-purpose flour, granulated sugar, light brown sugar, baking powder, and salt. Add the very cold, cubed unsalted butter and cut it into the dry ingredients using a pastry blender or fingertips until the mixture resembles coarse crumbs with pea-sized butter pieces. Create a well in the center, add the large egg and non-alcoholic vanilla extract, then mix until a shaggy dough forms. Do not overmix. -
Step 4
Divide the crumble mixture: use approximately two-thirds for the base and reserve one-third for the topping. Press the larger portion firmly and evenly into the bottom of the prepared 9×13 inch pan to form a solid crust. Optionally, pop the pan into the fridge for 10-15 minutes while preparing the filling. -
Step 5
In a second large mixing bowl, combine the sliced peaches, granulated sugar, cornstarch, fresh lemon juice, ground cinnamon, and ground nutmeg. Gently toss with a rubber spatula until the peaches are evenly coated. -
Step 6
Retrieve the pan with the pressed crust from the refrigerator. Carefully spoon the peach filling evenly over the crust layer, spreading it to the edges. Sprinkle the reserved one-third of the crumble mixture evenly over the peach filling, creating the topping. -
Step 7
Place the assembled pan into the preheated 375°F (190°C) oven and bake for 40-50 minutes. The bars are done when the crumble topping is beautifully golden brown, the edges are set, and the peach filling in the center appears bubbly and thickened. If unsure, a thin knife inserted into the filling should come out with minimal sticky residue. -
Step 8
Once baked, remove the pan from the oven and place it on a wire cooling rack. It is absolutely crucial to let the bars cool completely in the pan before attempting to cut them – allow at least 3-4 hours, or chill in the refrigerator for an hour or two after reaching room temperature. Once fully cooled and firm, use the parchment paper overhangs to carefully lift the entire slab out of the pan onto a cutting board. Using a sharp knife, cut into your desired bar size (e.g., 24 bars), wiping the knife clean between cuts. -
Step 9
Serve these Peach Crumble Bars on their own, or slightly warm with a scoop of vanilla bean ice cream or a dollop of fresh whipped cream. Store any leftover bars in an airtight container at room temperature for up to 3 days, or in the refrigerator for up to a week. They can also be frozen for up to 3 months; thaw at room temperature before serving.
Important Information
Nutrition Facts (Per Serving)
It is important to consider this information as approximate and not to use it as definitive health advice.
Allergy Information
Please check ingredients for potential allergens and consult a health professional if in doubt.
Leave a Comment