
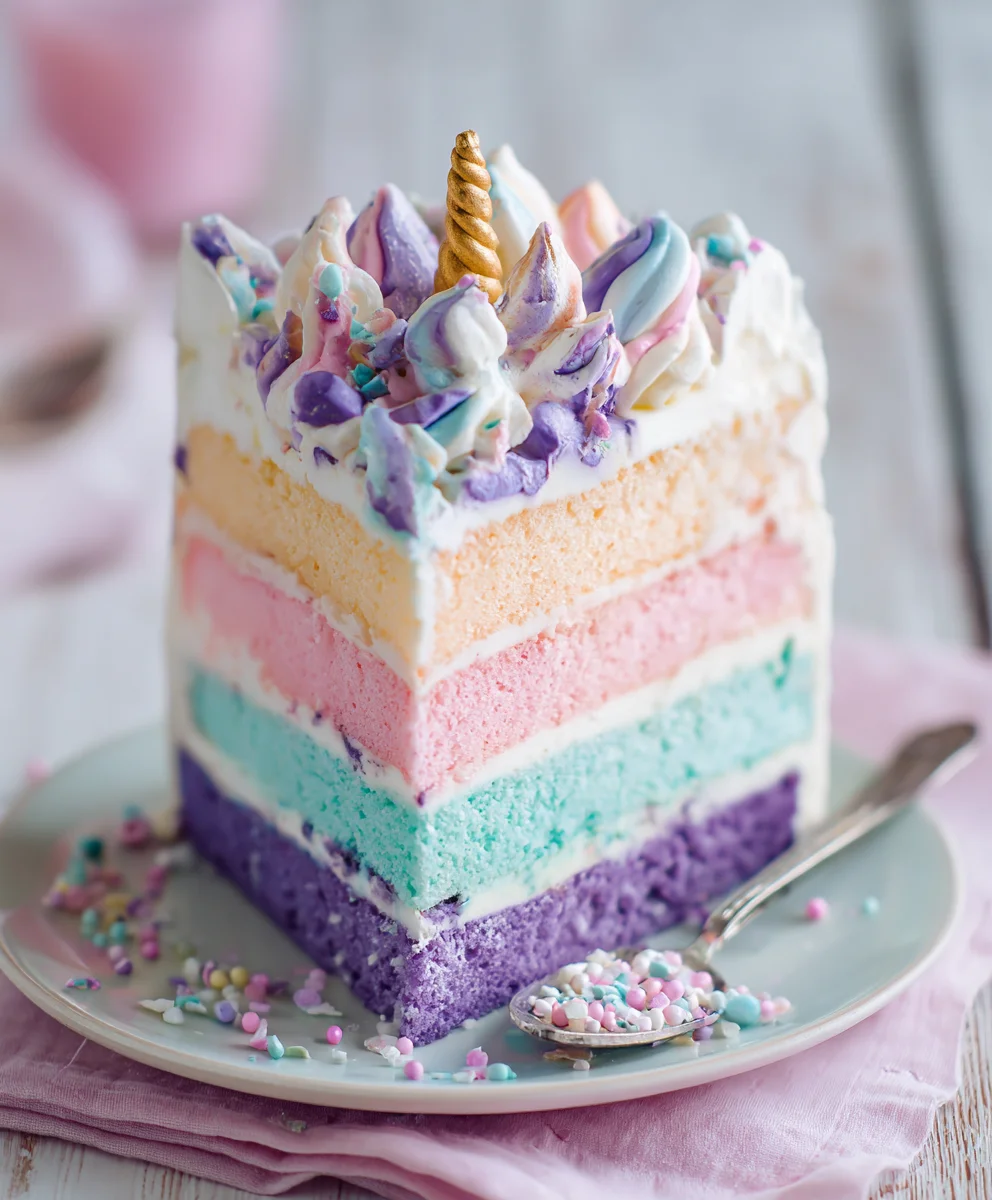
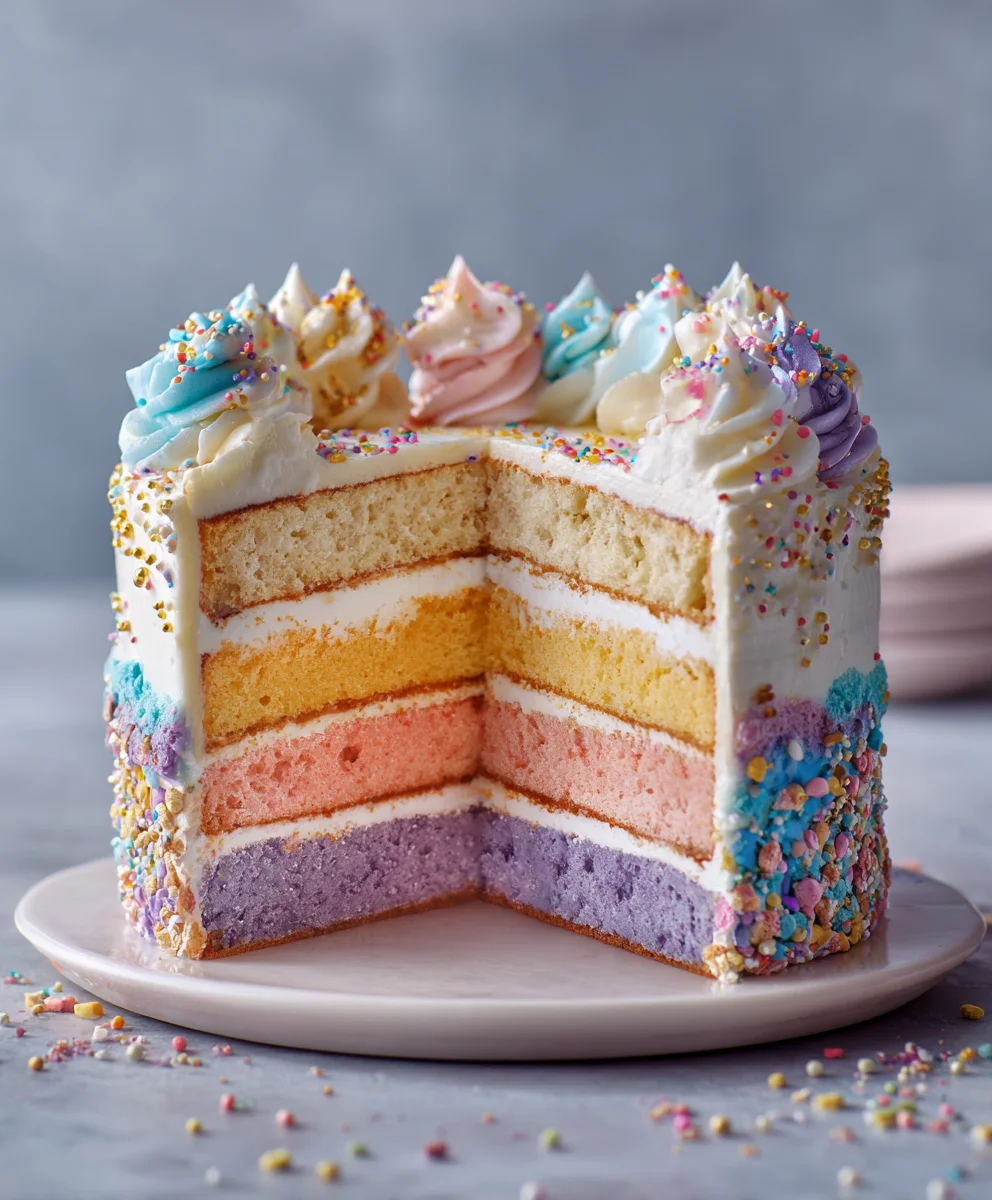
Ultimate Unicorn Ice Cream Cake is not merely a dessert; it’s an enchanting centerpiece, a vibrant burst of joy that promises to transform any gathering into an unforgettable celebration. Are you ready to embark on a culinary adventure that culminates in a show-stopping masterpiece, perfectly blending whimsical charm with irresistible flavors? I am absolutely thrilled to share the definitive guide to crafting this magical confection right in your own kitchen!
While the tradition of ice cream cakes has delighted generations, the rise of the unicorn trend has elevated this classic treat into an extraordinary spectacle of color and fantasy. This cake captures the pure essence of childhood wonder and celebratory delight, making it an instant hit at birthdays, themed parties, or any occasion warranting a touch of magic. People adore this dish not just for its breathtaking visual appeal, but for its delightful symphony of textures and tastes: the smooth, creamy layers of ice cream perfectly complement the soft, moist cake base, all brought together with playful sprinkles and a dreamy frosting.
I’ve meticulously crafted this recipe to ensure every slice offers a truly magical experience. Get ready to sprinkle some extra sparkle and create lasting, joyful memories with your very own homemade Ultimate Unicorn Ice Cream Cake. I assure you, the delight on your guests’ faces will be absolutely priceless!

Ingredients:
-
For the Fluffy Vanilla Cake Layers:
- 2 ½ cups (300g) all-purpose flour, sifted
- 1 ½ teaspoons baking powder
- ½ teaspoon baking soda
- ½ teaspoon salt
- 1 cup (226g) unsalted butter, softened
- 2 cups (400g) granulated sugar
- 4 large eggs, room temperature
- 1 tablespoon pure vanilla extract
- 1 cup (240ml) buttermilk, room temperature
- Gel food coloring in various pastel shades (pink, blue, purple, yellow, green)
-
For the Magical Ice Cream Filling:
- 2 quarts (about 8 cups) premium vanilla ice cream, slightly softened
- Gel food coloring in pastel shades (to match cake layers or new ones)
- Optional: 1 cup (120g) white chocolate chips, melted and cooled slightly (for a thin chocolate layer between ice cream and cake, if desired)
- Optional: ½ cup (120ml) heavy cream, whipped to soft peaks (for a lighter texture if folding into ice cream)
-
For the Silky Swiss Meringue Buttercream:
- 5 large egg whites
- 1 ½ cups (300g) granulated sugar
- 1 ½ cups (340g) unsalted butter, softened but still cool, cut into 1-inch pieces
- 2 teaspoons pure vanilla extract
- Pinch of salt
- Gel food coloring in various pastel shades (for piping decorations)
-
For the Ultimate Unicorn Decorations:
- Assorted rainbow sprinkles (jimmie, nonpareils, confetti)
- Edible glitter (pink, iridescent, or gold)
- Edible sugar pearls (various sizes)
- Pre-made edible unicorn horn and ears (available at specialty baking stores or online, or you can craft them from fondant)
- Optional: White chocolate candy melts for securing decorations
Phase 1: Baking the Vibrant Cake Layers
-
Prepare Your Pans and Preheat the Oven:
Let’s get started by preheating our oven to a cozy 350°F (175°C). Then, prepare three 8-inch round cake pans. I like to grease them really well, line the bottoms with parchment paper circles, and then grease and flour the parchment too. This ensures our beautiful cake layers will release without a hitch. A perfectly prepped pan is the first step to a perfect cake!
-
Whisk Together Dry Ingredients:
In a medium bowl, combine your sifted all-purpose flour, baking powder, baking soda, and salt. Give these a good whisk to ensure they’re thoroughly mixed and aerated. This step is super important for achieving that light, fluffy texture we’re aiming for in our Ultimate Unicorn Ice Cream Cake layers.
-
Cream the Butter and Sugar:
In a large bowl, using an electric mixer fitted with a paddle attachment (or a hand mixer), beat the softened unsalted butter on medium-high speed until it’s light and fluffy, about 2-3 minutes. Then, gradually add the granulated sugar, beating for another 3-5 minutes until the mixture is truly pale and fluffy. This creaming process incorporates air, which contributes significantly to the cake’s tenderness.
-
Add Eggs and Vanilla:
Add the eggs, one at a time, beating well after each addition until fully incorporated. Scrape down the sides of the bowl as needed to ensure everything is mixing evenly. Once all eggs are in, beat in the pure vanilla extract. The mixture might look a little curdled at this point, but don’t worry, it will come together once we add the dry and wet ingredients.
-
Alternate Dry and Wet Ingredients:
Now, with the mixer on low speed, gradually add the dry ingredients to the wet ingredients in three additions, alternating with the buttermilk in two additions, beginning and ending with the dry ingredients. For example, add about a third of the flour mixture, mix until just combined, then half the buttermilk, mix, another third of flour, mix, the remaining buttermilk, mix, and finally the last third of flour, mixing until just barely combined. Be careful not to overmix! Overmixing develops the gluten too much, leading to a tough cake. A few streaks of flour are okay; we’ll finish mixing by hand.
-
Divide and Color the Batter:
Divide the finished cake batter evenly into five separate small bowls. Now comes the fun part! Using your gel food colorings, gently tint each bowl of batter a different pastel shade – think soft pink, sky blue, lavender purple, sunshine yellow, and mint green. Use a small amount of coloring and add more if needed to achieve your desired vibrancy. Stir gently until the color is uniform in each bowl.
-
Layer and Swirl the Colors:
Take your three prepared 8-inch cake pans. For each pan, spoon dollops of each colored batter randomly into the pan. You don’t need to be precise, just aim for an even distribution of colors. Once all the batter is in the pans, take a skewer or a butter knife and gently swirl the colors together once or twice. Be careful not to over-swirl, or the colors will just blend into a muddy mess. We want distinct, marbled unicorn magic!
-
Bake and Cool:
Bake the cake layers for 25-30 minutes, or until a wooden skewer inserted into the center of each cake comes out clean. Keep an eye on them! Cake layers bake quickly. Once baked, remove the pans from the oven and let them cool on wire racks for about 10-15 minutes before inverting them onto the racks, carefully peeling off the parchment paper, and allowing them to cool completely. It’s absolutely crucial that the cake layers are completely cool before we move on, especially for an ice cream cake, as any warmth will melt our ice cream! You can even wrap them tightly in plastic wrap and chill them in the fridge or freezer for a short while to ensure they are firm and cold.
Phase 2: Preparing the Magical Ice Cream Filling
-
Soften the Ice Cream:
Remove the two quarts of premium vanilla ice cream from the freezer and let it sit at room temperature for about 15-20 minutes, or until it’s soft enough to spread easily but not completely melted. It should have the consistency of soft-serve ice cream.
-
Divide and Tint the Ice Cream:
Divide the softened vanilla ice cream into four separate bowls. Using your gel food colorings, tint each bowl a different pastel shade – for example, pink, blue, purple, and yellow. Stir gently but thoroughly until the color is uniform in each bowl. If you’re opting for different flavors, you could also stir in a small amount of flavor extract here (e.g., raspberry for pink, blueberry for blue).
-
Prepare for Layering:
Line an 8-inch round cake pan (or a springform pan with a removable bottom, which makes this step much easier!) with plastic wrap, leaving a generous overhang on all sides. This plastic wrap will act as a sling to help you remove the frozen ice cream disk later.
-
Create the First Ice Cream Layer:
Spread one of your colored ice cream mixtures (let’s say purple) evenly into the bottom of the plastic-lined pan. Smooth the top with an offset spatula. Place the pan in the freezer for at least 30-45 minutes, or until this layer is firm to the touch. This intermediate freezing is key to distinct layers.
-
Add Subsequent Layers:
Once the first layer is firm, remove the pan from the freezer. Spread the next colored ice cream mixture (e.g., blue) evenly over the purple layer. Smooth and return to the freezer. Repeat this process for the remaining two colors (pink, then yellow), freezing each layer for 30-45 minutes until firm before adding the next. This meticulous layering is what creates the beautiful rainbow effect within the ice cream of our Ultimate Unicorn Ice Cream Cake.
-
Final Freeze for Ice Cream Disk:
After the final ice cream layer is in place and smoothed, cover the pan with more plastic wrap and return it to the freezer. Allow it to freeze for at least 4-6 hours, or preferably overnight, until the entire ice cream disk is rock solid. This solid disc will be much easier to handle when we assemble the cake.
Phase 3: Crafting the Silky Swiss Meringue Buttercream
Swiss Meringue Buttercream is the perfect choice for our Ultimate Unicorn Ice Cream Cake because it’s incredibly stable, less sweet than traditional American buttercream, and has a silky-smooth texture that pipes beautifully.
-
Prepare the Meringue Base:
Combine the egg whites and granulated sugar in a large heatproof bowl. Place this bowl over a saucepan of simmering water, ensuring the bottom of the bowl does not touch the water (this is a double boiler setup). Whisk constantly with a balloon whisk until the sugar has completely dissolved and the mixture reaches 160°F (71°C) on an instant-read thermometer. To check for dissolved sugar, rub a small amount of the mixture between your fingers; if it feels completely smooth, you’re good to go. Heating the egg whites to this temperature is crucial for food safety and for creating a stable meringue.
-
Whip the Meringue:
Remove the bowl from the heat. Transfer the hot egg white mixture to the bowl of an electric stand mixer fitted with the whisk attachment. Begin whisking on medium speed, gradually increasing to high. Whip until the meringue is very thick, glossy, and forms stiff peaks. The bowl should feel cool to the touch, indicating the meringue has properly cooled down, which usually takes about 8-12 minutes. This creates a strong, airy base for our buttercream.
-
Add the Butter, Gradually:
Switch to the paddle attachment. With the mixer on medium-low speed, begin adding the softened (but still cool) butter, one piece at a time. Add a piece, let it fully incorporate, then add the next. It might look curdled or soupy at some points – don’t panic! This is completely normal and part of the process. Just keep mixing. If it looks very soupy, try chilling the bowl in the fridge for 10-15 minutes and then resuming mixing. If it looks curdled, keep mixing; it will usually come together. Patience is a virtue here!
-
Finish and Flavor:
Once all the butter has been added and the mixture has transformed into a smooth, fluffy buttercream, add the vanilla extract and a pinch of salt. Beat on medium-high speed for another 1-2 minutes until the buttercream is incredibly light, airy, and velvety smooth. This is your base for frosting the Ultimate Unicorn Ice Cream Cake.
-
Color the Buttercream for Decorations (Optional):
If you plan to pipe a colorful unicorn mane, divide a portion of your finished buttercream into several small bowls. Tint each bowl with a different pastel gel food coloring, stirring gently until the color is uniform. Cover these colored buttercreams with plastic wrap directly touching the surface until ready to use.
Phase 4: Assembling the Ultimate Unicorn Ice Cream Cake
This is where the magic truly comes together! Work quickly to keep the ice cream frozen.
-
Level the Cake Layers:
Ensure your cooled cake layers are perfectly flat. Using a long serrated knife or a cake leveling tool, carefully trim any domes off the top of your cake layers so they are level. This creates a stable and beautiful foundation for our ice cream cake.
-
First Cake Layer Placement:
Place one of your leveled cake layers on your serving plate or cake stand. If using a turntable, place a non-slip mat underneath the cake stand. Apply a small dab of buttercream to the center of the plate before placing the cake layer to help secure it.
-
Retrieve and Place the Ice Cream Disk:
Remove the fully frozen ice cream disk from the freezer. Using the plastic wrap overhang as a sling, carefully lift the ice cream disk out of the pan. Peel away the plastic wrap. Gently center the ice cream disk on top of your first cake layer. Work quickly here to prevent melting!
Optional Chocolate Layer for Stability:
If you want an extra layer of stability and flavor, you can melt white chocolate chips and cool them slightly. Once the first cake layer is on the plate, brush a thin layer of cooled melted white chocolate onto its top surface before placing the ice cream disk. This acts as a barrier and prevents the cake from absorbing moisture from the ice cream, keeping it fresh longer and adding a nice snap.
-
Second Cake Layer:
Carefully place the second leveled cake layer directly on top of the ice cream disk, pressing down very gently to ensure it’s level.
-
Apply a Crumb Coat:
Using an offset spatula, apply a very thin layer of your Swiss meringue buttercream all over the top and sides of the cake. This is called a “crumb coat,” and its purpose is to trap any loose cake crumbs, preventing them from appearing in your final, pristine frosting layer. Don’t worry about perfection here, just aim for a thin, even coat.
-
Chill the Crumb Coat:
Place the entire cake in the freezer for 20-30 minutes, or until the crumb coat is firm to the touch. This step is crucial for stability and a smooth final finish. The cold temperature will also help solidify the ice cream further, making the final frosting process much easier.
-
Apply the Final Frosting Layer:
Once the crumb coat is firm, remove the cake from the freezer. Apply a generous, even layer of the plain white Swiss meringue buttercream all over the top and sides of the cake. Use an offset spatula or a bench scraper to smooth the sides and top as much as possible, aiming for a clean, professional finish. Dip your spatula in hot water and wipe it clean between strokes for an extra smooth surface.
-
Final Chill Before Decorating:
Return the frosted cake to the freezer for another 30 minutes to firm up the outer buttercream layer. This will make decorating much easier as the surface will be less prone to smudging.
Phase 5: Decorating the Ultimate Unicorn Ice Cream Cake Extravaganza
Now for the most exciting part – bringing our unicorn to life with vibrant decorations!
-
Position the Unicorn Horn and Ears:
Once your cake is firm from its final chill, carefully position the edible unicorn horn in the center-front of the cake’s top. Place the edible ears on either side of the horn. If they feel unstable, you can use a tiny dab of melted white chocolate candy melts on their bases to secure them firmly to the cake. This forms the foundation of our unicorn’s majestic head.
-
Pipe the Magical Mane:
Load your piping bags with the various colored buttercreams you prepared earlier. Use different piping tips (e.g., star tip, petal tip, round tip) to create a beautiful, whimsical mane that cascades down the side of the cake, starting from around the unicorn horn and ears. Pipe swirls, rosettes, stars, and waves, alternating colors to create a truly magical, rainbow effect. Don’t be afraid to be creative here! The more playful, the better for our Ultimate Unicorn Ice Cream Cake!
-
Add Sparkle and Sprinkles:
While the buttercream mane is still fresh, gently press your assorted rainbow sprinkles into and around the piped mane and along the base of the cake. You can even strategically place some on the top surface. For an extra touch of magic, use a clean, dry food-safe brush to dust edible glitter over the mane and around the horn and ears. The glitter catches the light beautifully, enhancing the enchanting look.
-
Place Edible Pearls:
Dot various sizes of edible sugar pearls around the cake, either individually or in small clusters. These add a lovely texture and elegant finish to your unicorn design. You can place them along the bottom border, scattered on the top, or nestled within the buttercream mane.
-
Final Freeze and Serving:
Once decorated, return the Ultimate Unicorn Ice Cream Cake to the freezer for at least 2-4 hours to allow the ice cream to become rock solid again and the decorations to set. When you’re ready to serve, take the cake out of the freezer and let it sit at room temperature for 15-20 minutes before slicing. This allows the ice cream to soften just enough for easy cutting while keeping the cake firm. Enjoy the magical moment of serving your incredible creation! This cake is sure to bring joy and wonder to any celebration.
<h2>Conclusion:</h2>
<p>Well, my fellow dessert enthusiasts, we’ve reached the sweet finale of our culinary journey! I truly hope you’re feeling inspired and excited to bring a burst of vibrant joy and unparalleled deliciousness into your life, or the lives of someone special. This isn’t just another dessert; it’s an experience, a statement, and an unforgettable treat that promises to light up any room it enters. I’ve poured my heart into guiding you through each step, and now it’s time for you to take the reins and create something truly spectacular.</p>
<h4>Why This Recipe is an Absolute Must-Try!</h4>
<p>If there’s one recipe that encapsulates pure joy and wonder, it has to be this one. The sheer visual impact of those swirling pastel colors, the edible glitter, and the delightful toppings instantly transports you to a whimsical wonderland. <strong>It’s a showstopper, a conversation starter, and an absolute magnet for smiles.</strong> Beyond its stunning appearance, the taste is equally enchanting. Imagine layers of soft, moist cake perfectly complemented by creamy, dreamy ice cream, all enveloped in a cloud of fluffy, sweet frosting. It’s a symphony of textures and flavors that are both refreshing and utterly satisfying. Each bite is a delightful fusion of childhood nostalgia and sophisticated indulgence, making it perfect for both kids and adults who are young at heart. Whether you’re celebrating a birthday, a special milestone, or simply want to add a touch of magic to an ordinary day, this <strong>Ultimate Unicorn Ice Cream Cake</strong> delivers on every front. It proves that creating something breathtaking doesn’t have to be overly complicated, and the reward of seeing faces light up when this masterpiece is unveiled is truly priceless. It’s a testament to the fact that food can be art, and delicious art at that! Trust me, this isn’t just a dessert; it’s a memory in the making, and you absolutely deserve to experience the magic of bringing it to life in your own kitchen.</p>
<h4>Elevate Your Creation: Serving Suggestions & Creative Variations</h4>
<p>Once your magnificent creation is ready, you might wonder how to serve it for maximum impact or how to put your unique spin on it. For serving, I always recommend presenting slices on individual plates, perhaps with a scattering of fresh berries like raspberries or blueberries for a burst of contrasting color and tartness. A delicate drizzle of a simple fruit coulis or a tiny dollop of freshly whipped cream can also elevate the experience, adding an extra layer of elegance. And, of course, a few more sprinkles never hurt anyone! When it comes to variations, the sky’s the limit for your creativity. Feel free to experiment with different ice cream flavors – imagine a strawberry swirl, a vibrant mint chip, or even a rainbow sherbet layer for an even more kaleidoscopic effect. You could also change up the cake base; a funfetti cake mix would add extra sprinkles within the cake itself, or for a richer twist, a delicate chocolate cake could create a “dark unicorn” theme that’s surprisingly chic. For the frosting, consider a cream cheese frosting for a tangy counterpoint, or even a marshmallow fluff frosting for extra gooey sweetness. Don’t be afraid to fold in mini chocolate chips, crushed cookies, or even mini marshmallows into your ice cream layers before freezing for added texture and surprise. For an adult gathering, a tiny splash of a complementary liqueur (like raspberry or vanilla vodka) in the cake batter or a boozy berry sauce served alongside could turn this whimsical treat into a sophisticated indulgence. The beauty of this recipe is its adaptability; it’s a fantastic canvas for your imagination!</p>
<h4>Your Turn to Create Magic!</h4>
<p>Now that you have all the tips, tricks, and inspiration at your fingertips, I genuinely hope you feel empowered to give this sensational recipe a try. Don’t be intimidated by its impressive appearance; remember, every great chef started somewhere, and the joy is truly in the process of creation. <strong>Unleash your inner dessert artist and let your creativity shine!</strong> I promise, the effort is incredibly rewarding, and the smiles it brings will be worth every moment. Once you’ve conjured up your own magical confection, I would absolutely love to hear about your experience. Did you add your own unique twist? What was the most fun part of the process? Did it bring joy to your family and friends? Please, don’t keep your triumphs a secret! Share your stories, your photos, and your tips with me and our community. Your culinary adventures inspire us all, and I can’t wait to see the incredible creations you’ll undoubtedly conjure up. Happy baking (and freezing)!</p>
Ultimate Unicorn Ice Cream Cake
A magical, show-stopping dessert featuring vibrant, fluffy vanilla cake layers, a colorful, creamy ice cream filling, silky Swiss meringue buttercream, and dazzling unicorn decorations. Perfect for birthdays, themed parties, or any celebration, offering a delightful symphony of textures and tastes.
Ingredients
-
2 ½ cups (300g) all-purpose flour, sifted
-
1 ½ tsp baking powder
-
½ tsp baking soda
-
½ tsp salt
-
1 cup (226g) unsalted butter, softened
-
2 cups (400g) granulated sugar
-
4 large eggs, room temp
-
1 tbsp pure vanilla extract
-
1 cup (240ml) buttermilk, room temp
-
Pastel gel food coloring (pink, blue, purple, yellow, green)
-
2 quarts (approx. 8 cups) premium vanilla ice cream, softened
-
5 large egg whites
-
1 ½ cups (300g) granulated sugar
-
1 ½ cups (340g) unsalted butter, softened, cut into 1-inch pieces
-
2 tsp pure vanilla extract
-
Pinch of salt
-
Assorted rainbow sprinkles
-
Edible glitter
-
Edible sugar pearls
-
Edible unicorn horn and ears
-
Optional: 1 cup (120g) melted white chocolate chips (for stability)
-
Optional: ½ cup (120ml) heavy cream, whipped (for lighter ice cream)
-
Optional: White chocolate candy melts (for securing decorations)
Instructions
-
Step 1
Preheat oven to 350°F (175°C). Grease, line with parchment, and flour three 8-inch round cake pans. -
Step 2
In a medium bowl, whisk sifted flour, baking powder, baking soda, and salt. -
Step 3
In a large bowl, beat softened butter until light and fluffy (2-3 min). Gradually add granulated sugar, beating until pale and fluffy (3-5 min). -
Step 4
Add eggs one at a time, beating well after each. Beat in vanilla extract. -
Step 5
On low speed, alternately add dry ingredients (in 3 additions) and buttermilk (in 2 additions), starting and ending with dry. Mix until just combined; do not overmix. -
Step 6
Divide batter evenly into 5 bowls. Tint each bowl a different pastel shade using gel food coloring (pink, blue, purple, yellow, green). -
Step 7
Spoon dollops of each colored batter randomly into the three prepared pans. Gently swirl once or twice with a skewer or knife for a marbled effect. -
Step 8
Bake 25-30 min, or until a skewer comes out clean. Cool in pans 10-15 min, then invert onto wire racks, remove parchment, and cool completely. Chill if desired for firm layers. -
Step 9
Let 2 quarts vanilla ice cream soften at room temp for 15-20 min. Divide into 4 bowls and tint each a different pastel shade (e.g., pink, blue, purple, yellow) using gel food coloring. -
Step 10
Line an 8-inch round pan with plastic wrap. Spread one colored ice cream layer, smooth, and freeze 30-45 min. Repeat for remaining colors, freezing each layer until firm. After the final layer, freeze 4-6 hours or overnight until rock solid. -
Step 11
Combine egg whites and granulated sugar in a heatproof bowl over simmering water. Whisk constantly until sugar dissolves and mixture reaches 160°F (71°C). -
Step 12
Remove from heat. Transfer to a stand mixer with whisk attachment. Whip on medium-high until thick, glossy, stiff peaks form and bowl is cool to touch (8-12 min). -
Step 13
Switch to paddle attachment. On medium-low speed, gradually add softened butter pieces, incorporating each. Continue mixing until smooth and fluffy. Add vanilla extract and pinch of salt; beat on medium-high for 1-2 min until light and smooth. -
Step 14
Divide a portion of buttercream; tint with pastel gel food coloring for piping decorations. Cover until ready to use. -
Step 15
Trim any domes off cooled cake layers. Place one leveled cake layer on a serving plate, securing with a dab of buttercream. -
Step 16
Remove frozen ice cream disk from pan using plastic wrap sling. Peel wrap and center disk on first cake layer. Work quickly. (Optional: Brush a thin layer of cooled melted white chocolate on the cake layer before adding ice cream for stability). -
Step 17
Carefully place the second leveled cake layer on top of the ice cream disk, pressing gently. -
Step 18
Apply a very thin layer of Swiss meringue buttercream all over the cake. Freeze for 20-30 min until firm. -
Step 19
Apply a generous, even layer of plain white Swiss meringue buttercream to top and sides; smooth. Freeze for another 30 min to firm up the buttercream. -
Step 20
Position edible unicorn horn in center-front of cake’s top, with ears on either side. Secure with melted white chocolate candy melts if needed. -
Step 21
Load piping bags with colored buttercreams and various tips. Pipe a whimsical, colorful mane cascading from around the horn and ears down the side of the cake, using swirls, rosettes, stars, and waves. -
Step 22
While mane is fresh, press assorted rainbow sprinkles into and around the mane and along the base of the cake. Dust edible glitter over the mane, horn, and ears. -
Step 23
Dot various sizes of edible sugar pearls around the cake. Freeze decorated cake for 2-4 hours. Before serving, let sit at room temp for 15-20 min for easier slicing.
Important Information
Nutrition Facts (Per Serving)
It is important to consider this information as approximate and not to use it as definitive health advice.
Allergy Information
Please check ingredients for potential allergens and consult a health professional if in doubt.

Leave a Comment