
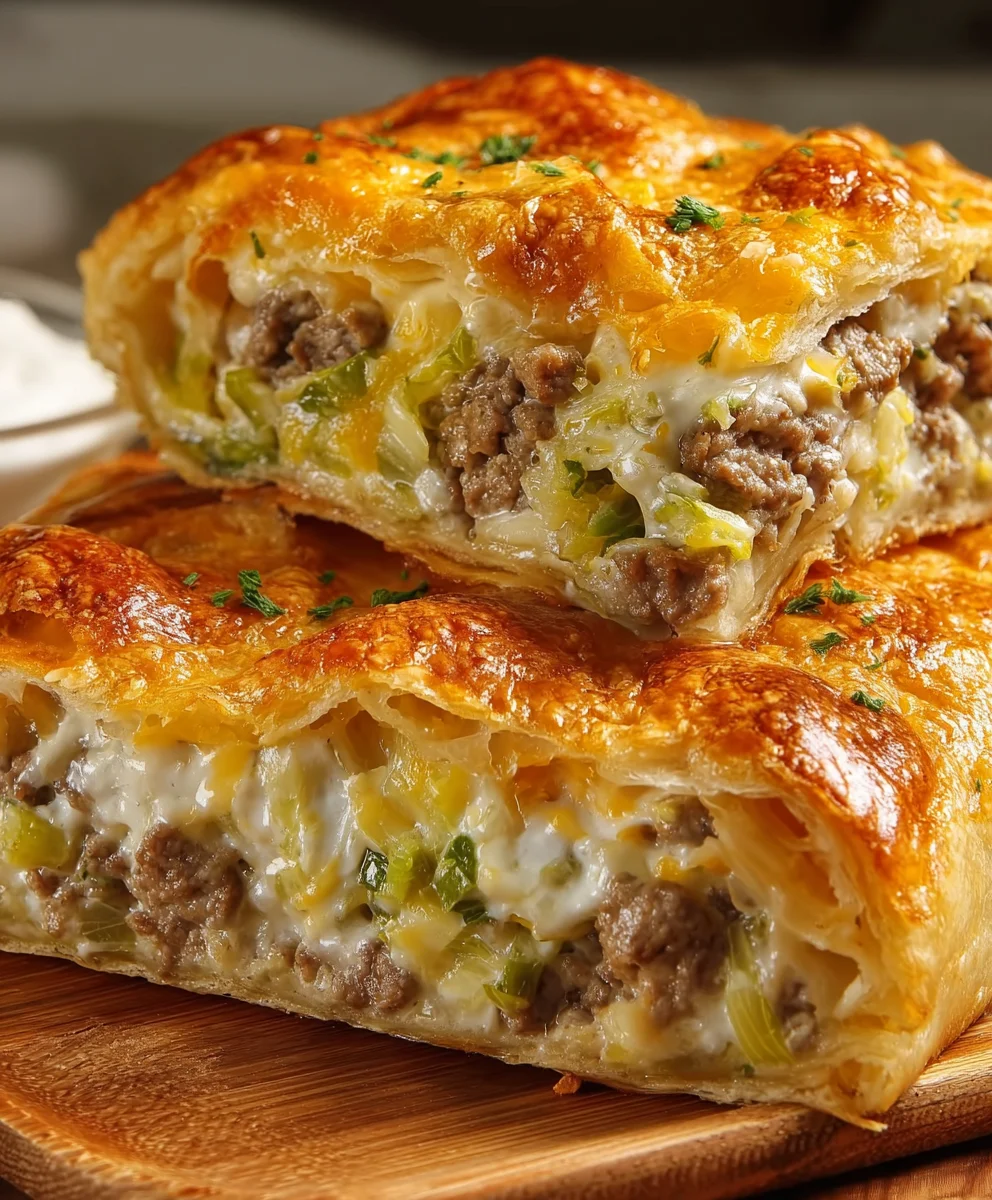
Ultimate Runza Casserole is here to redefine your idea of comfort food! Imagine taking all the beloved, hearty flavors of the iconic Runza sandwich – that savory blend of seasoned ground beef and tender cabbage, enveloped in soft, pillowy dough – and transforming it into an incredibly convenient, deeply satisfying casserole that’s perfect for any occasion. This dish isn’t just a meal; it’s a warm embrace, a culinary nod to the German-Russian heritage that brought the original ‘bierock’ (the precursor to the Runza) to the American Great Plains.
Why This Ultimate Runza Casserole Will Become Your New Family Favorite
People absolutely adore this recipe because it delivers all the nostalgic taste of a traditional Runza without the meticulous individual dough wrapping. It’s the ultimate weeknight solution for feeding a hungry crowd, offering that perfect balance of robust flavor, comforting texture, and ease of preparation. The tender, seasoned meat and cabbage filling is beautifully complemented by a biscuit-like topping, ensuring every spoonful is packed with that unique, irresistible Runza goodness. I am so excited for you to experience the convenience and deliciousness of this Ultimate Runza Casserole firsthand!

Ingredients:
- For the Dough:
- Active Dry Yeast: 2 ¼ teaspoons (1 standard packet), essential for a fluffy crust.
- Granulated Sugar: 1 teaspoon (for yeast activation) + 2 tablespoons (for the dough itself), balancing the savory notes.
- Warm Water: ¼ cup (around 105-115°F / 40-46°C), just right for waking up the yeast.
- Warm Milk: 1 ¼ cups (whole milk for richness, also 105-115°F / 40-46°C), contributing to a tender crumb.
- Unsalted Butter: ¼ cup (½ stick), melted and slightly cooled, adding richness and pliability.
- Large Egg: 1, at room temperature, for structure and a golden hue.
- All-Purpose Flour: 4 ½ to 5 cups, plus extra for dusting (I always keep a little more on hand), the backbone of our dough.
- Salt: 1 ½ teaspoons, enhancing all the flavors.
- For the Savory Filling:
- Ground Beef: 2 pounds (80/20 lean is my preference for maximum flavor without being overly greasy).
- Yellow Onion: 1 large, finely chopped, providing aromatic sweetness.
- Garlic: 3 cloves, minced, for that unmistakable savory depth.
- Green Cabbage: 1 medium head (approximately 2-2.5 pounds), cored and very thinly shredded or finely chopped, the signature element of any Runza dish.
- Beef Broth: ½ cup, to keep the filling moist and flavorful.
- Worcestershire Sauce: 1 tablespoon, for a touch of umami.
- Dijon Mustard: 1 teaspoon (optional, but I find it adds a subtle tang that really elevates the dish).
- Salt: 1 ½ teaspoons, or to taste, always adjust to your preference.
- Black Pepper: ½ teaspoon, freshly ground, or to taste, for a hint of warmth.
- Caraway Seeds: ½ teaspoon (optional, but a classic Runza seasoning that brings a unique character).
- Sharp Cheddar Cheese: 1 ½ cups, shredded (or Swiss, if you prefer), melting beautifully into the rich filling.
- For Assembly and Topping:
- Unsalted Butter: 2 tablespoons, melted (for brushing the top crust), for a beautiful golden finish.
Preparing the Dough for Your Ultimate Runza Casserole:
- Activate the Yeast: In a large mixing bowl (or the bowl of your stand mixer), combine the warm water and 1 teaspoon of granulated sugar. Sprinkle the active dry yeast evenly over the top. Let this mixture sit undisturbed for 5 to 10 minutes. You’ll know your yeast is alive and well when it becomes wonderfully foamy and fragrant, indicating it’s ready to make our dough light and airy. If it doesn’t foam, it might mean your water wasn’t the correct temperature, or your yeast could be expired; in that case, it’s best to start again with fresh yeast and properly tempered water. This initial activation step is absolutely crucial for achieving that perfectly risen, tender dough.
- Combine Wet Ingredients: Once your yeast is visibly active, gently whisk in the warm milk, the melted butter (ensuring it’s only slightly warm, not hot enough to kill the yeast), and the room-temperature large egg. A quick test with your finger should tell you if the mixture is comfortably warm, like a pleasant bath.
- Add Dry Ingredients: Now, gradually incorporate the remaining 2 tablespoons of granulated sugar, the salt, and about 3 cups of the all-purpose flour into your wet mixture. If you’re using a stand mixer with a dough hook, mix on low speed until everything is just combined. If you’re mixing by hand, use a sturdy wooden spoon for this initial stage.
-
Knead the Dough: Continue adding the remaining flour, about ½ cup at a time, until the dough comes together into a cohesive ball and begins to pull away from the sides of the bowl. The dough should feel soft and slightly tacky, but not overly sticky.
- Stand Mixer Method: Increase the speed to medium-low and knead for a full 8-10 minutes. As it kneads, you’ll notice the dough transforming, becoming smooth, elastic, and springy. A good way to check for proper kneading is the “windowpane test”: pinch off a small piece of dough and gently stretch it. If you can stretch it thin enough to see light through it without tearing, your gluten has developed beautifully.
- By Hand Method: Turn the dough out onto a lightly floured surface. Knead with enthusiasm for 10-15 minutes. Use the heels of your hands to push the dough away, fold it back over itself, rotate, and repeat. Add only as much flour as needed to prevent sticking, as too much flour can make the dough tough. You’ll literally feel the dough change from a shaggy, uneven mass to a smooth, resilient, and elastic ball under your hands.
- First Rise: Lightly coat a clean, large bowl with a little oil. Place your kneaded dough into the bowl, turning it once to ensure the entire surface is lightly greased. This prevents a dry skin from forming. Cover the bowl securely with plastic wrap or a clean, damp kitchen towel. Find a warm, draft-free spot in your kitchen (like an oven with just the light on) and let the dough rise for 1 to 1 ½ hours, or until it has distinctly doubled in size. Resist the urge to rush this phase; a good first rise is paramount for a light, airy crust.
- Punch Down and Prepare for Shaping: Once the dough has proudly doubled, gently punch it down in the center to release the accumulated air. I like to briefly knead it for about 30 seconds to further redistribute the yeast and gluten, which can help with an even texture. At this point, your beautifully prepared dough is ready to be divided and rolled out, eager to become the glorious layers of our Ultimate Runza Casserole.
Crafting the Savory Filling for Your Ultimate Runza Casserole:
- Brown the Beef: In a large skillet or Dutch oven, brown the ground beef over medium-high heat. Use a wooden spoon or spatula to break the beef into small, even crumbles as it cooks. Once the beef is thoroughly browned and no pink remains, it’s time to drain off any excess fat. This step is vital to prevent your casserole from becoming greasy. I usually tilt the pan and scoop out the fat, sometimes even giving it a final blot with a paper towel.
- Sauté Aromatics: Add the finely chopped yellow onion directly to the skillet with the browned beef. Reduce the heat to medium and cook the onion, stirring occasionally, until it softens and becomes translucent, which usually takes about 5-7 minutes. Then, add the minced garlic and cook for just one more minute until you can smell its wonderful fragrance. Be careful not to let the garlic burn, as scorched garlic can introduce a bitter note to your otherwise perfect filling.
- Cook the Cabbage: Now, add the star of the show – the very thinly shredded or finely chopped green cabbage – to the skillet. It might seem like an enormous amount at first, overflowing the pan, but trust me, cabbage cooks down significantly. Stir it in thoroughly with the beef, onions, and garlic. Cover the skillet and allow the cabbage to steam and soften for about 10-15 minutes, stirring periodically to ensure even cooking. You’re aiming for tender cabbage, but not mushy; it should still have a slight bit of texture.
- Flavor Building: Pour in the beef broth and Worcestershire sauce. Stir in the Dijon mustard (if you’re using it – I highly recommend it for that extra layer of complexity), salt, freshly ground black pepper, and the caraway seeds (if they’re part of your flavor profile). Continue to cook, uncovered this time, for another 5-10 minutes. This allows some of the liquid to evaporate, concentrating those rich flavors and allowing them to meld together into a truly harmonious blend. Taste and adjust the seasonings as needed here; this filling is the very heart of our Runza Casserole, so make sure it’s seasoned exactly to your liking.
- Cool and Combine with Cheese: Remove the skillet from the heat and allow the filling to cool down slightly. This brief cooling period is important because it prevents the cheese from melting too quickly and clumping when you add it. Once the filling has cooled a bit, stir in the shredded sharp cheddar cheese. I find the sharpness of cheddar beautifully complements the savory beef and tender cabbage, but feel free to experiment with other melting cheeses like Swiss or Monterey Jack if you prefer. Ensuring the filling isn’t piping hot when you add the cheese is key for a beautifully distributed, melty cheese throughout.
Assembling the Ultimate Runza Casserole:
- Prepare Baking Dish: Begin by lightly greasing a standard 9×13-inch baking dish. I often use a pat of butter or a quick spray of cooking spray; this helps prevent sticking and ensures easy removal of those glorious slices later.
- Divide the Dough: Turn your beautifully risen dough out onto a lightly floured surface. Gently divide it into two equal portions. One portion will form the sturdy bottom crust of your casserole, and the other will create the perfect golden top.
- Bottom Crust: Take one portion of the dough and, using a rolling pin, roll it out into a rectangle. You’ll want this rectangle to be large enough to comfortably fit the bottom of your 9×13-inch baking dish and extend slightly up the sides. Carefully transfer the rolled dough into your prepared dish, gently pressing it into all the corners and ensuring a slight overhang around the edges. This creates a wonderful, even foundation for our hearty filling.
- Spread the Filling: Now, evenly spoon and spread your delicious, savory beef and cabbage filling over the bottom dough layer. Make sure to distribute it all the way to the edges, so every single bite of your Ultimate Runza Casserole is bursting with flavor.
- Top Crust: Take the second portion of dough and roll it out into another rectangle, roughly the same dimensions as your baking dish. Carefully lay this rolled dough over the filling, creating the perfect top crust for your casserole.
- Seal the Casserole: Bring up the overhanging edges of the bottom dough and gently fold them over the top crust. Now, firmly pinch the edges of the top and bottom dough together all around the perimeter to create a secure seal. You can crimp them decoratively with a fork, or simply press them together firmly with your fingers – the goal is to seal in all that deliciousness and prevent any filling from escaping during baking. I sometimes make a few small slits in the top dough with a sharp knife; this is mostly for aesthetics and allows a tiny bit of steam to escape, though the dough is usually forgiving enough without it.
- Optional Egg Wash (Highly Recommended!): For that truly professional, beautifully golden-brown, and slightly shiny crust, I highly recommend an egg wash. In a small bowl, whisk one large egg with a tablespoon of water or milk. Then, lightly brush this mixture evenly over the entire top surface of the casserole. This step really makes a difference in the final appearance.
- Second Brief Rise (Optional, but Beneficial): Cover the assembled casserole loosely with plastic wrap or a clean kitchen towel. Let it rest on your countertop for about 20-30 minutes while your oven preheats. This short resting period allows the dough to relax a bit and gives the yeast one last gentle “puff,” which contributes to a lighter, more tender crust.
Baking Your Ultimate Runza Casserole to Perfection:
- Preheat Oven: Preheat your oven to a steady 375°F (190°C). Make sure your oven rack is positioned in the middle of the oven to ensure even baking and browning of both the top and bottom crusts.
- Bake the Casserole: Carefully place the assembled Ultimate Runza Casserole into your preheated oven. Bake for approximately 30-40 minutes. You’ll know it’s done when the crust is a gorgeous, deep golden brown all over, and you can see the filling bubbling invitingly around the edges. If you notice the top browning too quickly before the filling is fully heated through or the bottom crust is done, you can loosely tent the casserole with aluminum foil for the last 10-15 minutes of baking. Remember, every oven has its own quirks, so it’s always a good idea to keep a watchful eye on your masterpiece! The incredible, savory aroma wafting from your kitchen will be your best indicator that pure perfection is nearing.
- Resting Period: Once baked to golden perfection, carefully remove the Ultimate Runza Casserole from the oven. This next step is crucial: let it rest on a wire rack for at least 10-15 minutes before you even think about slicing into it. This resting period is vital because it allows the rich filling to set and firm up, which will make it much easier to cut into neat, beautiful squares without the filling spilling out. Plus, it’s still incredibly hot when it first emerges from the oven, so a little patience here will prevent burnt tongues and ensure a much more enjoyable first bite!
Serving Suggestions and Storage for Your Ultimate Runza Casserole:
- Serving: Once it has rested, slice your Ultimate Runza Casserole into generous squares. This hearty dish is truly a complete and satisfying meal all on its own. However, I find it pairs wonderfully with a simple, crisp green salad tossed with a bright vinaigrette to offer a refreshing contrast to the richness. For those who love a little tang, some dill pickles or a spoonful of sauerkraut on the side are fantastic complements. A dollop of sour cream or a sprinkle of fresh, chopped parsley on top can also add a delightful flourish and an extra layer of flavor.
- Leftovers: Should you be so lucky as to have any leftovers of this incredible Ultimate Runza Casserole, they store beautifully! Transfer any remaining portions to an airtight container and refrigerate for up to 3-4 days. I often find that the flavors in this dish deepen and meld even further overnight, making it taste even better the next day!
- Reheating: To reheat individual slices, you can simply warm them in the microwave until heated through. However, for a superior texture and to regain that delightful crispiness of the crust, I highly recommend reheating larger portions in an oven preheated to 350°F (175°C) for about 15-20 minutes, or until the casserole is thoroughly hot in the center. If you’re reheating in the oven, covering it loosely with aluminum foil for the first part of the reheating process can help prevent the crust from drying out, then uncover for the last few minutes for a perfectly crisp finish.
- Freezing (for future cravings!): One of the best things about this Ultimate Runza Casserole is how incredibly well it freezes, making it an excellent candidate for meal prep! Once the casserole has cooled completely to room temperature, you can wrap individual slices or larger portions tightly in plastic wrap, then an additional layer of aluminum foil, and store them in a freezer-safe bag or container. It will keep beautifully in the freezer for up to 2-3 months. To enjoy from frozen, you can either thaw it overnight in the refrigerator and then reheat as directed above, or reheat directly from frozen in a preheated oven (around 350°F / 175°C) for about 30-45 minutes, keeping it loosely covered with foil for most of the cooking time, then uncovering for the final 10 minutes to crisp up the crust. This foresight will bring you immense joy on a busy weeknight!
Conclusion:
And there you have it, friends! We’ve journeyed through the steps of creating what I truly believe is not just a dish, but a culinary revelation. This isn’t merely another casserole; it’s a masterclass in comfort food, a testament to how simple ingredients can come together to create something truly extraordinary. I’ve personally poured my heart into perfecting this recipe, and what emerged is nothing short of spectacular. If you’re searching for a meal that will warm your soul, fill your belly, and utterly delight your taste buds, then look no further. This is the Ultimate Runza Casserole you’ve been dreaming of – a hearty, flavorful, and incredibly satisfying experience that effortlessly combines savory ground beef, tender cabbage, sweet onions, and a perfectly seasoned, creamy binder, all nestled under a golden, irresistible crust. It’s the kind of dish that brings people together, sparking conversations and creating cherished memories around the dinner table. Forget complicated techniques or obscure ingredients; this recipe celebrates robust flavors and heartwarming simplicity. It’s a go-to for busy weeknights when you need something substantial and delicious, yet it’s equally impressive for a casual get-together with friends or a family feast. Its ability to feed a crowd with minimal fuss, coupled with its universally appealing flavor profile, makes it an absolute triumph. You’ll find yourself craving its unique blend of savory and slightly sweet notes, and the comforting texture of every forkful. Seriously, it’s a game-changer.
Enhance Your Experience: Serving Suggestions & Creative Variations
Now that you’re armed with the knowledge to create this incredible casserole, let’s talk about how to make it truly your own, or how to elevate the dining experience even further. While the Ultimate Runza Casserole is a complete meal in itself, I love serving it alongside a crisp, fresh green salad with a tangy vinaigrette. The bright, acidic notes of the salad cut through the richness of the casserole beautifully, creating a perfectly balanced meal. A side of homemade dill pickles or a spoonful of sauerkraut also makes for an excellent accompaniment, adding that delightful zing that complements the hearty flavors so well. Don’t be shy about experimenting with variations either! For those who love a bit of heat, a pinch of red pepper flakes mixed into the beef mixture or a dash of hot sauce drizzled over the top before serving can add a wonderful kick. If you’re a cheese lover (and who isn’t?), consider sprinkling an extra layer of sharp cheddar or a blend of your favorite cheeses over the top during the last 10 minutes of baking for an extra gooey, golden crust. Vegetarians could adapt this concept using plant-based ground “meat” and perhaps some sautéed mushrooms for added umami, though it wouldn’t be a traditional Runza. You could also stir in some finely diced carrots or bell peppers with the cabbage and onions for extra nutrients and a pop of color. Leftovers, should you be so lucky to have any, are absolutely fantastic the next day, perhaps reheated in a pan until slightly crispy, or even tucked into a warm tortilla for a quick lunch wrap. The flavors tend to meld and deepen overnight, making it almost better the second time around!
Your Turn to Create and Share!
So, my friends, the recipe is complete, the secrets shared, and all that’s left is for you to embark on your own culinary adventure. I genuinely hope you’re feeling inspired to roll up your sleeves and bring this magnificent dish to life in your own kitchen. Trust me, the aroma alone as it bakes will be enough to get everyone excited! This isn’t just a recipe; it’s an invitation to experience comfort, flavor, and pure satisfaction. I am incredibly confident that once you take that first glorious bite, this will swiftly become a cherished staple in your family’s meal rotation. Please, don’t keep the joy to yourself! I absolutely adore hearing about your cooking triumphs. When you whip up this incredible casserole, I would be absolutely thrilled if you’d share your experience with me and our community. Did you add a unique twist? Was it a hit with your family? Snap a photo, drop a comment, or share your thoughts on social media. Your feedback and creativity inspire us all. Let’s spread the love for this truly remarkable and utterly delicious creation. Go forth, cook, enjoy, and let the comforting magic of this dish fill your home!

Ultimate Runza Casserole
A hearty beef and cabbage casserole that transforms the iconic Runza sandwich flavors into a convenient and deeply satisfying comfort food, perfect for any occasion.
Ingredients
-
2 ¼ tsp active dry yeast
-
1 tsp + 2 tbsp granulated sugar
-
¼ cup warm water (105-115°F)
-
1 ¼ cups warm milk (105-115°F)
-
¼ cup unsalted butter, melted
-
1 large egg, room temperature
-
4 ½ – 5 cups all-purpose flour
-
1 ½ tsp salt (for dough)
-
2 lbs ground beef (80/20 lean)
-
1 large yellow onion, finely chopped
-
3 cloves garlic, minced
-
1 medium head green cabbage (approx. 2-2.5 lbs), thinly shredded
-
½ cup beef broth
-
1 tbsp Worcestershire sauce
-
1 tsp Dijon mustard (optional)
-
1 ½ tsp salt (for filling)
-
½ tsp black pepper, freshly ground
-
½ tsp caraway seeds (optional)
-
1 ½ cups sharp cheddar cheese, shredded
-
1 tbsp water or milk (for egg wash)
Instructions
-
Step 1
Activate yeast by combining warm water, 1 tsp sugar, and yeast; let sit 5-10 min until foamy. Whisk in warm milk, melted butter, and 1 egg. Gradually add remaining 2 tbsp sugar, 1 ½ tsp salt, and flour; mix until combined. Knead 8-15 min until smooth and elastic. Place in a lightly oiled bowl, cover, and let rise 1-1.5 hours until doubled. Gently punch down dough. -
Step 2
Brown ground beef in a large skillet; drain fat. Add chopped onion, cook 5-7 min until soft, then add minced garlic and cook 1 min. Stir in shredded cabbage, cover, and steam 10-15 min until tender. Add beef broth, Worcestershire sauce, Dijon mustard (opt), 1 ½ tsp salt, ½ tsp black pepper, and caraway seeds (opt); cook uncovered 5-10 min until liquid reduces. Cool slightly, then stir in shredded cheddar cheese. -
Step 3
Lightly grease a 9×13-inch baking dish. Divide dough in half. Roll one half to fit the bottom and slightly up the sides of the dish. Evenly spread the cooled filling over the bottom dough layer. Roll the second half of dough to fit the top. Lay on top, bring up bottom edges, and firmly pinch to seal. Whisk 1 egg with 1 tbsp water or milk; brush over top crust. Optionally, let rest 20-30 min while oven preheats. -
Step 4
Preheat oven to 375°F (190°C). Bake for 30-40 minutes until the crust is golden brown and the filling is bubbling. If the top browns too quickly, loosely tent with aluminum foil. Remove from oven and let rest on a wire rack for 10-15 minutes before slicing into generous squares. Serve warm, optionally with a green salad, pickles, or sour cream. -
Step 5
Store leftover casserole refrigerated in an airtight container for up to 3-4 days. Reheat individual slices in the microwave or larger portions in an oven preheated to 350°F (175°C) for 15-20 min. For freezing, cool completely, wrap individual slices or portions tightly in plastic wrap and then foil, and store in a freezer-safe bag for up to 2-3 months. Thaw overnight in the refrigerator or reheat directly from frozen in a preheated oven (350°F/175°C) for 30-45 min, covered loosely with foil for most of the time, then uncovered to crisp up the crust.
Important Information
Nutrition Facts (Per Serving)
It is important to consider this information as approximate and not to use it as definitive health advice.
Allergy Information
Please check ingredients for potential allergens and consult a health professional if in doubt.

Leave a Comment