
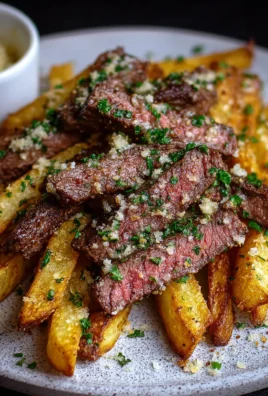
Tri Tip (2 Ways) is about to become your new go-to for an incredibly flavorful and surprisingly simple meal. This cut of beef, often found nestled in the bottom sirloin, boasts a fantastic marbling and a rich, beefy taste that’s absolutely irresistible. It’s no wonder tri tip has carved out a special place in the hearts (and on the grills) of so many home cooks. Its versatility is a huge part of its appeal; whether you’re a grilling enthusiast or prefer the oven, the tri tip delivers. What truly sets tri tip apart is its incredible tenderness and the way it soaks up marinades and rubs, transforming into a culinary masterpiece. We’re going to explore two distinct, yet equally delicious, approaches to preparing this magnificent cut of meat, ensuring you have options for any craving.
Tri Tip (2 Ways)
The tri-tip roast, a triangular-shaped cut from the sirloin, is a hidden gem that offers incredible flavor and tenderness when prepared correctly. It’s lean yet wonderfully marbled, making it perfect for a variety of cooking methods. Today, I’m going to show you how to unlock its full potential with two delicious preparation methods, offering you flexibility and fantastic results every time. Whether you’re craving a perfectly seared steakhouse-style roast or a smoky, slow-cooked masterpiece, this guide has you covered.
Ingredients:
Preparation Method 1: The Steakhouse Sear
This method focuses on achieving a beautiful, crusty exterior with a juicy, medium-rare interior, much like you’d find at a high-end steakhouse. It’s a quicker method, perfect for a weeknight dinner or when you want impressive results in a short amount of time.
Step 1: Prepare the Rub and Tri-Tip
Begin extract by patting your 2 & 1/2 pound tri-tip roast completely dry with paper towels. This is a crucial step for achieving a good sear. The drier the surface, the better the Maillard reaction will occur, creating that delicious brown crust. In a small bowl, combine the garlic salt, Lawry’s seasoning salt, kosher salt, black pepper, sugar, garlic powder, and parsley. Mix these ingredients thoroughly. The sugar acts as a tenderizer and aids in browning, while the parsley adds a fresh, aromatic note.
Step 2: Season the Roast
Gently rub the 1/4 cup of olive oil all over the tri-tip roast. Ensure it’s evenly coated, as this will help the rub adhere and contribute to the crust. Then, liberally apply the prepared spice rub to all sides of the roast, pressing it gently into the meat. Don’t be shy with the rub; a good coating is key to infusing flavor. Let the roast sit at room temperature for about 30-60 minutes before cooking. This allows the meat to come up closer to cooking temperature, promoting more even cooking.
Step 3: Searing and Roasting
Preheat your oven to 400°F (200°C). Heat a heavy, oven-safe skillet (cast iron is ideal) over medium-high heat. Add a touch more olive oil if needed, just enough to lightly coat the pan. Once the skillet is hot and shimmering, carefully place the seasoned tri-tip roast into the pan, fat side down if there’s a prominent fat cap. Sear the roast for about 2-3 minutes per side, until a deep brown crust forms. Once all sides are seared, transfer the skillet to the preheated oven.
Step 4: Roasting to Perfection
Roast the tri-tip for approximately 10-15 minutes per pound for medium-rare, or until an internal thermometer inserted into the thickest part of the roast (avoiding bone, if any) reads 130-135°F (54-57°C). For medium, aim for 135-140°F (57-60°C). The exact cooking time will vary depending on your oven and the thickness of the roast. Keep a close eye on the temperature.
Step 5: Resting and Slicing
Once the roast reaches your desired internal temperature, remove the skillet from the oven. Transfer the tri-tip to a cutting board and let it rest, tented loosely with foil, for at least 10-15 minutes. This resting period is absolutely critical for the juices to redistribute throughout the meat, ensuring a tender and moist result. Cutting too soon will cause all those delicious juices to run out onto the board. After resting, slice the tri-tip thinly against the grain. The grain of the tri-tip can be a bit tricky as it runs in different directions, so pay attention to the muscle fibers and slice perpendicular to them for maximum tenderness.
Preparation Method 2: The Smoky Oven Roast
This method utilizes a longer, slower cooking time in the oven with the option to add a hint of smoke, resulting in a incredibly tender and flavorful roast that slices like butter. It’s perfect for a weekend gathering or when you have a bit more time to dedicate to the cooking process.
Step 1: Prepare the Rub and Tri-Tip
Follow Step 1 and Step 2 from the Steakhouse Sear method. The same rub and initial preparation apply here. Patting the roast dry, applying olive oil, and thoroughly seasoning are essential for building flavor regardless of the cooking method. Allow the roast to sit at room temperature for 30-60 minutes.
Step 2: Slow Roasting
Preheat your oven to a lower temperature, around 275°F (135°C). This low and slow approach allows the connective tissues to break down gradually, resulting in exceptional tenderness. Place the seasoned tri-tip roast in a roasting pan or on a baking sheet. If you want to incorporate a smoky flavor, you can add a few wood chips (like hickory or mesquite) to the bottom of the pan, or even use a stovetop smoker.
Step 3: Cooking to Temperature
Roast the tri-tip for a longer duration, typically 1 to 1.5 hours, or until the internal temperature reaches around 125-130°F (52-54°C). This initial slow roast is designed to gently cook the interior and make it incredibly tender.
Step 4: The Sear Finish (Optional but Recommended)
Once the roast has reached the lower temperature, remove it from the oven. For a lovely crust, you can then sear it in a hot skillet with a little olive oil for about 1-2 minutes per side, as described in the Steakhouse Sear method. Alternatively, you can crank up your oven to its broiler setting and broil the roast for a few minutes per side, watching it very closely to prevent burning. This step adds that desirable crispy exterior.
Step 5: Resting and Slicing
After searing (or broiling), let the tri-tip rest again, tented with foil, for at least 15-20 minutes. This extended rest is even more important with slower-cooked meats to ensure maximum moisture retention. Once rested, slice the tri-tip thinly against the grain, just as you would with the steakhouse method. The result will be a remarkably tender and flavorful roast, perfect for sandwiches, salads, or as a main course.
Both of these methods offer a delicious way to enjoy tri-tip. Experiment with both to see which one becomes your favorite!
Conclusion:
You’ve just explored two fantastic ways to prepare a truly magnificent Tri Tip! This cut of beef, when handled with a little care and the right technique, transforms into an incredibly tender and flavorful centerpiece for any meal. Whether you opt for the smoky depth of the grilled preparation or the rich caramelization achieved through searing and oven-finishing, the results are consistently impressive. These methods are perfect for weeknight dinners that feel special or for entertaining friends and family without breaking the bank. Don’t hesitate to experiment with your favorite rubs and marinades to put your personal spin on this versatile cut.
We highly recommend serving your finished Tri Tip sliced thinly against the grain, accompanied by classic steakhouse sides like roasted potatoes, asparagus, or a fresh salad. For a more casual vibe, consider turning it into mouthwatering sandwiches or tacos. Remember, the beauty of this recipe lies in its adaptability. Feel free to adjust cooking times based on your preferred doneness and the thickness of your roast. So go ahead, give these Tri Tip recipes a try – I’m confident you’ll be delighted with the delicious results!
Frequently Asked Questions:
What is the best way to slice a Tri Tip?
The key to tender Tri Tip is to slice it thinly against the grain. Look for the direction the muscle fibers are running and cut perpendicular to them. This breaks down the connective tissues, ensuring a melt-in-your-mouth experience.
Can I prepare Tri Tip ahead of time?
Yes, you can certainly prepare the Tri Tip ahead of time. You can marinate it for up to 24 hours in the refrigerator. Once cooked, it’s best enjoyed fresh, but leftovers can be stored in an airtight container in the fridge for 2-3 days and reheated gently.
What if I don’t have a grill?
No problem! The second recipe option focuses on searing and oven-finishing, which is perfect for those without a grill. You’ll achieve a beautiful crust and tender interior right in your kitchen.
Tri Tip (2 Ways)
A versatile tri tip roast prepared using two distinct seasoning methods for different flavor profiles.
Ingredients
-
2 1/2 pound tri tip roast
-
1 1/2 teaspoons garlic salt
-
1 tablespoon Lawry’s seasoning salt
-
1 1/2 teaspoons kosher salt (Diamond Crystal)
-
1 teaspoon black pepper
-
1/2 teaspoon sugar
-
2 teaspoons garlic powder
-
1 tablespoon dried or fresh parsley
-
1/4 cup olive oil
Instructions
-
Step 1
Divide the tri tip roast into two equal portions. -
Step 2
For the first portion, rub with 1/2 tablespoon Lawry’s seasoning salt, 3/4 teaspoon kosher salt, 1/2 teaspoon black pepper, 1/4 teaspoon sugar, and 1 teaspoon garlic powder. Drizzle with 2 tablespoons olive oil and sprinkle with 1/2 tablespoon parsley. -
Step 3
For the second portion, rub with 1/2 tablespoon Lawry’s seasoning salt, 3/4 teaspoon garlic salt, 1/2 teaspoon kosher salt, 1/2 teaspoon black pepper, 1/4 teaspoon sugar, and 1 teaspoon garlic powder. Drizzle with 2 tablespoons olive oil and sprinkle with 1/2 tablespoon parsley. -
Step 4
Preheat oven to 400°F (200°C) or grill to medium-high heat. -
Step 5
Sear both tri tip portions for 2-3 minutes per side until well browned. -
Step 6
Transfer to a baking sheet (if using oven) or indirect heat on grill. Cook for approximately 30-40 minutes, or until internal temperature reaches 130-135°F (54-57°C) for medium-rare. -
Step 7
Let rest for 10-15 minutes before slicing against the grain.
Important Information
Nutrition Facts (Per Serving)
It is important to consider this information as approximate and not to use it as definitive health advice.
Allergy Information
Please check ingredients for potential allergens and consult a health professional if in doubt.

Leave a Comment