
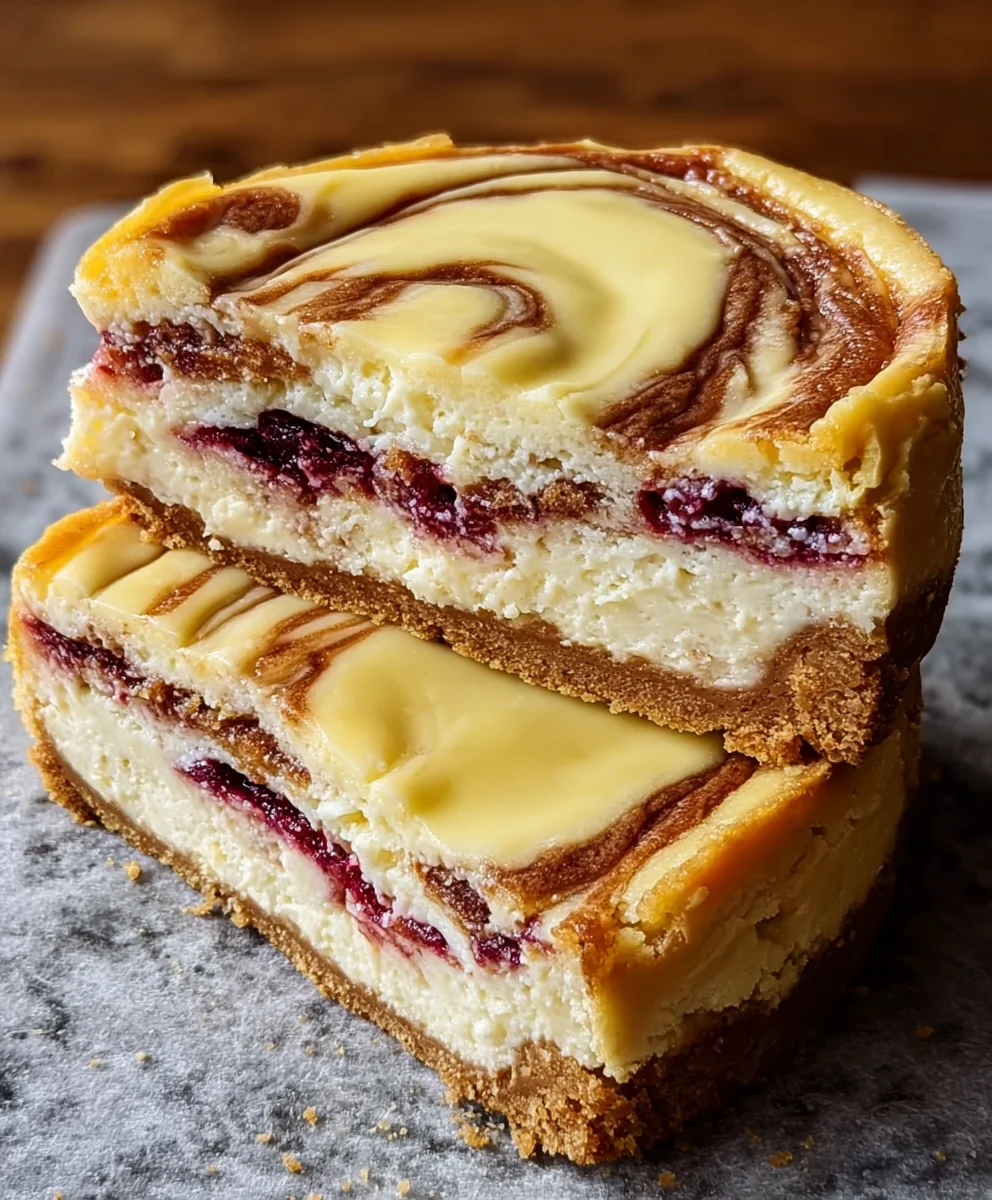
Swirled Cheesecake is more than just a dessert; it’s an edible masterpiece, a symphony of creamy indulgence and artistic flair that captivates both the eyes and the palate. There’s something inherently magical about the way the contrasting colors and flavors intertwine, creating a visually stunning presentation that promises an equally delightful eating experience. We all know and love the classic cheesecake – that velvety smooth, rich base that’s a timeless crowd-pleaser. But a Swirled Cheesecake elevates this beloved dessert to a whole new level, infusing it with bursts of vibrant fruit purees or decadent chocolate, each swirl a testament to thoughtful flavor pairing and a touch of culinary artistry. It’s the perfect centerpiece for any celebration, a guaranteed way to impress your guests, or simply a luxurious treat to savor on a quiet evening. Prepare to be enchanted by this exquisite rendition of a classic.

Ingredients:
- 2 cups graham cracker crumbs
- ½ cup unsalted butter, melted
- ¼ cup granulated sugar
- 3 cups cream cheese, softened
- 1 cup granulated sugar
- 1 teaspoon vanilla extract
- 3 large eggs
- 1 cup sour cream
- Zest of 2 lemons
- Juice of 1 lemon
- ½ cup lemon curd
- 1 tablespoon lemon juice
- ½ cup raspberry puree
- 1 tablespoon sugar
- Lemon zest curls, for garnish
Preparing the Crust
The foundation of our delightful Swirled Cheesecake is a classic graham cracker crust. This step is crucial for adding a satisfying crunch and a hint of sweetness that perfectly complements the creamy filling. Begin by preheating your oven to 350°F (175°C). In a medium bowl, combine the 2 cups of graham cracker crumbs with the melted ½ cup of unsalted butter. Stir until the crumbs are evenly moistened, resembling wet sand. This ensures a cohesive crust that won’t crumble when you slice into your finished cheesecake. Next, add the ¼ cup of granulated sugar to the crumb mixture and mix until well combined. This small amount of sugar adds just enough sweetness to balance the richness of the cheesecake filling.
Now, take your prepared 9-inch springform pan. Pour the graham cracker mixture into the bottom of the pan. Using the bottom of a glass or a flat-bottomed measuring cup, firmly press the crumbs evenly across the bottom of the pan. Don’t be shy with the pressing; a dense crust will hold together beautifully. For an even more robust crust, you can press about half an inch up the sides of the pan as well, creating a slight rim. This helps contain the filling and adds a professional touch. Place the prepared crust in the preheated oven and bake for 8-10 minutes, or until it’s lightly golden brown. This brief bake sets the crust and enhances its flavor. Once baked, remove the crust from the oven and let it cool completely on a wire rack while you prepare the cheesecake filling. This cooling period is important so that the hot crust doesn’t start cooking the filling prematurely.
Crafting the Cheesecake Filling
This is where the magic of our Swirled Cheesecake truly begins. In a large mixing bowl, place the 3 cups of softened cream cheese. It’s absolutely essential that your cream cheese is at room temperature for a smooth, lump-free filling. Cold cream cheese will result in a lumpy texture, no matter how much you beat it. Beat the cream cheese with an electric mixer on medium speed until it’s completely smooth and creamy. Scrape down the sides of the bowl periodically to ensure all the cream cheese is incorporated.
Gradually add the 1 cup of granulated sugar to the cream cheese, beating continuously until it’s well combined and the mixture is light and fluffy. The sugar will dissolve, contributing to the sweet, velvety texture of the cheesecake. Next, add the 1 teaspoon of vanilla extract. Vanilla is a classic flavor enhancer for cheesecake, adding depth and warmth to the overall taste. Beat in the eggs, one at a time, mixing on low speed just until each egg is incorporated. Over-mixing the eggs can introduce too much air into the batter, which can cause the cheesecake to crack during baking. After the eggs are in, gently mix in the 1 cup of sour cream. Sour cream adds a pleasant tanginess that balances the sweetness and contributes to a richer, creamier texture. Finally, fold in the zest of 2 lemons and the juice of 1 lemon. The lemon zest provides a bright, fragrant citrus note, while the lemon juice adds a subtle tartness that cuts through the richness of the cream cheese, creating a beautifully balanced flavor profile that is quintessential for a lemon-infused cheesecake.
Creating the Swirls
Now for the artistic part – creating those beautiful swirls that give our Swirled Cheesecake its name and visual appeal. Divide the cheesecake batter into two equal portions in separate bowls. To one bowl, add the ½ cup of lemon curd and 1 tablespoon of lemon juice. Stir these ingredients gently until they are fully incorporated into this portion of the batter. This will give us a distinct, vibrant lemon flavor and color for one part of our swirl.
To the second bowl of batter, add the ½ cup of raspberry puree and the 1 tablespoon of sugar. Stir these together until the raspberry puree is evenly distributed throughout this portion of the batter. The raspberry will lend a gorgeous pink hue and a fruity sweetness that will contrast beautifully with the lemon. The extra tablespoon of sugar here helps to balance the tartness of the raspberries.
Now, it’s time to assemble. Pour alternating dollops of the lemon-flavored batter and the raspberry-flavored batter into the cooled graham cracker crust. Don’t worry about making them perfectly even; the natural variation will create more interesting swirls. Once all the batter has been poured, take a butter knife or a skewer and gently swirl the two batters together. Insert the knife into the batter and draw it through in a zig-zag or circular motion. Be careful not to over-swirl, as this will blend the colors and flavors too much. You want distinct streaks of color and flavor to remain visible. A few gentle passes are all you need to create a beautiful marbled effect.
Baking and Cooling the Swirled Cheesecake
Baking a cheesecake requires a gentle approach to ensure a smooth, creamy texture and prevent cracking. Place the filled springform pan on a large baking sheet. This will catch any potential drips and make it easier to handle. To create a moist baking environment, which is crucial for preventing cracks, we’ll use a water bath. Wrap the outside of your springform pan tightly with several layers of heavy-duty aluminum foil, ensuring there are no gaps where water can seep in. Carefully place the foil-wrapped pan into a larger roasting pan. Then, carefully pour boiling water into the roasting pan, ensuring the water level comes about halfway up the sides of the springform pan.
Carefully transfer the roasting pan with the cheesecake and water bath into the preheated oven, which should now be set to 325°F (160°C). Bake for 60-75 minutes, or until the edges of the cheesecake are set but the center still has a slight wobble when gently shaken. This wobble is normal and indicates a perfectly creamy interior. Once baked, turn off the oven and prop the oven door open slightly with a wooden spoon. Let the cheesecake cool in the oven for another hour. This slow cooling process is another key step in preventing cracks, as it allows the cheesecake to gradually adjust to the room temperature. After the hour in the oven, carefully remove the cheesecake from the water bath and place it on a wire rack to cool completely to room temperature. Once fully cooled, cover the cheesecake loosely with plastic wrap and refrigerate for at least 6 hours, or preferably overnight. This chilling period is essential for the cheesecake to fully set and for the flavors to meld.
Serving Your Masterpiece
The moment of truth has arrived! Once your Swirled Cheesecake has had ample time to chill and set, it’s ready to be unveiled and enjoyed. Carefully remove the sides of the springform pan. If you find it a bit stubborn, you can gently run a thin, sharp knife around the edge of the cheesecake before unclasping the pan. For an extra touch of elegance and a burst of fresh citrus, garnish your Swirled Cheesecake with the lemon zest curls. These delicate curls not only look beautiful but also add a wonderful aroma and a hint of bright lemon flavor with every bite. Slice the cheesecake with a sharp knife that has been dipped in hot water and wiped dry between cuts for clean, even slices. Each slice will reveal the beautiful swirls of lemon and raspberry, a testament to your culinary artistry. Enjoy the delightful combination of creamy, tangy, and fruity flavors in every decadent spoonful of your homemade Swirled Cheesecake.
Conclusion:
I hope you’ve enjoyed learning how to create this delightful Swirled Cheesecake! This recipe offers a beautiful marbled effect that looks as impressive as it tastes. The creamy, rich texture paired with the subtle swirl of flavor is truly a showstopper for any occasion. Remember, the key to a perfect cheesecake is patience – don’t rush the baking or cooling process!
For serving, I love to pair a slice of this Swirled Cheesecake with fresh berries, a dollop of whipped cream, or even a drizzle of raspberry coulis. It’s also fantastic on its own, allowing the complex flavors to shine. If you’re feeling adventurous, consider variations! You could try swirling in melted chocolate, caramel sauce, or even a fruit puree like strawberry or blueberry. Each variation will bring a unique twist to this classic dessert. So go ahead, give it a try, and don’t be afraid to experiment. You might just discover your new favorite way to enjoy cheesecake!
Frequently Asked Questions:
Why did my cheesecake crack?
Cracking often happens if the cheesecake is baked at too high a temperature or cooled too quickly. Using a water bath during baking helps maintain a gentle, even heat, and allowing the cheesecake to cool gradually in the oven with the door ajar, then at room temperature before refrigerating, can prevent cracks.
Can I make this Swirled Cheesecake ahead of time?
Absolutely! Cheesecakes are best made a day in advance. This allows the flavors to meld and the cheesecake to fully set. Once completely cooled and chilled, you can cover it tightly with plastic wrap and store it in the refrigerator for up to 3-4 days.

Swirled Cheesecake Bliss – Creamy & Decadent Dessert
A creamy and decadent cheesecake with beautiful swirls of lemon and raspberry, featuring a classic graham cracker crust.
Ingredients
-
2 cups graham cracker crumbs
-
½ cup unsalted butter, melted
-
¼ cup granulated sugar
-
3 cups cream cheese, softened
-
1 cup granulated sugar
-
1 teaspoon vanilla extract
-
3 large eggs
-
1 cup sour cream
-
Zest of 2 lemons
-
Juice of 1 lemon
-
½ cup lemon curd
-
1 tablespoon lemon juice
-
½ cup raspberry puree
-
1 tablespoon sugar
-
Lemon zest curls, for garnish
Instructions
-
Step 1
Prepare the crust: Preheat oven to 350°F (175°C). Combine graham cracker crumbs, melted butter, and ¼ cup sugar. Press into a 9-inch springform pan and bake for 8-10 minutes until golden brown. Let cool completely. -
Step 2
Craft the cheesecake filling: Beat softened cream cheese until smooth. Gradually add 1 cup sugar, then vanilla extract. Beat in eggs one at a time on low speed. Gently mix in sour cream, lemon zest, and lemon juice. -
Step 3
Create the swirls: Divide batter into two bowls. In one bowl, stir in lemon curd and 1 tablespoon lemon juice. In the other bowl, stir in raspberry puree and 1 tablespoon sugar. Alternate dollops of each flavored batter into the cooled crust and swirl gently with a knife. -
Step 4
Bake and cool: Wrap springform pan tightly in foil. Place in a larger roasting pan and fill with boiling water halfway up the sides (water bath). Bake at 325°F (160°C) for 60-75 minutes until edges are set and center wobbles. Turn off oven, prop door open, and let cool in oven for 1 hour. Then, cool completely on a wire rack. -
Step 5
Chill and serve: Cover cooled cheesecake loosely and refrigerate for at least 6 hours, or overnight. Remove springform pan sides. Garnish with lemon zest curls and slice with a hot, dry knife.
Important Information
Nutrition Facts (Per Serving)
It is important to consider this information as approximate and not to use it as definitive health advice.
Allergy Information
Please check ingredients for potential allergens and consult a health professional if in doubt.

Leave a Comment