
Christmas Santa Face Cupcakes are truly the epitome of holiday joy, baked into individual servings. Imagine the gasps of delight from children and adults alike when they encounter these adorable, edible works of art at your festive celebration. This recipe isn’t just about baking; it’s about crafting cherished memories and bringing a sprinkle of magic to your table, making every moment sweeter and more memorable.
Why We Adore These Festive Treats
We all embrace the festive spirit of Christmas, and what better way to express it than through charming desserts? Cupcakes, with their perfect portion size and versatile canvas, have long been a favorite, but transforming them into miniature Santa faces takes them to an entirely new level. The combination of a moist, fluffy cupcake base, rich, creamy frosting, and simple yet impactful decorations creates a treat that is as delicious to eat as it is delightful to behold. They are incredibly popular not only for their irresistible taste and appealing texture but also for the convenience they offer as individual servings, making them ideal for parties and family gatherings, effortlessly bringing smiles to every guest.
This holiday season, let’s embrace the joyous tradition of festive baking. Our guide will help you effortlessly create stunning Christmas Santa Face Cupcakes, transforming a simple dessert into a highlight of your holiday feast. Prepare to spread smiles and warmth with every single bite of these wonderful, charming creations.

Ingredients:
-
For the Vanilla Cupcakes:
- 1 ½ cups (190g) all-purpose flour, sifted
- 1 ½ teaspoons baking powder
- ½ teaspoon salt
- ¾ cup (170g) unsalted butter, softened to room temperature
- 1 cup (200g) granulated sugar
- 2 large eggs, at room temperature
- 1 teaspoon pure vanilla extract
- ¾ cup (180ml) whole milk, at room temperature
- 12 standard cupcake liners
-
For the Vanilla Buttercream Frosting:
- 1 cup (226g) unsalted butter, softened to room temperature
- 4-5 cups (480-600g) powdered sugar, sifted, plus more if needed
- 1 teaspoon pure vanilla extract
- 3-5 tablespoons (45-75ml) heavy cream or whole milk, at room temperature
- Pinch of salt
- Red gel food coloring (high quality for vibrant red)
-
For Decorating Your Christmas Santa Face Cupcakes:
- 12 mini marshmallows (for hat pom-poms)
- 24 mini chocolate chips (for Santa’s eyes)
- 12 small red candies or jelly beans (for Santa’s nose – round ones work best!)
- White nonpareil sprinkles or very fine white sanding sugar (for mustache texture, optional)
- Piping bags (at least 2-3, preferably with couplers)
- Piping tips: a round tip (like Wilton 1A or 12) for the hat base and beard, and a small star tip (like Wilton 18 or 21) for the hat trim and mustache, or simply a round tip for all details if you prefer.
Cupcake Preparation:
Making delicious cupcakes from scratch is the first joyful step towards creating your adorable Christmas Santa Face Cupcakes. It’s a process that fills your kitchen with the most wonderful aroma!
- Preheat and Prepare: My first step is always to get the oven ready. Preheat your oven to 350°F (175°C). Line a standard 12-cup muffin tin with cupcake liners. I sometimes give the liners a quick spray with non-stick spray, just for extra assurance, though it’s not always necessary.
- Combine Dry Ingredients: In a medium bowl, whisk together the sifted all-purpose flour, baking powder, and salt. Sifting the flour is a little extra step, but trust me, it makes a world of difference for a light and airy cupcake texture. Set this aside for now.
- Cream Butter and Sugar: In a large mixing bowl, using an electric mixer (either a stand mixer with the paddle attachment or a handheld mixer), beat the softened unsalted butter on medium speed for about 1-2 minutes until it’s light and creamy. Gradually add the granulated sugar, beating for another 2-3 minutes until the mixture is truly light, fluffy, and pale in color. This creaming process is vital as it incorporates air, which contributes to the cupcakes’ tender crumb.
- Add Eggs and Vanilla: Scrape down the sides of the bowl. Add the large eggs one at a time, beating well after each addition until fully incorporated. Then, mix in the pure vanilla extract. The mixture might look a little curdled at this point, but don’t worry, it will come together once the dry ingredients are added.
- Alternate Wet and Dry: Now for the magic! With the mixer on low speed, gradually add the dry ingredients to the wet ingredients, alternating with the milk. Start and end with the dry ingredients. I typically add about a third of the flour mixture, mix until just combined, then half of the milk, mix, another third of the flour, the remaining milk, and finally the last third of the flour mixture. Be careful not to overmix! Overmixing develops gluten too much, leading to tough cupcakes. Mix only until just combined and no streaks of flour remain.
- Fill Liners: Divide the cupcake batter evenly among the 12 prepared cupcake liners. I find an ice cream scoop works perfectly for this, filling each liner about two-thirds full.
- Bake to Perfection: Bake for 18-22 minutes, or until a wooden skewer or toothpick inserted into the center of a cupcake comes out clean. The tops should be lightly golden and spring back when gently touched. Every oven is a little different, so keep an eye on them!
- Cool Completely: Remove the muffin tin from the oven and let the cupcakes cool in the tin for about 5 minutes before transferring them to a wire rack to cool completely. This step is non-negotiable! Attempting to frost warm cupcakes will result in a melty, disastrous mess. You want them completely, utterly cool before you even think about frosting.
Vanilla Buttercream Frosting:
This rich and creamy vanilla buttercream is the perfect canvas for your “Christmas Santa Face Cupcakes.” It’s smooth, holds its shape beautifully, and tastes absolutely divine!
- Cream the Butter: In a large mixing bowl, using an electric mixer, beat the softened unsalted butter on medium speed for about 3-5 minutes. You want it to become super light, pale, and fluffy. This is another crucial step for airy, delicious frosting.
- Gradually Add Powdered Sugar: With the mixer on low speed, gradually add the sifted powdered sugar, one cup at a time, mixing well after each addition. Be patient here; if you add it too quickly, you’ll end up with a sugar cloud in your kitchen! Once all the sugar is incorporated, the mixture will be quite thick.
- Flavor and Thin: Add the pure vanilla extract and a pinch of salt. Now, gradually add the heavy cream or milk, one tablespoon at a time, beating on medium-high speed until the frosting reaches your desired consistency. I like my buttercream fluffy but firm enough to hold its shape for piping. You might need more or less liquid depending on the humidity and your butter consistency.
- Beat for Fluffiness: Once everything is combined, beat the frosting on medium-high speed for another 2-3 minutes. This final beating incorporates more air, making the buttercream incredibly light and smooth. Scrape down the sides of the bowl periodically.
- Color the Frosting: Now it’s time to prepare our frosting for the iconic Santa look! Divide about two-thirds of the buttercream into a separate bowl. Leave this larger portion white for Santa’s beard, mustache, and hat trim. To the remaining one-third of the buttercream, add a few drops of red gel food coloring. Start with a little and add more until you achieve a vibrant, deep Santa red. Mix thoroughly until the color is uniform. Gel food coloring is best as it doesn’t thin out the frosting as much as liquid coloring.
- Prepare Piping Bags: Fit one piping bag with your desired round tip (like Wilton 1A or 12) for the white frosting. Fill it with the white buttercream. Fit another piping bag with a slightly smaller star tip (like Wilton 18 or 21) or another round tip for the red frosting. Fill this bag with the red buttercream. If you want to use the star tip for the white hat trim and mustache, you can either have three bags or swap tips using a coupler. For our Christmas Santa Face Cupcakes, having distinct piping bags makes the decorating process much smoother!
Assembling Your Christmas Santa Face Cupcakes:
This is where the real fun begins! Transforming simple cupcakes into charming “Christmas Santa Face Cupcakes” is such a delightful and creative process. Gather your cooled cupcakes, colored frosting, and all your decorative elements.
- Base Layer for the Face (Optional, but Recommended): I often find it helpful to create a very thin, smooth base of white frosting over the top of the cupcake where Santa’s face will be, allowing the white beard and hat trim to adhere well. Using your white frosting and a small offset spatula or butter knife, spread a thin layer over about two-thirds of the cupcake top. This gives your Santa a nice, clean canvas.
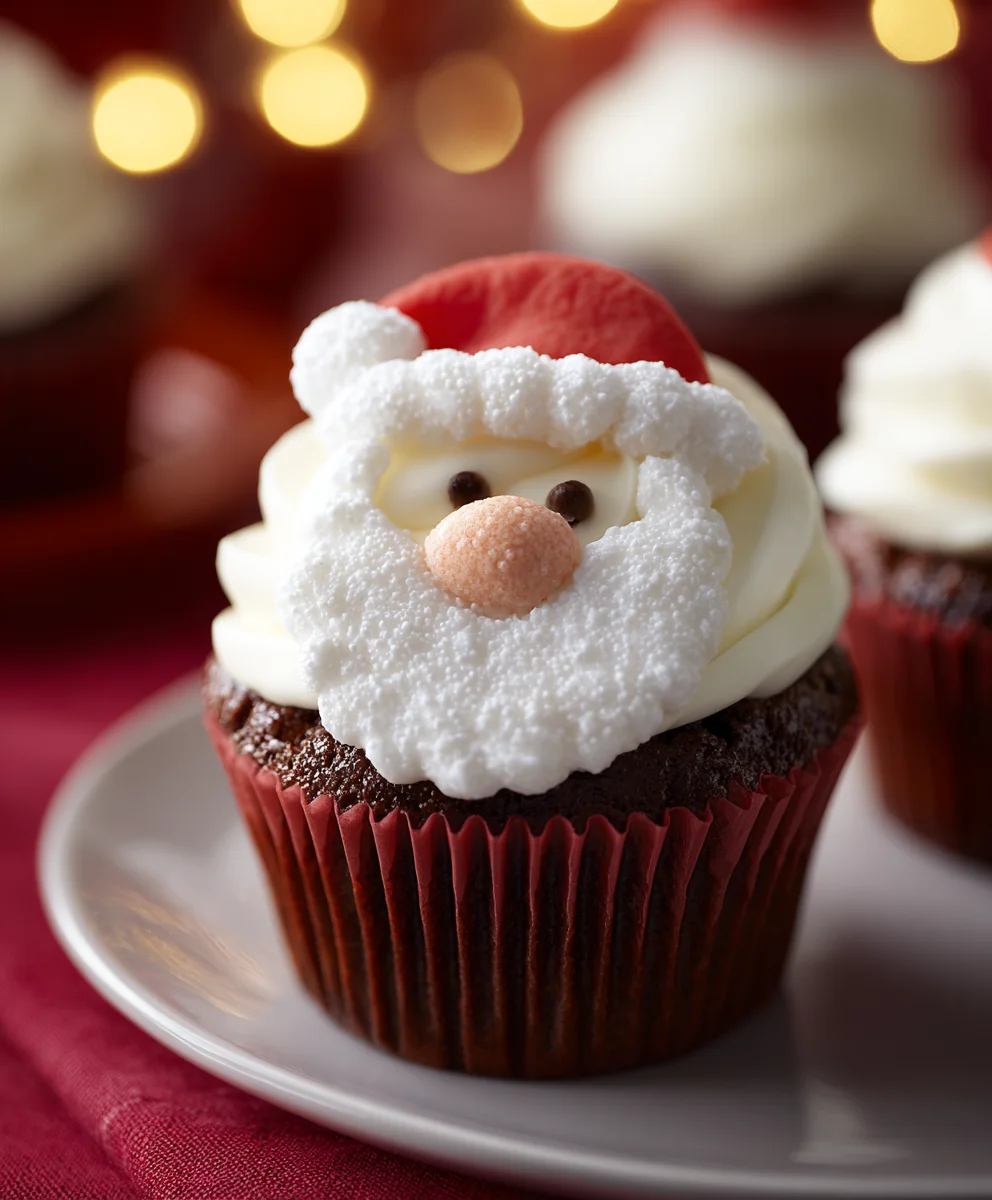
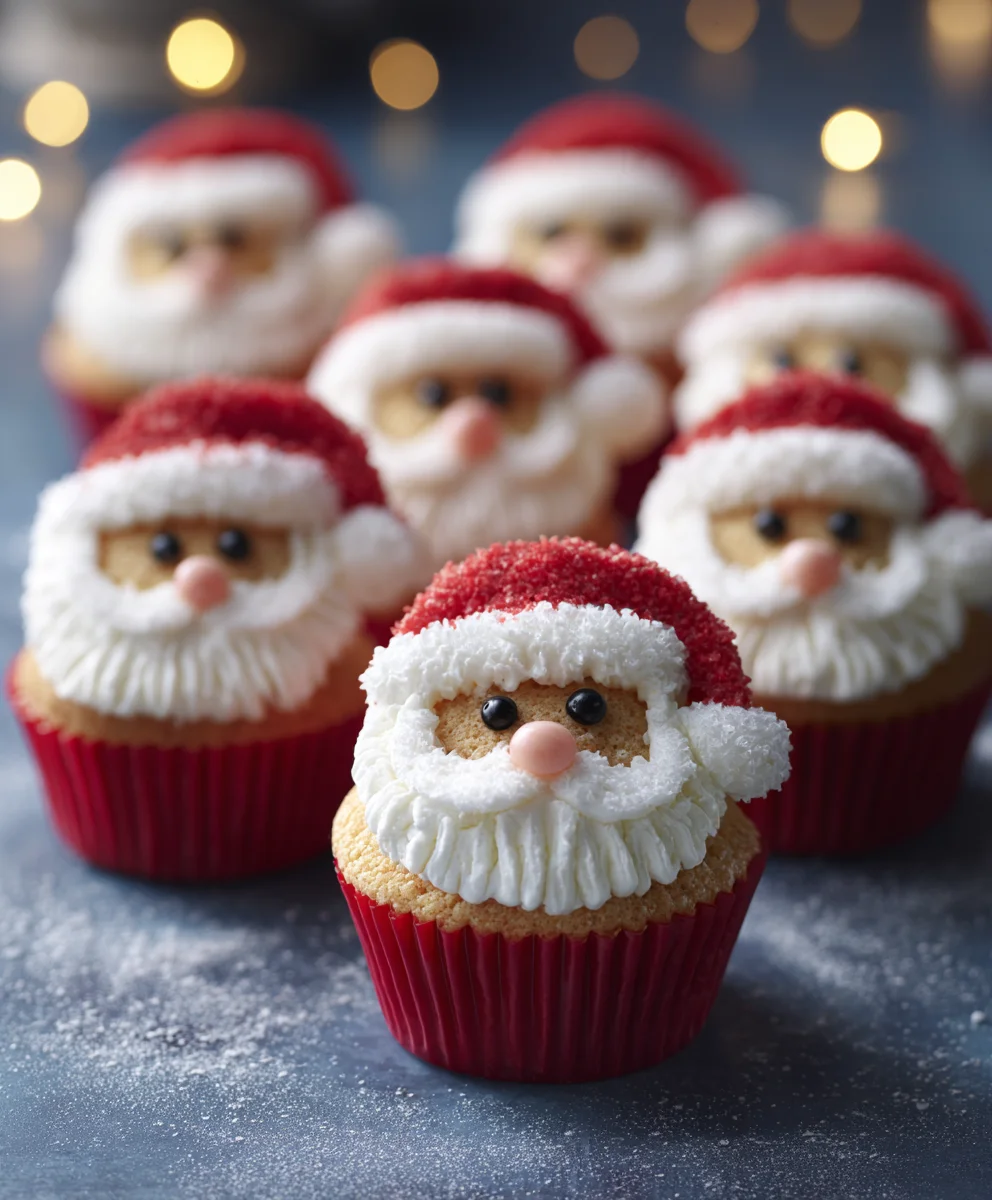
- Pipe Santa’s Red Hat: Pick up your piping bag with the red buttercream. Starting at the very top edge of the cupcake (the portion without the white base layer), pipe a neat, somewhat triangular or slightly rounded shape to form Santa’s hat. I usually start with an outline and then fill it in, making sure the red frosting is relatively smooth and covers about one-third to one-half of the cupcake top, slanting down towards what will be the back of Santa’s head. This red hat is the defining feature of our Christmas Santa Face Cupcakes, so make it bold!
- Add the White Hat Trim: Now, switch to your white buttercream piping bag. Using a small star tip (or a round tip if that’s all you have), pipe a wavy or dotted border along the bottom edge of the red hat. This forms the fluffy white trim of Santa’s hat. You can do a single continuous wavy line, or small, close-together star bursts to mimic fur. This contrast makes the hat truly pop.
- Create Santa’s Fluffy White Beard: With your white buttercream (using either a large round tip or a star tip for more texture), pipe Santa’s beard. Start from just below the hat trim on one side of the cupcake and pipe generous swirls or ruffles of white frosting downwards, extending to the bottom edge of the cupcake, forming a full, voluminous beard. Bring it up slightly on the other side to meet the hat trim, leaving a small open space in the middle near the top for his nose and eyes. Make this beard impressive! It’s a key element of our “Christmas Santa Face Cupcakes.”
- Position Santa’s Nose: Carefully place one small red candy or jelly bean in the center of the white beard, just below the red hat trim. This is Santa’s iconic rosy nose! Gently press it into the frosting so it stays put.
- Give Santa His Eyes: Now for the eyes! Take two mini chocolate chips and place them just above the red candy nose, slightly spaced apart. Position them so they look like little mischievous eyes peeking out from under the hat. You might need to gently push them into the frosting to secure them.
- Add Santa’s Mustache (Optional, but Adorable): If you’d like to give Santa an extra flourish, use your white buttercream (with a small star tip for texture, or a small round tip for a smoother look) to pipe two small, curved mustache swirls directly above the red candy nose, bridging the gap between the beard. You can also use white nonpareil sprinkles or very fine white sanding sugar sprinkled over a thin layer of white frosting for a furry mustache effect.
- The Hat’s Pom-Pom: Finally, place one mini marshmallow right at the very tip of the red hat. This makes the perfect fluffy pom-pom! You can dab a tiny bit of white frosting on the tip of the hat first to help the marshmallow adhere better.
- Final Touches: Step back and admire your beautiful “Christmas Santa Face Cupcakes”! If desired, you can sprinkle a tiny bit of white nonpareil sprinkles over the beard and mustache for added texture and a snowy look. This adds just that extra bit of festive magic.
- Serve and Enjoy: Once all your Santa faces are complete, arrange them on a festive platter. These festive treats are best enjoyed fresh, bringing smiles and holiday cheer to anyone who sees them. Sharing these delightful “Christmas Santa Face Cupcakes” is truly the best part of the season!
Conclusion:
As we reach the sweet conclusion of our recipe journey, I truly hope you’re feeling inspired and excited to dive into your kitchen. This isn’t just a recipe; it’s an invitation to create edible joy, a chance to bring a little extra sparkle to your holiday season. Imagine the gasps of delight and the wide smiles these festive treats will elicit from young and old alike. Their irresistible charm lies not only in their utterly delightful flavor – a perfect balance of fluffy cake and creamy, sweet frosting – but also in the sheer joy they spark the moment they appear on a table. Every single bite is a miniature celebration, a testament to the magic of homemade goodness.
What makes these particular cupcakes an absolute must-try, in my humble opinion, is their unique combination of festive visual appeal and surprising simplicity. You don’t need to be a professional baker to achieve stunning results. The steps are straightforward, and the decorating process, while seemingly intricate, is genuinely fun and forgiving. It’s an activity that can transform a regular afternoon into a heartwarming session of creative expression, perfect for involving family members. From mixing the batter to piping Santa’s iconic beard, each stage is infused with the spirit of the season. And let’s be honest, who can resist a treat that looks this adorable and tastes even better? These aren’t just any holiday treats; they are the quintessential Christmas Santa Face Cupcakes, designed to be the highlight of any holiday gathering or a delightful surprise for those you cherish. They embody everything wonderful about Christmas baking: deliciousness, beauty, and that unmistakable feeling of warmth and generosity.
Bringing Even More Cheer: Serving & Variation Ideas
Once your magnificent batch of Santa creations is complete, the ways to enjoy and share them are as boundless as your imagination. For a cozy evening at home, pair them with a steaming mug of hot cocoa topped with whipped cream and a sprinkle of cinnamon – pure bliss! They make an absolutely stunning centerpiece for any holiday dessert table, instantly drawing eyes and compliments. Consider packaging individual cupcakes in clear cellophane bags tied with festive ribbons; they transform into charming, homemade gifts for neighbors, teachers, or colleagues. Imagine the delight on their faces when they receive such a thoughtful and delicious present!
Feeling adventurous and want to put your own spin on things? This recipe is wonderfully versatile. For a rich, decadent twist, try using a chocolate or red velvet cake mix as your base – the contrast of the dark cake with the white frosting would be visually striking and incredibly tasty. You could also experiment with different frosting flavors for Santa’s beard, perhaps a hint of almond extract or even a touch of peppermint for an extra festive kick, though I personally love the classic vanilla for its universal appeal and pristine white color. Don’t shy away from adding a touch of edible glitter to Santa’s hat for an extra sparkle, or tiny silver dragees for “bells” on his hat brim. For a less sweet option, you could even swap out some of the traditional sprinkles for finely crushed candy canes to give a refreshing burst of minty flavor. The core design of the Santa face is forgiving enough that you can really play around with the details and make them uniquely yours.
Your Turn to Create Magic!
Now that you’re armed with the knowledge and inspiration, it’s truly your turn to bring these enchanting Santa cupcakes to life. I promise you, the joy of creating them is matched only by the delight of tasting them. Don’t be afraid to get a little messy, to experiment, and to pour your heart into each and every one. Baking is, after all, an act of love. I am incredibly eager to see your magnificent creations! Please, please, please, once you’ve made them, don’t keep them to yourself. Share your experiences, your triumphs, and even your funny baking mishaps. I would absolutely love for you to share photos of your festive Santa Face Cupcakes on social media, tagging me or simply letting me know how they turned out in the comments section below. There’s nothing more rewarding than seeing what you, my wonderful readers, create with these recipes. Happy baking, happy holidays, and may your kitchen be filled with the sweet aroma of success and the spirit of the season!
Christmas Santa Face Cupcakes
Christmas Santa Face Cupcakes are delightful, festive treats, bringing holiday joy to any celebration. These charming cupcakes feature a moist vanilla base topped with creamy buttercream, transformed into Santa’s face using red and white frosting, mini marshmallows, chocolate chips, and red candies. They are perfect for crafting cherished memories and spreading smiles.
Ingredients
-
1 ½ cups (190g) all-purpose flour
-
1 ½ tsp baking powder
-
½ tsp salt
-
¾ cup (170g) unsalted butter (for cupcakes)
-
1 cup (200g) granulated sugar
-
2 large eggs
-
1 tsp pure vanilla extract (for cupcakes)
-
¾ cup (180ml) whole milk (for cupcakes)
-
1 cup (226g) unsalted butter (for frosting)
-
4-5 cups (480-600g) powdered sugar
-
1 tsp pure vanilla extract (for frosting)
-
3-5 tbsp (45-75ml) heavy cream or whole milk (for frosting)
-
Pinch of salt (for frosting)
-
Red gel food coloring
-
12 mini marshmallows
-
24 mini chocolate chips
-
12 small red candies or jelly beans
-
White nonpareil sprinkles (optional)
Instructions
-
Step 1
Preheat oven to 350°F (175°C) and line a 12-cup muffin tin. Whisk together flour, baking powder, and salt. Cream softened butter and granulated sugar until light and fluffy. Beat in eggs one at a time, then vanilla extract. Alternately add dry ingredients and milk to wet, mixing until just combined. Divide batter among 12 liners, filling each two-thirds full. -
Step 2
Bake for 18-22 minutes, until a toothpick inserted comes out clean. Cool in tin for 5 minutes, then transfer to a wire rack to cool completely. -
Step 3
Beat softened butter for 3-5 minutes until light and pale. Gradually add sifted powdered sugar. Add vanilla extract and a pinch of salt. Gradually add heavy cream/milk, beating until desired consistency is reached. Beat 2-3 minutes for fluffiness. Divide frosting: leave two-thirds white. Color remaining one-third vibrant red with gel food coloring. Prepare piping bags with tips (round for white, star or round for red). -
Step 4
Spread a thin layer of white frosting over two-thirds of each cooled cupcake. Pipe Santa’s red hat onto the remaining one-third of the cupcake. Pipe a white wavy or dotted border along the bottom edge of the red hat for trim. Pipe generous swirls of white frosting below the hat trim for Santa’s beard, leaving space for the nose and eyes. -
Step 5
Place a small red candy in the center of the beard for Santa’s nose. Position two mini chocolate chips just above the red candy for Santa’s eyes. Optionally, pipe two small white mustache swirls above the nose, or sprinkle nonpareils for texture. Place one mini marshmallow at the tip of the red hat for the pom-pom. Optionally, sprinkle white nonpareils over the beard/mustache. Serve and enjoy!
Important Information
Nutrition Facts (Per Serving)
It is important to consider this information as approximate and not to use it as definitive health advice.
Allergy Information
Please check ingredients for potential allergens and consult a health professional if in doubt.


Leave a Comment