
How to Make the Perfect Grilled Pizza. Forget soggy crusts and lukewarm toppings; we’re diving headfirst into a world where smoky char meets gooey cheese and vibrant flavors, all kissed by the open flame. There’s something undeniably magical about pizza, isn’t there? It’s the ultimate comfort food, the centerpiece of casual gatherings, and a canvas for our wildest culinary dreams. But when you take that beloved classic and elevate it to the grill, it transcends into something truly extraordinary. The secret to a perfect grilled pizza lies in its unique texture – that delightful crispness on the bottom, a slight chegrape juicess within, and the non-intoxicating aroma of smoky goodness that you just can’t replicate indoors. Ready to impress yourself and your guests with a truly unforgettable meal? Let’s get grilling!
How to Make the Perfect Grilled Pizza
There’s something truly magical about pizza, and when you take that beloved dish outdoors and onto the grill, it reaches a whole new level of deliciousness. The smoky char, the perfectly crisp crust, and the melty cheese are an irresistible combination. Forget takeout; making your own grilled pizza is surprisingly straightforward and incredibly rewarding. It’s a fantastic way to entertain, especially during warmer months, and a guaranteed crowd-pleaser. I’ve been perfecting my grilled pizza technique for years, and I’m excited to share my secrets with you.
Ingredients:
Cooking Instructions
This is where the magic happens! Grilling pizza requires a few key steps to ensure a perfectly cooked crust and melty toppings.
Phase 1: Preparing Your Dough and Grill
1. Preheat Your Grill: This is arguably the most important step. You want your grill to be hot, but not scorching. Aim for a medium-high heat, around 450-500°F (230-260°C). If you’re using a charcoal grill, get your coals good and hot, then spread them out for even cooking. If you have a gas grill, turn all burners to high, close the lid, and let it preheat for at least 10-15 minutes. Once preheated, turn down the heat to medium-high. Clean your grill grates thoroughly with a wire brush to prevent sticking.
2. Prepare Your Dough: Take your room-temperature pizza dough and gently stretch or roll it out on a lightly floured or cornmeal-dusted surface. Aim for a rustic, freeform shape, about 10-12 inches in diameter. Don’t overwork the dough; you want to preserve some of its airiness. Lightly brush one side of the dough with olive oil. This oiled side will be the side that hits the grill first, and the oil helps prevent sticking while also contributing to a beautiful char.
Phase 2: Grilling the Crust
3. Grill One Side of the Dough: Carefully transfer the stretched dough, oiled-side down, onto the preheated grill grates. Close the lid immediately. You’ll want to grill this first side for about 3-5 minutes. Keep a close eye on it! You’re looking for beautiful grill marks and for the dough to puff up slightly and firm up. Resist the urge to lift the lid too often, as this lets precious heat escape. Use a spatula to gently lift a corner and check for those golden-brown grill marks.
4. Flip and Top: Using a large spatula or pizza peel, carefully flip the dough over so the grilled side is now facing up. This side will be where you add your toppings. Work relatively quickly so the uncooked side doesn’t overcook before you get your toppings on. Brush this uncooked side lightly with olive oil, then spread your pizza sauce evenly, leaving a small border for the crust. Sprinkle generously with your cheese, and then arrange your chosen toppings. Don’t overload the pizza; too many toppings can make the crust soggy and difficult to manage.
Phase 3: Finishing Your Pizza
5. Grill the Topped Pizza: Carefully slide the pizza back onto the grill, over indirect heat if possible, or on the cooler side of your grill if you have a two-zone setup. Close the lid and cook for another 5-8 minutes, or until the crust is golden brown and cooked through, and the cheese is melted and bubbly. Again, watch it closely! The cooking time will depend on your grill’s temperature and how thick your crust is. You might need to rotate the pizza once or twice to ensure even cooking. You can also use a spatula to gently lift the edge and check the bottom of the crust for that perfect char. If the cheese is melting nicely but the crust isn’t quite done, you can move it to a slightly hotter part of the grill for a minute or two.
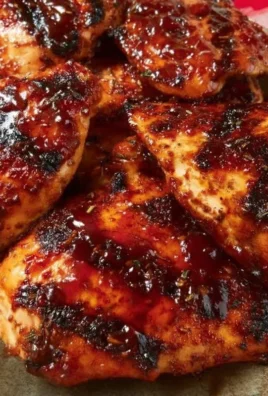
6. Serve and Enjoy: Once your grilled pizza is done, carefully remove it from the grill using your spatula or pizza peel. Transfer it to a cutting board. Let it rest for a minute or two – this helps the cheese set slightly and makes it easier to slice. Garnish with fresh basil leaves or a pinch of red pepper flakes if desired. Slice it up and enjoy the amazing smoky flavor and crisp, chewy crust that only grilled pizza can deliver! This is a fun and interactive dish, so consider setting up a “pizza bar” with various toppings and letting everyone create their own masterpiece.
Conclusion:
There you have it – the secrets to making the perfect grilled pizza! This method truly elevates your pizza game, transforming a simple meal into a culinary masterpiece. The intense heat of the grill creates an unbelievably crispy crust with delightful char marks, while the toppings cook quickly, locking in freshness and flavor. It’s a fantastic way to enjoy homemade pizza, especially during warmer months, and incredibly satisfying to pull off a restaurant-quality pie right in your backyard. The smoky aroma alone is worth the effort!
Serve your delicious grilled pizza hot off the grates! It’s perfect as a fun family dinner, an impressive appetizer for guests, or even a creative addition to your next barbecue spread. Pair it with a crisp green salad, some refreshing coleslaw, or a side of garlic bread for a complete meal. Don’t be afraid to get creative with your toppings! Consider classic Margherita, spicy beef pepperoni, or even a white pizza with ricotta and spinach. You can also experiment with different cheeses, vegetables, and even fruits like figs and beef prosciutto for a gourmet touch. Give this recipe a try – you’ll be amazed at how easy and rewarding it is to achieve grilled pizza perfection!
Frequently Asked Questions:
Can I use store-bought pizza dough?
Absolutely! While homemade dough offers a unique flavor, a good quality store-bought pizza dough will work wonderfully. Just ensure it’s brought to room temperature before stretching and grilling for the best results. It’s a great shortcut to achieve perfect grilled pizza.
What if I don’t have a grill brush?
No worries! You can use a crum extractpled piece of aluminum foil, held with tongs, to scrub your grill grates clean. Alternatively, a sturdy paper towel can also do the trick. Ensuring clean grates is crucial for preventing sticking and achieving that beautiful char.
How do I prevent the dough from sticking to the grill?
A well-oiled and clean grill is your best friend. Make sure to brush the grates generously with oil before placing the dough on them. You can also lightly flour the dough before grilling. If a bit sticks, don’t panic; often, you can gently lift and reposition it.
The Perfect Grilled Pizza
Achieve a crispy, flavorful crust and perfectly melted toppings with this simple grilled pizza recipe. Ideal for outdoor gatherings and a fantastic way to enjoy fresh ingredients.
Ingredients
-
1 ball pizza dough (store-bought or homemade)
-
1/4 cup pizza sauce
-
1 cup shredded mozzarella cheese
-
1/4 cup sliced pepperoni (substitute with thinly sliced grilled chicken if preferred)
-
1/4 cup sliced bell peppers
-
1/4 cup sliced red onion
-
1 tablespoon olive oil
Instructions
-
Step 1
Preheat your grill to medium-high heat (around 450-500°F or 230-260°C). If using a charcoal grill, bank the coals to one side for indirect heat. If using a gas grill, turn half the burners to high and the other half to low. -
Step 2
Lightly flour a clean surface and stretch or roll out your pizza dough to your desired thickness and shape (approximately 12-14 inches in diameter). -
Step 3
Brush one side of the pizza dough generously with olive oil. This is the side that will hit the grill first. -
Step 4
Carefully place the oiled side of the dough directly onto the preheated grill grates. Grill for 2-3 minutes, or until the bottom is golden brown and has grill marks. Use tongs to lift and check the underside. -
Step 5
Flip the pizza dough over onto the cooler side of the grill (or onto a clean section if using direct heat). Quickly spread the pizza sauce evenly over the grilled side, leaving a small border for the crust. Sprinkle with mozzarella cheese, followed by pepperoni, bell peppers, and red onion. -
Step 6
Close the grill lid and cook for another 5-7 minutes, or until the cheese is melted and bubbly and the crust is cooked through. -
Step 7
Carefully remove the pizza from the grill using a pizza peel or large spatula. Let it rest for a minute before slicing and serving.
Important Information
Nutrition Facts (Per Serving)
It is important to consider this information as approximate and not to use it as definitive health advice.
Allergy Information
Please check ingredients for potential allergens and consult a health professional if in doubt.

Leave a Comment