
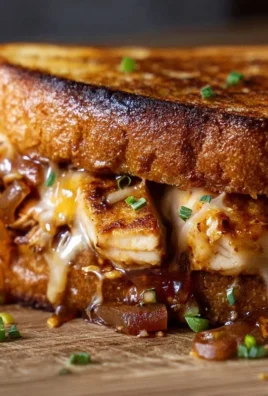
Perfect Grilled Cheese: Is there anything more comforting than the warm, gooey embrace of a perfectly made grilled cheese sandwich? I think not! This isn’t just a recipe; it’s a nostalgic journey back to childhood, a quick lunch solution, and a satisfying dinner option all rolled into one golden-brown package.
The humble grilled cheese has a surprisingly rich history. While variations existed before, the modern grilled cheese as we know it gained popularity in the United States during the 1920s, thanks to the invention of sliced bread and processed cheese. It became a staple during the Great Depression as an affordable and filling meal. Over the years, it has evolved from a simple comfort food to a culinary canvas for gourmet creations.
But what makes the perfect grilled cheese so universally loved? It’s the symphony of textures and flavors: the crisp, buttery bread giving way to the molten, stretchy cheese. It’s the simplicity of the ingredients combined with the endless possibilities for customization. Whether you prefer classic cheddar, a sophisticated blend of Gruyère and Swiss, or even a sprinkle of jalapeños for a spicy kick, the grilled cheese adapts to your personal taste. And let’s be honest, its quick preparation time makes it a lifesaver on busy weeknights. So, let’s dive into the secrets of crafting the ultimate grilled cheese experience!

Ingredients:
- 4 slices of your favorite bread (I personally love sourdough or a hearty multigrain)
- 2 tablespoons butter, softened (salted or unsalted, your preference!)
- 2-4 slices of cheese per sandwich (I recommend a blend of cheddar and Gruyere for ultimate meltiness, but feel free to experiment!)
- Optional: A sprinkle of garlic powder
- Optional: A dash of onion powder
- Optional: A thin spread of mayonnaise on the outside of the bread (trust me on this one!)
Preparing the Perfect Grilled Cheese:
- Prepare your workspace: Before you even think about turning on the stove, gather all your ingredients and equipment. This includes your bread, butter, cheese, a spatula, and a non-stick skillet or griddle. Having everything within reach will make the process smoother and more enjoyable.
- Butter the bread: This is a crucial step! Spread a thin, even layer of softened butter on one side of each slice of bread. Make sure to get right to the edges nobody wants a dry, unbuttered crust. If you’re using salted butter, you might want to skip adding any extra salt later. If you’re using unsalted butter, a tiny pinch of salt on the buttered side can enhance the flavor.
- Optional: Mayonnaise trick: For an extra crispy and golden-brown crust, lightly spread a very thin layer of mayonnaise on the *outside* of the buttered bread. I know it sounds weird, but the mayonnaise helps the bread brown beautifully and adds a subtle tang. Don’t overdo it, though a little goes a long way.
- Cheese it up: Now for the best part! Place two slices of bread, butter-side down (or mayonnaise-side down, if you’re using it), in your skillet. Pile your cheese on top of one slice of bread. I like to use a combination of cheddar and Gruyere for a sharp and nutty flavor, but feel free to use your favorite cheeses. Monterey Jack, provolone, or even a little bit of pepper jack can be delicious additions. Make sure the cheese is evenly distributed so you get a good melt in every bite. Don’t be afraid to use a generous amount of cheese this is grilled cheese, after all!
- Optional: Seasoning: If you’re feeling fancy, sprinkle a tiny bit of garlic powder and onion powder over the cheese. This adds a subtle savory note that complements the cheese perfectly.
- Top it off: Place the other slice of bread on top of the cheese, butter-side up (or mayonnaise-side up).
Cooking the Grilled Cheese:
- Heat the skillet: Place your skillet or griddle over medium-low heat. This is the key to a perfectly melted grilled cheese. If the heat is too high, the bread will burn before the cheese has a chance to melt.
- Grill it low and slow: Carefully place the assembled sandwich in the heated skillet. Let it cook for about 3-5 minutes per side, or until the bread is golden brown and the cheese is melted and gooey. Keep a close eye on it to prevent burning.
- Press it down (optional): If you want a flatter, more compact grilled cheese, you can gently press down on the sandwich with a spatula while it’s cooking. This helps to ensure even browning and melting.
- Flip it carefully: Once the first side is golden brown, carefully flip the sandwich with a spatula. Be gentle so you don’t lose any of that precious melted cheese!
- Continue cooking: Cook the other side for another 3-5 minutes, or until it’s golden brown and the cheese is completely melted.
- Check for doneness: The grilled cheese is done when the bread is golden brown and crispy, and the cheese is melted and gooey. You can gently lift the edge of the sandwich with a spatula to check the cheese.
Serving and Enjoying:
- Remove from skillet: Once the grilled cheese is cooked to perfection, carefully remove it from the skillet and place it on a cutting board.
- Slice and serve: Use a sharp knife to slice the grilled cheese in half (or into triangles, if you’re feeling fancy). This makes it easier to eat and also shows off that beautiful melted cheese.
- Serve immediately: Grilled cheese is best enjoyed hot and fresh, when the cheese is at its melty, gooey peak.
- Pair it perfectly: Grilled cheese is a classic comfort food that pairs well with a variety of sides. Some of my favorites include:
- Tomato soup (a must-have!)
- A simple green salad
- Pickles (the acidity cuts through the richness of the cheese)
- Coleslaw
- Potato chips
- Enjoy! Take a bite and savor the crispy bread, the gooey cheese, and the comforting flavors. You’ve just made the perfect grilled cheese!
Tips and Tricks for the Ultimate Grilled Cheese:
- Use quality ingredients: The better the bread and cheese, the better the grilled cheese will be. Don’t skimp on the ingredients!
- Softened butter is key: Softened butter spreads more evenly and prevents tearing the bread.
- Low and slow is the way to go: Cooking the grilled cheese over medium-low heat ensures that the cheese melts completely without burning the bread.
- Don’t overcrowd the skillet: If you’re making multiple grilled cheeses, cook them in batches to avoid overcrowding the skillet and lowering the temperature.
- Experiment with different cheeses: Don’t be afraid to try different cheese combinations. Some other great options include:
- Havarti
- Gouda
- Fontina
- Brie (for a more decadent grilled cheese)
- Add some extras: Get creative and add some extra ingredients to your grilled cheese. Some ideas include:
- Sliced tomatoes
- Bacon
- Avocado
- Caramelized onions
- Pesto
- Use a panini press: If you have a panini press, you can use it to make a perfectly pressed and grilled cheese.
- Make it ahead of time: You can assemble the grilled cheese sandwiches ahead of time and store them in the refrigerator until you’re ready to cook them. Just add a few minutes to the cooking time.
- Clean your skillet immediately: Melted cheese can be a pain to clean, so wash your skillet as soon as possible after cooking the grilled cheese.
Variations on the Classic Grilled Cheese:
Gourmet Grilled Cheese:
Elevate your grilled cheese with gourmet ingredients like artisanal bread, aged cheddar, Gruyere, caramelized onions, and fig jam.
Caprese Grilled Cheese:
A taste of Italy in a sandwich! Use mozzarella, sliced tomatoes, fresh basil, and a balsamic glaze.
Breakfast Grilled Cheese:
Start your day with a grilled cheese featuring cheddar, bacon, and a fried egg.
Spicy Grilled Cheese:
Add some heat with pepper jack cheese, jalapenos, and a drizzle of hot sauce.
Vegan Grilled Cheese:
Use vegan bread, vegan butter, and your favorite vegan cheese alternative for a plant-based twist.
Enjoy your culinary adventure!

Conclusion:
And there you have it! This isn’t just any grilled cheese; it’s a journey to grilled cheese perfection. From the perfectly browned, crispy exterior to the gooey, melty cheese pull that dreams are made of, this recipe elevates a simple classic into something truly special. I truly believe that mastering this perfect grilled cheese recipe will become a staple in your kitchen, a go-to for quick lunches, comforting dinners, or even a late-night snack attack.
But why is this recipe a must-try? It’s all about the details. The combination of butter and mayonnaise ensures a golden-brown crust that’s both crispy and flavorful. The careful selection of cheeses creates a symphony of textures and tastes that will tantalize your taste buds. And the low-and-slow cooking method guarantees that the cheese melts evenly and completely, creating that irresistible gooeyness we all crave. It’s the sum of these small, but significant, choices that makes this grilled cheese stand out from the crowd.
Now, let’s talk serving suggestions and variations! While this grilled cheese is divine on its own, it’s also incredibly versatile. Pair it with a bowl of creamy tomato soup for the ultimate comfort food experience. Or, elevate it with a side of tangy coleslaw or a crisp green salad for a more balanced meal.
Serving Suggestions:
- Tomato Soup: A classic pairing that never fails.
- Coleslaw: The tanginess cuts through the richness of the cheese.
- Green Salad: Adds a refreshing element to the meal.
- Pickles: Dill or sweet pickles provide a delightful contrast.
Feeling adventurous? Try these variations:
Grilled Cheese Variations:
- The “Deluxe”: Add sliced tomatoes, crispy bacon, and avocado for a truly decadent experience.
- The “Spicy”: Incorporate jalapeños, pepper jack cheese, and a drizzle of hot sauce for a fiery kick.
- The “Italian”: Use mozzarella, provolone, and pesto for a taste of Italy.
- The “Apple & Cheddar”: Thinly sliced apples and sharp cheddar cheese create a sweet and savory delight.
Don’t be afraid to experiment and create your own signature grilled cheese masterpiece! The possibilities are endless. Try different cheeses, add your favorite vegetables, or even incorporate some leftover cooked meats. The key is to have fun and let your creativity shine.
I’m so excited for you to try this recipe and experience the joy of a truly perfect grilled cheese. I’m confident that you’ll love it as much as I do. Once you’ve given it a go, I’d absolutely love to hear about your experience! Did you stick to the original recipe, or did you try any of the variations? What were your favorite cheese combinations? What did you serve it with?
Please, share your thoughts, photos, and tips in the comments below. I can’t wait to see what you create! Happy grilling! And remember, the secret to a truly perfect grilled cheese is patience, quality ingredients, and a whole lot of love. So, get in the kitchen, fire up that stove, and prepare to be amazed!
Perfect Grilled Cheese: The Ultimate Guide to Golden, Gooey Perfection
The ultimate guide to making the perfect grilled cheese sandwich! Learn tips, tricks, and variations for a classic comfort food.
Ingredients
- 4 slices of your favorite bread (sourdough or hearty multigrain recommended)
- 2 tablespoons butter, softened (salted or unsalted)
- 2-4 slices of cheese per sandwich (cheddar and Gruyere recommended)
- A sprinkle of garlic powder
- A dash of onion powder
- A thin spread of mayonnaise
Instructions
- Prepare your workspace: Gather all ingredients and equipment (bread, butter, cheese, spatula, non-stick skillet).
- Butter the bread: Spread a thin, even layer of softened butter on one side of each slice of bread, right to the edges.
- Optional: Mayonnaise trick: Lightly spread a very thin layer of mayonnaise on the *outside* of the buttered bread.
- Cheese it up: Place two slices of bread, butter-side down (or mayonnaise-side down, if using), in your skillet. Pile cheese on top of one slice of bread.
- Optional: Seasoning: Sprinkle a tiny bit of garlic powder and onion powder over the cheese.
- Top it off: Place the other slice of bread on top of the cheese, butter-side up (or mayonnaise-side up).
- Heat the skillet: Place your skillet or griddle over medium-low heat.
- Grill it low and slow: Carefully place the assembled sandwich in the heated skillet. Let it cook for about 3-5 minutes per side, or until the bread is golden brown and the cheese is melted and gooey.
- Press it down (optional): Gently press down on the sandwich with a spatula while it’s cooking.
- Flip it carefully: Once the first side is golden brown, carefully flip the sandwich with a spatula.
- Continue cooking: Cook the other side for another 3-5 minutes, or until it’s golden brown and the cheese is completely melted.
- Check for doneness: The grilled cheese is done when the bread is golden brown and crispy, and the cheese is melted and gooey.
- Remove from skillet: Once the grilled cheese is cooked to perfection, carefully remove it from the skillet and place it on a cutting board.
- Slice and serve: Use a sharp knife to slice the grilled cheese in half (or into triangles, if you’re feeling fancy).
- Serve immediately: Grilled cheese is best enjoyed hot and fresh, when the cheese is at its melty, gooey peak.
- Pair it perfectly: Tomato soup, a simple green salad, pickles, coleslaw, or potato chips.
- Enjoy!
Notes
- Use quality ingredients for the best flavor.
- Softened butter is essential for even spreading.
- Cooking over medium-low heat prevents burning and ensures the cheese melts completely.
- Experiment with different cheeses and add-ins to customize your grilled cheese.
- The mayonnaise trick creates an extra crispy and golden-brown crust.

Leave a Comment