
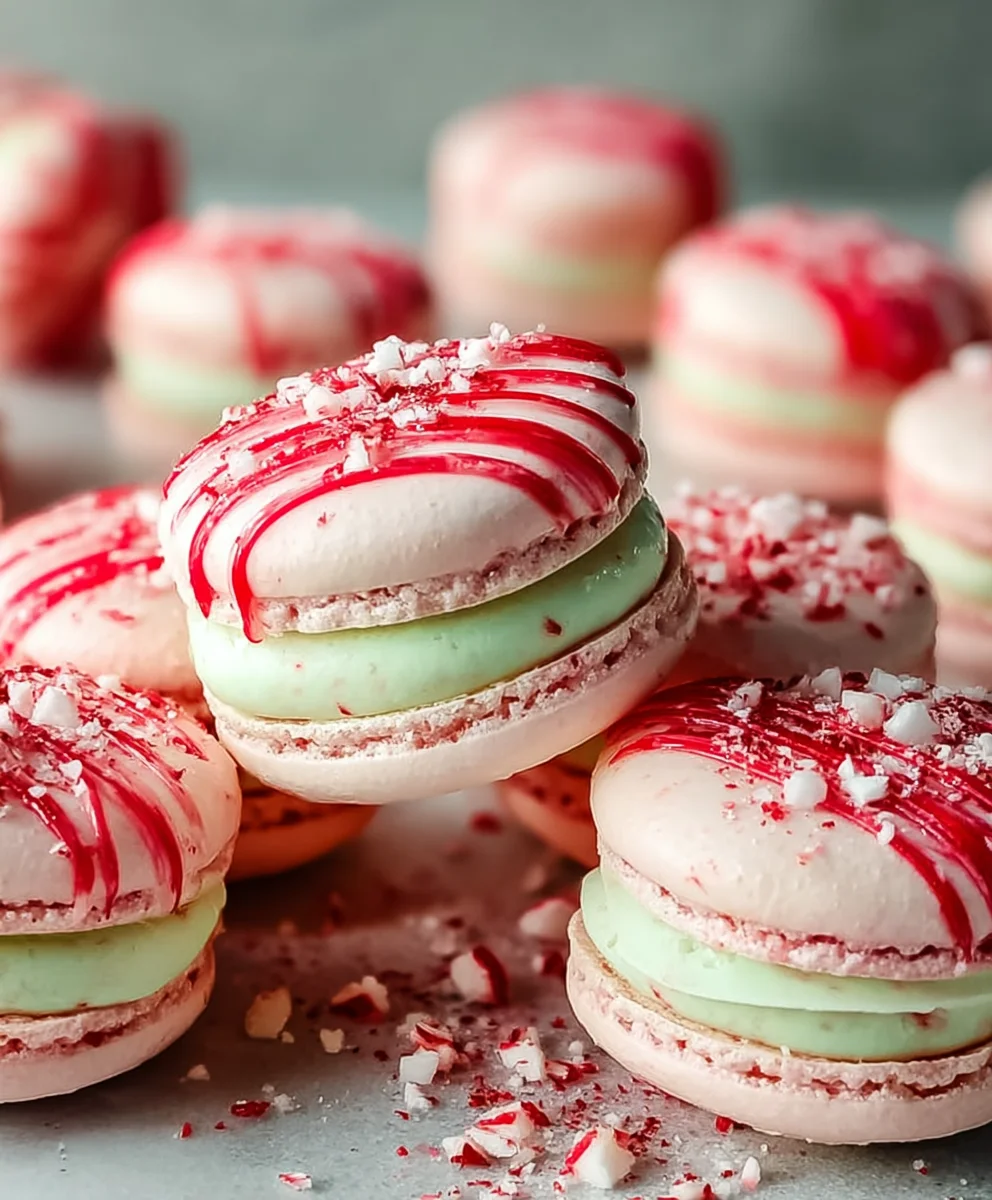
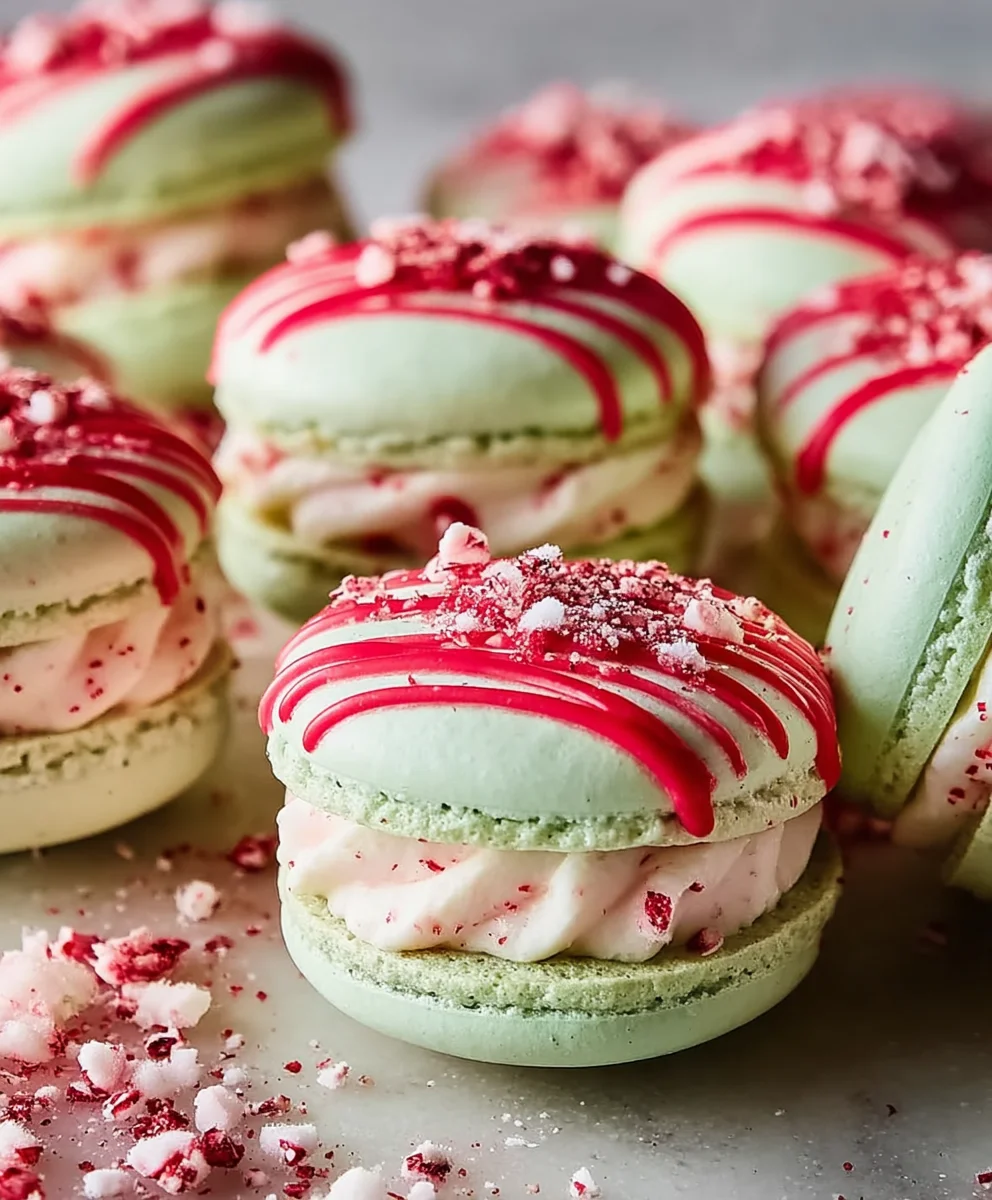
Peppermint Macarons are more than just a dessert; they are a tiny masterpiece, a delightful paradox of delicate crunch and chewy bliss that instantly evokes festive cheer. Imagine biting into a perfectly crisp shell, giving way to a soft, melt-in-your-mouth center, all infused with the invigorating, cool burst of peppermint. It’s an experience that awakens the senses and brings a touch of refined elegance to any occasion. While macarons themselves boast a rich French heritage, celebrated for their sophisticated charm, the addition of peppermint transforms them into an irresistible seasonal treat. They capture the essence of winter holidays, turning a classic into a festive sensation.
These elegant Peppermint Macarons are a testament to the magic of baking, offering a balance of sweet and minty notes that is simply captivating. Their vibrant colors and intricate design make them a showstopper, perfect for holiday gatherings or simply a delightful indulgence. I find immense joy in crafting these little gems, and I’m thrilled to guide you through the process of creating your own batch of these beautiful and delicious treats.

Ingredients:
- For the Peppermint Macaron Shells:
- 100 grams (approx. 1 cup) aged egg whites, at room temperature (about 3 large egg whites). Aged egg whites, separated a day or two prior and stored in an airtight container in the fridge, then brought to room temperature, are often recommended for the most stable meringue.
- 100 grams (approx. 1 cup) almond flour, superfine. Make sure it’s superfine and not almond meal, which can be too coarse. I always pulse mine further in a food processor with the powdered sugar to ensure maximum fineness.
- 100 grams (approx. 1/2 cup) granulated sugar. This is for the meringue itself, adding structure and stability.
- 100 grams (approx. 3/4 cup) powdered sugar (confectioners’ sugar). This combines with the almond flour to create the dry mix.
- 1/4 teaspoon cream of tartar (optional, but I find it helps stabilize the meringue, especially on humid days).
- Red gel food coloring (a tiny amount, for a subtle pink hue, or more for vibrant Peppermint Macarons). Gel coloring is preferred as it won’t add excess liquid.
- For the Peppermint Buttercream Filling:
- 1 cup (226 grams) unsalted butter, softened to room temperature. Crucial for smooth buttercream; cold butter will result in lumps.
- 3-4 cups (360-480 grams) powdered sugar, sifted. Sifting prevents lumps and ensures a silky smooth filling for your Peppermint Macarons.
- 1-2 tablespoons heavy cream or whole milk. Adjust for desired consistency.
- 1 teaspoon pure vanilla extract. A classic flavor enhancer.
- 1/2 to 1 teaspoon pure peppermint extract, to taste. Start with less and add more; peppermint can be potent! This is what truly makes them Peppermint Macarons.
- Pinch of salt. Balances the sweetness.
- Red gel food coloring (optional, for a pale pink or vibrant red filling).
- For Decoration (Optional):
- Crushed candy canes or peppermint candies. Adds a lovely crunch and extra festive flair to your finished Peppermint Macarons.
Preparing the Peppermint Macaron Shells: The Foundation of Deliciousness
Making Peppermint Macarons can feel a little daunting at first, but with patience and precision, you’ll be piping beautiful shells in no time. I always find this part to be the most satisfying, watching those feet rise!
- Gather Your Tools and Prep Your Workspace: Before you even think about mixing, lay out two baking sheets with silicone mats (like Silpats) or parchment paper. If using parchment, you might want to trace 1.5-inch circles spaced about an inch apart on the underside, as a guide. Get your piping bag fitted with a round tip (I use an Ateco 805 or Wilton 1A) ready. Precision is key for perfect Peppermint Macarons.
- Sift and Combine Dry Ingredients: In a medium bowl, combine your 100 grams of superfine almond flour and 100 grams of powdered sugar. I always sift these together at least twice to ensure there are no lumps whatsoever. For an extra smooth batter, I sometimes pulse them in a food processor for about 30 seconds before sifting. This helps break down any larger almond pieces that might have snuck through. Set this aside. This mixture is often called the “tant pour tant” – meaning equal parts, and it’s a cornerstone for stable Peppermint Macarons.
- Whip the Meringue: In a very clean, grease-free bowl (I prefer a metal or glass bowl for meringues), add your 100 grams of room temperature egg whites. Using an electric hand mixer or stand mixer with a whisk attachment, begin whisking on medium-low speed until the egg whites become frothy, like dish soap bubbles. At this point, add your optional 1/4 teaspoon of cream of tartar. This helps acidify the egg whites, making the meringue more stable.
- Gradually Add Granulated Sugar: Once the egg whites are frothy, start slowly adding your 100 grams of granulated sugar, one tablespoon at a time, while continuing to whisk on medium speed. Don’t rush this step! Giving the sugar time to dissolve into the egg whites is essential for a glossy, stable meringue. Once all the sugar is incorporated, increase your mixer speed to medium-high.
- Achieve Stiff Peaks and Add Coloring: Continue whisking until the meringue forms stiff, glossy peaks. When you lift the whisk, the peak should hold its shape firmly, pointing straight up or curling slightly at the very tip, like a bird’s beak. The meringue should be shiny and smooth. At this stage, if you’re using gel food coloring, add a tiny drop or two of red gel color. For a delicate pink, start small; for a bolder red, add a bit more. Whisk for just another 30 seconds to fully incorporate the color. You want a lovely pale red or vibrant hue for your festive Peppermint Macarons.
- The Macaronage Process: This is arguably the most critical step for making perfect Peppermint Macarons. Add about one-third of your sifted dry ingredients (almond flour and powdered sugar mix) to the meringue. Gently fold it in with a rubber spatula using a specific technique: scrape around the sides of the bowl, then cut through the center, lifting the batter. Repeat this with the remaining dry ingredients in two additions.
- Achieving the “Lava” or “Ribbon” Consistency: The goal of macaronage is to deflate the meringue just enough to create a batter that flows slowly, like molten lava, when lifted with the spatula. This is known as the “ribbon stage.” When you lift the spatula, the batter should fall off in a continuous ribbon, and you should be able to draw a figure eight with it before it reabsorbs into the main batter within 10-20 seconds. Be careful not to overmix! Overmixing leads to runny batter and flat Peppermint Macarons without “feet.” Undermixing will result in lumpy, cracked shells. It takes practice, so trust your instincts and err on the side of slightly undermixed if you’re unsure.
- Pipe the Macaron Shells: Transfer your perfectly macaronaged batter into the prepared piping bag. Hold the piping bag perpendicular to your baking sheet and pipe uniform 1.5-inch circles, using your traced guides if you have them. Apply consistent pressure, pipe from the center, and stop applying pressure just before lifting the bag with a small flick of your wrist to avoid “nips” or “tails.”
- “Slam” and Remove Air Bubbles: Once all your shells are piped, firmly rap each baking sheet on your countertop about 2-3 times. This helps release any trapped air bubbles within the batter, which can cause cracking during baking. If you see any persistent bubbles, use a toothpick to gently pop them. This step is crucial for smooth, pristine Peppermint Macarons.
- Dry the Shells (Crusting): Now for the patience test! Let your piped macaron shells sit out at room temperature for 30 minutes to 2 hours, or even longer depending on the humidity in your kitchen. You’ll know they’re ready when they form a “skin” – when you gently touch the top of a shell, it should feel dry to the touch and not stick to your finger. This skin is what allows the “feet” to form during baking.
- Preheat Oven and Bake: While the shells are drying, preheat your oven to 300°F (150°C). Oven temperatures can vary greatly, so knowing your oven is key. I sometimes use an oven thermometer to ensure accuracy. Once crusted, bake one sheet at a time (if possible, to ensure even heating) for 12-16 minutes. The baking time will vary.
- Check for Doneness: The shells are done when the “feet” (the ruffled edge at the bottom) have fully developed, and the shell doesn’t wobble when gently nudged. If it wobbles, bake for another 1-2 minutes. The tops should not brown significantly.
- Cool Completely: Remove the baking sheet from the oven and let the macaron shells cool completely on the sheet before attempting to peel them off the silicone mat or parchment. This is incredibly important! Trying to remove them too soon will result in broken shells. They should easily lift off once cooled, leaving a clean, smooth bottom. Once cooled, store them in an airtight container until you’re ready to fill your Peppermint Macarons.
Crafting the Creamy Peppermint Buttercream Filling
While your beautiful Peppermint Macaron shells are cooling, let’s whip up the perfect, most luscious peppermint buttercream. This filling is the heart of your festive Peppermint Macarons, so we want it to be absolutely divine!
- Cream the Butter: In a large mixing bowl, using an electric mixer with the paddle attachment (or whisk attachment), beat your softened unsalted butter on medium speed for about 2-3 minutes until it’s light, fluffy, and pale in color. This aerates the butter, which is crucial for a light and smooth buttercream.
- Gradually Add Powdered Sugar: With the mixer on low speed, slowly add the sifted powdered sugar, one cup at a time. I usually start with 3 cups. Mix until each addition is fully incorporated before adding the next. If you add it too quickly, you’ll end up with a sugar cloud in your kitchen! Once all the sugar is in, increase the speed to medium and beat for another 2-3 minutes.
- Introduce Flavor and Consistency: Add the vanilla extract, peppermint extract, and the pinch of salt. Start with 1/2 teaspoon of peppermint extract and taste after mixing. Peppermint is strong, so you might not need the full teaspoon. Slowly drizzle in the heavy cream or milk, 1 tablespoon at a time, until you reach your desired creamy, pipeable consistency. Beat on medium-high speed for another 1-2 minutes until the buttercream is light, fluffy, and smooth.
- Optional: Add Color or Crushed Candy Canes: If you’d like a pink or red peppermint buttercream, add a tiny drop of red gel food coloring and mix until fully combined. For an extra festive touch, you can fold in a tablespoon or two of finely crushed candy canes or peppermint candies at this stage. Just be mindful not to add too much, as it can make the buttercream a bit gritty, though for Peppermint Macarons, a little crunch is often welcome!
- Prepare for Piping: Transfer the peppermint buttercream filling to a piping bag fitted with a round tip (like an Ateco 804 or Wilton 12) or a star tip (like a Wilton 1M) if you prefer a decorative edge. Twist the top of the bag to secure the filling and prevent it from squeezing out the wrong end.
Assembling and Maturing Your Peppermint Macarons
This is the moment of truth, where all your hard work comes together to create truly magical Peppermint Macarons! The final steps are all about bringing the shells and filling together and letting them marry their flavors.
- Pair the Macaron Shells: Lay out all your cooled macaron shells. Take your time to pair them up by size and shape. Since I pipe them by hand, they are never perfectly identical, so finding their perfect match ensures beautiful, consistent Peppermint Macarons.
- Pipe the Filling: Pick up one paired shell. Take your piping bag filled with peppermint buttercream and pipe a generous dollop of filling onto the flat side of one macaron shell. I like to pipe a ring around the edge or a mound in the center, ensuring there’s enough filling to just reach the edge when the top shell is placed on.
- Top with the Second Shell: Gently place the matching top shell on top of the filling, pressing down very lightly until the filling spreads to the edges. You don’t want to squeeze out too much, just enough to create a neat sandwich. Repeat this process for all your Peppermint Macarons.
- Optional: Decorate: If desired, gently roll the edges of the assembled Peppermint Macarons in crushed candy canes or sprinkle some over the top of the filling before placing the top shell. This adds an extra layer of peppermint flavor and a lovely visual appeal.
- The Maturing Process (The Secret to Amazing Peppermint Macarons): This is perhaps the most important, yet often overlooked, step for truly excellent Peppermint Macarons. Once assembled, arrange your macarons in an airtight container. Refrigerate them for at least 24 hours, or ideally 48 hours. During this “maturing” period, the moisture from the filling softens the macaron shell, creating that signature slightly chewy, melt-in-your-mouth texture that everyone loves.
- Serve and Store: After maturing, your Peppermint Macarons are ready to be enjoyed! They are best served at room temperature, so take them out of the fridge about 15-30 minutes before serving. They will keep well in an airtight container in the refrigerator for up to 5-7 days. For longer storage, you can freeze them for up to a month; simply thaw them in the refrigerator overnight before bringing them to room temperature to serve. Enjoy your beautifully crafted and utterly delicious Peppermint Macarons!
Conclusion:
From the moment I first perfected this recipe, I knew I had to share it with all of you. These aren’t just any ordinary baked goods; these Peppermint Macarons are a true celebration of flavor, texture, and holiday cheer. I genuinely believe that every home baker, regardless of their experience level with macarons, deserves the joy and satisfaction that comes from creating these exquisite treats. We’ve walked through each step together, from achieving that perfect meringue to piping those delicate shells and crafting the most divine peppermint filling. The distinct crispness of the shell, the tender chewiness of the interior, and that invigorating burst of cool peppermint are simply unparalleled. It’s a sensory experience that transforms a simple dessert into a memorable event.
What makes these Peppermint Macarons an absolute must-try isn’t just their incredible taste, but also the sheer delight they bring. Imagine presenting a plate of these vibrant, jewel-toned confections at your next gathering. They are instant showstoppers, sparking conversation and delight with every bite. I’ve heard countless stories from friends and family who, after trying my recipe, felt a tremendous sense of accomplishment and pride. There’s a misconception that macarons are incredibly difficult, but with patience and following these precise steps, I promise you, success is well within your reach. And let me tell you, the reward for your effort is immeasurably sweet.
Elevating Your Peppermint Macaron Experience: Serving & Variations
Now that you’ve put in the wonderful work of creating these beauties, let’s talk about how to best enjoy them and perhaps even experiment a little. These Peppermint Macarons are absolutely divine served simply, alongside a hot cup of coffee or a delicate herbal tea. The warmth of the beverage perfectly complements the cool, refreshing mint. For a truly decadent experience, I love pairing them with a rich, dark hot chocolate – the combination of chocolate and peppermint is timeless for a reason! They also make an incredibly elegant addition to any dessert platter, instantly elevating the entire spread.
But don’t stop there! Consider these serving and variation ideas to truly make them your own. For a festive twist, you could drizzle melted dark or white chocolate over the finished macarons once they’ve set. A sprinkle of edible glitter or crushed candy cane pieces on top of the wet chocolate drizzle would add another layer of visual appeal and textural interest. If you want to explore different flavor intensities, you could adjust the amount of peppermint extract in the filling slightly, or even add a hint of vanilla or almond extract to create a more complex undertone. Another delightful variation is to add a thin layer of chocolate ganache alongside the peppermint buttercream, creating a beautiful dual-layered filling that’s sure to impress.
Beyond serving them at home, these Peppermint Macarons also make spectacular homemade gifts. Carefully pack a few in a small, decorative box, tied with a festive ribbon, and you have a thoughtful, handcrafted present that speaks volumes about your care and effort. They’re perfect for teachers, neighbors, or as hostess gifts during the holiday season or any special occasion.
Your Macaron Journey Starts Now!
I genuinely hope this recipe has inspired you. Baking, for me, is an act of love, a creative outlet, and a wonderful way to bring people together. I can’t express enough how much I encourage you to set aside an afternoon, gather your ingredients, and embark on this delightful journey of making your own Peppermint Macarons. Don’t be afraid to try; remember, practice makes perfect, and even imperfect macarons taste absolutely heavenly!
Once you’ve whipped up your batch, I would be absolutely thrilled to hear about your experience. Did you find a particular step easier or harder than expected? Did you try any interesting variations? Please, share your triumphs, your tips, and especially your photos! Tag me on social media or leave a comment below – I love seeing your creations and connecting with fellow baking enthusiasts. Your feedback not only brightens my day but also helps others who are just starting their macaron adventure. Let’s build a community where we celebrate every delicious success, big or small. Go forth, bake some magic, and share the joy of these incredible Peppermint Macarons with everyone you love! I truly can’t wait to see what you create. Happy baking!
Recipe
A delicious recipe
Ingredients
Instructions
Important Information
Nutrition Facts (Per Serving)
It is important to consider this information as approximate and not to use it as definitive health advice.
Allergy Information
Please check ingredients for potential allergens and consult a health professional if in doubt.
Leave a Comment