
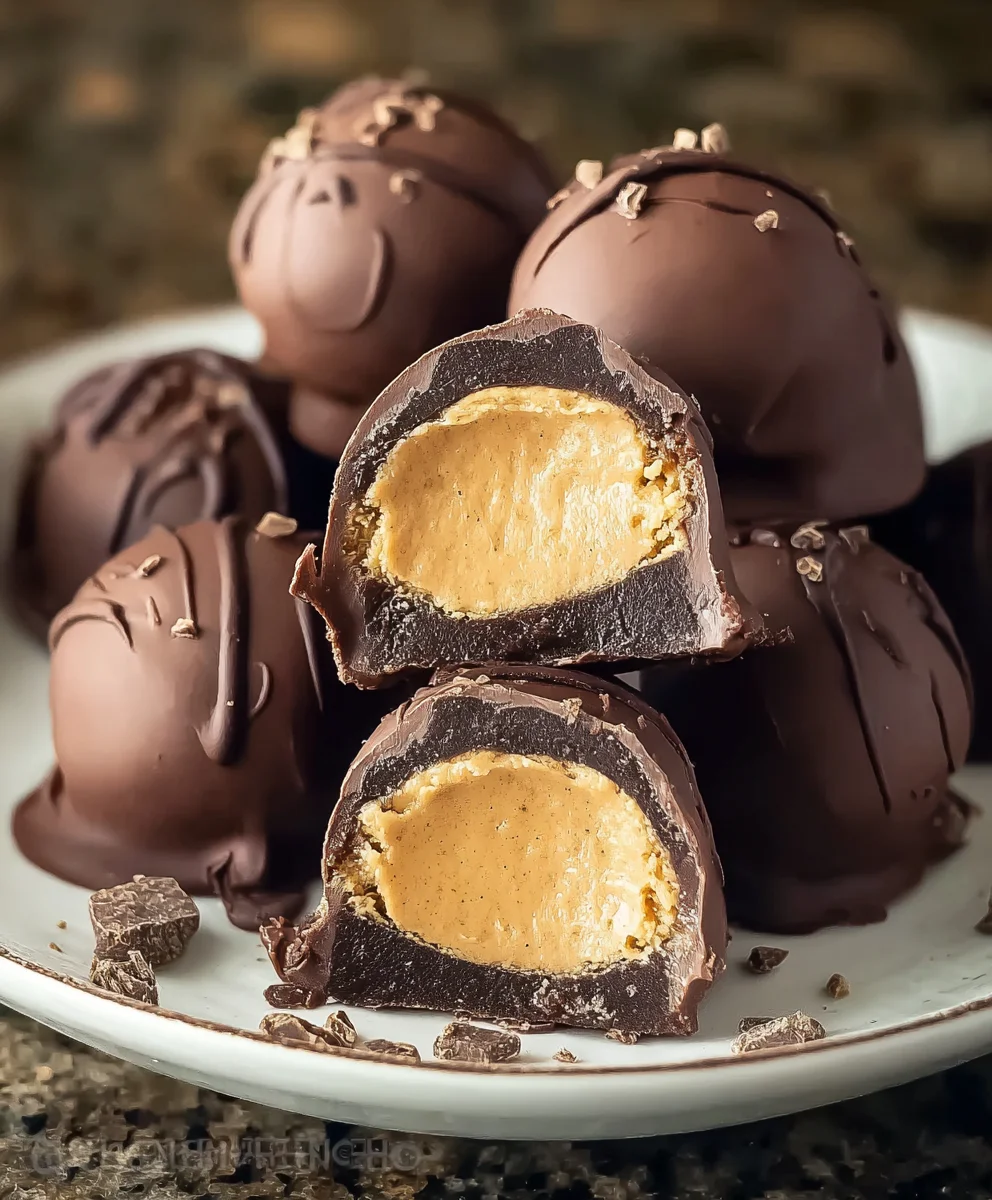
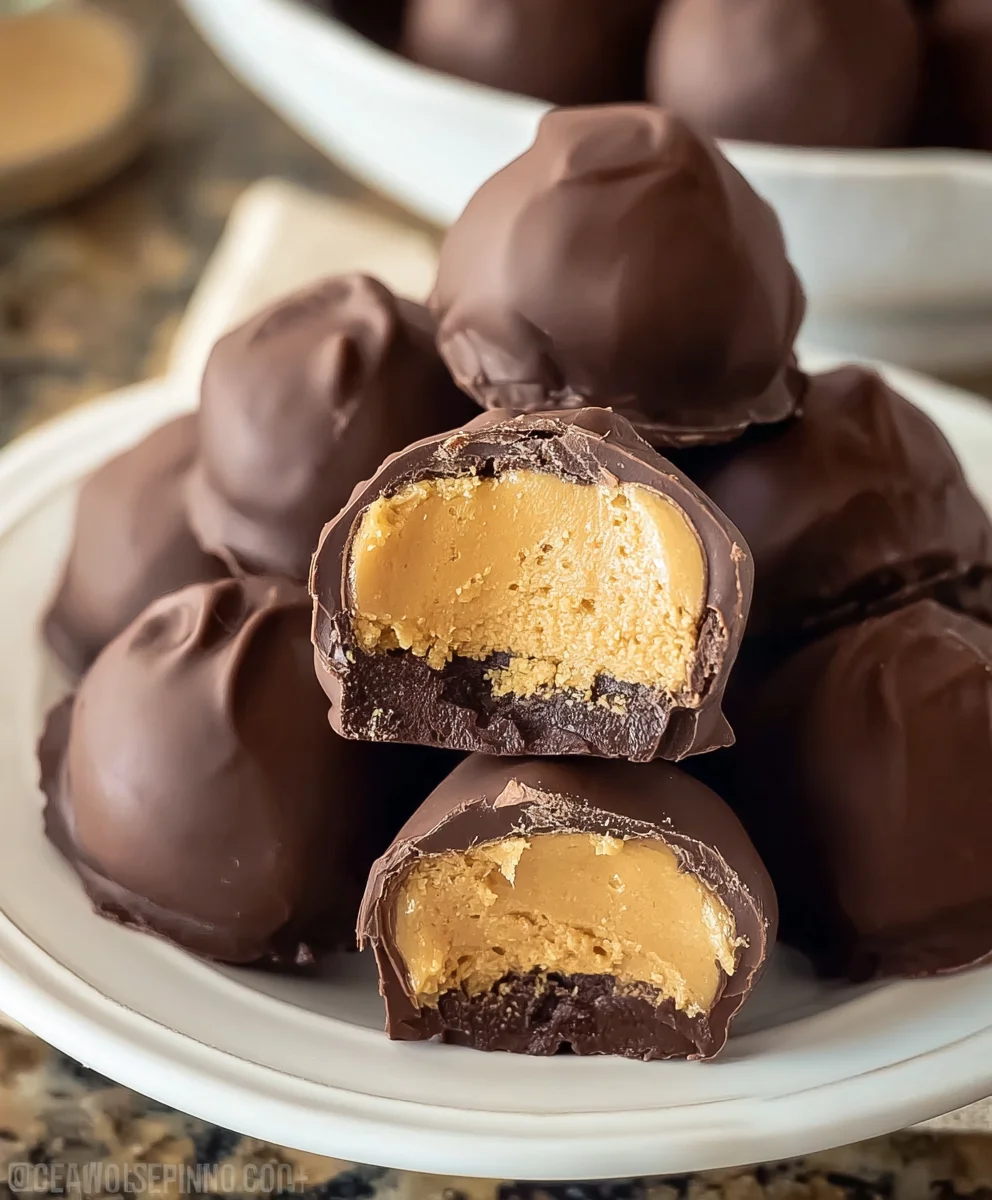
Peanut Butter Buckeyes are more than just a candy; they are a delightful culinary tradition, a true testament to the irresistible pairing of rich peanut butter and decadent chocolate. As someone who absolutely adores creating joyful treats, I am thrilled to guide you through the process of making these iconic, no-bake wonders. These spherical delights, famously named after the poisonous nuts of the Ohio buckeye tree they closely resemble, hold a special place in the hearts of many, particularly throughout the Midwest during the holiday season.
Why are Peanut Butter Buckeyes so universally cherished?
It’s that perfect harmony of flavors and textures. Imagine a lusciously smooth, sweet, and slightly salty peanut butter fudge center, enrobed in a crisp, dark chocolate shell, leaving just a peek of the peanut butter exposed at the top. This clever design not only gives them their distinctive look but also ensures a sublime melt-in-your-mouth experience with every bite. They are incredibly easy to prepare, making them a fantastic project for bakers of all skill levels, perfect for gifting, parties, or simply satisfying that intense craving for a nostalgic, chocolate-peanut butter dream.

Ingredients:
- For the Peanut Butter Filling:
- 1 cup (2 sticks) unsalted butter, softened to room temperature
- 1 ¾ cups creamy peanut butter (I find Jif or Skippy work wonderfully for the classic texture)
- 4-5 cups powdered sugar (confectioners’ sugar), sifted, plus more if needed
- 1 teaspoon pure vanilla extract
- For the Chocolate Coating:
- 12 ounces semi-sweet chocolate chips or melting wafers (high-quality chocolate will make a difference here!)
- 6 ounces milk chocolate chips (optional, for a slightly sweeter coating)
- 1 tablespoon vegetable shortening or refined coconut oil (this is key for a smooth, dippable consistency)
Preparing the Irresistible Peanut Butter Filling for Your Buckeyes
Get ready to create the heart of your magnificent Peanut Butter Buckeyes! This initial phase is all about achieving that perfect, creamy, and slightly firm peanut butter center that everyone adores. Precision here will make your dipping process much smoother.
- Softening the Butter and Peanut Butter: First things first, ensure your butter and creamy peanut butter are properly softened to room temperature. This is absolutely crucial for a smooth, lump-free mixture. If your butter is too cold, it won’t cream properly, and you’ll end up with a lumpy, inconsistent filling. I like to take them out of the fridge at least an hour or two before I plan to start. You want them soft enough to easily press your finger into, but not melted or greasy.
- Creaming Together the Foundation: In a large mixing bowl, combine the softened unsalted butter and the creamy peanut butter. Using an electric mixer (either a stand mixer with a paddle attachment or a hand mixer) on medium speed, beat the butter and peanut butter together until the mixture is light, fluffy, and well-combined. This usually takes about 2-3 minutes. Scrape down the sides of the bowl frequently to ensure everything is thoroughly incorporated. This step is vital for a smooth, uniform base for your Peanut Butter Buckeyes.
- Incorporating the Sweetness: Now it’s time to add the powdered sugar. Gradually add the sifted powdered sugar to the peanut butter mixture, one cup at a time, mixing on low speed after each addition until just combined. Sifting the powdered sugar beforehand is a small step that makes a huge difference in preventing lumps, giving your Buckeyes a wonderfully smooth texture. As you add more sugar, the mixture will start to thicken considerably. You’ll likely use between 4 and 5 cups. The exact amount can depend on the humidity in your kitchen and the brand of peanut butter you’re using. Continue mixing until a stiff, dough-like consistency forms.
- A Touch of Vanilla: Once the powdered sugar is mostly incorporated, add the pure vanilla extract. Increase the mixer speed to medium and beat for another minute or two, until the vanilla is evenly distributed and the mixture is truly smooth and uniform. The vanilla enhances the rich flavors of both the peanut butter and the forthcoming chocolate, making your Peanut Butter Buckeyes truly irresistible.
- Achieving the Perfect Consistency: At this point, you should have a firm but pliable dough. It should be easy to roll but not sticky, and it should hold its shape well. To test, grab a small piece and try to roll it between your palms. If it’s too sticky, add another ¼ to ½ cup of sifted powdered sugar and mix again. If it feels too dry or crumbly, you might need to add a tiny bit more softened butter (a tablespoon at a time) or a splash of milk, though this is rare if your butter and peanut butter were properly softened. The ideal consistency is crucial for forming perfect balls.
- Rolling into Spheres of Delight: Line a couple of baking sheets with parchment paper or wax paper. Using a small cookie scoop (about 1-inch in diameter, which holds approximately 1 tablespoon of mixture) or just your hands, roll the peanut butter mixture into smooth, uniform balls. Aim for balls that are roughly 1 inch to 1 ½ inches in diameter. Consistency in size is important, as it helps with even dipping and ensures all your Peanut Butter Buckeyes look professional and cook (or rather, set) at the same rate. Place the rolled balls onto your prepared baking sheets, leaving a little space between each.
- Chilling is Crucial for Dipping Success: Once all your peanut butter balls are rolled, transfer the baking sheets to the refrigerator. Chill them for at least 30-60 minutes, or even longer (up to several hours). This chilling time is absolutely essential! It firms up the peanut butter balls, preventing them from melting or falling apart when you dip them into the warm chocolate. Do not skip this step! A firm center ensures beautifully shaped Peanut Butter Buckeyes. You can even place them in the freezer for 15-20 minutes for a faster chill, but don’t let them freeze solid, as this can cause cracking in the chocolate later.
Crafting the Velvety Chocolate Coating for Your Peanut Butter Buckeyes
Now for the luscious outer shell! The chocolate coating is what turns a simple peanut butter ball into a decadent Buckeye. Getting the chocolate just right is key to a smooth, glossy, and beautifully set finish.
- Gathering Your Chocolate Arsenal: While your peanut butter balls are chilling, it’s time to prepare the chocolate coating. I prefer a mix of semi-sweet and milk chocolate chips for a balanced flavor that isn’t too bitter or too sweet, but feel free to use just semi-sweet or even dark chocolate if that’s your preference. High-quality chocolate chips or melting wafers will yield the best results – they melt more smoothly and have a better flavor. Measure out your chocolate chips and have your vegetable shortening or refined coconut oil ready.
- The Gentle Melt (Double Boiler Method): My favorite method for melting chocolate is a double boiler, as it provides gentle, even heat, significantly reducing the risk of scorching. Place the chocolate chips (and milk chocolate chips, if using) and the shortening/coconut oil in a heatproof bowl. Set this bowl over a saucepan filled with about an inch or two of simmering water, ensuring the bottom of the bowl does not touch the water. Stir occasionally with a rubber spatula until the chocolate is completely melted and smooth. This process takes a bit of patience, but it’s worth it.
- The Gentle Melt (Microwave Method – if preferred): If you’re using a microwave, place the chocolate chips and shortening/coconut oil in a microwave-safe bowl. Heat on high power for 30-second intervals, stirring thoroughly after each interval. It’s crucial to stir even if the chocolate doesn’t appear melted, as residual heat will continue to melt the chips. Continue until the chocolate is smooth and entirely melted. Be very careful not to overheat, as chocolate can seize up quickly if it gets too hot.
- Adding the Shortening/Oil – The Secret to Smoothness: Whether you use the double boiler or microwave method, the tablespoon of vegetable shortening or refined coconut oil is your secret weapon. It thins the chocolate slightly, making it much easier to dip your peanut butter balls, and also gives the coating a lovely glossy finish that sets beautifully without cracking. Stir it in thoroughly until it’s completely dissolved and the chocolate is perfectly smooth and fluid, with no lumps. A smooth, dippable chocolate is essential for perfectly coated Peanut Butter Buckeyes.
- Maintaining Optimal Temperature: Keep your melted chocolate warm throughout the dipping process. If you’re using the double boiler method, you can keep the bowl over very low heat or turn off the heat and let the residual warmth from the water keep it fluid. If using the microwave, you might need to reheat it for 10-15 seconds at a time if it starts to thicken too much. The goal is to keep the chocolate liquid enough for easy dipping but not so hot that it melts your chilled peanut butter balls on contact.
The Art of Dipping and Finishing Your Peanut Butter Buckeyes
This is where the magic happens and your simple peanut butter balls transform into classic Peanut Butter Buckeyes! This step requires a bit of finesse, but with the right technique, you’ll be making bakery-worthy treats in no time.
- Setting Up Your Dipping Station: Before you start dipping, make sure your work area is prepared. Have your chilled peanut butter balls ready, your bowl of melted chocolate within easy reach, and a fresh sheet of parchment paper or wax paper laid out on a clean surface or another baking sheet for placing the dipped Buckeyes. You’ll also need toothpicks or a specialized chocolate dipping tool (a two-pronged fork or a candy dipping spiral works wonders if you have one).
- The Iconic Dip: Take one chilled peanut butter ball and carefully insert a toothpick into the very top. Hold the ball by the toothpick and immerse it almost completely into the melted chocolate, leaving a small, circular portion of the peanut butter exposed at the top. This exposed peanut butter is the “eye” that gives Peanut Butter Buckeyes their distinctive name! Do not fully submerge the ball.
- Allowing Excess to Drip: Once dipped, lift the peanut butter ball out of the chocolate. Gently tap the toothpick against the rim of the bowl to allow any excess chocolate to drip back into the bowl. This helps create a neat, even coating and prevents a thick “foot” of chocolate from forming around the base of your Buckeye. Rotate the ball slightly as you tap to ensure all sides are evenly coated and excess drips off.
- Transferring with Care: Carefully transfer the dipped Buckeye to your prepared parchment-lined surface. Once the Buckeye is resting on the parchment paper, gently remove the toothpick by twisting and pulling it straight up. You might have a tiny hole where the toothpick was, which is completely normal. If you want a perfectly smooth top, you can use the tip of another toothpick or a very small offset spatula to lightly smooth over the hole.
- Repeat and Refrigerate: Continue this dipping process with the remaining peanut butter balls, working efficiently to ensure your chocolate stays at an optimal dipping temperature. Once all your Peanut Butter Buckeyes are dipped, allow them to set. You can let them set at room temperature, which might take a couple of hours, or place the baking sheets back into the refrigerator for about 20-30 minutes for a quicker set. Refrigeration will make the chocolate firm and glossy.
- Final Touches and Storage: Once the chocolate has fully set, your beautiful Peanut Butter Buckeyes are ready to enjoy! If you want to add a special touch, you can sprinkle a tiny bit of flaky sea salt on top of the chocolate before it sets for a delicious sweet and salty contrast. Store your Buckeyes in an airtight container at room temperature for up to a week, or in the refrigerator for up to two weeks. They also freeze beautifully for longer storage, lasting up to a month or more. Just make sure to bring them to room temperature for about 15-20 minutes before serving to enjoy their best texture and flavor. These truly are a holiday favorite, a party showstopper, or simply a delightful treat for any day!
Conclusion:
And there you have it, dear friends! We’ve journeyed through every delightful step, and now you stand on the precipice of creating something truly extraordinary. This isn’t just another recipe; it’s an invitation to craft a treat that consistently garners smiles, whispers of appreciation, and often, requests for the recipe itself. This simple yet profoundly satisfying confection is a guaranteed crowd-pleaser, a nostalgic hug in edible form, and surprisingly effortless to master. I’ve poured my heart into guiding you through the nuances, ensuring that your first, or twentieth, attempt at these delightful sweets is nothing short of spectacular. What makes this recipe an absolute must-try, you ask? It’s the perfect harmony of creamy, rich peanut butter filling, which literally melts in your mouth, perfectly contrasted with a crisp, slightly bitter chocolate coating that balances the sweetness. The textural interplay is divine, and the flavor profile is utterly addictive – a classic combination that never, ever disappoints. You’re not just making a dessert; you’re creating a moment, a memory, a little piece of joy that can be shared and savored.
Now, let’s talk about how to truly make these your own, or how to present them to maximize their appeal. While perfect on their own, a little creativity can elevate them even further. For serving suggestions, imagine these beautiful morsels artfully arranged on a holiday dessert platter, perhaps nestled amongst a sprinkle of festive edible glitter or alongside some fresh berries for a vibrant pop of color. They are utterly divine served with a steaming mug of coffee or a tall, cold glass of milk for a comforting snack. During cooler months, pair them with a rich hot chocolate for an indulgent experience. They also make magnificent homemade gifts, thoughtfully packaged in decorative boxes or cello bags, tied with a pretty ribbon – your friends and family will undoubtedly be thrilled with such a personal, delicious present. Trust me, the effort (minimal as it is!) will be immensely appreciated.
Elevate Your Buckeye Experience with Creative Variations
But wait, the fun doesn’t stop there! The beauty of this recipe lies in its adaptability. While the classic approach yields impeccable results, don’t hesitate to experiment with variations once you’ve mastered the basic technique. For instance, consider using different types of chocolate for the coating: a rich, dark chocolate will provide a more intense, sophisticated contrast to the sweet peanut butter, while milk chocolate will lean into a sweeter, more comforting profile. For a visually stunning twist, you could even dip them in white chocolate and then drizzle with dark chocolate, or vice versa, creating an elegant marbled effect. If you’re feeling particularly adventurous, try adding a pinch of sea salt to the peanut butter mixture for a delightful salty-sweet explosion that truly enhances the flavors. Alternatively, a tiny dash of cayenne pepper can introduce an unexpected, exciting kick! For those who enjoy a little extra crunch, finely chopped roasted peanuts or even mini chocolate chips can be folded into the peanut butter base before chilling. You could also explore different nut butters, though I must confess, the classic
Peanut Butter Buckeyes
hold a special place in my heart for a reason – the creamy, roasted peanut flavor is simply unparalleled. Just ensure your chosen nut butter has a similar consistency to traditional peanut butter for the best results in forming the balls. If you’re catering to dietary restrictions, many brands offer gluten-free chocolate chips and certified gluten-free peanut butter, making this a wonderfully inclusive treat for many.
Your Culinary Journey Starts Now!
So, what are you waiting for? This is your moment to shine in the kitchen. Gather your ingredients, put on some cheerful music, and dive into the delightful process of making these incredible confections. I promise you, the joy of creating something so utterly delicious with your own hands is an incredibly rewarding experience. Once you’ve pulled off your first batch of these amazing treats, I wholeheartedly encourage you to share your triumphs! Did you stick to the classic recipe, or did you venture into one of the variations? What did your friends and family think? We, as a community of food lovers, thrive on shared experiences and culinary adventures. So please, don’t be shy! I would absolutely love to hear about your journey, your tips, your successes, and perhaps even any little tweaks you made to truly make them your signature dish. Share your photos, your stories, and your feedback in the comments section below. Let’s celebrate the joy of baking together. Happy cooking, and even happier eating!
Peanut Butter Buckeyes
Peanut Butter Buckeyes are a cherished no-bake treat, combining a luscious peanut butter fudge center with a crisp, decadent chocolate shell. Named for their resemblance to Ohio buckeye nuts, these easy-to-make candies are perfect for holidays, gifting, or satisfying any chocolate-peanut butter craving.
Ingredients
-
1 cup (2 sticks) unsalted butter, softened
-
1 ¾ cups creamy peanut butter
-
4-5 cups powdered sugar, sifted
-
1 teaspoon pure vanilla extract
-
12 ounces semi-sweet chocolate chips or melting wafers
-
6 ounces milk chocolate chips (optional)
-
1 tablespoon vegetable shortening or refined coconut oil
Instructions
-
Step 1
Ensure butter and creamy peanut butter are softened to room temperature. -
Step 2
In a large bowl, beat softened butter and peanut butter with an electric mixer until light and fluffy. -
Step 3
Gradually add sifted powdered sugar (4-5 cups total), mixing on low speed until a stiff, dough-like consistency forms. -
Step 4
Stir in vanilla extract until well combined and smooth. -
Step 5
Adjust consistency with more powdered sugar if too sticky, or a tiny bit more softened butter if too dry/crumbly. The dough should be firm but pliable. -
Step 6
Line baking sheets with parchment. Roll peanut butter mixture into 1 to 1 ½ inch balls and place on sheets. -
Step 7
Chill peanut butter balls in the refrigerator for 30-60 minutes (or freezer for 15-20 minutes) until firm, but not frozen solid. This is crucial for smooth chocolate coating without cracking. -
Step 8
Prepare chocolate chips and shortening/coconut oil. Melt them in a double boiler or microwave until smooth. -
Step 9
Stir shortening/oil into melted chocolate until smooth and fluid, ensuring no lumps remain for easy dipping and a glossy finish. Keep melted chocolate warm but not hot during dipping. -
Step 10
Set up a dipping station with chilled peanut butter balls, melted chocolate, parchment-lined sheets, and toothpicks. -
Step 11
Insert a toothpick into a peanut butter ball. Dip it almost entirely into the chocolate, leaving a small ‘eye’ of peanut butter exposed at the top. Tap the toothpick gently against the bowl to remove excess chocolate. -
Step 12
Place dipped Buckeye on parchment. Gently remove toothpick; smooth over the hole if desired. -
Step 13
Repeat dipping for all balls. Let Buckeyes set at room temperature or chill in the refrigerator for 20-30 minutes for a quicker, glossy set. -
Step 14
Once set, optionally sprinkle with flaky sea salt. Store in an airtight container: room temp up to a week, fridge up to two weeks, or freeze up to 3 months. Bring to room temp before serving.
Important Information
Nutrition Facts (Per Serving)
It is important to consider this information as approximate and not to use it as definitive health advice.
Allergy Information
Please check ingredients for potential allergens and consult a health professional if in doubt.

Leave a Comment