
Oreo Dump Cake: Just the name alone conjures up images of effortless baking and decadent desserts, doesn’t it? Prepare to be amazed because this recipe lives up to the hype! Imagine a dessert so simple, so ridiculously easy to throw together, yet so incredibly delicious that it will become your go-to for potlucks, family gatherings, or even just a weeknight treat.
While the exact origins of dump cakes are shrouded in a bit of mystery, their popularity exploded in the mid-20th century, fueled by the convenience of boxed cake mixes and canned fruits. They represent a nostalgic era of home cooking, where resourcefulness and speed were highly valued. This Oreo Dump Cake variation takes that classic concept and elevates it to a whole new level of chocolatey, creamy goodness.
What’s not to love? The combination of moist cake, crunchy Oreo cookies, and a buttery topping creates a symphony of textures and flavors that is simply irresistible. People adore this dish because it’s quick, requires minimal effort (seriously, you just “dump” everything in!), and always delivers a crowd-pleasing result. The rich, chocolatey taste is universally appealing, and the soft, crumbly texture is pure comfort food. Get ready to experience dessert bliss with this incredibly easy and satisfying Oreo Dump Cake recipe!

Ingredients:
- 1 package (14.3 ounces) Oreo cookies, divided
- 1 box (15.25 ounces) chocolate cake mix (plus ingredients called for on the box, usually eggs, oil, and water)
- 1 package (3.4 ounces) instant chocolate pudding mix
- 3 cups milk
- 1 container (8 ounces) frozen whipped topping, thawed
- 1/4 cup butter, melted
Preparing the Oreo Base:
Okay, let’s get started! The first thing we need to do is create that delicious Oreo base that makes this dump cake so irresistible. Don’t worry, it’s super easy!
- Crush the Oreos: Grab about 2/3 of the Oreo cookies (that’s most of the package, leaving some for topping later). You can use a food processor if you want a really fine crumb, but I usually just put them in a large zip-top bag and crush them with a rolling pin. It’s a great way to relieve some stress! You want them to be mostly crumbs, but a few larger pieces are totally fine. It adds some texture.
- Spread the Oreo Crumbs: Pour the crushed Oreos into the bottom of a 9×13 inch baking dish. Spread them out evenly to create a nice, even layer. This will be the foundation of our dump cake, so make sure it’s well distributed.
Making the Chocolate Pudding Layer:
Next up, we’re going to create a rich and creamy chocolate pudding layer. This adds moisture and a decadent chocolate flavor that complements the Oreos perfectly.
- Whisk the Pudding and Milk: In a large bowl, whisk together the instant chocolate pudding mix and the milk. Make sure you whisk it really well to get rid of any lumps. You want a smooth, creamy consistency.
- Let it Thicken: Let the pudding mixture sit for about 5 minutes to thicken up. This is important because it will help the pudding layer set properly in the cake. You’ll notice it getting noticeably thicker as it sits.
- Pour over Oreo Crumbs: Once the pudding has thickened, gently pour it over the layer of crushed Oreos in the baking dish. Try to spread it out evenly so that it covers all the Oreo crumbs. A spatula can help with this.
Adding the Cake Mix Layer:
Now for the cake mix! This is where the “dump” part of the dump cake really comes into play. We’re just going to sprinkle the dry cake mix over the pudding layer. It sounds crazy, but trust me, it works!
- Sprinkle the Cake Mix: Evenly sprinkle the dry chocolate cake mix over the pudding layer. Make sure you cover the entire surface of the pudding. Don’t worry about mixing it in; just sprinkle it on top.
- Drizzle with Melted Butter: Drizzle the melted butter evenly over the dry cake mix. This is crucial because the butter helps the cake mix bake properly and creates a delicious, golden-brown crust. Try to get the butter distributed as evenly as possible.
Baking the Oreo Dump Cake:
Time to bake this beauty! The oven does all the work from here. Just pop it in and let it bake until it’s golden brown and bubbly.
- Preheat the Oven: Preheat your oven to 350°F (175°C). Make sure your oven is fully preheated before you put the cake in.
- Bake: Bake for 45-50 minutes, or until the cake is golden brown and bubbly. A toothpick inserted into the center should come out with moist crumbs, not completely clean. The baking time may vary depending on your oven, so keep an eye on it.
- Cool Completely: Once the cake is done, remove it from the oven and let it cool completely. This is really important! If you try to frost it while it’s still warm, the whipped topping will melt. Be patient!
Frosting and Finishing Touches:
Almost there! Now for the final touches that make this Oreo dump cake truly special. We’re going to top it with whipped topping and those reserved Oreo cookies.
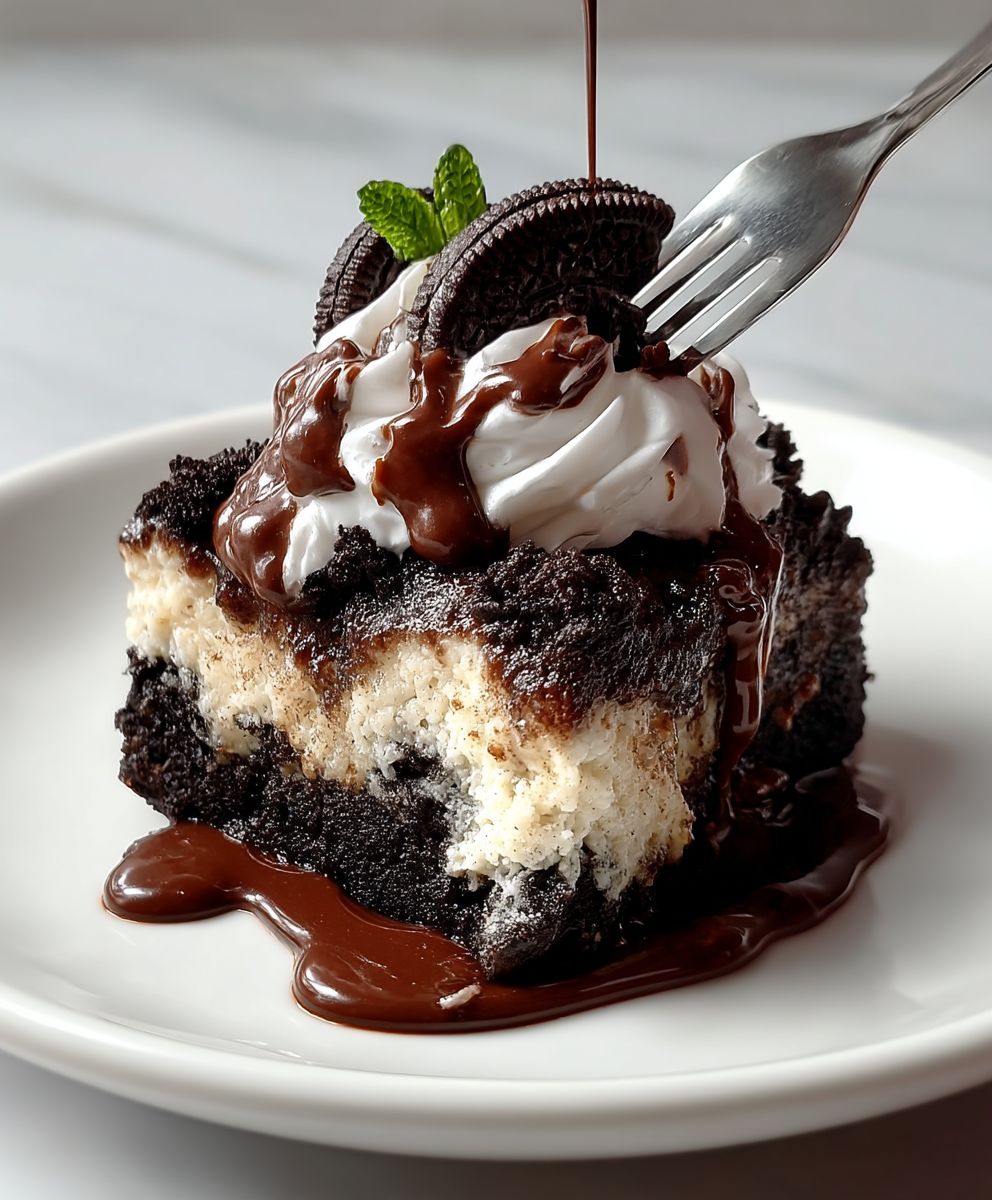
- Spread the Whipped Topping: Once the cake is completely cool, spread the thawed whipped topping evenly over the top. You can use a spatula or a knife to get a nice, smooth layer.
- Crush Remaining Oreos: Crush the remaining Oreo cookies (the ones you set aside earlier). Again, you can use a food processor or a zip-top bag and a rolling pin.
- Sprinkle with Oreo Crumbs: Sprinkle the crushed Oreo cookies over the whipped topping. This adds a final touch of Oreo flavor and a beautiful visual appeal.
- Chill (Optional): For best results, chill the cake in the refrigerator for at least 30 minutes before serving. This allows the flavors to meld together and the whipped topping to set up a bit.
Serving Suggestions:
Now for the best part enjoying your Oreo dump cake! Here are a few serving suggestions to make it even more special:
- Serve with a scoop of vanilla ice cream: The cold ice cream is a perfect complement to the warm, chocolatey cake.
- Drizzle with chocolate syrup: For an extra dose of chocolate, drizzle some chocolate syrup over each slice.
- Add some fresh berries: A few fresh raspberries or strawberries can add a pop of color and a touch of tartness.
- Enjoy it warm or cold: This cake is delicious both warm and cold, so feel free to experiment and see which way you prefer it.
Enjoy your delicious Oreo dump cake! I hope you love it as much as I do. It’s the perfect dessert for any occasion, and it’s always a crowd-pleaser.
Conclusion:
This Oreo dump cake isn’t just a dessert; it’s a shortcut to pure, unadulterated happiness. Seriously, if you’re looking for a recipe that delivers maximum flavor with minimal effort, look no further. The combination of the rich, chocolatey Oreos, the moist cake, and the buttery topping creates a symphony of textures and tastes that will have everyone begging for seconds. It’s the kind of dessert that disappears in minutes, leaving behind only crumbs and satisfied smiles.
But why is this particular Oreo dump cake a must-try? It’s the simplicity, really. We’re talking about a recipe that even the most novice baker can master. No fancy techniques, no complicated steps, just dump, bake, and devour. And the best part? It’s incredibly versatile.
Serving Suggestions and Variations
Want to take it to the next level? Serve it warm with a scoop of vanilla ice cream. The cold ice cream melting over the warm cake is an experience you won’t soon forget. Or, if you’re feeling adventurous, try a drizzle of hot fudge sauce or a sprinkle of chopped nuts.
For a fun twist, consider using different flavors of Oreos. Golden Oreos would add a delightful vanilla flavor, while mint Oreos would create a refreshing and festive dessert. You could even experiment with different cake mixes. Chocolate cake mix will intensify the chocolate flavor, while yellow cake mix will provide a lighter, more subtle sweetness.
Another variation I love is adding a layer of cream cheese filling. Simply mix together softened cream cheese, powdered sugar, and a touch of vanilla extract, and spread it over the Oreos before adding the cake mix. This adds a tangy and creamy element that complements the chocolate perfectly.
And don’t forget about the toppings! While butter is the classic choice, you could also use coconut oil for a slightly different flavor profile. Or, for a truly decadent treat, try using browned butter. The nutty, caramelized flavor of browned butter will elevate this dump cake to a whole new level.
Get Creative!
Feel free to get creative and experiment with your own variations. Add a layer of peanut butter chips, sprinkle in some chocolate chunks, or even drizzle with caramel sauce. The possibilities are endless!
I truly believe that this Oreo dump cake is a recipe that everyone should have in their repertoire. It’s perfect for potlucks, birthday parties, or simply a weeknight treat. It’s a crowd-pleaser that’s guaranteed to impress, and it’s so easy to make that you’ll find yourself whipping it up again and again.
So, what are you waiting for? Grab your ingredients, preheat your oven, and get ready to experience the magic of this incredible dessert. I promise you won’t be disappointed.
I’m so excited for you to try this recipe! Once you do, I’d love to hear about your experience. Did you make any variations? What did your family and friends think? Share your photos and stories in the comments below. Let’s spread the Oreo dump cake love! I can’t wait to see what delicious creations you come up with. Happy baking!
Oreo Dump Cake: Easy Recipe & Delicious Variations
Decadent Oreo Dump Cake with a crushed Oreo base, creamy chocolate pudding, moist cake layer, and whipped topping. An easy, crowd-pleasing dessert for any occasion.
Ingredients
- 1 package (14.3 ounces) Oreo cookies, divided
- 1 box (15.25 ounces) chocolate cake mix (plus ingredients called for on the box, usually eggs, oil, and water)
- 1 package (3.4 ounces) instant chocolate pudding mix
- 3 cups milk
- 1 container (8 ounces) frozen whipped topping, thawed
- 1/4 cup butter, melted
Instructions
- Prepare the Oreo Base: Crush about 2/3 of the Oreo cookies and spread them evenly in the bottom of a 9×13 inch baking dish.
- Make the Chocolate Pudding Layer: In a large bowl, whisk together the instant chocolate pudding mix and milk until smooth. Let it thicken for about 5 minutes.
- Pour Pudding Over Oreos: Gently pour the thickened pudding over the crushed Oreo layer, spreading it evenly.
- Add the Cake Mix Layer: Evenly sprinkle the dry chocolate cake mix over the pudding layer, covering the entire surface.
- Drizzle with Butter: Drizzle the melted butter evenly over the dry cake mix.
- Bake: Preheat oven to 350°F (175°C). Bake for 45-50 minutes, or until the cake is golden brown and bubbly. A toothpick inserted into the center should come out with moist crumbs.
- Cool Completely: Remove from oven and let cool completely.
- Frost and Finish: Spread the thawed whipped topping evenly over the cooled cake. Crush the remaining Oreo cookies and sprinkle them over the whipped topping.
- Chill (Optional): For best results, chill the cake in the refrigerator for at least 30 minutes before serving.
Notes
- For a finer Oreo crumb, use a food processor. Otherwise, a zip-top bag and rolling pin work great!
- Make sure the pudding thickens before pouring it over the Oreo base.
- Distribute the melted butter as evenly as possible over the dry cake mix.
- Cool the cake completely before frosting to prevent the whipped topping from melting.
- Serve with vanilla ice cream, chocolate syrup, or fresh berries for an extra special treat.


Leave a Comment