
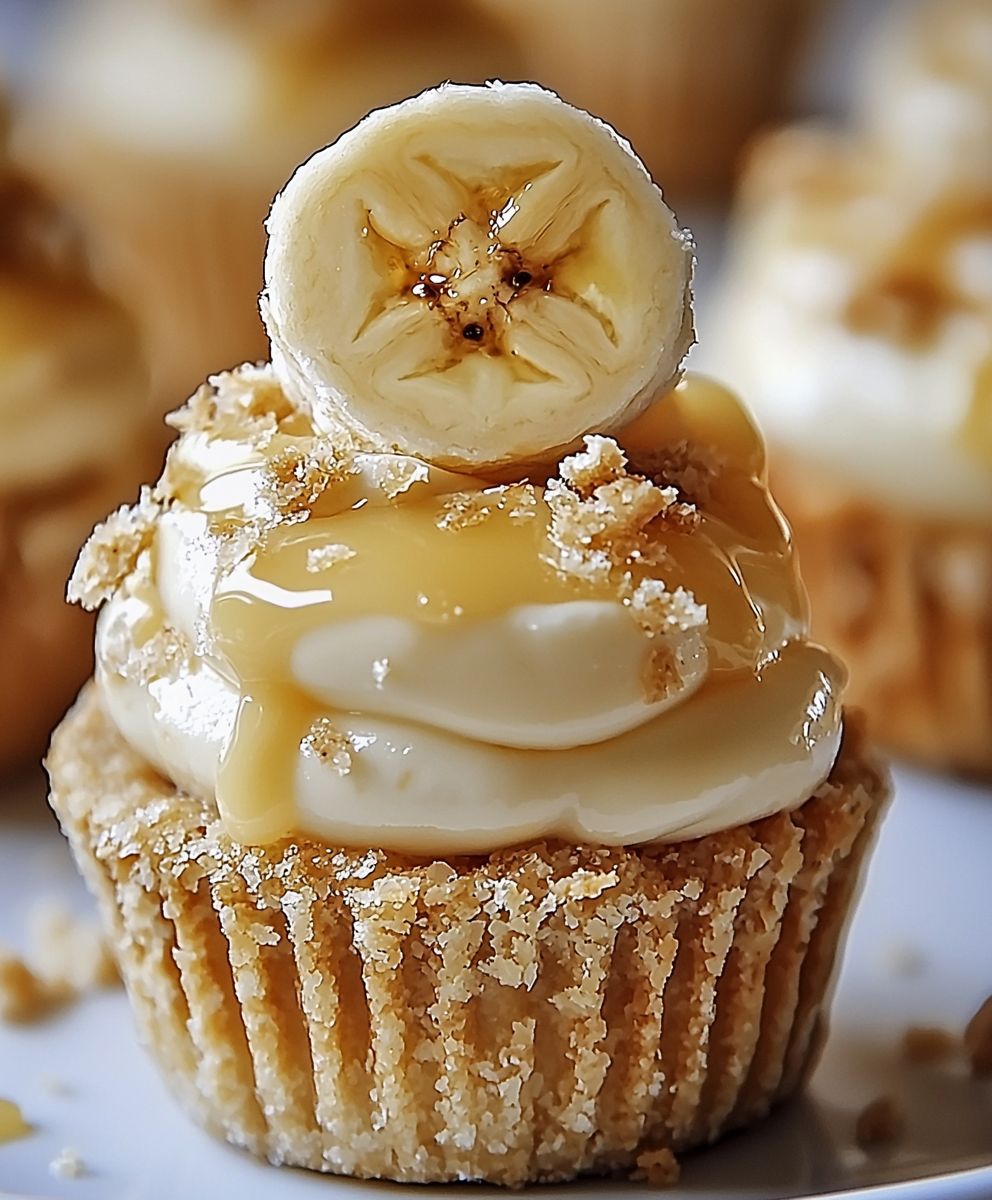
Mini Banana Cream Pies: Prepare to be utterly charmed by these delightful, bite-sized desserts! Imagine a buttery, crumbly crust cradling a luscious, creamy banana filling, all topped with a cloud of whipped cream and a sprinkle of nutmeg. These aren’t just pies; they’re miniature moments of pure bliss, perfect for parties, potlucks, or simply treating yourself after a long day.
The banana cream pie, in its larger form, has a fascinating history, tracing back to the early 20th century in the United States. It quickly became a staple in diners and home kitchens alike, a testament to its simple elegance and crowd-pleasing flavor. The beauty of transforming it into mini banana cream pies is that you get all that classic flavor in a perfectly portioned, incredibly adorable package.
What makes these little pies so irresistible? It’s the harmonious blend of textures and tastes. The crisp crust provides a satisfying contrast to the smooth, velvety filling. The sweetness of the bananas is perfectly balanced by the richness of the cream, creating a symphony of flavors that dance on your palate. Plus, let’s be honest, who can resist anything miniature? They’re easy to eat, easy to share (or not!), and undeniably fun. Get ready to experience a taste of pure joy with every bite of these delectable mini banana cream pies!

Ingredients:
- For the Crust:
- 1 ½ cups graham cracker crumbs
- 5 tablespoons unsalted butter, melted
- ¼ cup granulated sugar
- Pinch of salt
- For the Banana Cream Filling:
- 3 cups whole milk
- ¾ cup granulated sugar
- ½ cup cornstarch
- ¼ teaspoon salt
- 4 large egg yolks
- 2 tablespoons unsalted butter
- 2 teaspoons vanilla extract
- 3 ripe bananas, sliced
- For the Whipped Cream Topping:
- 1 ½ cups heavy cream
- 3 tablespoons powdered sugar
- 1 teaspoon vanilla extract
- Optional Garnish:
- Banana slices
- Chocolate shavings
- Chopped nuts (walnuts, pecans, or almonds)
Preparing the Graham Cracker Crusts
Okay, let’s start with the foundation of our mini pies the graham cracker crusts! This part is super easy and satisfying.
- Combine the Dry Ingredients: In a medium bowl, whisk together the graham cracker crumbs, granulated sugar, and salt. Make sure everything is evenly distributed. This ensures a consistent flavor and texture in each crust.
- Add the Melted Butter: Pour the melted butter into the bowl with the dry ingredients. Use a fork or your fingers to mix everything together until the crumbs are evenly moistened and resemble wet sand. The mixture should hold its shape when you squeeze it in your hand. If it’s too dry, add a tiny bit more melted butter, a teaspoon at a time, until you reach the right consistency.
- Press into Mini Muffin Tins: Now, grab your mini muffin tin. I like to use a 24-cup tin for this recipe, but you can adjust the number of pies depending on the size of your tin. Spoon about 1 ½ to 2 teaspoons of the graham cracker mixture into each muffin cup. Use the bottom of a measuring cup or a small spoon to firmly press the crumbs into an even layer at the bottom and up the sides of each cup. The firmer you press, the better the crust will hold its shape.
- Bake the Crusts: Place the muffin tin in a preheated oven at 350°F (175°C) and bake for 6-8 minutes, or until the crusts are lightly golden brown and fragrant. Keep a close eye on them, as they can burn easily.
- Cool Completely: Once baked, remove the muffin tin from the oven and let the crusts cool completely in the tin. This is important because the crusts will firm up as they cool. If you try to remove them while they’re still warm, they might crumble. You can speed up the cooling process by placing the muffin tin in the refrigerator for about 30 minutes.
- Carefully Remove the Crusts: After the crusts have cooled completely, gently loosen them from the muffin tin using a thin knife or offset spatula. Be careful not to break them. If they’re sticking, you can try running the knife around the edges again or placing the tin in the freezer for a few minutes to help them release.
Making the Banana Cream Filling
Next up, the star of the show the creamy, dreamy banana filling! This is where the magic happens.
- Combine Dry Ingredients: In a medium saucepan, whisk together the granulated sugar, cornstarch, and salt. Make sure there are no lumps of cornstarch. This step is crucial for a smooth and creamy filling.
- Whisk in Milk and Egg Yolks: Gradually whisk in the milk until the mixture is smooth. Then, whisk in the egg yolks until they are fully incorporated. The egg yolks will add richness and help thicken the filling.
- Cook the Filling: Place the saucepan over medium heat and cook, stirring constantly with a whisk, until the mixture comes to a simmer and thickens significantly. This usually takes about 5-7 minutes. Be patient and keep stirring to prevent the filling from sticking to the bottom of the pan and burning. The filling should be thick enough to coat the back of a spoon.
- Temper the Egg Yolks (Important!): This step is crucial to prevent the egg yolks from scrambling. Before adding the hot mixture to the egg yolks, temper them by slowly drizzling about ½ cup of the hot mixture into the egg yolk mixture while whisking constantly. This will gradually raise the temperature of the egg yolks and prevent them from curdling when you add them to the rest of the hot mixture.
- Finish Cooking: Pour the tempered egg yolk mixture back into the saucepan with the remaining hot mixture. Continue to cook over medium heat, stirring constantly, for another 1-2 minutes, or until the filling is very thick and smooth.
- Remove from Heat and Add Butter and Vanilla: Remove the saucepan from the heat and stir in the butter and vanilla extract until the butter is completely melted and the vanilla is evenly distributed. The butter will add richness and shine to the filling, while the vanilla will enhance the flavor.
- Cool Slightly: Let the filling cool slightly for about 5-10 minutes before adding the bananas. This will prevent the bananas from becoming too soft and mushy.
- Add the Bananas: Gently fold in the sliced bananas into the warm filling. Be careful not to overmix, as this can cause the bananas to break down and make the filling watery.
- Prevent a Skin from Forming: To prevent a skin from forming on the surface of the filling while it cools, press a piece of plastic wrap directly onto the surface of the filling. This will create an airtight seal and prevent condensation from forming.
- Chill the Filling: Refrigerate the filling for at least 2 hours, or preferably overnight, to allow it to cool completely and thicken further. This will also allow the flavors to meld together.
Making the Whipped Cream Topping
No banana cream pie is complete without a generous dollop of whipped cream! This is the perfect finishing touch.
- Chill the Bowl and Whisk: Before you start, make sure your mixing bowl and whisk (or the bowl and whisk attachment of your stand mixer) are well-chilled. This will help the cream whip up faster and hold its shape better. You can place them in the freezer for about 15-20 minutes before you start.
- Combine Ingredients: In the chilled bowl, combine the heavy cream, powdered sugar, and vanilla extract.
- Whip the Cream: Using a whisk or an electric mixer, whip the cream on medium speed until stiff peaks form. Be careful not to overwhip the cream, as it can turn into butter. You’ll know the cream is ready when it holds its shape and forms stiff peaks when you lift the whisk or beaters.
- Keep Chilled: Keep the whipped cream refrigerated until ready to use.
Assembling the Mini Banana Cream Pies
Finally, the moment we’ve all been waiting for assembling our adorable mini banana cream pies!
- Fill the Crusts: Spoon or pipe the chilled banana cream filling into the cooled graham cracker crusts, filling them to the top.
- Top with Whipped Cream: Dollop or pipe the whipped cream on top of the banana cream filling. You can use a piping bag with a decorative tip for a more elegant presentation.
- Garnish (Optional): If desired, garnish the mini pies with additional banana slices, chocolate shavings, or chopped nuts.
- Chill Before Serving: Refrigerate the assembled mini pies for at least 30 minutes before serving to allow the flavors to meld together and the whipped cream to set.
- Serve and Enjoy!: Serve the mini banana cream pies chilled and enjoy! These are best enjoyed within a day or two, as the crusts can become soggy over time.
Conclusion:
These Mini Banana Cream Pies are truly a must-try, and I’m not just saying that! The combination of the buttery, crumbly crust, the silky smooth banana cream filling, and the light, airy whipped topping is simply divine. It’s a dessert that’s both comforting and elegant, perfect for any occasion, from a casual weeknight treat to a more formal gathering. The individual portions make them incredibly easy to serve and enjoy, and let’s be honest, who can resist a mini pie all to themselves? What makes these pies so special is the perfect balance of flavors and textures. The sweetness of the bananas is perfectly complemented by the richness of the cream and the subtle tang of the vanilla. The crust provides a delightful contrast, adding a satisfying crunch to each bite. Plus, the recipe is surprisingly simple to follow, even for beginner bakers. You don’t need any fancy equipment or complicated techniques to create these little masterpieces. But the best part? The versatility! While I’ve shared my go-to recipe, there are so many ways you can customize these Mini Banana Cream Pies to your liking.Serving Suggestions and Variations:
* Chocolate Lovers: Add a layer of chocolate ganache to the bottom of the crust before adding the banana cream filling. Or, sprinkle some chocolate shavings on top of the whipped cream. * Nutty Delight: Toast some chopped pecans or walnuts and sprinkle them on top of the whipped cream for added crunch and flavor. You could even incorporate a tablespoon or two of nut butter into the banana cream filling for a richer, nuttier taste. * Tropical Twist: Add a layer of sliced mango or pineapple to the bottom of the crust for a tropical twist. A sprinkle of toasted coconut on top would also be a delicious addition. * Boozy Banana: For an adult-friendly version, add a tablespoon or two of rum or banana liqueur to the banana cream filling. Just be sure to adjust the sweetness accordingly. * Crust Alternatives: While I love the classic graham cracker crust, you could also use a shortbread crust or even a vanilla wafer crust for a different flavor and texture. * Whipped Cream Upgrade: Instead of store-bought whipped topping, try making your own homemade whipped cream. It’s incredibly easy and tastes so much better! You can even infuse it with vanilla extract or a touch of rum. * Individual Parfaits: If you’re short on time, skip the crust altogether and layer the banana cream filling, sliced bananas, and whipped cream in individual glasses or jars for a quick and easy parfait. I truly believe that these Mini Banana Cream Pies will become a new favorite in your household. They’re the perfect dessert to satisfy your sweet tooth and impress your friends and family. So, what are you waiting for? Gather your ingredients, preheat your oven, and get ready to bake some deliciousness! I’m so excited for you to try this recipe and experience the joy of these little pies for yourself. Once you do, I would absolutely love to hear about your experience! Did you make any variations? What did your family and friends think? Share your photos and stories in the comments below. Let’s spread the banana cream pie love! Happy baking! Print
Mini Banana Cream Pies: The Perfect Bite-Sized Dessert
- Total Time: 170 minutes
- Yield: 24 mini pies 1x
Description
Delicious mini banana cream pies featuring a graham cracker crust, creamy banana filling, and whipped cream topping. Perfect for a sweet treat!
Ingredients
- 1 ½ cups graham cracker crumbs
- 5 tablespoons unsalted butter, melted
- ¼ cup granulated sugar
- Pinch of salt
- 3 cups whole milk
- ¾ cup granulated sugar
- ½ cup cornstarch
- ¼ teaspoon salt
- 4 large egg yolks
- 2 tablespoons unsalted butter
- 2 teaspoons vanilla extract
- 3 ripe bananas, sliced
- 1 ½ cups heavy cream
- 3 tablespoons powdered sugar
- 1 teaspoon vanilla extract
- Banana slices
- Chocolate shavings
- Chopped nuts (walnuts, pecans, or almonds)
Instructions
- In a medium bowl, whisk together graham cracker crumbs, granulated sugar, and salt.
- Add melted butter and mix until the crumbs are evenly moistened and resemble wet sand.
- Press 1 ½ to 2 teaspoons of the mixture into each cup of a mini muffin tin (24-cup tin recommended), pressing firmly to create an even layer.
- Bake in a preheated oven at 350°F (175°C) for 6-8 minutes, or until lightly golden brown.
- Cool completely in the tin.
- Carefully remove the crusts from the muffin tin.
- In a medium saucepan, whisk together granulated sugar, cornstarch, and salt.
- Gradually whisk in milk until smooth, then whisk in egg yolks until fully incorporated.
- Cook over medium heat, stirring constantly, until the mixture comes to a simmer and thickens significantly (5-7 minutes).
- Temper the egg yolks by slowly drizzling about ½ cup of the hot mixture into the egg yolk mixture while whisking constantly.
- Pour the tempered egg yolk mixture back into the saucepan with the remaining hot mixture. Continue to cook over medium heat, stirring constantly, for another 1-2 minutes, or until the filling is very thick and smooth.
- Remove from heat and stir in butter and vanilla extract until the butter is completely melted and the vanilla is evenly distributed.
- Let the filling cool slightly for about 5-10 minutes before adding the bananas.
- Gently fold in the sliced bananas into the warm filling.
- Press a piece of plastic wrap directly onto the surface of the filling to prevent a skin from forming.
- Refrigerate the filling for at least 2 hours, or preferably overnight, to allow it to cool completely and thicken further.
- Chill the mixing bowl and whisk (or the bowl and whisk attachment of your stand mixer) for about 15-20 minutes before you start.
- In the chilled bowl, combine heavy cream, powdered sugar, and vanilla extract.
- Whip the cream on medium speed until stiff peaks form. Be careful not to overwhip the cream, as it can turn into butter.
- Keep the whipped cream refrigerated until ready to use.
- Spoon or pipe the chilled banana cream filling into the cooled graham cracker crusts, filling them to the top.
- Dollop or pipe the whipped cream on top of the banana cream filling.
- Garnish with additional banana slices, chocolate shavings, or chopped nuts, if desired.
- Refrigerate the assembled mini pies for at least 30 minutes before serving to allow the flavors to meld together and the whipped cream to set.
- Serve chilled and enjoy!
Notes
- Make sure to press the graham cracker crust firmly into the muffin tins for a sturdy base.
- Stir the banana cream filling constantly while cooking to prevent sticking and burning.
- Chilling the bowl and whisk for the whipped cream helps it whip up faster and hold its shape better.
- The mini pies are best enjoyed within a day or two, as the crusts can become soggy over time.
- Prep Time: 30 minutes
- Cook Time: 20 minutes
Leave a Comment