
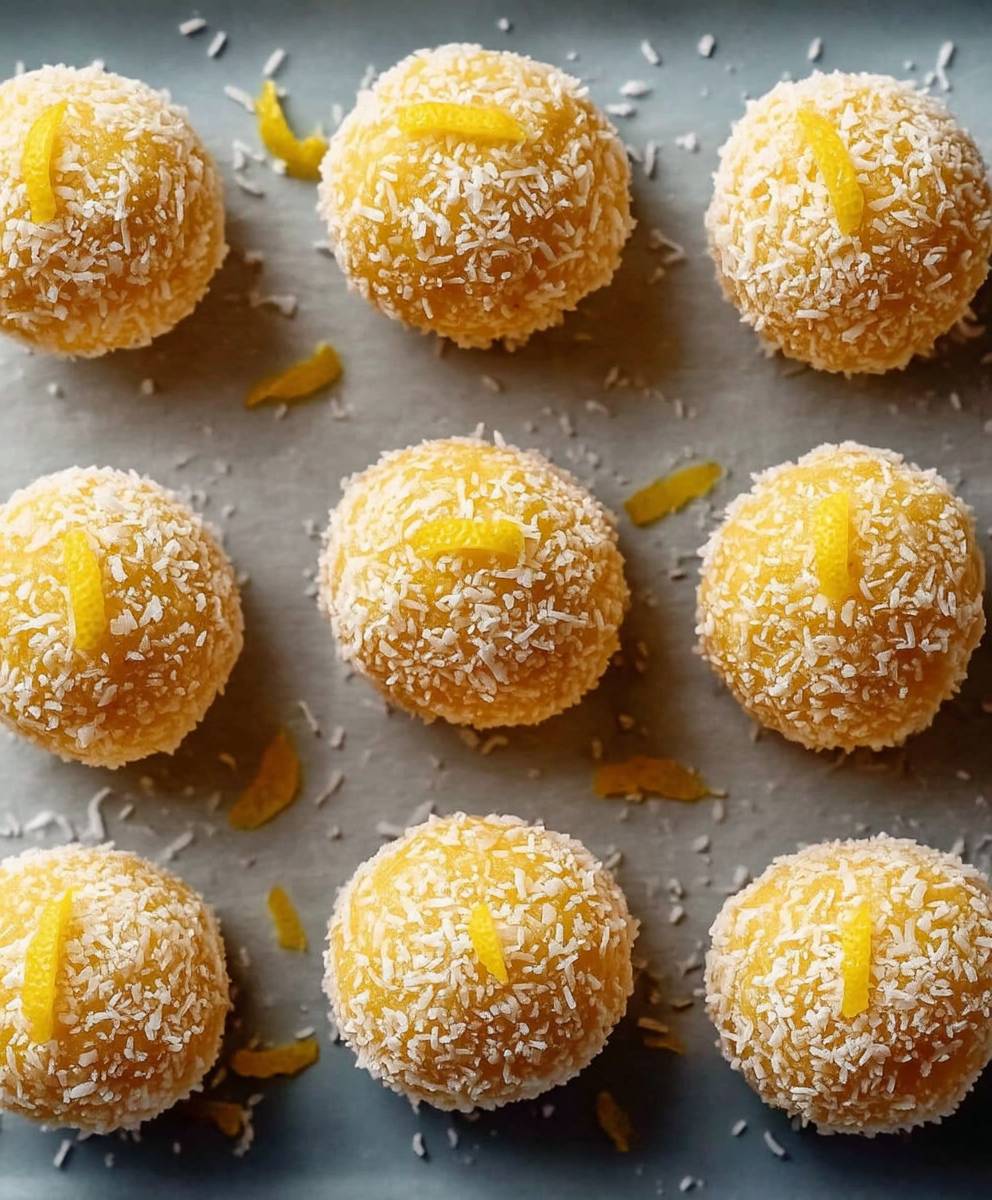
Lemon Bliss Balls: Prepare to be transported to a realm of sunshine and citrus with these delightful little bites! Imagine a burst of tangy lemon flavor, perfectly balanced with a subtle sweetness and a melt-in-your-mouth texture. These aren’t just any energy balls; they’re a celebration of simple ingredients transformed into something truly extraordinary.
While the exact origins of energy balls are somewhat modern, the concept of combining nuts, seeds, and dried fruits for sustained energy dates back centuries. Think of the ancient travelers carrying mixtures of dried goods for long journeys! Our Lemon Bliss Balls take that concept and elevate it with the bright, zesty flavor of lemon, a fruit revered for its refreshing qualities and believed by some to have originated in Southeast Asia.
What makes these little spheres so irresistible? It’s the perfect combination of taste and convenience. They’re incredibly easy to make, requiring no baking and minimal ingredients. The vibrant lemon flavor is a welcome change from heavier desserts, and the chewy, slightly crumbly texture is simply addictive. Plus, they’re packed with healthy fats and natural sugars, making them a guilt-free treat you can enjoy any time of day. Whether you need a quick energy boost, a satisfying afternoon snack, or a light dessert, these Lemon Bliss Balls are guaranteed to brighten your day!

Ingredients:
- 1 cup raw cashews, soaked in water for at least 2 hours, then drained
- 1/2 cup shredded unsweetened coconut, plus extra for rolling
- 1/4 cup fresh lemon juice (about 2 lemons)
- 1/4 cup agave nectar (or maple syrup)
- 2 tablespoons coconut oil, melted
- 1 tablespoon lemon zest (from about 2 lemons)
- 1 teaspoon vanilla extract
- 1/4 teaspoon sea salt
- Optional: 1 tablespoon chia seeds for added texture and nutrition
Preparing the Cashews:
The key to creamy bliss balls is properly preparing the cashews. Soaking them softens them, making them easier to blend into a smooth, almost buttery consistency. Don’t skip this step!
- Soaking the Cashews: Place the raw cashews in a bowl and cover them with plenty of water. Make sure the water level is well above the cashews, as they will absorb some of it. Let them soak for at least 2 hours, or even better, overnight in the refrigerator.
- Draining and Rinsing: After soaking, drain the cashews thoroughly in a colander. Rinse them well under cold running water to remove any residual starch or impurities. This will also help to ensure a cleaner, brighter flavor in your bliss balls.
Blending the Bliss Ball Mixture:
Now comes the fun part creating the base for our lemon bliss balls! We’ll be using a food processor for this, so make sure yours is ready to go.
- Combining the Ingredients: In the bowl of your food processor, combine the drained and rinsed cashews, shredded coconut, fresh lemon juice, agave nectar (or maple syrup), melted coconut oil, lemon zest, vanilla extract, and sea salt. If you’re using chia seeds, add them now as well.
- Processing the Mixture: Pulse the mixture a few times to initially break down the ingredients. Then, process continuously until the mixture is smooth and creamy. This may take a few minutes, and you’ll likely need to stop the food processor occasionally to scrape down the sides of the bowl with a spatula. This ensures that all the ingredients are evenly incorporated and that no cashew pieces are left unblended.
- Checking the Consistency: The mixture should be thick and slightly sticky. It should hold its shape when you press it together. If it seems too wet, add a tablespoon or two more of shredded coconut. If it seems too dry, add a teaspoon or two more of lemon juice. Remember, you can always adjust the ingredients to achieve your desired consistency.
Forming the Bliss Balls:
This is where the “bliss” part really comes into play! Getting your hands a little messy is part of the joy of making these treats.
- Preparing for Rolling: Place the extra shredded coconut in a shallow bowl or plate. This will be used to coat the bliss balls.
- Scooping the Mixture: Using a small cookie scoop or a spoon, scoop out approximately 1 tablespoon of the bliss ball mixture. You can adjust the size of the balls to your preference, but a tablespoon is a good starting point.
- Rolling into Balls: Gently roll the scooped mixture between your palms to form a smooth, round ball. Don’t press too hard, as you want to maintain the light and airy texture.
- Coating with Coconut: Immediately after rolling, place the bliss ball in the bowl of shredded coconut. Gently roll it around until it’s completely coated with coconut. Press the coconut lightly into the ball to ensure it adheres well.
- Placing on a Tray: Place the coconut-covered bliss ball on a parchment-lined baking sheet or plate. This will prevent them from sticking and make them easier to transfer later.
- Repeating the Process: Repeat steps 2-5 until all the bliss ball mixture has been used.
Chilling and Storing:
While you *could* eat these right away, chilling them allows the flavors to meld together and the bliss balls to firm up, resulting in a more enjoyable texture.
- Chilling the Bliss Balls: Place the baking sheet or plate of bliss balls in the refrigerator. Chill for at least 30 minutes, or preferably an hour, to allow them to firm up.
- Storing the Bliss Balls: Once chilled, transfer the bliss balls to an airtight container. They can be stored in the refrigerator for up to a week. You can also freeze them for longer storage (up to a month). If freezing, let them thaw slightly before serving.
Tips and Variations:
Want to customize your lemon bliss balls? Here are a few ideas to get you started:
- Add Protein Powder: For an extra boost of protein, add a scoop of your favorite vanilla or lemon-flavored protein powder to the mixture.
- Use Different Nuts: While cashews provide a creamy texture, you can experiment with other nuts like almonds or macadamia nuts. Just remember to soak them first!
- Spice it Up: Add a pinch of ground ginger or cardamom for a warm, spicy twist.
- Chocolate Chip Bliss Balls: Fold in some mini dark chocolate chips for a decadent treat.
- Lemon Poppy Seed Bliss Balls: Add a tablespoon of poppy seeds to the mixture for a delightful crunch and visual appeal.
- Make them Vegan: This recipe is already naturally vegan, but ensure your agave nectar or maple syrup is sourced from a vegan-friendly supplier.
- Adjust Sweetness: Taste the mixture before rolling and adjust the amount of agave nectar (or maple syrup) to your liking. Some people prefer a sweeter bliss ball, while others prefer a more tart flavor.
- Rolling Alternatives: Instead of shredded coconut, try rolling the bliss balls in chopped nuts, cocoa powder, or even freeze-dried fruit powder.
- Use a High-Speed Blender: If you don’t have a food processor, you can use a high-speed blender. You may need to add a little more liquid (lemon juice or water) to help the mixture blend smoothly. Be sure to scrape down the sides frequently.
- Don’t Over-Process: Be careful not to over-process the mixture, as this can result in a cashew butter-like consistency. You want the mixture to be smooth and creamy, but still slightly textured.
Troubleshooting:
Sometimes things don’t go exactly as planned. Here are a few common issues and how to fix them:
- Bliss Balls are Too Sticky: If the mixture is too sticky to roll, add a tablespoon or two more of shredded coconut. You can also chill the mixture for a longer period of time to help it firm up.
- Bliss Balls are Too Dry: If the mixture is too dry and crumbly, add a teaspoon or two more of lemon juice or melted coconut oil.
- Bliss Balls are Not Sweet Enough: If the bliss balls are not sweet enough for your liking, add a little more agave nectar (or maple syrup) to the mixture.
- Bliss Balls are Too Tart: If the bliss balls are too tart, add a little more agave nectar (or maple syrup) to the mixture. You can also add a pinch of baking soda to neutralize some of the acidity.
Enjoying Your Lemon Bliss Balls:
These lemon bliss balls are perfect for a quick and healthy snack, a post-workout treat, or a guilt-free dessert. They’re also great for packing in lunchboxes or taking on the go. Enjoy!
Conclusion:
So, there you have it! These Lemon Bliss Balls are truly a must-try recipe, and I’m not just saying that because I created it! The bright, zesty flavor combined with the satisfyingly chewy texture makes them an irresistible treat. They’re incredibly easy to whip up, require minimal ingredients, and are perfect for satisfying that sweet craving without the guilt. Seriously, what’s not to love?
Why are these Lemon Bliss Balls a must-try? Because they’re a burst of sunshine in every bite! They’re naturally sweetened, packed with healthy fats, and offer a delightful energy boost. Forget those processed snacks filled with artificial ingredients; these bliss balls are a wholesome and delicious alternative that you can feel good about eating and sharing.
But the best part? They’re incredibly versatile! While I adore them just as they are, there are so many ways you can customize them to your liking.
Serving Suggestions and Variations:
- For a richer flavor: Try using toasted coconut flakes instead of regular ones. The toasting process brings out a deeper, nuttier flavor that complements the lemon beautifully.
- Chocolate lovers, rejoice!: Add a handful of dark chocolate chips to the mixture before rolling. The bitterness of the dark chocolate provides a wonderful contrast to the tangy lemon.
- Nutty twist: Incorporate a tablespoon or two of your favorite nut butter, like almond or cashew butter, for added creaminess and protein.
- Spice it up: A pinch of cardamom or ginger can add a warm and aromatic dimension to the bliss balls.
- Serving suggestion: Serve these Lemon Bliss Balls chilled for a refreshing treat on a warm day. They’re also perfect as a post-workout snack or a healthy dessert option. You can even crumble them over yogurt or oatmeal for an extra burst of flavor and texture.
- Presentation matters: Roll the finished bliss balls in finely chopped nuts, shredded coconut, or even a dusting of powdered sugar for an elegant touch.
I truly believe that once you try this recipe, it will become a staple in your kitchen. It’s the perfect solution for those moments when you need a quick and healthy snack, a delightful dessert, or a thoughtful homemade gift. Plus, it’s a fantastic way to impress your friends and family with your culinary skills (even though it’s incredibly simple!).
So, what are you waiting for? Gather your ingredients, put on some music, and get ready to experience the joy of making these incredible Lemon Bliss Balls. I’m confident that you’ll love them as much as I do!
And now, for the most important part: I want to hear about your experience! Did you try the recipe? Did you make any variations? What did you think? Please, please, please share your thoughts and photos in the comments below. I’m so excited to see your creations and hear your feedback. Happy bliss ball making!
Lemon Bliss Balls: A Refreshing & Easy Recipe
Zesty lemon bliss balls with creamy cashews, coconut, and a burst of lemon. A healthy and satisfying treat!
Ingredients
- 1 cup raw cashews, soaked in water for at least 2 hours, then drained
- 1/2 cup shredded unsweetened coconut, plus extra for rolling
- 1/4 cup fresh lemon juice (about 2 lemons)
- 1/4 cup agave nectar (or maple syrup)
- 2 tablespoons coconut oil, melted
- 1 tablespoon lemon zest (from about 2 lemons)
- 1 teaspoon vanilla extract
- 1/4 teaspoon sea salt
- Optional: 1 tablespoon chia seeds for added texture and nutrition
Instructions
- Soak Cashews: Place cashews in a bowl, cover with water, and soak for at least 2 hours (or overnight in the refrigerator).
- Drain and Rinse: Drain cashews in a colander and rinse well under cold water.
- Combine Ingredients: In a food processor, combine drained cashews, coconut, lemon juice, agave nectar (or maple syrup), melted coconut oil, lemon zest, vanilla extract, sea salt, and chia seeds (if using).
- Process Mixture: Pulse a few times, then process continuously until smooth and creamy, scraping down the sides as needed.
- Check Consistency: The mixture should be thick and slightly sticky. Add more coconut if too wet, or more lemon juice if too dry.
- Prepare for Rolling: Place extra shredded coconut in a shallow bowl.
- Scoop Mixture: Scoop out about 1 tablespoon of the mixture.
- Roll into Balls: Gently roll the mixture between your palms to form a ball.
- Coat with Coconut: Roll the ball in shredded coconut, pressing lightly to adhere.
- Place on Tray: Place the coated ball on a parchment-lined baking sheet or plate.
- Repeat: Repeat steps 7-10 until all the mixture is used.
- Chill: Refrigerate for at least 30 minutes (or preferably an hour) to firm up.
- Store: Transfer to an airtight container and store in the refrigerator for up to a week, or freeze for up to a month.
Notes
- Soaking the cashews is crucial for a creamy texture.
- Adjust the sweetness and tartness to your preference.
- For variations, consider adding protein powder, different nuts, spices, chocolate chips, or poppy seeds.
- If the mixture is too sticky, add more coconut. If too dry, add more lemon juice or coconut oil.
- These bliss balls are perfect for a healthy snack, post-workout treat, or guilt-free dessert.


Leave a Comment