
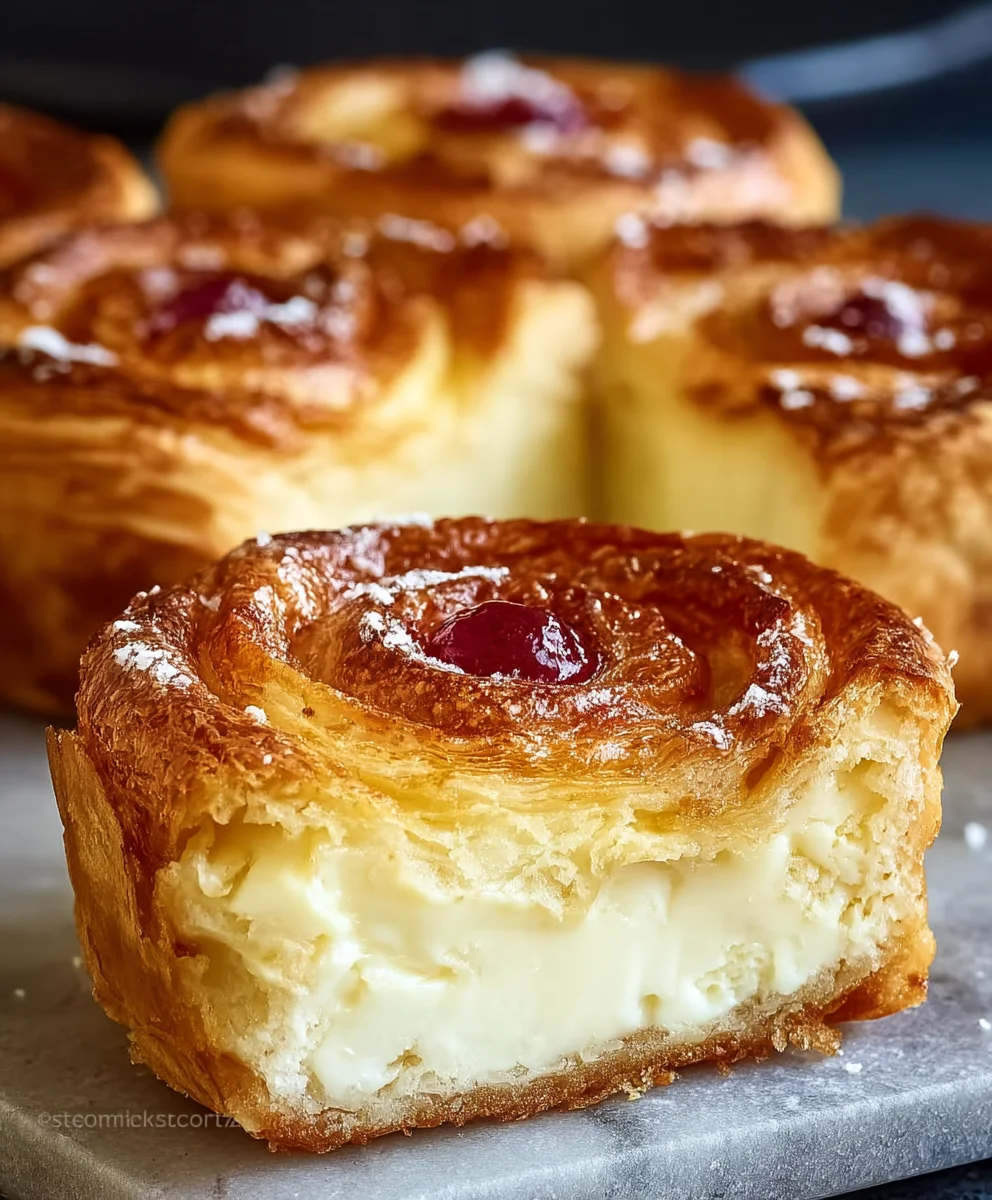
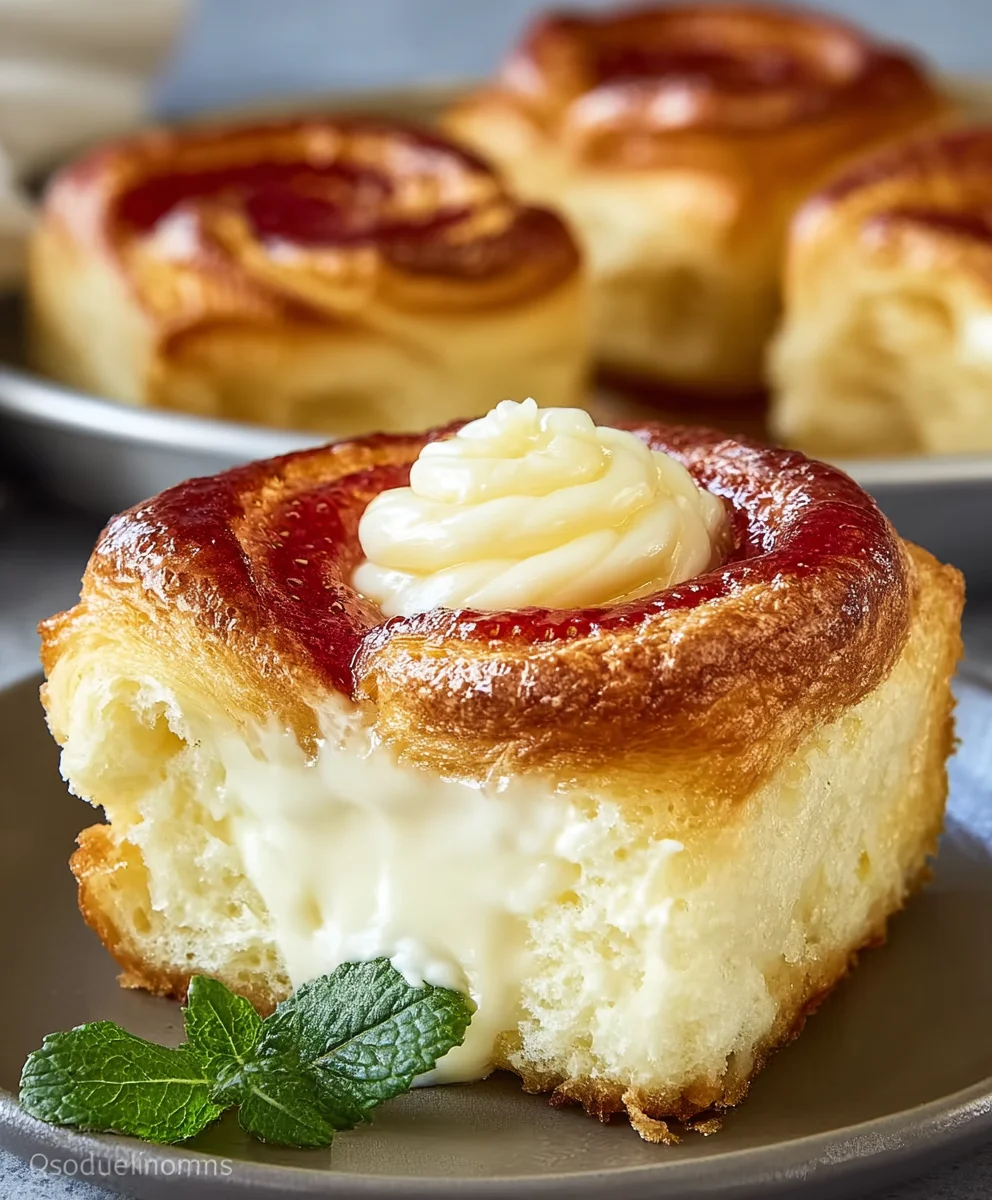
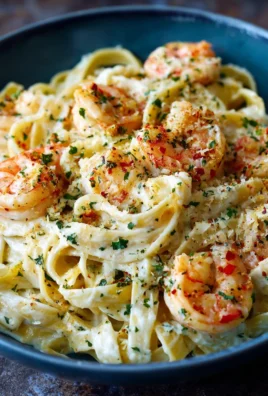
Kings Hawaiian Cheesecake Danish offers a truly enchanting fusion of flavors that promises to redefine your understanding of a perfect pastry. I’ve always been captivated by the idea of combining two utterly delightful treats, and this recipe does exactly that: it marries the iconic sweetness and pillowy texture of Kings Hawaiian rolls with the rich, tangy creaminess of a classic cheesecake filling. This isn’t just a simple dessert; it’s a culinary experience that pays homage to the beloved Hawaiian sweet bread, known for its unique origins from a Portuguese baker in Hilo, Hawaii, while elevating the traditional Danish pastry to new, irresistible heights.
People adore this particular Kings Hawaiian Cheesecake Danish for its incredible balance – the golden-brown exterior giving way to a soft, slightly chewy interior, perfectly complemented by a luscious, smooth cheesecake center that’s just sweet enough with a hint of bright citrus. It’s incredibly satisfying, surprisingly easy to assemble, and versatile enough for a special breakfast, a delightful brunch, or a comforting dessert. Prepare to fall in love with every bite of this extraordinary creation, a dish that truly embodies comfort and joy in one unforgettable package.

Ingredients:
- One 12-count package King’s Hawaiian Sweet Rolls (Original Hawaiian Sweet, I find, works best!)
- For the Cream Cheese Filling:
- 8 ounces (one block) full-fat cream cheese, softened to room temperature
- 1/3 cup granulated sugar
- 1 large egg yolk (save the egg white for another use or discard)
- 1 teaspoon pure vanilla extract
- 1/2 teaspoon fresh lemon zest (optional, but I highly recommend it for that bright cheesecake tang!)
- Pinch of salt
- For the Egg Wash:
- 1 large egg
- 1 tablespoon milk or water
- For the Glaze:
- 1 cup powdered sugar (confectioners’ sugar)
- 2-3 tablespoons milk or heavy cream, adjust as needed
- 1/2 teaspoon pure vanilla extract
Preparing the Cheesecake Filling:
Alright, let’s kick things off with what I consider the heart and soul of our Kings Hawaiian Cheesecake Danish: that luscious, creamy cheesecake filling. This step is super straightforward, but paying attention to a couple of details will make all the difference in achieving that perfectly smooth texture we’re aiming for.
- First things first, make sure your cream cheese is at room temperature. This is absolutely essential! I usually take mine out of the fridge at least an hour, sometimes even two, before I plan to start baking. Cold cream cheese will resist mixing and leave you with frustrating clumps, no matter how hard you beat it. We want silky smooth, so patience here pays off.
- In a medium-sized mixing bowl, combine your softened cream cheese and the granulated sugar. Using an electric hand mixer (or a stand mixer with the paddle attachment), beat these two together on medium speed until they are light, fluffy, and incredibly smooth. This usually takes me about 2-3 minutes. Make sure to scrape down the sides of the bowl with a rubber spatula periodically to ensure everything is incorporated evenly. You’re looking for a uniform, pale mixture without any grainy sugar bits.
- Next, we’ll add in the egg yolk. I find that just an egg yolk gives the filling a beautiful richness and helps it set just right without making it too eggy. Beat the egg yolk into the cream cheese mixture until it’s just combined. Be careful not to overmix once the egg is in; we just want it integrated.
- Now for the flavor enhancers! Stir in the pure vanilla extract and that lovely fresh lemon zest, if you’re using it. The lemon zest, in my humble opinion, is a secret weapon here. It brightens up the richness of the cream cheese and really makes the “cheesecake” aspect shine. Don’t skip the tiny pinch of salt either; it enhances all the other flavors. Mix these in gently until they are just distributed throughout the filling.
- Give the filling one final scrape down with your spatula, ensuring no unmixed bits are clinging to the sides. You should now have a wonderfully creamy, slightly thick filling that smells absolutely divine. Set this aside for a moment, or pop it into the fridge if you’re not assembling immediately. It’s ready to transform our King’s Hawaiian rolls into delightful Kings Hawaiian Cheesecake Danish.
Preparing the King’s Hawaiian Rolls:
Now for the star of our show, the King’s Hawaiian Sweet Rolls! These rolls are fantastic on their own, but with a little manipulation, they become the perfect buttery, slightly sweet base for our cheesecake filling. This part requires a bit of gentle handling and precision to get that classic danish look.
- Preheat your oven to 375°F (190°C). It’s always a good idea to get the oven warming up so it’s perfectly hot when your danishes are ready to bake. Line a large baking sheet with parchment paper. This is key for easy cleanup and preventing sticking, especially with a sweet, potentially sticky dough like these rolls.
- Take your package of King’s Hawaiian Sweet Rolls. Gently separate each roll from the others. You’ll have 12 individual rolls. Be careful not to tear them too much, as we want them to hold their shape.
- For each roll, you’re going to create a small “well” or indentation in the center. The easiest way I’ve found to do this is to place a roll on your clean work surface and, using the back of a spoon or even your thumb, gently press down in the center of the roll. You want to flatten the center without pressing all the way through to the bottom. Aim to create a border or rim around the edge of the roll, which will help hold our cheesecake filling in place. The more defined this border, the better it will contain the filling during baking. Be firm but gentle so you don’t tear the bread.
- Arrange your prepared rolls on your parchment-lined baking sheet, making sure to leave a little space between each one. While they won’t spread dramatically, giving them some breathing room helps them bake evenly and brown beautifully.
- Once all your rolls have their little indentations, it’s time to prepare the egg wash. In a small bowl, whisk together the large egg and the tablespoon of milk or water until well combined. This is going to give our Kings Hawaiian Cheesecake Danish a lovely golden sheen and a slightly crispy exterior.
- Using a pastry brush, gently brush the egg wash over the raised edges of each King’s Hawaiian roll. Try to avoid brushing the egg wash into the center indentation where the filling will go, as we want the filling to adhere directly to the bread, not a slick layer of egg wash. This egg wash step is truly simple but makes a big visual difference, giving them that professional, bakery-fresh appearance.
Assembling the Kings Hawaiian Cheesecake Danish:
Now comes the fun part where we bring everything together and create those individual Kings Hawaiian Cheesecake Danish pastries. This is where your efforts from the previous steps really start to pay off, as we transform simple rolls into something truly special.
- Retrieve your beautifully creamy cheesecake filling from earlier. If you’ve refrigerated it, give it a quick stir to loosen it up a bit, but it should still be quite thick.
- For easy and neat filling, I often like to transfer my cream cheese filling into a piping bag fitted with a wide round tip, or even just a large Ziploc bag with one corner snipped off. This gives you excellent control and helps keep the edges of your rolls clean. However, if you don’t have a piping bag, a small spoon will work perfectly fine – just be a bit more careful.
- Carefully spoon or pipe about 1 to 1.5 tablespoons of the cheesecake filling into the center indentation of each King’s Hawaiian roll. You want to fill it generously but not so much that it overflows the raised edges. The filling will puff up slightly during baking, so leaving a small margin at the top is a good idea to prevent spills. Think of it like filling a mini pie crust – you want a nice mound without going over the edge.
- Once all 12 of your Kings Hawaiian Cheesecake Danish bases are filled, take a moment to admire your work! They should look like little sweet bread bowls cradling a tempting white filling. This organized process ensures each danish gets an even amount of that delicious creaminess.
- At this point, if you wanted to add a little something extra, you could sprinkle a few fresh berries (like small blueberries or finely diced strawberries) or a tiny pinch of cinnamon sugar over the top of the cream cheese filling. While the classic Kings Hawaiian Cheesecake Danish is wonderful on its own, these additions can offer a delightful twist. I usually stick to the pure cheesecake for maximum flavor focus, but it’s an option to consider!
Baking Instructions:
This is where the magic happens! Baking our Kings Hawaiian Cheesecake Danish will transform them into golden, fluffy pastries with a perfectly set, warm, and creamy center. Paying attention to the visual cues during baking is key to achieving perfection.
- Carefully transfer your baking sheet with the assembled Kings Hawaiian Cheesecake Danish into your preheated 375°F (190°C) oven. Place it on the middle rack for even heat distribution.
- Bake for approximately 12 to 18 minutes. Now, this is an estimate, as all ovens vary! I always recommend setting a timer for the lower end of the range and then checking frequently.
- What you’re looking for:
- The King’s Hawaiian rolls themselves should be a beautiful golden brown around the edges and on the egg-washed crusts. They should look delightfully toasted.
- The cheesecake filling in the center should appear set and slightly puffed. It might have a very light golden hue on its surface, but it shouldn’t be deeply browned. If it starts to brown too quickly, you can loosely tent the danishes with aluminum foil for the last few minutes of baking to prevent over-browning.
- When you gently jiggle the baking sheet, the center of the cheesecake filling should appear mostly firm, with perhaps a very slight wobble in the very center, similar to a perfectly baked cheesecake.
- Once they reach this ideal state, carefully remove the baking sheet from the oven. The aroma filling your kitchen right now should be absolutely incredible – a blend of sweet bread and warm cheesecake!
- Let the Kings Hawaiian Cheesecake Danish cool on the baking sheet for about 5 minutes. This initial cooling time helps the filling to continue setting and makes them easier to handle.
- After 5 minutes, use a spatula to transfer the danishes to a wire rack to cool completely. This is a crucial step! Cooling on a wire rack allows air to circulate around all sides, preventing the bottoms from becoming soggy and ensuring a lovely texture throughout. While it might be tempting to glaze and devour them immediately, allowing them to cool completely will ensure the glaze sets nicely and the flavors meld.
Making the Sweet Glaze:
No danish is truly complete without a beautiful, sweet drizzle of glaze! This final touch adds another layer of sweetness and a touch of elegance to our Kings Hawaiian Cheesecake Danish. It’s incredibly simple to make, but watch the consistency closely.
- While your Kings Hawaiian Cheesecake Danish are cooling on the wire rack, you can whip up this quick glaze. In a small bowl, measure out your powdered sugar (confectioners’ sugar). It’s always best to sift your powdered sugar if it’s lumpy, but for a simple drizzle, I often skip this step if my sugar is fresh and lump-free.
- Add 2 tablespoons of milk or heavy cream and the 1/2 teaspoon of pure vanilla extract to the powdered sugar.
- Whisk everything together thoroughly with a fork or a small whisk until you have a smooth, pourable glaze.
- Now, here’s the important part: consistency! You’re aiming for a glaze that is thick enough to visibly cling to a spoon but still thin enough to drizzle beautifully. If your glaze seems too thick and pasty, add a very small amount (a teaspoon at a time) of additional milk or cream until you reach the desired consistency. If, by chance, you add too much liquid and it becomes too thin, you can always whisk in a little more powdered sugar until it thickens up. It’s much easier to add liquid than to take it away, so go slow!
- Once your Kings Hawaiian Cheesecake Danish have completely cooled (this is important, otherwise the glaze will melt and just run off!), it’s time to apply the glaze. You can do this in a couple of ways:
- Drizzle: The simplest method is to use a spoon and drizzle the glaze artfully over each danish. I like to make back-and-forth motions to create appealing lines.
- Pipe: For more precise lines, you can transfer the glaze to a small piping bag (or again, a Ziploc bag with a tiny corner snipped off) and pipe thin lines across each danish.
- Let the glaze set for about 10-15 minutes before serving. This allows it to firm up slightly, creating that lovely thin, sweet crust that’s so characteristic of danishes.
Serving Suggestions and Storage:
Congratulations! You’ve successfully created a batch of truly delightful Kings Hawaiian Cheesecake Danish. Now comes the best part: enjoying them! Here are a few tips on serving and how to keep them fresh for as long as possible.
- Serving Temperature: While they are absolutely scrumptious when slightly warm (especially if you’re eating them shortly after glazing), I find these danishes are actually at their peak when they’ve cooled completely and the glaze has set. The flavors of the cheesecake filling seem to meld beautifully, and the sweetness of the glaze provides the perfect counterpoint to the rich filling and soft bread. Serve them at room temperature for the best experience.
- Perfect Pairings:
- Coffee or Tea: These danishes are an ideal companion to your morning coffee, afternoon tea, or even a delightful brunch spread. The sweetness is perfectly balanced by the bitterness of a good brew.
- A Glass of Milk: For a simple, comforting treat, enjoy your Kings Hawaiian Cheesecake Danish with a cold glass of milk. It’s a classic combination for a reason!
- Fresh Fruit: To add a touch of freshness, serve them alongside a bowl of mixed fresh berries (strawberries, blueberries, raspberries) or sliced peaches. The fruit’s acidity can cut through the richness of the danish beautifully.
- When to Enjoy: These are fantastic for breakfast, a mid-morning snack, an after-school treat, or a light dessert. Their individual portion size makes them incredibly convenient for gatherings or just for enjoying on the go. Imagine surprising your family with these on a lazy weekend morning – what a treat!
- Storage: Since these Kings Hawaiian Cheesecake Danish contain a cream cheese filling, they do need to be stored properly to maintain their freshness and safety.
- Room Temperature: If you plan to consume them within a few hours (say, for a brunch or party), they can sit at room temperature for up to 2 hours. After that, it’s best to refrigerate them.
- Refrigeration: For longer storage, place the cooled and glazed danishes in an airtight container and store them in the refrigerator for up to 3-4 days. When stored properly, they maintain their delicious texture and flavor wonderfully. The bread might become slightly firmer in the fridge, but a quick gentle warming can often bring back some of its softness.
- Reheating (Optional): If you prefer your danishes slightly warm, you can gently warm them in a microwave for 10-15 seconds or in a preheated oven at 300°F (150°C) for about 5-7 minutes. Be careful not to overheat, as the filling can become too soft and the bread can dry out. Warming them can bring out more of that wonderful King’s Hawaiian sweetness and the creamy richness of the cheesecake filling, making for another delightful experience.
I genuinely hope you enjoy making and, most importantly, eating these Kings Hawaiian Cheesecake Danish as much as I do. They’re a fantastic way to elevate a simple sweet roll into a truly memorable treat!
Conclusion:
So, there you have it! We’ve journeyed through the incredibly simple steps to create something truly spectacular, a dessert or brunch item that feels gourmet but is delightfully straightforward to execute. I genuinely believe this recipe is going to become a fast favorite in your kitchen, just as it has quickly become a cherished treat in mine. It’s not every day you stumble upon a dish that offers such a perfect blend of comfort, elegance, and sheer deliciousness with so little fuss. This isn’t just another recipe to add to your collection; it’s an invitation to elevate your everyday and surprise your taste buds with a creation that’s both familiar and excitingly new. Get ready to impress your family and friends, all while keeping your stress levels wonderfully low.
Why This Kings Hawaiian Cheesecake Danish Is an Absolute Must-Try:
What makes this particular creation, our delightful Kings Hawaiian Cheesecake Danish, an absolute must-try? Well, for starters, it perfectly marries two universally loved components: the irresistible, fluffy sweetness of Kings Hawaiian rolls with the rich, tangy creaminess of a classic cheesecake filling. This isn’t just a recipe; it’s a brilliant culinary hack that takes humble, store-bought Kings Hawaiian rolls and elevates them into something truly spectacular and seemingly complex. Imagine sinking your teeth into a warm, golden-brown pastry – slightly crisp on the outside, yielding to a cloud-like, buttery interior, which then gives way to a decadent, smooth cheesecake center. It’s an experience that truly has to be tasted to be believed, offering exquisite layers of texture and flavor in every single bite. Forget complicated doughs, lengthy proofs, or intimidating techniques that often deter home bakers; we’re talking about an impressive bake that comes together with incredible ease and minimal specialized equipment. This recipe is meticulously designed for maximum impact with minimum effort, making it the ideal choice for a special breakfast treat, an elegant addition to a festive brunch spread, or even a surprisingly light yet satisfying dessert after a meal. Its versatility is truly one of its strongest selling points. Whether you’re looking for a comforting sweet start to your day to enjoy with your morning coffee, an eye-catching and conversation-starting dish for a potluck, or a comforting dessert that everyone will rave about long after the last crumb is gone, this recipe fits the bill perfectly. The exquisite interplay of sweet and subtly tart notes from the cheesecake, combined with the unparalleled, melt-in-your-mouth softness of the Kings Hawaiian rolls, creates a harmonious balance that is truly addictive. It’s a dish that feels incredibly special and indulgent, yet is remarkably approachable for even novice bakers. I promise you, once you try this unique twist, you’ll wonder how you ever lived without this delightful creation in your baking repertoire. It’s a guaranteed crowd-pleaser that delivers on flavor, presentation, and ease, making it a stellar addition to any menu.
Elevate Your Danish: Serving Suggestions and Delicious Variations:
But the magic doesn’t stop once your Danish comes out of the oven. Part of the joy of baking is customizing your creations, and this recipe offers a fantastic canvas for your culinary imagination. For a simple yet elegant finish, a delicate dusting of powdered sugar is always a classic and never disappoints. However, why not elevate it further? A handful of fresh berries – think vibrant raspberries, plump blueberries, or thinly sliced strawberries – not only adds a burst of captivating color but also provides a refreshing tang that beautifully cuts through the richness of the cheesecake filling. A thin drizzle of homemade berry coulis, a simple lemon glaze made with powdered sugar and citrus juice, or even a luscious caramel sauce can also transform your Danish into a truly gourmet experience. If you’re feeling adventurous, consider incorporating a touch of fresh citrus zest directly into your cheesecake filling – lemon or orange zest can add a wonderful brightness and aromatic depth. For those who adore a bit of texture, a sprinkle of toasted slivered almonds, chopped pecans, or a quick homemade streusel topping (butter, flour, brown sugar, and a pinch of cinnamon) can add an extra layer of delightful crunch and flavor. And when it comes to serving, these warm, fluffy Danes pair absolutely perfectly with a robust cup of coffee or a delicate cup of herbal tea for breakfast or brunch. For a more celebratory occasion, imagine them served alongside a crisp mimosa or a sparkling cider. During cooler months, a dollop of freshly whipped cream or a scoop of premium vanilla bean ice cream could turn them into an irresistible, comforting dessert. Don’t be afraid to experiment with extracts in your filling either; a touch of almond extract, pure vanilla bean paste, or even a hint of rum extract can deepen the flavor profile considerably. Perhaps a sprinkle of mini chocolate chips folded into the filling for a chocolatey twist? The possibilities are truly endless, allowing you to make this wonderful recipe uniquely yours every time you bake it.
Your Turn: Bake, Share, and Inspire!
Now, it’s your turn! I’ve shared all my secrets, tips, and boundless enthusiasm for this incredible recipe, and now I’m eagerly waiting for you to bring it to life in your own kitchen. Seriously, go grab those Kings Hawaiian rolls, whip up that simple yet decadent cheesecake filling, and experience the pure joy of baking something truly delicious and impressively beautiful. I guarantee you won’t be disappointed; in fact, I suspect you’ll be wondering why you hadn’t tried this genius idea sooner! When you do try this recipe – and I really, really hope you will – I would absolutely love to hear all about your experience. Did you add a special topping? Did you serve it for breakfast, as a delightful brunch centerpiece, or as an indulgent dessert? What did your family, friends, and anyone lucky enough to try it think? Please, don’t keep your culinary triumphs to yourself! Share your photos and your feedback in the comments section below, or even better, tag me on social media. Let’s build a vibrant community of enthusiastic bakers who appreciate the magic of simple ingredients transforming into extraordinary treats. Your insights, your creative twists, and your delicious results inspire me, and I’m sure they’ll inspire other readers too. So, what are you waiting for? Your next delightful kitchen adventure awaits, promising not only delightful aromas that will fill your home but even more delightful flavors that will linger happily on your palate. Happy baking, everyone! I can’t wait to see your wonderful Kings Hawaiian Cheesecake Danish creations!
Kings Hawaiian Cheesecake Danish
An enchanting fusion of Kings Hawaiian rolls with a rich, tangy cream cheese filling. This recipe elevates a traditional Danish pastry to new, irresistible heights, perfect for breakfast, brunch, or dessert.
Ingredients
-
12 King’s Hawaiian Sweet Rolls
-
8 oz (1 block) full-fat cream cheese, softened
-
1/3 cup granulated sugar
-
1 large egg yolk
-
1 tsp pure vanilla extract
-
1/2 tsp fresh lemon zest (optional)
-
Pinch of salt
-
1 large egg (for egg wash)
-
1 tbsp milk or water (for egg wash)
-
1/3 cup melted butter (for glaze)
-
1/4 cup brown sugar (for glaze)
-
1/2 tsp ground cinnamon (for glaze)
-
1/4 tsp ground nutmeg (for glaze)
Instructions
-
Step 1
In a medium bowl, beat softened cream cheese and 1/3 cup granulated sugar with an electric mixer until light and smooth (2-3 minutes). Mix in the egg yolk, 1 tsp vanilla extract, 1/2 tsp lemon zest (if using), and a pinch of salt until just combined. Scrape down sides of bowl and set aside. -
Step 2
Preheat oven to 375°F (190°C). Line a large baking sheet with parchment paper. Gently separate the 12 King’s Hawaiian Sweet Rolls. For each roll, use the back of a spoon or your thumb to gently press down in the center, creating a shallow well or indentation with a raised border. Arrange rolls on the prepared baking sheet, leaving some space between each. -
Step 3
In a small bowl, whisk together 1 large egg and 1 tbsp milk or water. Using a pastry brush, gently brush the egg wash over the raised edges of each King’s Hawaiian roll, avoiding the center indentation. -
Step 4
Carefully spoon or pipe about 1 to 1.5 tablespoons of the prepared cream cheese filling into the center indentation of each roll, ensuring it doesn’t overflow the edges. -
Step 5
Transfer the baking sheet to the preheated oven. Bake for approximately 12 to 18 minutes, or until the King’s Hawaiian rolls are golden brown around the edges and on the crusts, and the cheesecake filling is set and slightly puffed. If the filling browns too quickly, you may loosely tent with foil. -
Step 6
Carefully remove from oven. Let the danishes cool on the baking sheet for about 5 minutes, then transfer them to a wire rack to cool completely. This prevents soggy bottoms and allows the filling to set fully. -
Step 7
In a small bowl, combine 1/3 cup melted butter, 1/4 cup brown sugar, 1/2 tsp ground cinnamon, and 1/4 tsp ground nutmeg. Whisk well until the glaze is smooth and thoroughly combined. -
Step 8
Once the danishes have completely cooled, pour the prepared glaze evenly over each danish. Let the glaze set for about 10-15 minutes before serving. Serve at room temperature. Store any leftover danishes in an airtight container in the refrigerator for up to 3-4 days.
Important Information
Nutrition Facts (Per Serving)
It is important to consider this information as approximate and not to use it as definitive health advice.
Allergy Information
Please check ingredients for potential allergens and consult a health professional if in doubt.
Leave a Comment