
Jalapeño Popper Chicken is not just a meal; it’s a brilliant culinary innovation that brings together two of America’s most beloved comfort food concepts into one unforgettable dish. I’m absolutely thrilled to share with you a recipe that promises to transform your dinner routine with its irresistible flavors and satisfying textures. Imagine sinking your teeth into tender chicken, generously crowned with the creamy, cheesy, and subtly spicy goodness of classic jalapeño poppers – it’s a symphony for the taste buds that’s both excitingly bold and deeply comforting.
A Culinary Evolution: From Pepper to Plate
While the humble jalapeño pepper boasts a rich and ancient history in Central and South American cuisines, its transformation into the iconic cream-cheese-filled, breaded, and fried appetizer we know today is a distinctly American innovation, especially popular in Tex-Mex culinary traditions. Our recipe celebrates this delicious fusion, expertly marrying the piquant charm of the jalapeño popper with the versatility of chicken, elevating your weeknight dinners to something truly special without excessive effort.
Why Everyone Craves Jalapeño Popper Chicken
People adore this particular iteration because it masterfully balances the vibrant, fresh heat of jalapeños with the smooth richness of cream cheese, often enhanced with crispy bacon, all baked to perfection atop juicy, tender chicken breasts. It’s a convenient, often one-pan wonder that delivers incredibly big on flavor and texture, making it an absolute hit for family meals, casual gatherings, or simply when you’re craving something truly satisfying. Prepare to fall head over heels for the ultimate combination of savory chicken and that beloved popper kick in this incredible Jalapeño Popper Chicken dish.

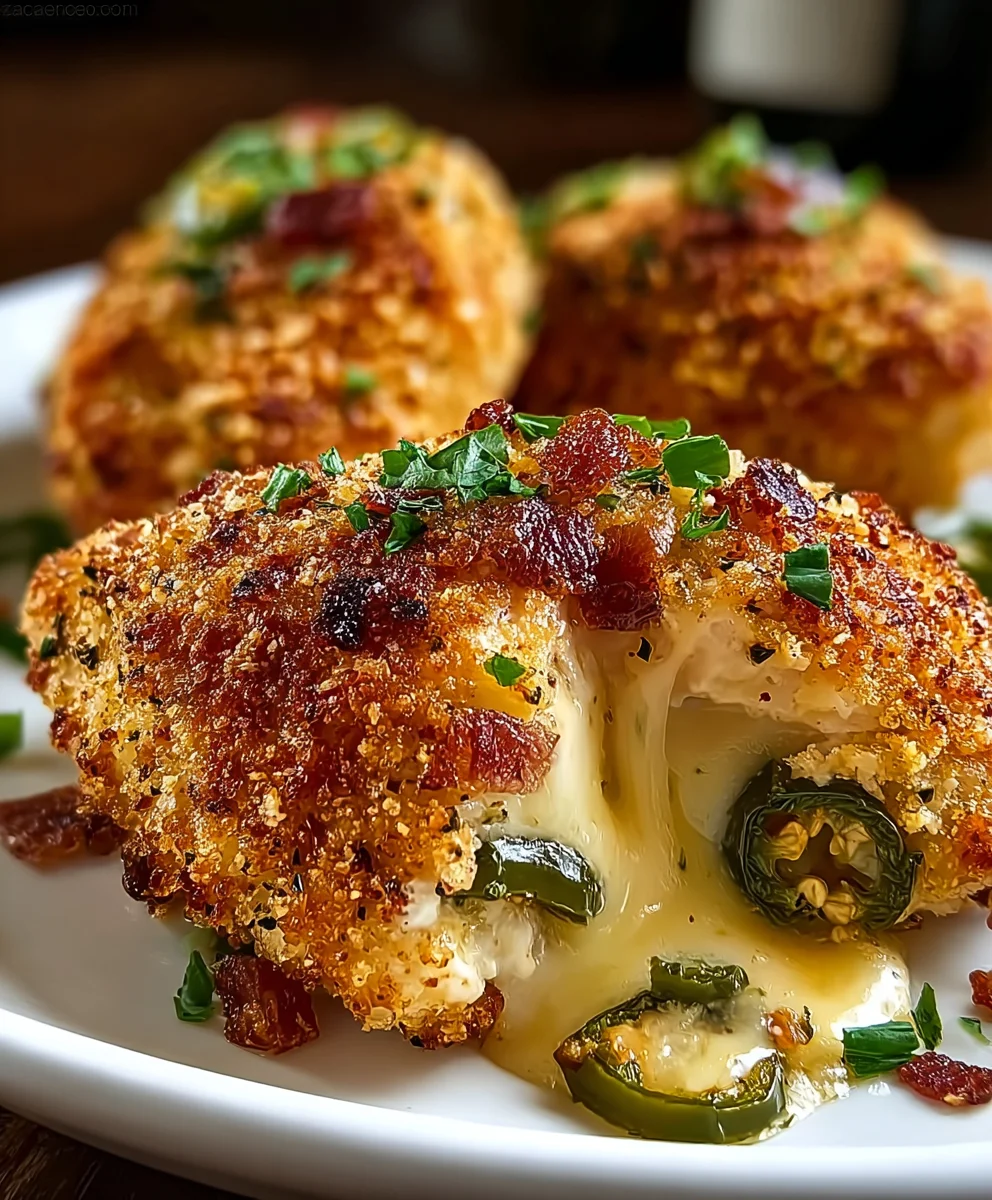
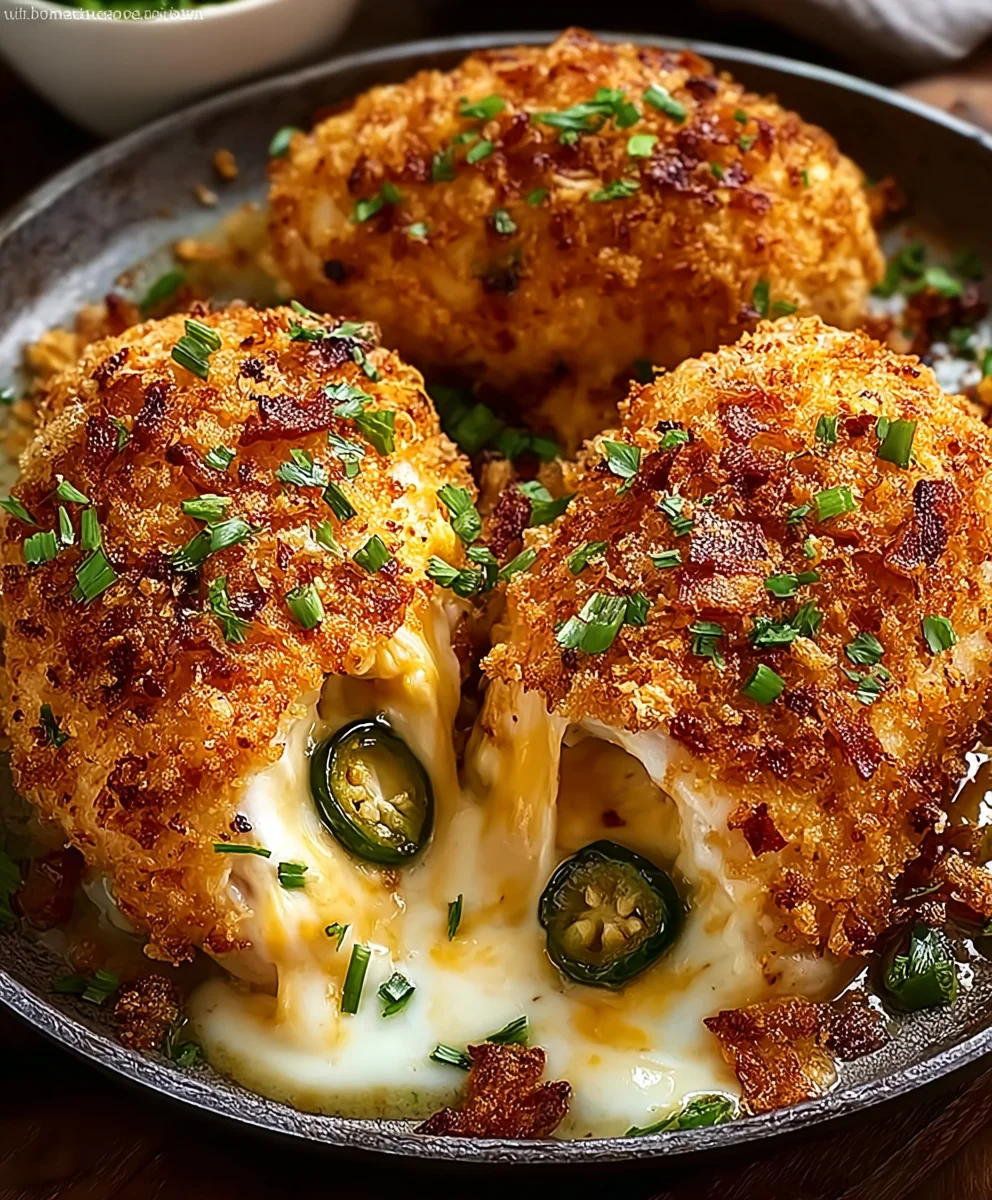
Get ready to elevate your grilling game with these incredible Smoked Jalapeño Popper Chicken Bombs! If you’re anything like me, you love the classic combination of spicy, creamy, and smoky, and this recipe delivers on all fronts. We’re talking about tender chicken breasts, generously stuffed with a zesty, cheesy jalapeño filling, then wrapped in savory bacon and smoked to perfection. It’s a flavor explosion that will have everyone asking for more. Let’s dive right into crafting these masterpieces!
Ingredients:
- 4 large boneless, skinless chicken breasts (approximately 6-8 ounces each, ensuring they are roughly uniform in size for even cooking)
- 8 ounces (1 block) cream cheese, full-fat, softened to room temperature for easy mixing
- 1 cup shredded sharp cheddar cheese, preferably freshly grated from a block for superior melt and flavor compared to pre-shredded varieties which often contain anti-caking agents
- 1/2 cup diced fresh jalapeños (approximately 2-3 medium jalapeños). For less heat, make sure to remove all seeds and membranes; for a bolder kick, you can leave some in.
- 12 slices regular-cut bacon (we’ll use about 3 slices per chicken bomb to ensure full coverage and a good crispy texture)
Preparation: Crafting Your Jalapeño Popper Chicken Bombs
The journey to creating truly irresistible Smoked Jalapeño Popper Chicken Bombs begins with meticulous preparation. Each step is crucial for building layers of flavor and ensuring a delightful texture in every bite. I always find that taking my time here pays off immensely in the final product.
-
Prepare the Chicken Breasts:
This is where we really set the stage for our chicken bombs. I start by taking each of my large boneless, skinless chicken breasts and placing them individually between two sheets of plastic wrap or inside a large freezer bag. This prevents any raw chicken juices from splattering around my kitchen, maintaining a clean and sanitary workspace. Using a meat mallet, or even the flat side of a heavy pan, I then gently but firmly pound each chicken breast. The goal here is not to obliterate the chicken, but rather to flatten it evenly to about 1/4 to 1/2-inch thick. This even thickness is paramount for two main reasons: first, it ensures that the chicken cooks uniformly, preventing dry spots and undercooked areas; second, it creates a larger, more pliable surface area for us to spread our delicious filling and roll into a neat package. Pounding also helps tenderize the chicken, making for a more succulent end result. Once flattened, I carefully remove the chicken from the plastic wrap and set it aside, ready for its cheesy stuffing.
-
Mix the Creamy Jalapeño Popper Filling:
Now, let’s bring together the heart of our chicken bombs – the creamy, spicy, and utterly delicious jalapeño popper filling! In a medium-sized mixing bowl, I combine my softened cream cheese, the shredded sharp cheddar, and the diced fresh jalapeños. The cream cheese needs to be at room temperature; this isn’t just a suggestion, it’s a necessity. Softened cream cheese mixes smoothly and evenly with the other ingredients, creating a uniform, lump-free filling. If your cream cheese is cold, it will be difficult to incorporate the cheddar and jalapeños properly, leading to a clumpy texture. I use a sturdy spatula or a wooden spoon to thoroughly mix everything together until it’s well combined and creamy. I ensure the jalapeños are evenly distributed throughout the cheese mixture, so every bite of the chicken bomb gets that perfect balance of heat and cheesy goodness. This filling is the cornerstone of the “Jalapeño Popper Chicken” experience, so make sure it’s perfect!
-
Stuff and Roll the Chicken:
With our chicken pounded flat and our filling ready, it’s time for the assembly line! I lay one flattened chicken breast out on a clean surface. Then, I take about 1/4 of the cream cheese mixture (a generous scoop, usually about 1/2 cup) and spread it evenly over one end of the chicken breast. I like to leave about an inch or so clear around the edges, especially the side opposite where I’ll start rolling, to prevent the filling from oozing out excessively during the rolling process. Starting from the end with the filling, I carefully and tightly roll the chicken breast over the filling, creating a compact log or “bomb.” The key here is to roll it as snugly as possible without tearing the chicken. A tight roll helps keep the filling secure inside and ensures the chicken cooks into a nice, cylindrical shape. Once rolled, I set this aside seam-side down to keep it from unraveling while I prepare the others. Repeat this process for all four chicken breasts, creating four beautifully stuffed chicken logs.
-
Wrap with Bacon:
The final layer of deliciousness and structural integrity comes from our bacon wrap. For each stuffed chicken log, I typically use 3 slices of regular-cut bacon. I take one slice and wrap it around one end of the chicken, tucking it snugly. Then, I take the second slice and wrap it around the middle, overlapping slightly with the first slice. Finally, the third slice goes around the other end, again overlapping to ensure complete coverage. The goal is to encase the entire chicken log in a protective, flavorful blanket of bacon. I make sure there are no gaps where the filling might escape or where the chicken might dry out too much. To secure the bacon in place, especially if it’s a bit loose, I use toothpicks. I insert a toothpick or two, perpendicular to the bacon strips, to hold everything together. These toothpicks are essential for maintaining the bomb’s shape during the smoking process and preventing the bacon from unraveling. Remember to remove them before serving!
Smoking Process: Infusing Smoky Goodness
Now, we move on to the smoking phase, which is truly what transforms these stuffed chicken rolls into “Smoked Jalapeño Popper Chicken” bombs. This process requires a bit of patience and attention to detail, but the smoky aroma and flavor it imparts are absolutely worth every moment. I find great satisfaction in watching my creations slowly cook and absorb that incredible smoky essence.
-
Preheat Your Smoker:
Setting up your smoker correctly is the most critical first step. I preheat my smoker to a consistent temperature of 275°F (135°C). Consistency is key here; fluctuations can lead to uneven cooking. If you’re using a pellet smoker, this is usually straightforward. For charcoal smokers, I arrange my coals for indirect heat and use a temperature probe to monitor the ambient temperature inside the cooking chamber. I also like to incorporate a water pan if my smoker allows, as this helps maintain moisture during the long cook, preventing the chicken from drying out and promoting better smoke adhesion. When it comes to wood, I typically opt for mild to medium fruitwoods like apple, cherry, or pecan. These woods complement the chicken and the cheesy filling beautifully, providing a sweet and nuanced smoke flavor without overpowering the other ingredients. Hickory can also be a fantastic choice for a more traditional BBQ flavor, but I often reserve it for beef or pork for a milder approach with chicken. I ensure my wood chips or chunks are ready to go, producing a nice, clean blue smoke once the smoker is up to temperature.
-
Arrange and Smoke the Chicken Bombs:
Once my smoker is humming along steadily at 275°F (135°C) and producing that desirable thin blue smoke, it’s time to carefully place the prepared Jalapeño Popper Chicken Bombs onto the smoker grates. I make sure to arrange them in a single layer, leaving a little space between each bomb. This allows for optimal air circulation and ensures that the smoke can evenly kiss all surfaces of the bacon-wrapped chicken. I insert a reliable meat thermometer probe into the thickest part of one of the chicken bombs, being careful to avoid hitting the bacon or the filling directly. This allows me to accurately monitor the internal temperature of the chicken without having to constantly open the smoker, which would lead to temperature drops and extended cooking times. I close the smoker lid and let the magic happen. The initial cooking phase typically lasts for about 1.5 to 2 hours. During this time, the chicken will slowly cook, the bacon will begin to render its fat, and the smoky flavors will start to permeate the entire bomb. I resist the urge to peek too often, as every time the lid opens, heat escapes, and the smoking process slows down.
-
Monitor Temperature and Achieve Doneness:
Patience is truly a virtue when smoking. I continue to smoke the chicken bombs, maintaining that steady 275°F (135°C) temperature in the smoker, until the internal temperature of the chicken reaches 165°F (74°C). This is the critical doneness temperature for poultry, ensuring it is safe to eat and perfectly cooked. The time it takes can vary depending on the exact thickness of your chicken breasts, the consistency of your smoker’s temperature, and even external weather conditions, but it generally falls in the 1.5 to 2.5-hour range. When the chicken reaches around 155-160°F, I like to take a moment to assess the bacon. If it’s not as crispy as I’d like (and who doesn’t love crispy bacon?), I might briefly increase the smoker temperature to around 350-375°F (175-190°C) for the last 15-20 minutes. This higher heat helps crisp up the bacon beautifully, giving it that perfect bite. Alternatively, if your smoker has a searing zone or if you have a separate grill, you could briefly transfer them to high direct heat for a few minutes per side to crisp the bacon, but be extremely careful not to overcook the chicken during this step. Once the internal temperature hits 165°F and the bacon is to my liking, I carefully remove the Smoked Jalapeño Popper Chicken Bombs from the smoker.
-
Rest Before Serving:
This final step, often overlooked, is arguably as important as any other. Once the chicken bombs are removed from the heat, I immediately transfer them to a cutting board or a serving platter. I then loosely tent them with aluminum foil and let them rest for at least 10-15 minutes. This resting period is absolutely crucial for a few reasons. As the chicken cooks, the muscle fibers contract, pushing the juices towards the center. If you cut into the chicken immediately, those juices will simply run out, leaving you with a drier piece of chicken. Resting allows the muscle fibers to relax, redistributing those precious juices back throughout the meat. This results in a significantly more tender, moist, and flavorful “Jalapeño Popper Chicken” experience. While they rest, the internal temperature may also rise by a few more degrees (this is called carryover cooking), so factor that into your planning. Before serving, remember to carefully remove any toothpicks you used to secure the bacon. This ensures a safe and enjoyable dining experience for everyone!
Tips for Success with Your Smoked Jalapeño Popper Chicken
I’ve made these “Jalapeño Popper Chicken” bombs countless times, and I’ve picked up a few tricks along the way to ensure they turn out perfectly every single time. These pointers will help you navigate any potential challenges and truly master this incredible dish.
Managing the Spice Level:
- Jalapeño Heat: The heat level of jalapeños can vary wildly from pepper to pepper. If you prefer a milder flavor, I always recommend thoroughly removing all the seeds and white membranes (the pith) from the jalapeños before dicing them. Most of the capsaicin, which is responsible for the heat, resides in these parts. For those who love an extra kick, you can leave some or all of the seeds and membranes intact. Just be sure to wear gloves when handling fresh jalapeños to avoid irritating your skin, and always wash your hands thoroughly afterward!
- Testing the Filling: Before stuffing, you can always take a tiny bit of the cream cheese mixture and taste it (assuming you’re comfortable tasting raw cream cheese mixture without raw chicken, of course). This gives you an idea of the spice level and allows you to adjust if needed, perhaps by adding a tiny bit more cream cheese or cheddar to mellow it out, or a dash of hot sauce (if you decide to introduce extra ingredients in a future iteration of the recipe, which is outside the scope of the current ingredients list).
Achieving the Perfect Bacon:
- Bacon Thickness: I find that regular-cut bacon works best for these bombs. Thin-cut bacon can cook too quickly and become overly crispy or even burnt before the chicken is fully done, while thick-cut bacon might not render all its fat or crisp up enough within the smoking time frame. Regular-cut offers that ideal balance.
- Crisping It Up: As mentioned in the cooking instructions, if your bacon isn’t as crispy as you’d like it to be towards the end of the cook, don’t despair! A quick blast of higher heat can work wonders. After the chicken reaches 160°F, I often crank up the smoker temperature to around 375-400°F for the last 15-20 minutes. Keep a close eye on it, as bacon can go from perfectly crisp to burnt very quickly at higher temperatures.
Ensuring Moist Chicken and Secure Filling:
- Pounding Consistency: Don’t underestimate the importance of evenly pounding your chicken breasts. It not only helps with even cooking but also provides a consistent thickness to roll, ensuring the filling is well-contained. If parts are too thick, they won’t cook at the same rate; if too thin, they might tear.
- Rolling Technique: Roll the chicken as tightly as possible without tearing. A tight roll keeps the filling from escaping. Using toothpicks to secure the bacon is also a safeguard against the whole bomb unraveling during the cooking process.
- Avoiding Overcooking: Always rely on a good meat thermometer! This is your best friend when it comes to poultry. Chicken can go from perfectly juicy to dry and tough in a matter of minutes if overcooked. Pulling it off the smoker precisely at 165°F (before the resting period) is key to a succulent interior.
Smoker Specifics:
- Maintaining Temperature: A stable smoker temperature is crucial for predictable results. Invest in good external and internal probe thermometers if your smoker doesn’t have reliable built-in ones. Fluctuating temperatures can dramatically increase your cooking time and impact the texture.
- Wood Choice: Experiment with different wood types! While apple, cherry, and pecan are great starting points for chicken, you might discover a preference for something else. Each wood imparts a unique smoky nuance. Just avoid heavily pungent woods like mesquite for chicken, as they can sometimes be too overpowering.
Safety and Storage:
- Food Safety: Always handle raw chicken with care. Use separate cutting boards and utensils for raw meat, and thoroughly wash your hands with soap and hot water before and after handling.
- Leftovers: If you happen to have any leftovers (which is rare in my house!), they store beautifully. Once cooled, place the “Jalapeño Popper Chicken” bombs in an airtight container and refrigerate for up to 3-4 days. Reheat gently in an oven or air fryer to maintain moisture and crispness.
These Smoked Jalapeño Popper Chicken Bombs are more than just a recipe; they’re an experience. They combine the best elements of classic comfort food with the irresistible allure of outdoor cooking. The creamy, spicy filling, tender chicken, and crispy, smoky bacon make for a dish that is truly unforgettable. I hope you enjoy making and devouring them as much as I do!
Conclusion:
And there you have it, my friends – a culinary journey culminating in a dish that is nothing short of spectacular! If you’ve been following along, you know that this recipe isn’t just about combining ingredients; it’s about crafting an experience, a symphony of flavors and textures that dance on your palate. I truly believe that this is one of those dishes that effortlessly earns its place in your regular rotation, whether you’re looking for a weeknight dinner solution or something impressive to serve guests.
Why is this recipe a must-try, you ask? Well, let me count the ways! First, there’s the sheer genius of taking the beloved flavors of a classic jalapeño popper and marrying them with tender, juicy chicken. You get that irresistible creaminess from the rich cream cheese, the perfect spicy kick from the fresh jalapeños (customizable to your heat preference, of course!), and the savory, salty crunch of bacon, all wrapped up and baked to golden perfection. It’s comfort food elevated, a dish that manages to be both excitingly bold and wonderfully familiar at the same time. Every bite offers a satisfying contrast – the crispy exterior giving way to a moist, flavorful interior that’s bursting with cheesy goodness. I’ve made this countless times, and it never fails to impress; it’s a testament to how truly satisfying a well-executed dish can be. The ease of preparation, combined with the incredibly rewarding outcome, makes it a recipe I champion without hesitation.
Now, let’s talk about how to make this star dish shine even brighter on your table. While it’s certainly a standalone marvel, thoughtful serving suggestions can enhance the entire meal. I love pairing this Jalapeño Popper Chicken with a vibrant, crisp green salad tossed in a light vinaigrette to cut through the richness. For something heartier, a side of fluffy jasmine rice or even some creamy mashed potatoes would be fantastic for soaking up any delicious juices. Roasted or steamed vegetables like asparagus, broccoli, or green beans would add a wonderful freshness and a touch of healthy balance. If you’re hosting, consider a colorful corn salad or a simple coleslaw for a truly well-rounded feast. And for those who enjoy a beverage pairing, a crisp lager or a chilled Sauvignon Blanc would complement the spicy notes beautifully.
But don’t stop there! One of the joys of cooking is making a recipe your own, and this dish offers plenty of room for creative variations. Feeling extra adventurous? Try incorporating different cheeses into the filling – a sharp cheddar for tang, pepper jack for an extra layer of heat, or even a smoked gouda for a deeper, more complex flavor. You could also experiment with adding other ingredients to the filling, such as finely minced chives for freshness, or a touch of smoked paprika for an additional smoky depth. For a different texture, consider rolling the chicken in panko breadcrumbs mixed with Parmesan cheese before baking for an even crispier crust. And if you’re a true spice fiend, a pinch of cayenne pepper in the cream cheese mixture or a drizzle of your favorite hot sauce over the top before serving will take the heat to the next level. This recipe is wonderfully adaptable, allowing you to tailor it perfectly to your family’s tastes and your culinary whims.
So, what are you waiting for? I wholeheartedly encourage you to roll up your sleeves, gather your ingredients, and give this incredible recipe a try. It’s more than just a meal; it’s an opportunity to create something truly delicious and memorable in your own kitchen. Once you’ve experienced the unparalleled satisfaction of biting into this perfectly cooked chicken, bursting with those familiar and fantastic flavors, you’ll understand why I’m so passionate about it. And when you do, please, please come back and share your experience with me! Did you add your own unique twist? What did you serve it with? Your stories, photos, and feedback are always incredibly inspiring and help build our community of food lovers. Happy cooking, and I can’t wait to hear all about your delicious journey!
FAQs: Your Burning Questions Answered About Jalapeño Popper Chicken
Can I make this Jalapeño Popper Chicken less spicy?
Absolutely! The heat in jalapeños is primarily concentrated in the seeds and the white pith or membrane. To reduce the spice significantly, make sure to thoroughly remove all seeds and membrane before dicing the jalapeños. You can also use fewer jalapeños, or even substitute a portion of them with milder bell peppers for a gentle flavor without the intense kick.
Can I prepare this dish ahead of time?
Yes, you can certainly do some prep work in advance! The filling mixture (cream cheese, jalapeños, cheese, bacon, and seasonings) can be prepared a day ahead and stored in an airtight container in the refrigerator. When you’re ready to cook, simply stuff your chicken breasts and proceed with the baking instructions. For the freshest and most delicious results, I recommend assembling and cooking the chicken on the same day, but pre-prepping the filling will definitely save you time on a busy evening.
What kind of chicken is best for this recipe?
Boneless, skinless chicken breasts are typically the go-to for this recipe, as their shape is perfect for butterflying and stuffing. However, if you prefer a juicier, richer chicken, boneless, skinless chicken thighs can also be used. You might need to adjust their shape slightly to create a pocket for the filling, but they offer a fantastic flavor and tend to be very forgiving during cooking, ensuring a moist result.
How do I store and reheat leftovers?
Any leftover Jalapeño Popper Chicken should be stored in an airtight container in the refrigerator for up to 3-4 days. To reheat, I find the best method is to warm it gently in the oven at around 300-325°F (150-160°C) until it’s heated through. This helps to maintain the chicken’s tenderness and prevents it from drying out, and can also help crisp up any outer coating. While you can microwave it, the texture might not be quite as good.
Is this recipe suitable for a keto or low-carb diet?
Yes, with a few simple modifications, this Jalapeño Popper Chicken can be made perfectly suitable for a keto or low-carb diet! The core ingredients – chicken, cream cheese, jalapeños, bacon, and cheese – are inherently low-carb. The main thing to ensure is to omit any breading if the recipe calls for it, or use a keto-friendly alternative like crushed pork rinds, almond flour, or a mix of Parmesan cheese. This makes for a wonderfully satisfying and flavorful meal that fits right into a ketogenic lifestyle.
Can I bake this recipe instead of pan-frying it?
Absolutely! Baking is a fantastic, hands-off method for cooking this dish. After you’ve stuffed and (optionally) breaded your chicken, place it in a baking dish. Bake at 375°F (190°C) for approximately 25-35 minutes, or until the chicken is cooked through and reaches an internal temperature of 165°F (74°C). Baking will still result in delicious, moist chicken, though the exterior might be slightly less crispy than if it were pan-fried. It’s a great option for a healthier approach or when you want to minimize cleanup!
Jalapeño Popper Chicken Recipe: Cheesy, Spicy & Easy Dinner
Smoked Jalapeño Popper Chicken Bombs are the perfect combination of bold, smoky flavors and cheesy goodness. Chicken breasts are pounded thin and stuffed with a zesty filling made from cream cheese, cheddar, and diced jalapeños. Once rolled, the chicken is wrapped in crispy beef bacon and smoked low and slow to bring out that irresistible BBQ flavor. With each bite, you’ll experience the creamy, spicy jalapeño popper filling paired with the savory chicken and smoky beef bacon, making these chicken bombs a must-try for BBQ lovers. Flatten each chicken breast by pounding it to an even thickness.
Ingredients
-
4 large boneless, skinless chicken breasts
-
8 ounces (1 block) cream cheese, softened
-
1 cup shredded sharp cheddar cheese
-
1/2 cup diced fresh jalapeños (approx. 2-3 medium)
-
12 slices regular-cut beef bacon
Instructions
-
Step 1
Pound each chicken breast evenly to about 1/4 to 1/2-inch thick between plastic wrap. This ensures uniform cooking and a pliable surface for stuffing. -
Step 2
In a medium bowl, combine softened cream cheese, shredded sharp cheddar, and diced fresh jalapeños. Mix thoroughly until creamy and well combined, ensuring jalapeños are evenly distributed. -
Step 3
Spread about 1/4 of the cream cheese mixture evenly over one end of each flattened chicken breast, leaving an inch clear around the edges. Tightly roll the chicken over the filling to form a compact log or ‘bomb’. -
Step 4
For each stuffed chicken log, wrap with 3 slices of regular-cut beef bacon, overlapping to completely encase the chicken. Secure the beef bacon with 1-2 toothpicks to prevent unravelling during cooking. -
Step 5
Preheat your smoker to a consistent 275°F (135°C). Use mild to medium fruitwoods (e.g., apple, cherry, pecan) for a complementary smoke flavor. A water pan can help maintain moisture. -
Step 6
Place the prepared chicken bombs on the smoker grates in a single layer, ensuring space between each for optimal smoke circulation. Insert a meat thermometer into the thickest part of one bomb (avoiding beef bacon or filling). Smoke for approximately 1.5 to 2.5 hours. -
Step 7
Continue smoking until the internal temperature of the chicken reaches 165°F (74°C). If crispier beef bacon is desired, briefly increase smoker temperature to 350-400°F (175-200°C) for the last 15-20 minutes, monitoring closely to prevent burning. -
Step 8
Once cooked, remove the chicken bombs from the smoker. Transfer to a cutting board or platter, loosely tent with aluminum foil, and let rest for 10-15 minutes. This allows juices to redistribute for a more tender result. Remember to remove all toothpicks before serving.
Important Information
Nutrition Facts (Per Serving)
It is important to consider this information as approximate and not to use it as definitive health advice.
Allergy Information
Please check ingredients for potential allergens and consult a health professional if in doubt.

Leave a Comment