
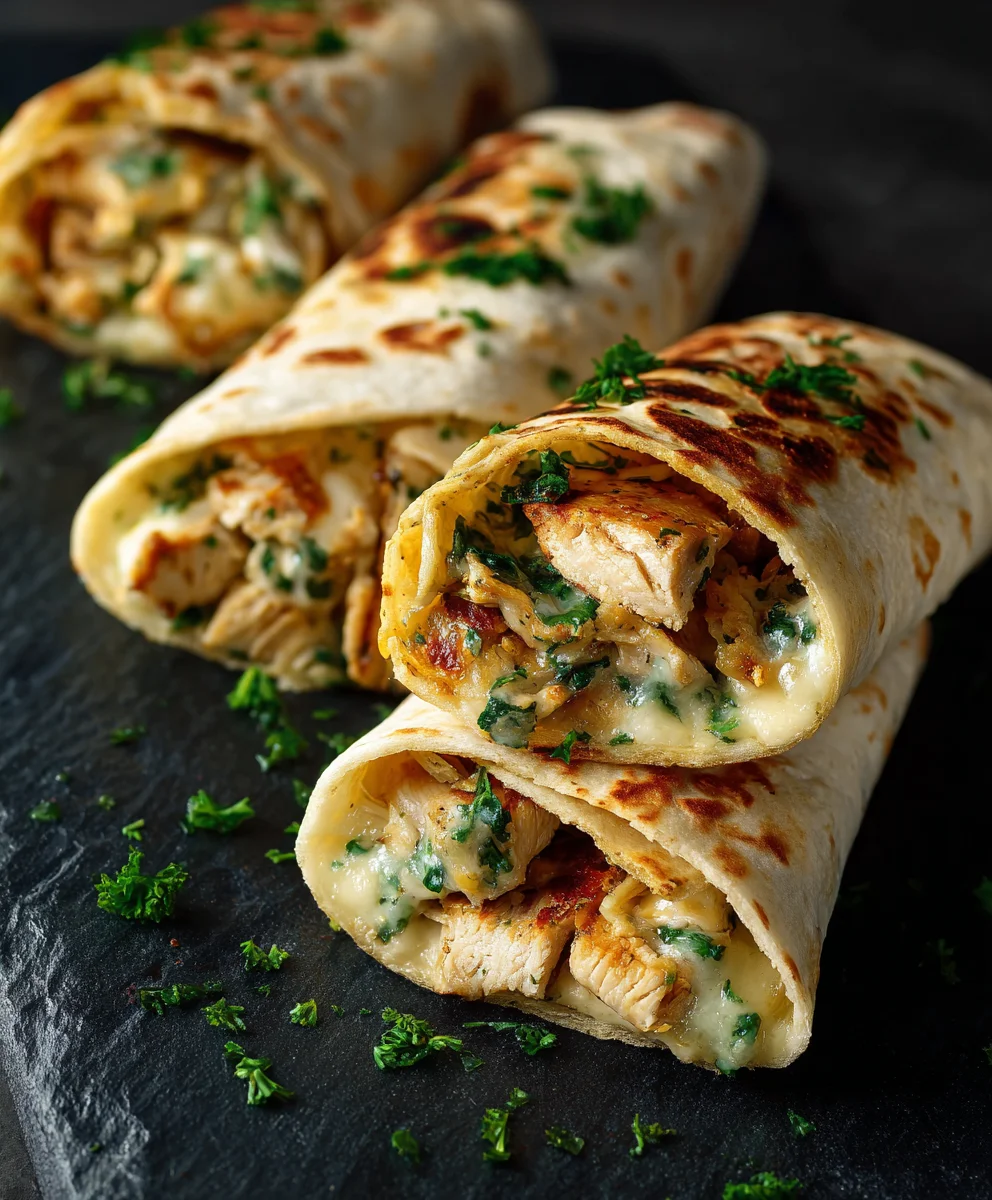
Cheesy Garlic Chicken Wraps are more than just a meal; they are a delightful symphony of flavors wrapped up in perfect harmony, promising a satisfying experience with every single bite. I’ve always found that the allure of tender, seasoned chicken combined with gooey, melted cheese and the aromatic punch of garlic creates an irresistible combination. It’s a dish that transcends simple weeknight dinner status, offering a comforting warmth and an explosion of taste that brightens any day, truly making it a standout in any kitchen.
There’s a universal appreciation for the convenience and deliciousness of a well-crafted wrap, a culinary format that has gracefully evolved to become a beloved staple across diverse palates. While not steeped in ancient tradition like some historical dishes, the concept of encasing delectable fillings within a soft shell has a rich, modern history of adaptability and global appeal. People adore this particular combination because it hits all the right notes: the savory depth of the chicken, the creamy richness of the cheese, and the fragrant piquancy of garlic, all cradled in a convenient, portable package. It’s an ideal choice for a quick lunch, a satisfying dinner, or even an impressive, fuss-free dish to share with loved ones.
I truly believe that the magic of Cheesy Garlic Chicken Wraps lies in their ability to deliver maximum flavor with minimal fuss.
From the first tantalizing aroma that fills your kitchen to the last fulfilling bite, this recipe is designed to captivate and satisfy. Prepare to discover your new favorite go-to meal that’s both incredibly simple to prepare and undeniably delicious.

Ingredients:
For the Garlic Herb Chicken:
- 1 ½ lbs boneless, skinless chicken breasts or thighs: I often find that a mix of both chicken breasts and thighs offers the best texture – the breasts are lean, while the thighs bring a wonderful juiciness. You’ll want to cut these into bite-sized pieces, about ½ to ¾ inch cubes or thin strips, for quick and even cooking. Patting them dry before seasoning is a little trick that helps them get a beautiful sear.
- 2 tablespoons olive oil: A good quality extra virgin olive oil works perfectly here for sautéing. It adds a lovely subtle flavor and helps prevent sticking.
- 4-6 cloves garlic, minced: Ah, garlic! The heart and soul of our “Cheesy Garlic Chicken Wraps.” For that robust, fragrant punch, I love using fresh garlic, finely minced. If you’re in a pinch, about 1 ½ to 2 teaspoons of pre-minced garlic will do, but fresh is always my preference for maximum aroma and taste.
- 1 teaspoon dried oregano: This classic herb brings a warm, earthy note. If you have fresh oregano, use about 1 tablespoon, finely chopped, adding it towards the end of the cooking process to preserve its delicate flavor.
- ½ teaspoon dried thyme: Thyme pairs beautifully with chicken and garlic, adding another layer of aromatic depth. Again, if using fresh, about 1 ½ teaspoons, chopped.
- ¼ teaspoon red pepper flakes (optional): For those of us who appreciate a little warmth and kick! This is completely optional, but I find it really elevates the flavor profile without making the dish overly spicy.
- Salt and freshly ground black pepper to taste: Essential for seasoning. I always recommend tasting as you go – but be careful not to over-salt before adding the cheese sauce, as many cheeses are already quite salty.
- 2 tablespoons fresh parsley, chopped: A final flourish of fresh parsley not only adds vibrant color but also a burst of fresh, herbaceous flavor that brightens the entire dish. Add this right at the very end, just before serving the chicken.
For the Creamy Cheese Sauce:
- 2 tablespoons unsalted butter: Butter forms the base of our sauce, lending richness and helping to create that smooth, velvety texture we’re aiming for. Unsalted butter allows us to control the seasoning precisely.
- 2 tablespoons all-purpose flour: This is our thickening agent, forming a roux with the butter. It’s crucial for achieving a beautifully thick and cohesive sauce that will cling perfectly to our chicken and fillings.
- 1 ½ cups milk (whole or 2%): Whole milk will give you a richer, creamier sauce, but 2% works wonderfully too. Make sure it’s at room temperature or slightly warmed to prevent lumps when adding it to the roux.
- 4 oz cream cheese, softened: Oh, the secret weapon for ultimate creaminess! Softened cream cheese melts seamlessly into the sauce, giving it an incredible velvety texture and a slight tang that balances the richness of the other cheeses.
- 1 cup shredded cheddar cheese: Sharp or medium cheddar works beautifully here, providing that classic cheesy flavor and a gorgeous golden hue. Freshly shredded cheese always melts better than pre-shredded, which often contains anti-caking agents.
- ½ cup shredded mozzarella cheese: Mozzarella contributes a fantastic stretch and mild, milky flavor, making the sauce extra appealing and adding to the overall “cheesy” experience of our “Cheesy Garlic Chicken Wraps.”
- ½ teaspoon garlic powder: While we have fresh garlic in the chicken, a touch of garlic powder in the sauce reinforces that delicious garlic theme without overwhelming it.
- Salt and white pepper to taste: White pepper is excellent in cream sauces as it provides seasoning without the visible black flecks, keeping the sauce visually pristine.
For Assembling the Wraps:
- 8 large flour tortillas (10-12 inches): These are the vessels for our delicious filling! Choose good quality, soft flour tortillas that are pliable and won’t crack when folded. Warmer tortillas are always easier to work with.
- 2 cups shredded romaine lettuce: Fresh, crisp romaine adds a wonderful crunch and a refreshing counterpoint to the rich chicken and cheese.
- 1 large tomato, diced or sliced: Juicy, ripe tomatoes provide a burst of freshness and a touch of acidity, cutting through the richness beautifully.
- ¼ cup red onion, thinly sliced (optional): For those who love a bit of pungent bite and extra crunch, thinly sliced red onion is a fantastic addition. Soaking it in cold water for a few minutes can temper its sharpness.
- Optional additions: Think about sliced avocado for extra creaminess, pickled jalapeños for more heat and tang, or a sprinkle of fresh cilantro for herbaceous brightness. The beauty of these Cheesy Garlic Chicken Wraps is how customizable they are!
Preparing the Garlic Herb Chicken
My friends, let’s get started on the star of our show: the incredibly flavorful garlic herb chicken! This step is where we build the foundational flavors for our amazing Cheesy Garlic Chicken Wraps.
- Prepare the Chicken: First things first, take your boneless, skinless chicken breasts or thighs. I like to cut them into uniform, bite-sized pieces, roughly ½ to ¾ inch cubes or thin strips. This ensures they cook evenly and quickly, and are easy to manage in a wrap. Once cut, gently pat the chicken pieces dry with paper towels. This is a crucial step for achieving a beautiful golden-brown sear, which means more flavor! Season the chicken generously all over with a good pinch of salt and freshly ground black pepper.
- Heat the Pan: Place a large skillet or a heavy-bottomed pan, like a cast-iron skillet, over medium-high heat. Allow it to heat up for a good minute or two until it’s nice and hot. Then, add the 2 tablespoons of olive oil, swirling it around to coat the bottom of the pan evenly. You should see it shimmer slightly when it’s ready.
- Sear the Chicken: Carefully add the seasoned chicken pieces to the hot pan in a single layer. Try not to overcrowd the pan; if necessary, work in two batches. Overcrowding can lower the pan’s temperature, leading to steamed chicken instead of beautifully seared chicken. Let the chicken cook undisturbed for 3-4 minutes on one side, until a golden-brown crust forms.
- Continue Cooking and Add Aromatics: Flip the chicken pieces and continue to cook for another 2-3 minutes, or until they are cooked through and no longer pink in the center. At this point, reduce the heat to medium-low. Add the minced garlic, dried oregano, dried thyme, and red pepper flakes (if using) to the pan. Sauté for just about 1 minute, stirring constantly, until the garlic is wonderfully fragrant. Be careful not to burn the garlic, as burnt garlic can taste bitter.
- Finish the Chicken: Remove the pan from the heat. If there are any browned bits stuck to the bottom of the pan (which there should be, and they’re packed with flavor!), you can deglaze it with a tablespoon or two of water or chicken broth, scraping them up with a wooden spoon. Stir in the chopped fresh parsley. Give everything a good stir and taste to adjust the seasoning if needed. Transfer the cooked garlic herb chicken to a bowl and set it aside, keeping it warm while we prepare our luscious cheese sauce.
Crafting the Creamy Cheese Sauce
Now, for the glorious, gooey, and absolutely essential creamy cheese sauce that truly makes these “Cheesy Garlic Chicken Wraps” live up to their name! This sauce is incredibly versatile and adds a richness that perfectly complements our savory chicken.
- Make the Roux: In a medium saucepan, melt the 2 tablespoons of unsalted butter over medium heat. Once the butter is fully melted and slightly bubbly, sprinkle in the 2 tablespoons of all-purpose flour. Whisk continuously for 1-2 minutes, creating a smooth paste known as a roux. It should be light golden in color and smell a bit like toasted nuts. This step is crucial for thickening our sauce and removing the raw flour taste.
- Add the Milk: Gradually, a little at a time (about ¼ cup at a time), pour in the 1 ½ cups of milk, whisking constantly to prevent lumps from forming. I find it easiest to pour with one hand and whisk vigorously with the other. Continue whisking until all the milk has been incorporated and the sauce is smooth and starting to thicken. Bring the mixture to a gentle simmer, still whisking.
- Incorporate the Cream Cheese: Reduce the heat to low. Add the 4 oz of softened cream cheese to the saucepan. Continue to whisk until the cream cheese has completely melted and is fully incorporated into the milk mixture, creating a wonderfully smooth and velvety base. Patience is key here to ensure no cream cheese lumps remain.
- Melt the Cheeses: Now for the good stuff! Add the 1 cup of shredded cheddar cheese and ½ cup of shredded mozzarella cheese to the sauce. Stir gently but continuously with a wooden spoon or spatula until both cheeses have completely melted and the sauce is smooth, creamy, and gloriously stretchy. Keep the heat on low to prevent the cheese from seizing or becoming oily.
- Season the Sauce: Stir in the ½ teaspoon of garlic powder. Season the cheese sauce with salt and white pepper to taste. Remember, the cheeses themselves are often salty, so start with a small amount and adjust as needed. Give it a final taste. You’re looking for a rich, savory, and perfectly balanced cheesy flavor. Remove the saucepan from the heat and keep the sauce warm while you prepare the wraps.
Assembling Your Cheesy Garlic Chicken Wraps
Alright, we’ve got our delectable garlic herb chicken, our incredibly creamy cheese sauce, and all our fresh fillings ready. Now comes the fun part: bringing it all together into magnificent, satisfying “Cheesy Garlic Chicken Wraps”!
-
Warm the Tortillas: Trust me on this one, warm tortillas are a game-changer! They become more pliable, less likely to crack, and generally just more enjoyable. You have a few options:
- Microwave: Stack a few tortillas on a plate, cover with a damp paper towel, and microwave for 20-30 seconds until warm and soft.
- Dry Skillet: Heat a dry skillet over medium-high heat. Place one tortilla at a time in the skillet for about 15-20 seconds per side, until slightly puffed and warm.
- Oven: Wrap a stack of tortillas in aluminum foil and warm them in a preheated 350°F (175°C) oven for about 10-15 minutes.
Keep the warmed tortillas covered (perhaps in a clean kitchen towel) to retain their heat and flexibility.
- Prepare Your Workstation: Lay out a single warmed tortilla on a clean, flat surface. Make sure you have all your fillings – the garlic herb chicken, creamy cheese sauce, shredded lettuce, diced tomato, and sliced red onion (if using) – within easy reach. Efficiency is key to happy wrapping!
- Spread the Cheese Sauce: Generously spread a layer of our luscious creamy cheese sauce across the center of the tortilla, leaving about an inch or so clear around the edges. I find that about 2-3 tablespoons per wrap is just right, but feel free to add more if you’re a true cheese enthusiast! The sauce acts as a delicious glue.
- Add the Chicken: Spoon a good portion of the warm garlic herb chicken onto the center of the cheese sauce. You want enough filling to be substantial, but not so much that you can’t comfortably roll the wrap. Roughly ¼ to ⅓ cup of chicken per wrap is a good starting point.
- Layer the Fresh Veggies: On top of the chicken, layer your fresh fillings. Start with a handful of shredded romaine lettuce, followed by some diced tomato, and a few slices of red onion if you’re using them. Remember, these fresh ingredients provide a crucial textural contrast and brightness to our Cheesy Garlic Chicken Wraps.
-
Fold Your Wrap – The Technique: This is where a little practice goes a long way.
- Fold the Sides In: Take the left and right sides of the tortilla and fold them inward over the filling, creating a somewhat rectangular shape. These side folds should overlap the filling by about an inch or two.
- Fold the Bottom Up: Now, take the bottom edge of the tortilla and pull it up and over the filling, tucking it in tightly. This is your anchor!
- Roll Tightly: While keeping the bottom tucked and the sides folded, continue to roll the tortilla upwards, away from you, as tightly as you can. Maintain gentle but firm pressure throughout the rolling process to ensure a compact, secure wrap that won’t fall apart.
- Serve Immediately: Your glorious Cheesy Garlic Chicken Wrap is now ready to be enjoyed!
- Repeat and Serve: Continue this assembly process with the remaining tortillas and fillings. These Cheesy Garlic Chicken Wraps are best served immediately while everything is still warm and the cheese sauce is at its peak gooeyness.
Tips for Perfect Cheesy Garlic Chicken Wraps
To ensure your Cheesy Garlic Chicken Wraps are nothing short of spectacular, here are a few extra tips I’ve picked up along the way:
-
Don’t Overfill Your Wraps:
It’s tempting to pile on all the delicious fillings, but an overstuffed wrap is a messy wrap! Aim for a balance that allows you to comfortably fold and roll without anything bursting out. A good rule of thumb is to keep your filling concentrated in the center, leaving enough edge space for folding.
-
Freshly Shredded Cheese Makes a Difference:
While pre-shredded cheese is convenient, it often contains anti-caking agents that can prevent it from melting as smoothly as block cheese you shred yourself. For the ultimate creamy cheese sauce, I highly recommend taking a few extra minutes to shred your own cheddar and mozzarella. The difference in texture and melt will be noticeable!
-
Keep Components Warm:
These wraps are truly at their best when served warm. Keep your cooked chicken covered and warm, and your cheese sauce gently heated on very low heat (or in a double boiler) until ready to assemble. Warm tortillas also make a huge difference in pliability and the overall enjoyment of the wrap.
-
Customization is Key:
Don’t be afraid to make these Cheesy Garlic Chicken Wraps your own!
- Spice It Up: Add a pinch more red pepper flakes to the chicken, or even a dash of cayenne to the cheese sauce. A drizzle of hot sauce inside the wrap wouldn’t go amiss either.
- Veggie Boost: Sautéed bell peppers, spinach, or even some caramelized onions would be fantastic additions to the chicken filling.
- Cheese Variations: Experiment with different cheeses in your sauce – Monterey Jack, provolone, or even a touch of smoked Gouda could add unique twists.
- Herb Swaps: If you’re not a fan of oregano or thyme, try a little rosemary or even some Italian seasoning blend.
-
Make Ahead Tips:
While best served fresh, you can definitely do some prep work in advance.
- Chicken: Cook the garlic herb chicken a day or two ahead and store it in an airtight container in the refrigerator. Reheat gently before assembling.
- Cheese Sauce: The cheese sauce can also be made a day ahead. Store it in an airtight container in the fridge. Reheat it gently on the stove over low heat, whisking frequently and adding a splash of milk if it’s too thick, until smooth and warm.
- Veggies: Chop your lettuce, dice your tomatoes, and slice your onions in advance and store them separately in the fridge.
Having these components prepped makes assembly a breeze when you’re ready to eat!

Conclusion:
So, we’ve journeyed through the simple yet sensational steps of creating what I truly believe will become a staple in your kitchen. This isn’t just another weeknight meal; it’s a vibrant explosion of flavor, a testament to how easy it can be to whip up something truly extraordinary without spending hours slaving over a hot stove. If you’re looking for that perfect blend of savory chicken, rich, gooey cheese, and an irresistible punch of garlic, all wrapped up in a tender package, then you’ve absolutely landed on a winner. What makes these particular Cheesy Garlic Chicken Wraps a standout? It’s the harmonious dance of creamy, melt-in-your-mouth cheese with the aromatic warmth of garlic, perfectly coating tender chicken pieces, all lovingly nestled within a soft tortilla. It’s comforting, it’s exciting, and frankly, it’s just plain delicious. I’ve made countless variations of wraps in my time, but this specific combination hits different; it offers a satisfying depth of flavor that is genuinely hard to beat and surprisingly straightforward to achieve.
Now that you’re armed with the knowledge to craft these culinary masterpieces, let’s talk about making them truly yours. One of the greatest joys of cooking is customization, and these Cheesy Garlic Chicken Wraps are incredibly versatile. For a perfect accompaniment, I love serving them with a crisp, refreshing side salad – think mixed greens with a light vinaigrette to cut through the richness, or even a simple coleslaw for added crunch. A bowl of tangy tomato soup on a cooler evening would also make for a delightful pairing, offering a comforting contrast. If you’re feeling a little adventurous and want to lean into a more Tex-Mex vibe, consider serving them alongside some vibrant pico de gallo, a dollop of sour cream, or even a side of black beans and rice.
Creative Twists to Elevate Your Wraps:
Don’t be afraid to experiment with the fillings! While the classic recipe is divine, here are a few ideas to spark your culinary imagination. Want more veggies? Sauté some bell peppers, onions, or even spinach and mushrooms with your chicken for added nutrients and texture. They’ll integrate beautifully into the cheesy garlic mixture. Craving a bit of heat? A pinch of red pepper flakes or a dash of your favorite hot sauce mixed into the chicken, or even a few slices of jalapeño, would provide a wonderful kick. For cheese lovers, feel free to mix and match! While mozzarella is fantastic for its melt factor, consider adding a sprinkle of sharp cheddar for extra tang, or some smoked gouda for a deeper, more complex flavor profile. You could even swap out the chicken for leftover shredded turkey or a plant-based alternative like chickpeas or grilled halloumi for a vegetarian-friendly option. For a breakfast twist, imagine adding scrambled eggs and a sprinkle of chives!
My friends, the kitchen is your canvas, and this recipe is merely a starting point for countless delicious possibilities. I genuinely encourage you to roll up your sleeves, gather your ingredients, and give these Cheesy Garlic Chicken Wraps a try this week. You’ll be amazed at how quickly they come together and how enthusiastically they’ll be received by everyone at your table. Whether you’re feeding a hungry family, preparing a quick lunch for yourself, or even hosting a casual get-together, these wraps are a guaranteed crowd-pleaser that deliver on flavor and satisfaction every single time.
Once you’ve experienced the joy of making and tasting them, please, do me a favor and come back to share your experience! What variations did you try? What did you serve them with? Did your family give them two thumbs up? I absolutely love hearing your success stories and seeing your delicious creations. Tag me on social media if you post pictures, or drop a comment below. Your feedback and personal touches inspire not just me, but our entire community of food lovers. So, go forth, conquer your kitchen, and enjoy every single mouthwatering bite of these incredible wraps!
Cheesy Garlic Chicken Wraps
Cheesy Garlic Chicken Wraps are a delightful symphony of flavors, combining tender, seasoned chicken with gooey, melted cheese and aromatic garlic in a convenient, portable package. Ideal for a quick lunch or satisfying dinner.
Ingredients
-
2 cups cooked chicken, shredded
-
1/2 cup garlic aioli
-
1 cup cheddar cheese, shredded
-
4 large tortillas
-
Salt and pepper to taste
Instructions
-
Step 1
In a bowl, combine the shredded cooked chicken, garlic aioli, and shredded cheddar cheese. Season with salt and pepper. -
Step 2
Gently warm the chicken mixture in a skillet over low heat for 3-5 minutes, stirring until the cheese is melted and gooey. -
Step 3
Warm the tortillas (microwave or dry skillet) until pliable. -
Step 4
Spoon a portion of the warm cheesy chicken mixture onto the center of each warmed tortilla. -
Step 5
Fold the sides of the tortilla over the filling, then fold the bottom edge up and roll tightly to form a wrap. Serve immediately.
Important Information
Nutrition Facts (Per Serving)
It is important to consider this information as approximate and not to use it as definitive health advice.
Allergy Information
Please check ingredients for potential allergens and consult a health professional if in doubt.

Leave a Comment