
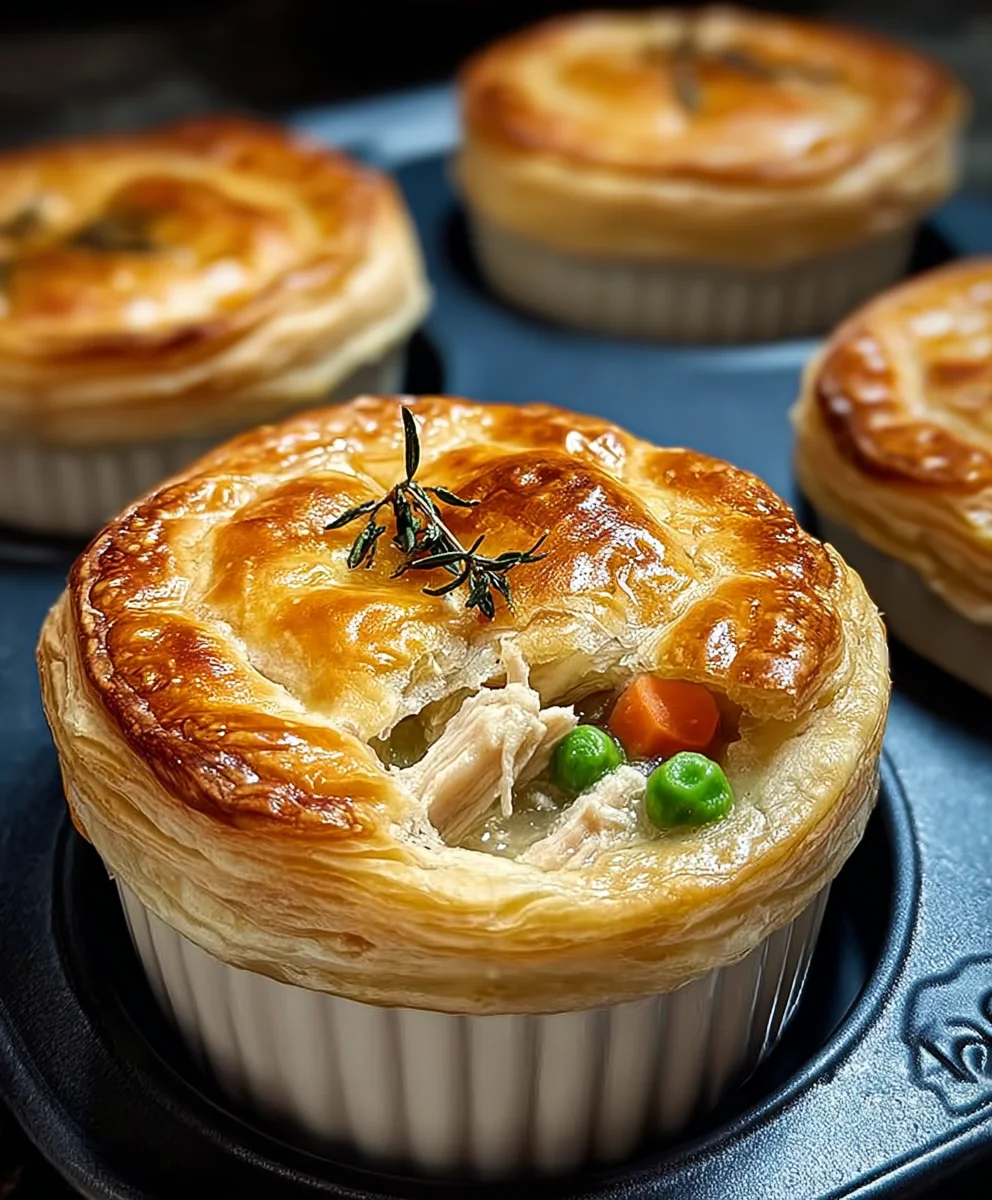
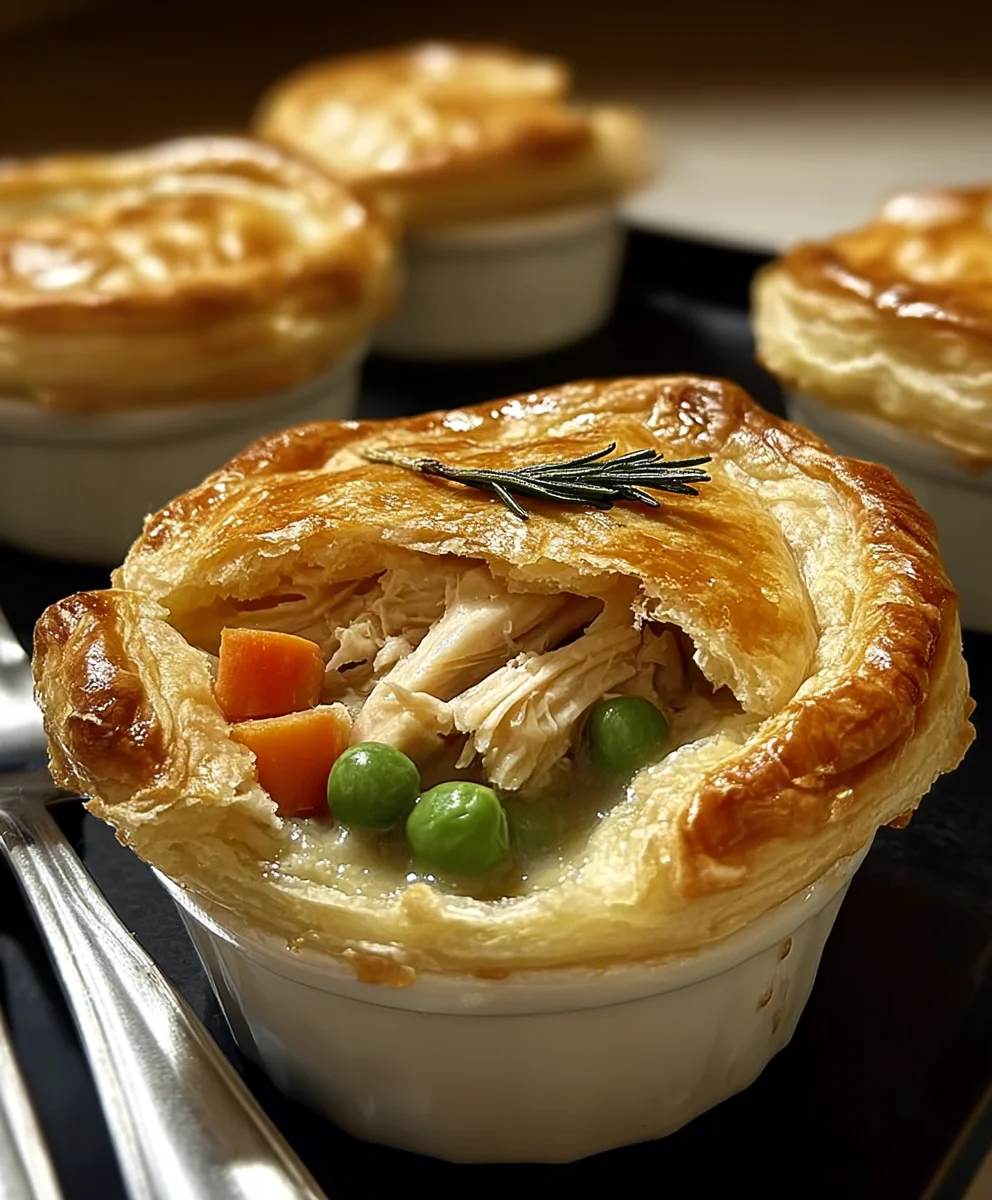
Mini Chicken Pot Pies are the epitome of comfort food, reimagined for modern convenience and undeniable charm. Imagine a golden, flaky crust encasing a rich, creamy filling packed with tender chicken and an assortment of vibrant vegetables, all perfectly portioned for individual enjoyment. It is my absolute pleasure to guide you through crafting these delightful culinary treasures that promise to warm hearts and satisfy appetites.
The Enduring Appeal of Mini Chicken Pot Pies
The humble pot pie boasts a rich history, evolving from ancient Roman creations and medieval meat pies into the beloved American classic we cherish today. While traditional pot pies often serve a crowd, the concept of Mini Chicken Pot Pies takes this time-honored dish and transforms it into an elegant, easy-to-handle serving, perfect for any occasion. People absolutely adore this dish not only for its incredible taste – the savory chicken mingling with a velvety sauce and crisp-tender vegetables, all crowned by that buttery, flaky crust – but also for its heartwarming essence. Each bite is a journey back to simpler times, offering a warmth and satisfaction that few dishes can match. Furthermore, their individual size makes them fantastic for dinner parties, quick weeknight meals, or even elegant appetizers, proving that great things truly do come in small packages.

Ingredients:
- For the Chicken:
- 2 large (about 1.5 lbs total) boneless, skinless chicken breasts, or 3 cups cooked, shredded chicken. I often poach my own for the best texture in these “Mini Chicken Pot Pies.”
- 6 cups water or low-sodium chicken broth (if poaching chicken).
- 1 bay leaf (if poaching chicken).
- 1/2 teaspoon black peppercorns (if poaching chicken).
- For the Filling Base:
- 6 tablespoons unsalted butter. Using unsalted butter gives me control over the final saltiness, which is crucial for delicious “Mini Chicken Pot Pies.”
- 1 large yellow onion, finely diced (about 1.5 cups).
- 2 medium carrots, peeled and finely diced (about 1 cup).
- 2 celery stalks, finely diced (about 1 cup).
- 1/2 cup all-purpose flour. This is the magic ingredient for a thick, rich filling.
- 2 cups low-sodium chicken broth.
- 1 cup whole milk or half-and-half. For an extra creamy touch, you could even use heavy cream!
- 1 cup frozen peas, thawed. No need to cook them beforehand, they’ll warm through beautifully.
- 2 tablespoons fresh parsley, chopped (optional, for garnish and fresh flavor).
- Seasonings:
- 1 teaspoon dried thyme. Thyme is a classic companion to chicken pot pie and really shines in these “Mini Chicken Pot Pies.”
- 1/2 teaspoon dried rosemary, crushed (optional, but adds depth).
- 1 teaspoon salt, or to taste.
- 1/2 teaspoon black pepper, freshly ground, or to taste.
- 1/4 teaspoon garlic powder (optional, for an extra aromatic kick).
- Pinch of nutmeg (optional, adds a subtle warmth).
- For the Crust:
- 2 boxes (each containing 2 sheets) refrigerated pie crusts, for a total of 4 sheets. I find this quantity perfect for making about 12-16 “Mini Chicken Pot Pies,” depending on your cutter size. Of course, you can make your own, but store-bought is a fantastic shortcut for busy weeknights!
- 1 large egg, whisked with 1 tablespoon water (for an egg wash). This gives our “Mini Chicken Pot Pies” that beautiful golden-brown, shiny crust.
Preparing the Chicken:
- Poach the Chicken (if starting with raw breasts): First things first, let’s get that chicken perfectly tender for our “Mini Chicken Pot Pies.” In a medium pot, combine the chicken breasts, 6 cups of water or low-sodium chicken broth, the bay leaf, and black peppercorns. Bring to a gentle simmer over medium heat. Once simmering, reduce the heat to low, cover the pot, and let the chicken poach for about 15-20 minutes, or until it’s cooked through and registers 165°F (74°C) on an instant-read thermometer. Do not boil vigorously; we want tender, not tough, chicken. This gentle cooking method ensures the chicken stays incredibly moist and flavorful, which is key for a truly satisfying pot pie filling.
- Cool and Shred/Dice: Carefully remove the cooked chicken from the broth and place it on a cutting board to cool slightly. Once it’s cool enough to handle but still warm, you have a choice. You can either shred the chicken using two forks or dice it into small, bite-sized pieces (about 1/2-inch cubes). For “Mini Chicken Pot Pies,” I prefer dicing because it gives a more uniform texture in each small bite, making them easier to eat. Set the chicken aside. You can save the poaching liquid for future use as chicken broth – it’s full of flavor!
Building the Creamy Filling:
- Sauté the Aromatics: Now for the heart of our “Mini Chicken Pot Pies” – the filling! In a large, heavy-bottomed pot or Dutch oven, melt the 6 tablespoons of unsalted butter over medium heat. Once the butter is shimmering, add the finely diced yellow onion, carrots, and celery. I always make sure these are diced quite small so they cook evenly and fit nicely into our mini pies. Sauté for about 8-10 minutes, stirring occasionally, until the vegetables have softened and the onion is translucent. This step is crucial for building a foundational layer of flavor, so don’t rush it. The aroma filling your kitchen will be absolutely delightful!
- Create the Roux: Sprinkle the 1/2 cup of all-purpose flour over the softened vegetables. Stir constantly with a wooden spoon or whisk for 1 to 2 minutes. This creates what we call a roux, which will thicken our filling. It’s important to cook the flour for a minute or two to eliminate that raw flour taste. The mixture will look a bit pasty and slightly golden. This is where the magic starts to happen for the rich, velvety texture of our “Mini Chicken Pot Pies.”
- Whisk in Liquids: Gradually, and I mean gradually, pour in the 2 cups of low-sodium chicken broth, whisking continuously to prevent any lumps from forming. Trust me, a lumpy sauce is not what we want for these elegant “Mini Chicken Pot Pies”! Once the broth is fully incorporated and smooth, slowly whisk in the 1 cup of whole milk or half-and-half. Continue whisking until the mixture is smooth and lump-free.
- Thicken and Season: Bring the mixture to a gentle simmer over medium heat, continuing to stir often. As it simmers, you’ll notice it start to thicken beautifully, transforming into a creamy, gravy-like consistency. This usually takes about 5-7 minutes. Once it’s thickened to your liking, remove the pot from the heat. Now it’s time to season! Stir in the dried thyme, dried rosemary (if using), salt, black pepper, garlic powder (if using), and a tiny pinch of nutmeg (if using). Taste the filling and adjust the seasonings as needed. Remember, the flavors will meld further as the “Mini Chicken Pot Pies” bake, but you want a well-seasoned base.
- Combine with Chicken and Peas: Gently fold in the cooked, shredded or diced chicken and the thawed frozen peas. Ensure everything is evenly distributed throughout the creamy sauce. This vibrant mix of chicken and vegetables is what makes our “Mini Chicken Pot Pies” so appealing. Let the filling cool for at least 15-20 minutes, or even longer. Cooling the filling is a very important step because if it’s too hot, it will melt the butter in your pie crusts, making them difficult to handle and potentially less flaky. I sometimes even make the filling a day ahead and chill it in the fridge – it makes assembly day so much easier!
Preparing the Pie Crusts:
- Prepare Your Work Surface: While the filling is cooling, let’s get our pie crusts ready. Lightly flour a clean work surface. Unroll one sheet of refrigerated pie crust onto the prepared surface. If the dough seems a bit stiff, let it sit at room temperature for 5-10 minutes to soften slightly, but don’t let it get too warm. You want it pliable but still cool.
-
Cut the Crusts: You’ll need circles for both the bottom and top of your “Mini Chicken Pot Pies” if using ramekins, or just for the tops if using a muffin tin with no bottom crust.
- For the bases: Using a 3.5 to 4-inch round cookie cutter, or the rim of a glass, cut out circles from two of your pie crust sheets. You should get about 6-8 circles per sheet, so aim for 12-16 total. If using a standard muffin tin, you might need a slightly larger circle (e.g., 4 inches) for the bottom to gently press into the cup and create a bit of an edge. For ramekins, measure your ramekin’s bottom diameter and add about 1/2 inch.
- For the tops: Using a 3-inch round cookie cutter (or one slightly smaller than your bases for a nice overlap), cut out circles from the remaining two pie crust sheets. Again, aim for 12-16 circles.
Gather and Re-roll Scraps: Gently gather the dough scraps, press them together, and re-roll them once or twice to cut out additional circles. Be careful not to overwork the dough, as this can make it tough. Keep all the cut circles on a baking sheet lined with parchment paper and, if your kitchen is warm, pop them into the fridge for a few minutes to keep them firm. This helps maintain their shape and flakiness for our “Mini Chicken Pot Pies.”
Assembling the Mini Chicken Pot Pies:
- Prepare Your Baking Vessel: Preheat your oven to 400°F (200°C). Lightly grease your muffin tins or individual ramekins. I prefer using a 12-cup standard muffin tin for truly “Mini Chicken Pot Pies,” but individual 6-ounce ramekins also work wonderfully for a slightly larger portion. If using ramekins, make sure they are oven-safe.
- Place the Bottom Crusts (Optional for Muffin Tins): If you’re making “Mini Chicken Pot Pies” with a full bottom crust in a muffin tin, carefully press one larger dough circle into each cup, gently shaping it to fit the bottom and sides without tearing. Make sure there’s a small overhang. If you’re using ramekins, center a larger dough circle in the bottom of each ramekin. If you prefer a crustless bottom, or are using a very shallow muffin tin, you can skip this step and just make top-crust “Mini Chicken Pot Pies.”
- Fill the Pies: Spoon the cooled chicken and vegetable filling into each prepared muffin cup or ramekin. Fill them generously, but leave a small border (about 1/4 to 1/2 inch) around the top edge to allow for the top crust and prevent overflow. It’s crucial that the filling is cool here, as mentioned before, to keep your pastry from becoming greasy and difficult to handle. These “Mini Chicken Pot Pies” will be bursting with flavor!
- Add the Top Crusts: Carefully place one smaller dough circle over the filling in each muffin cup or ramekin. Gently press the edges of the top crust down, sealing it to the bottom crust (if you used one) or directly to the rim of the muffin tin/ramekin. You can use your fingers to crimp the edges, or for a more decorative look, use the tines of a fork to press and seal around the entire circumference. This not only looks pretty but also helps to seal in all that delicious filling.
- Vent the Pies and Egg Wash: With a small sharp knife, cut a few slits (two or three short ones) in the center of the top crust of each “Mini Chicken Pot Pie.” These vents are essential for allowing steam to escape during baking, preventing the crust from becoming soggy or puffing up too much. In a small bowl, whisk together the egg and water to create an egg wash. Lightly brush the top of each pie crust with the egg wash. This will give your “Mini Chicken Pot Pies” that beautiful, glossy golden-brown finish we all love.
Baking the Mini Chicken Pot Pies:
- Bake to Perfection: Place the muffin tin or ramekins on a baking sheet (this catches any potential drips and makes it easier to transfer). Transfer to the preheated 400°F (200°C) oven. Bake for 20-25 minutes, or until the crusts are beautifully golden brown and the filling is bubbly and hot. Keep an eye on them towards the end of the baking time; if the crusts are browning too quickly, you can loosely tent the pan with aluminum foil to prevent over-browning. Every oven is a little different, so trust your eyes! The aroma filling your kitchen will be absolutely irresistible.
- Cool Before Serving: Once baked, carefully remove the “Mini Chicken Pot Pies” from the oven. For muffin tins, let them cool in the tin for 5-10 minutes before carefully removing them with a knife or small offset spatula. For ramekins, let them cool for at least 10-15 minutes before serving. The filling will be extremely hot and needs a little time to set, making them easier and safer to eat. Plus, the crust will be flakier if allowed to cool slightly.
Serving and Enjoying Your Mini Chicken Pot Pies:
- Serve Warm: These delightful “Mini Chicken Pot Pies” are best served warm, straight from the oven. They make a fantastic individual meal, perfect for a cozy dinner or a charming appetizer. I often serve them with a simple side salad to add a fresh contrast to the rich, creamy filling. They are also absolutely perfect for a packed lunch, as they reheat beautifully.
- Storage and Reheating: Leftover “Mini Chicken Pot Pies” can be stored in an airtight container in the refrigerator for up to 3-4 days. To reheat, you can pop them back into a preheated oven at 350°F (175°C) for about 10-15 minutes, or until warmed through and the crust is crisp again. I don’t recommend microwaving as it can make the crust soggy, and we want to preserve that wonderful flakiness we worked so hard for! These are also fantastic for freezing; bake them first, cool completely, then freeze. Reheat from frozen in the oven until warmed through. This makes them a perfect make-ahead meal for busy days.
- Customize Your Mini Chicken Pot Pies: Don’t be afraid to get creative! You can easily adapt this recipe. For instance, add some diced potatoes to the filling for extra heartiness, or swap out some of the peas for corn or green beans. A splash of dry white wine deglazed after sautéing the vegetables can add another layer of sophisticated flavor to your “Mini Chicken Pot Pies.” Fresh herbs like tarragon or sage also work wonderfully in the filling. The possibilities are endless when you’re making these versatile and comforting “Mini Chicken Pot Pies.” Enjoy every single delicious bite!
Conclusion:
And there you have it, my friends! We’ve journeyed through the simple yet incredibly rewarding process of crafting what I genuinely believe will become a staple in your recipe rotation. These aren’t just any appetizers or a simple weeknight dinner; these are moments of pure comfort, wrapped in a golden, flaky crust. The very essence of what makes a classic so beloved, reimagined in a perfect, individual portion. I’m talking about the irresistible charm of these homemade Mini Chicken Pot Pies – truly a culinary hug you can hold in your hand.
Why are they an absolute must-try? Well, for starters, the satisfaction of biting into that tender, savory chicken and vegetable filling, enveloped in a rich, creamy sauce, all contained within a perfectly baked, buttery crust, is simply unparalleled. There’s a magic that happens when all those classic flavors come together, creating a symphony for your taste buds. They manage to be both sophisticated enough for entertaining guests, making them feel incredibly special with their own individual serving, and yet utterly comforting and unfussy for a cozy family meal. I’ve found that even the pickiest eaters are often captivated by their charming appearance and delicious taste. Plus, the individual size means less mess and more fun – no awkward slicing or serving, just pick up and enjoy!
Serving Suggestions to Elevate Your Experience:
While these delightful little pies are certainly a star on their own, pairing them with a few thoughtful additions can transform your meal. For a fresh and vibrant contrast, I highly recommend serving them alongside a crisp, green salad with a light vinaigrette. The bright acidity of the dressing and the crunch of fresh greens cut through the richness of the pies beautifully. Another fantastic option is a side of roasted asparagus or green beans, lightly seasoned with garlic and a squeeze of lemon. If you’re looking to create a heartier spread, a simple cranberry sauce can add a lovely tang, or a bowl of creamy mashed potatoes (though perhaps a bit redundant with the pie crust, a small dollop never hurt anyone!). For a lighter touch, a fruit salad with seasonal berries can provide a refreshing counterpoint.
Endless Possibilities: Creative Variations for Your Mini Pot Pies:
One of the things I love most about this recipe is its incredible versatility. Once you have the basic technique down, the world of customization opens up! Don’t be afraid to experiment and make these pies uniquely yours. If you’re looking for a vegetarian option, try swapping the chicken for a hearty mix of sautéed mushrooms, leeks, and chickpeas, or even roasted sweet potatoes and kale. For a different protein, leftover roast turkey from a holiday feast works wonderfully, or you could even venture into beef or lamb for a richer, more robust flavor profile. Want to change up the crust? A puff pastry topping can offer an even flakier texture, or consider a savory biscuit topping for a more rustic feel. Feel free to play with the vegetables too – add some chopped celery, parsnips, or even a handful of spinach for extra nutrients and flavor. A pinch of fresh thyme or rosemary in the filling can add an aromatic depth, and for those who enjoy a little kick, a whisper of cayenne pepper will certainly awaken the palate. You could even stir in a spoonful of dijon mustard for a subtle tangy complexity. The possibilities truly are as vast as your imagination!
Your Culinary Journey Awaits!
Now, it’s your turn! I’ve shared my tips, my passion, and my absolute confidence that these will be a resounding success in your kitchen. There’s no time like the present to tie on that apron, gather your ingredients, and embark on this delicious adventure. Don’t be intimidated; the process is incredibly rewarding, and the end result speaks for itself. I promise, the effort is well worth it for that first glorious bite.
I am genuinely excited for you to experience the warmth and flavor of these incredible Mini Chicken Pot Pies. Once you’ve whipped up your own batch, I would absolutely love to hear about it! Please, please, share your triumphs, your clever substitutions, and any unique twists you added. Did you try a different spice blend? Did you serve them with something unexpected? Your feedback and culinary creativity inspire me and our entire community of food lovers. Snap a photo of your beautiful creations and let me know how it went. There’s nothing more gratifying than seeing others enjoy a recipe that brings so much joy. Happy cooking, and I can’t wait to see what deliciousness you create!
Homemade Mini Chicken Pot Pies – Cozy & Flavorful Dinner
Cozy, flavorful Mini Chicken Pot Pies with golden, flaky crusts encasing rich, creamy chicken and vegetable filling, perfectly portioned for individual enjoyment. A comforting classic reimagined for modern convenience, ideal for dinner parties, weeknights, or elegant appetizers.
Ingredients
-
2 large (about 1.5 lbs total) boneless, skinless chicken breasts (or 3 cups cooked, shredded chicken)
-
6 cups water or low-sodium chicken broth (if poaching chicken)
-
1 bay leaf (if poaching chicken)
-
1/2 teaspoon black peppercorns (if poaching chicken)
-
6 tablespoons unsalted butter
-
1 large yellow onion, finely diced (about 1.5 cups)
-
2 medium carrots, peeled and finely diced (about 1 cup)
-
2 celery stalks, finely diced (about 1 cup)
-
1/2 cup all-purpose flour
-
2 cups low-sodium chicken broth
-
1 cup whole milk or half-and-half
-
1 cup frozen peas, thawed
-
1 teaspoon dried thyme
-
1/2 teaspoon dried rosemary, crushed (optional)
-
1 teaspoon salt, or to taste
-
1/2 teaspoon black pepper, freshly ground, or to taste
-
1/4 teaspoon garlic powder (optional)
-
Pinch of nutmeg (optional)
-
2 boxes (total 4 sheets) refrigerated pie crusts
-
1 large egg, whisked with 1 tablespoon water (for egg wash)
-
2 tablespoons fresh parsley, chopped (optional)
Instructions
-
Step 1
If using raw chicken breasts: In a medium pot, combine chicken, 6 cups water/broth, bay leaf, and 1/2 tsp peppercorns. Gently simmer for 15-20 min until chicken reaches 165°F (74°C). Cool slightly, then shred or dice into 1/2-inch pieces. Set aside. -
Step 2
In a large pot, melt 6 tbsp unsalted butter over medium heat. Add finely diced onion, carrots, and celery. Sauté for 8-10 minutes, stirring occasionally, until vegetables soften and onion is translucent. -
Step 3
Sprinkle 1/2 cup all-purpose flour over softened vegetables. Stir constantly for 1-2 minutes to cook the flour. Gradually whisk in 2 cups low-sodium chicken broth, then slowly whisk in 1 cup whole milk or half-and-half until smooth and lump-free. -
Step 4
Bring mixture to a gentle simmer over medium heat, stirring often, for 5-7 minutes until it thickens to a creamy, gravy-like consistency. Remove from heat. Stir in 1 tsp dried thyme, 1/2 tsp dried rosemary (optional), 1 tsp salt, 1/2 tsp black pepper, 1/4 tsp garlic powder (optional), and a pinch of nutmeg (optional). Taste and adjust seasonings. -
Step 5
Gently fold in the cooked (shredded or diced) chicken and 1 cup thawed frozen peas. Ensure everything is evenly distributed. Let the filling cool for at least 15-20 minutes. (Cooling is crucial to prevent the pie crust from melting). -
Step 6
Preheat oven to 400°F (200°C). Lightly flour a clean work surface. Unroll 4 sheets of refrigerated pie crusts. Using a 3.5-4 inch round cutter, cut out 12-16 circles for bottom crusts (or bases). Using a 3-inch round cutter, cut out 12-16 circles for top crusts. Gather and re-roll scraps to cut additional circles. Keep crusts firm by chilling if kitchen is warm. -
Step 7
Lightly grease a 12-cup standard muffin tin or individual 6-ounce ramekins. If making full bottom crusts, gently press larger dough circles into each cup/ramekin. Spoon cooled filling generously into each, leaving a 1/4-1/2 inch border. -
Step 8
Carefully place smaller dough circles over filling. Gently press edges to seal (crimp with fingers or fork). Cut 2-3 small slits in the center of each top crust for venting. Whisk 1 large egg with 1 tbsp water for egg wash; lightly brush tops of pies for a golden finish. -
Step 9
Place muffin tin/ramekins on a baking sheet. Bake in preheated 400°F (200°C) oven for 20-25 minutes, or until crusts are beautifully golden brown and filling is bubbly. If browning too quickly, loosely tent with aluminum foil. -
Step 10
Remove from oven. For muffin tins, cool in the tin for 5-10 minutes before carefully removing. For ramekins, cool for at least 10-15 minutes before serving. Serve warm. -
Step 11
Store leftover Mini Pot Pies in an airtight container in the refrigerator for up to 3-4 days. Reheat in a preheated 350°F (175°C) oven for 10-15 minutes, or until warmed through and crust is crisp. For freezing, cool completely, wrap individually in plastic wrap, and store in freezer bags. Reheat from frozen at 350°F (175°C) for about 20 minutes. Avoid microwaving to prevent soggy crusts.
Important Information
Nutrition Facts (Per Serving)
It is important to consider this information as approximate and not to use it as definitive health advice.
Allergy Information
Please check ingredients for potential allergens and consult a health professional if in doubt.

Leave a Comment