
Hibachi Chicken Fried Rice: Just the name conjures up images of sizzling grills, dazzling knife skills, and that irresistible aroma that fills the air at your favorite Japanese steakhouse, doesn’t it? Forget waiting in line and paying restaurant prices! I’m going to show you how to recreate that authentic Hibachi experience right in your own kitchen.
Fried rice, in general, boasts a rich history, tracing its origins back to ancient China as a resourceful way to use leftover rice. Over time, it evolved into countless regional variations, each with its unique blend of flavors and ingredients. Hibachi-style fried rice, popularized by Japanese steakhouses, takes this classic dish to a whole new level, adding a touch of showmanship and interactive dining.
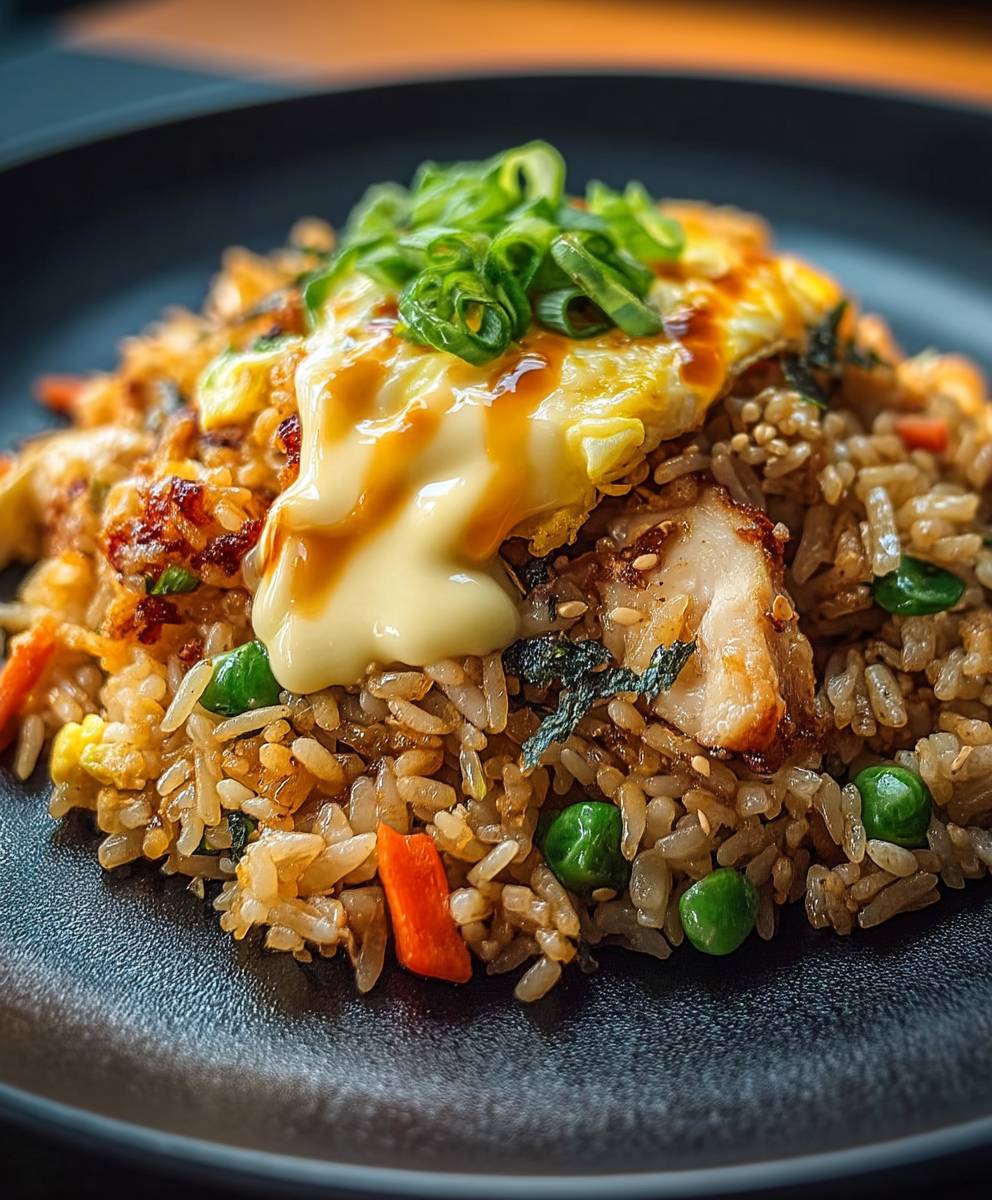
What’s not to love about Hibachi Chicken Fried Rice? The perfectly cooked rice, infused with savory soy sauce and sesame oil, the tender, juicy chicken, and the medley of colorful vegetables create a symphony of flavors and textures that tantalize the taste buds. It’s a complete meal in one pan, incredibly satisfying, and surprisingly easy to customize to your liking. Plus, it’s a fantastic way to use up leftover cooked chicken or vegetables lurking in your fridge. Get ready to impress your family and friends with this restaurant-quality dish that’s ready in minutes!

Ingredients:
- For the Chicken:
- 1.5 lbs boneless, skinless chicken thighs, cut into 1-inch pieces
- 2 tablespoons soy sauce
- 1 tablespoon sake (or dry sherry)
- 1 tablespoon sesame oil
- 1 teaspoon grated ginger
- 1/2 teaspoon garlic powder
- 1/4 teaspoon black pepper
- For the Fried Rice:
- 4 cups cooked and cooled long-grain rice (day-old rice is best!)
- 2 tablespoons vegetable oil
- 1 medium yellow onion, diced
- 2 carrots, peeled and diced
- 2 celery stalks, diced
- 1 cup frozen peas and carrots mix, thawed
- 2 cloves garlic, minced
- 2 large eggs, lightly beaten
- 3 tablespoons soy sauce
- 1 tablespoon oyster sauce (optional, but highly recommended)
- 1 teaspoon sesame oil
- 1/2 teaspoon ground ginger
- 1/4 teaspoon white pepper
- 2 green onions, thinly sliced, for garnish
- For the Yum Yum Sauce (optional, but a MUST in my opinion!):
- 1 cup mayonnaise
- 2 tablespoons water
- 1 tablespoon tomato paste
- 1 teaspoon garlic powder
- 1 teaspoon paprika
- 1/2 teaspoon onion powder
- 1/4 teaspoon cayenne pepper (or more, to taste)
- 1/4 teaspoon sugar
- Pinch of salt
Marinating the Chicken:
Okay, let’s get started! First things first, we need to marinate our chicken. This is where the magic happens, folks! The marinade infuses the chicken with so much flavor, it’s unbelievable. Trust me, don’t skip this step!
- In a medium bowl, combine the chicken pieces, soy sauce, sake (or dry sherry), sesame oil, grated ginger, garlic powder, and black pepper.
- Mix everything together really well, making sure all the chicken is coated in the marinade.
- Cover the bowl with plastic wrap and refrigerate for at least 30 minutes, or up to 4 hours. The longer it marinates, the more flavorful it will be! I usually aim for at least an hour if I have the time.
Preparing the Fried Rice Ingredients:
While the chicken is marinating, let’s get all our ingredients prepped for the fried rice. This is key to a smooth and efficient cooking process. Having everything ready to go before you start cooking is a game-changer!
- Make sure your rice is cooked and cooled. Day-old rice is ideal because it’s drier and less likely to clump together. If you’re using freshly cooked rice, spread it out on a baking sheet to cool down quickly.
- Dice the yellow onion, carrots, and celery into small, uniform pieces. This ensures they cook evenly and look nice in the finished dish.
- Thaw the frozen peas and carrots mix. You can run them under cold water to speed up the process.
- Mince the garlic. Freshly minced garlic is always best for flavor!
- Lightly beat the eggs in a small bowl. We’ll be scrambling these in the wok later.
- Measure out the soy sauce, oyster sauce (if using), sesame oil, ground ginger, and white pepper. Having these ready to go will make the cooking process much smoother.
- Thinly slice the green onions for garnish. Set them aside for later.
Cooking the Chicken:
Alright, chicken time! We’re going to cook the chicken in a wok or large skillet until it’s cooked through and slightly browned. The key here is to not overcrowd the pan, so the chicken can sear properly.
- Heat 1 tablespoon of vegetable oil in a wok or large skillet over medium-high heat.
- Add the marinated chicken to the wok in a single layer, being careful not to overcrowd the pan. You may need to cook the chicken in batches.
- Cook the chicken for about 5-7 minutes per side, or until it’s cooked through and slightly browned. The internal temperature should reach 165°F (74°C).
- Remove the cooked chicken from the wok and set aside.
Making the Hibachi Fried Rice:
Now for the main event: the fried rice! This is where all the flavors come together to create that classic hibachi taste. The key is to work quickly and keep the ingredients moving in the wok.
- Heat the remaining 1 tablespoon of vegetable oil in the same wok over medium-high heat.
- Add the diced onion, carrots, and celery to the wok and cook for about 3-5 minutes, or until they’re slightly softened.
- Add the minced garlic and cook for another minute, or until fragrant. Be careful not to burn the garlic!
- Push the vegetables to one side of the wok and pour the beaten eggs into the empty space. Scramble the eggs until they’re cooked through.
- Break the scrambled eggs into smaller pieces and mix them with the vegetables.
- Add the cooked chicken and thawed peas and carrots mix to the wok.
- Add the cooked rice to the wok and break it up with a spatula.
- Pour in the soy sauce, oyster sauce (if using), and sesame oil. Sprinkle with ground ginger and white pepper.
- Toss everything together really well, making sure the rice is evenly coated with the sauce and all the ingredients are combined.
- Cook for another 2-3 minutes, stirring constantly, until the rice is heated through and slightly crispy.
Making the Yum Yum Sauce:
While the Yum Yum sauce is optional, I highly recommend making it! It adds a creamy, tangy, and slightly sweet flavor that perfectly complements the hibachi chicken fried rice. It’s super easy to make, too!
- In a medium bowl, combine the mayonnaise, water, tomato paste, garlic powder, paprika, onion powder, cayenne pepper, sugar, and salt.
- Whisk everything together until smooth and creamy.
- Taste and adjust the seasonings as needed. Add more cayenne pepper for a spicier sauce, or more sugar for a sweeter sauce.
- Cover the bowl with plastic wrap and refrigerate for at least 30 minutes to allow the flavors to meld.
Serving:
Time to eat! This is the best part, right? I love serving this dish family-style, so everyone can dig in and enjoy.
- Serve the hibachi chicken fried rice hot, garnished with thinly sliced green onions.
- Drizzle with Yum Yum sauce (if using). You can also serve the sauce on the side for dipping.
- Enjoy! This dish is delicious on its own, but you can also serve it with a side of steamed vegetables or a simple salad.
Tips and Variations:
- Rice is Key: Using day-old rice is crucial for achieving the perfect fried rice texture. Freshly cooked rice tends to be too sticky and will clump together.
- Don’t Overcrowd the Wok: Overcrowding the wok will lower the temperature and prevent the ingredients from browning properly. Cook the chicken and rice in batches if necessary.
- Get Creative with Vegetables: Feel free to add other vegetables to the fried rice, such as mushrooms, bell peppers, or zucchini.
- Spice it Up: Add a pinch of red pepper flakes or a dash of sriracha to the fried rice for a little extra heat.
- Protein Power: You can substitute the chicken with shrimp, steak, or tofu.
- Make it Vegetarian: Omit the chicken and oyster sauce for a vegetarian version. Add extra vegetables or tofu for protein.
- Yum Yum Sauce Variations: Experiment with different spices and seasonings in the Yum Yum sauce. Try adding a pinch of smoked paprika or a dash of lemon juice.
- Storage: Leftover hibachi chicken fried rice can be stored in an airtight container in the refrigerator for up to 3 days. Reheat in the microwave or in a skillet over medium heat.
Enjoy your homemade Hibachi Chicken Fried Rice! I hope you love it as much as I do!
Conclusion:
So there you have it! This Hibachi Chicken Fried Rice recipe isn’t just another weeknight dinner; it’s a flavor explosion waiting to happen in your very own kitchen. I truly believe this is a must-try recipe because it captures the authentic taste of your favorite Hibachi restaurant, but with the satisfaction of knowing exactly what ingredients are going into your meal. Forget the takeout menus and embrace the joy of creating something delicious and impressive yourself!
What makes this recipe so special? It’s the perfect balance of savory chicken, perfectly cooked rice, and those signature Hibachi vegetables, all brought together with a delectable sauce that will have you craving more. Plus, it’s surprisingly easy to make! I’ve broken down each step to ensure even beginner cooks can achieve restaurant-quality results. The key is in the details: using day-old rice for that perfect texture, searing the chicken to lock in the juices, and not skimping on the garlic butter. Trust me, those little touches make all the difference.
But the best part? This recipe is incredibly versatile! Feel free to customize it to your liking.
Serving Suggestions and Variations:
* Spice it up! Add a pinch of red pepper flakes or a dash of sriracha to the sauce for an extra kick.
* Vegetarian Delight: Swap the chicken for tofu or extra vegetables like mushrooms, zucchini, or bell peppers.
* Seafood Sensation: Shrimp or scallops would be fantastic additions to this dish. Just be sure not to overcook them!
* Egg-cellent Addition: Top your Hibachi Chicken Fried Rice with a fried egg for added richness and protein.
* Side Dish Pairing: Serve with a side of steamed edamame or a simple green salad for a complete and balanced meal.
* Sauce it Up: While the included sauce is amazing, feel free to experiment with other sauces like Yum Yum sauce or a teriyaki glaze.
Beyond these suggestions, don’t be afraid to get creative and experiment with your own favorite ingredients and flavors. Cooking should be fun, so let your imagination run wild!
I’m confident that once you try this recipe, it will become a staple in your dinner rotation. It’s quick, easy, and incredibly satisfying. It’s also a great way to use up leftover rice and vegetables, making it a budget-friendly option as well.
So, what are you waiting for? Gather your ingredients, put on your apron, and get ready to create some culinary magic. I can’t wait to hear about your experience! Please, try this Hibachi Chicken Fried Rice recipe and let me know how it turns out. Share your photos, your variations, and your feedback in the comments below. I’m always eager to learn from your experiences and see how you’ve made this recipe your own. Happy cooking! I hope you enjoy this as much as I do!
Hibachi Chicken Fried Rice: The Ultimate Recipe and Guide
Easy homemade Hibachi Chicken Fried Rice! Features tender marinated chicken, flavorful rice, customizable veggies, and optional creamy Yum Yum sauce.
Ingredients
- 1.5 lbs boneless, skinless chicken thighs, cut into 1-inch pieces
- 2 tablespoons soy sauce
- 1 tablespoon sake (or dry sherry)
- 1 tablespoon sesame oil
- 1 teaspoon grated ginger
- 1/2 teaspoon garlic powder
- 1/4 teaspoon black pepper
- 4 cups cooked and cooled long-grain rice (day-old rice is best!)
- 2 tablespoons vegetable oil
- 1 medium yellow onion, diced
- 2 carrots, peeled and diced
- 2 celery stalks, diced
- 1 cup frozen peas and carrots mix, thawed
- 2 cloves garlic, minced
- 2 large eggs, lightly beaten
- 3 tablespoons soy sauce
- 1 tablespoon oyster sauce (optional, but highly recommended)
- 1 teaspoon sesame oil
- 1/2 teaspoon ground ginger
- 1/4 teaspoon white pepper
- 2 green onions, thinly sliced, for garnish
- 1 cup mayonnaise
- 2 tablespoons water
- 1 tablespoon tomato paste
- 1 teaspoon garlic powder
- 1 teaspoon paprika
- 1/2 teaspoon onion powder
- 1/4 teaspoon cayenne pepper (or more, to taste)
- 1/4 teaspoon sugar
- Pinch of salt
Instructions
- Marinate the Chicken: In a medium bowl, combine chicken, soy sauce, sake (or sherry), sesame oil, ginger, garlic powder, and pepper. Mix well, cover, and refrigerate for 30 minutes to 4 hours.
- Prep Fried Rice Ingredients: Ensure rice is cooked and cooled. Dice onion, carrots, and celery. Thaw peas and carrots. Mince garlic. Beat eggs. Measure out sauces and spices. Slice green onions.
- Cook the Chicken: Heat 1 tablespoon of vegetable oil in a wok or large skillet over medium-high heat. Add chicken in a single layer (cook in batches if needed). Cook for 5-7 minutes per side, or until cooked through (165°F/74°C). Remove and set aside.
- Make the Fried Rice: Heat remaining 1 tablespoon of vegetable oil in the same wok over medium-high heat. Add onion, carrots, and celery; cook for 3-5 minutes until softened. Add garlic; cook for 1 minute until fragrant. Push vegetables to one side, pour in eggs, and scramble. Break eggs into pieces and mix with vegetables. Add cooked chicken and thawed peas and carrots. Add rice, soy sauce, oyster sauce (if using), and sesame oil. Sprinkle with ginger and white pepper. Toss everything well to combine. Cook for 2-3 minutes, stirring constantly, until heated through and slightly crispy.
- Make the Yum Yum Sauce (Optional): In a medium bowl, combine mayonnaise, water, tomato paste, garlic powder, paprika, onion powder, cayenne pepper, sugar, and salt. Whisk until smooth. Adjust seasonings to taste. Cover and refrigerate for at least 30 minutes.
- Serve: Serve the hibachi chicken fried rice hot, garnished with thinly sliced green onions. Drizzle with Yum Yum sauce (if using).
Notes
- Day-old rice is best for fried rice.
- Don’t overcrowd the wok.
- Customize with your favorite vegetables.
- Adjust spice levels to your preference.
- Chicken can be substituted with shrimp, steak, or tofu.
- Omit chicken and oyster sauce for a vegetarian version.
- Leftovers can be stored in the refrigerator for up to 3 days.

Leave a Comment