
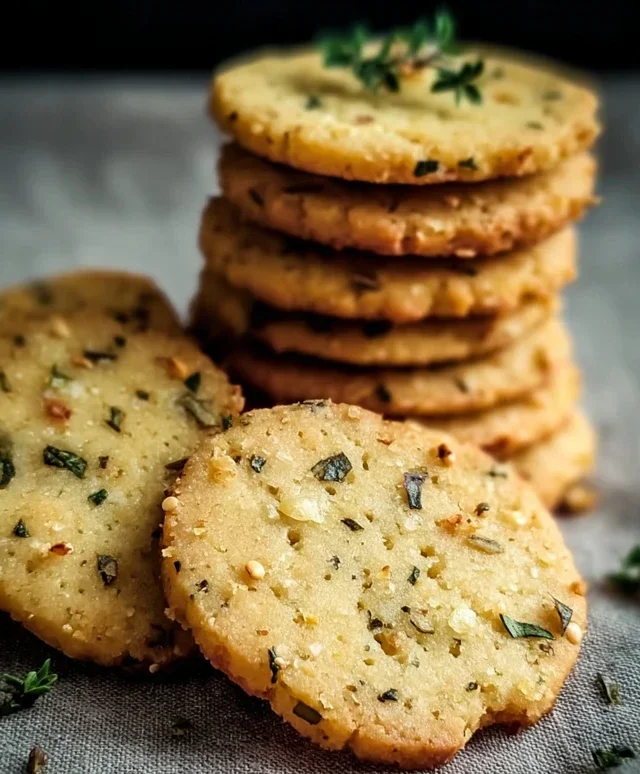
Garlic and Herb Chickpea Flour Snack Crackerss are about to become your new pantry obsession. Are you tired of bland, mass-produced crackers that offer little in the way of flavor or nutrition? I know I was! That’s why I’m so excited to share this recipe for Garlic and Herb Chickpea Flour Snack Crackerss. These aren’t just any crackers; they’re a testament to simple ingredients transforming into something truly extraordinary. Imagin extracte a satisfying crunch, followed by a burst of savory garlic and aromatic herbs that will tantalize your taste buds. What makes them truly special is their wholesome nature – packed with protein and fiber from the chickpea flour, they’re a guilt-free indulgence perfect for snacking, dipping, or topping. Get ready to ditch the store-bought options and embrace the delicious, homemade goodness of these incredible crackers.

Garlic and Herb Chickpea Flour Snack Crackers
Welcome to a delightful journey of creating your own incredibly satisfying and healthy snack crackers! If you’re looking for a gluten-free, flavorful, and surprisingly simple recipe that will have you ditching the store-bought varieties, you’ve come to the right place. These Garlic and Herb Chickpea Flour Snack Crackers are a testament to how wholesome ingredients can transform into something truly special. They’re perfect for a light lunch, a sophisticated appetizer, or just a guilt-free munching experience. The earthy notes of chickpea flour, beautifully complemented by aromatic herbs and pungent garlic, create a symphony of flavors that’s both comforting and invigorating. Plus, the satisfying crunch you achieve is simply divine. Let’s get started on crafting these little gems!
Ingredients:
Cooking Instructions:
Step 1: Crafting the Dough – The Foundation of Flavor
Begin extract by preparing your dough. In a medium-sized mixing bowl, combine the 1 cup of chickpea flour (also known as besan), which gives these crackers their wonderful nutty flavor and gluten-free structure. To this, add the 1 teaspoon of dried mixed herbs. I love using a blend of rosemary, thyme, and oregano for their classic savory notes, but feel free to experiment with your favorite herb combinations! Next, incorporate the 1 teaspoon of garlic powder, salt, and black pepper. Whisk these dry ingredients together thoroughly. This ensures that the seasonings are evenly distributed throughout the dough, promising a consistent flavor in every bite. Now, it’s time to introduce the wet ingredients. Pour in the ½ cup of water and the 2 tablespoons of olive oil. The olive oil not only adds a rich flavor but also contributes to the crispness of the final crackers.
Step 2: Mixing and Resting the Dough – Allowing Flavors to Mingle
Once all the ingredients are in the bowl, start mixing. You can use a spoon or a spatula initially, but as the dough starts to come together, you’ll find it easiest to use your hands. Work the ingredients until a cohesive dough forms. It should be firm but pliable, not too sticky and not too dry. If your dough feels a bit too dry and crum extractbly, add water a teaspoon at a time until it just comes together. Conversely, if it feels too wet, add a tiny bit more chickpea flour. Once you have a smooth ball of dough, cover the bowl with a clean kitchen towel or plastic wrap and let it rest for about 15-20 minutes. This resting period is crucial. It allows the chickpea flour to hydrate fully, making the dough easier to roll out and contributing to a better texture in the finished crackers. Think of it as letting the flavors have a little party before we bake them!
Step 3: Rolling and Scoring – Shaping Your Savory Snacks
Preheat your oven to 375°F (190°C). Line two large baking sheets with parchment paper. This step is vital for easy cleanup and preventing your crackers from sticking. Now, take your rested dough and place it on a lightly floured surface. I find it easiest to divide the dough into two equal portions. Take one portion and begin extract to roll it out. You want to roll it very thinly, aiming for about 1/16th of an inch. The thinner the dough, the crispier your crackers will be. You can use a rolling pin, or for extra precision, you can try using a pasta machine if you have one and are comfortable with it. Once the dough is rolled out to your desired thinness, carefully transfer it to the prepared baking sheets. You can also roll it out directly on a large piece of parchment paper and then transfer that to the baking sheet, which minimizes handling and potential tearing. Before baking, it’s time to score the crackers. This is where you decide the size and shape of your individual crackers. You can use a pizza cutter or a sharp knife to cut them into squares, rectangles, or even fun shapes. Gently score them, but don’t cut all the way through yet. This makes it easier to break them apart after baking.
Step 4: The Art of Topping – Adding Extra Zing and Appeal
This is where we elevate our crackers from good to gourmet! Lightly brush the surface of the rolled-out dough with a little extra olive oil. This will help the toppings adhere and give them a lovely sheen. Now, get creative with your toppings. Sprinkle a generous amount of sesame seeds over the dough for a nutty crunch and visual appeal. Then, add a good pinch of flaky sea salt. The flaky salt not only adds a delightful salty burst but also provides a beautiful textural contrast. For an extra layer of herby goodness, you can sprinkle a little more of your favorite dried herbs over the top. This is your chance to personalize your crackers! Ensure the toppings are distributed evenly for a beautiful and flavorful finish. Remember to press down gently on the toppings so they stick well to the oiled surface.
Step 5: Baking to Golden Perfection – The Transformation Begin extracts
Carefully place the prepared baking sheets into your preheated oven. Bake for 15-20 minutes, or until the edges of the crackers are golden brown and they appear crisp. The exact baking time will depend on how thinly you rolled your dough and your oven’s calibration. Keep an eye on them during the last few minutes, as they can go from perfectly golden to burnt very quickly. Once they look beautifully baked, remove the baking sheets from the oven. While the crackers are still warm, go over the scored lines with your pizza cutter or knife again, pressing down firmly to fully separate them into individual crackers. This is much easier to do while they’re still warm and pliable. Let the crackers cool completely on the baking sheets. As they cool, they will continue to crisp up. Once completely cool, you can then break them apart completely along the scored lines. They should be delightfully crunchy and perfectly seasoned. Store your finished Garlic and Herb Chickpea Flour Snack Crackers in an airtight container at room temperature for up to a week. Enjoy them on their own, with your favorite dips, or as a side to soup or salad!
Conclusion:
I truly hope you enjoy making these Garlic and Herb Chickpea Flour Snack Crackers! They’re an absolute triumph in my kitchen – not only are they incredibly simple to whip up with just a few pantry staples, but the result is a delightfully crunchy and flavorful cracker that’s miles better than anything store-bought. The earthy notes of the chickpea flour are perfectly complemented by the aromatic punch of garlic and mixed herbs, creating a snack that’s both satisfying and healthy. These are fantastic on their own, but they also shine when paired with your favorite dips, cheeses, or even used as a base for mini appetizers. Don’t be afraid to experiment with the herbs; rosemary, thyme, or even a pinch of chili flakes would be wonderful additions.
Give these Garlic and Herb Chickpea Flour Snack Crackers a go – I’m confident they’ll become a staple in your snacking repertoire. They’re the perfect guilt-free indulgence for movie nights, afternoon pick-me-ups, or even packed lunches.
Frequently Asked Questions:
Can I make these crackers ahead of time?
Absolutely! These crackers are excellent for meal prep. Once cooled completely, store them in an airtight container at room temperature. They should stay fresh and crispy for up to a week, though I doubt they’ll last that long!
What if I don’t have fresh herbs?
No problem at all! Dried herbs work wonderfully in this recipe. You can substitute about 1 teaspoon of dried mixed herbs for the fresh ones. Ensure your dried herbs are relatively fresh for the best flavor.
My dough is too sticky. What should I do?
Chickpea flour can sometimes absorb liquid differently. If your dough is too sticky to handle, add a tablespoon of chickpea flour at a time until it reaches a workable consistency. If it’s too dry, add a teaspoon of water or olive oil until it comes together.
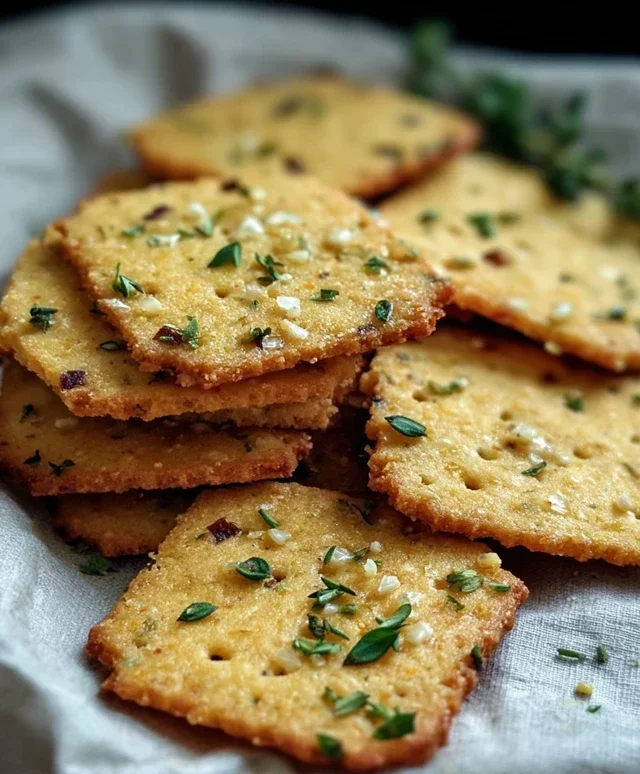
Garlic and Herb Chickpea Flour Snack Crackers
Crispy, savory snack crackers made with chickpea flour, garlic, and a blend of aromatic herbs. Perfect for a healthy and flavorful bite.
Ingredients
-
1 cup chickpea flour (besan)
-
½ cup water
-
2 tablespoons olive oil
-
1 teaspoon dried mixed herbs (such as rosemary, thyme, oregano)
-
1 teaspoon garlic powder
-
½ teaspoon salt
-
¼ teaspoon black pepper
-
Sesame seeds
-
Flaky sea salt
-
Additional dried herbs
-
Extra olive oil for brushing
Instructions
-
Step 1
Preheat your oven to 350°F (175°C). Line a baking sheet with parchment paper. -
Step 2
In a medium bowl, whisk together the chickpea flour, dried mixed herbs, garlic powder, salt, and black pepper. -
Step 3
Add the water and olive oil to the dry ingredients. Stir until a thick, smooth batter forms. If it’s too stiff, add a teaspoon of water at a time. If too thin, add a teaspoon of chickpea flour. -
Step 4
Spread the batter thinly and evenly onto the prepared baking sheet using an offset spatula or the back of a spoon. Aim for a consistent thickness for even baking. -
Step 5
Sprinkle the top of the batter with sesame seeds, flaky sea salt, and additional dried herbs, if desired. -
Step 6
Bake for 15-25 minutes, or until the edges are golden brown and the crackers are crisp. Cooking time will vary depending on the thickness of your crackers. -
Step 7
Once baked, remove from the oven and let cool completely on the baking sheet. They will crisp up further as they cool. Break into desired cracker sizes.
Important Information
Nutrition Facts (Per Serving)
It is important to consider this information as approximate and not to use it as definitive health advice.
Allergy Information
Please check ingredients for potential allergens and consult a health professional if in doubt.

Leave a Comment