
?p=8353 marks the precise location for an extraordinary culinary journey, and I am absolutely delighted to guide you through it today. Have you ever found yourself yearning for a dish that effortlessly combines profound comfort with understated elegance? One that can transform an ordinary evening into a memorable occasion without extensive effort? Look no further! Here, we’re embarking on the rewarding adventure of crafting the perfect, creamy risotto – a dish that, while often perceived as requiring advanced skill, is surprisingly approachable and immensely satisfying to create. Hailing from the verdant, rice-growing regions of northern Italy, risotto boasts a rich heritage, evolving from a simple, nourishing grain into a celebrated culinary staple cherished globally. People adore risotto for its unparalleled velvety texture, its remarkable capacity to absorb and elevate the most delicate flavors, and the comforting warmth it provides with every spoonful. It’s this captivating blend of tradition, taste, and versatility that secures its place as a perennial favorite in kitchens worldwide. This very special rendition, meticulously detailed for you right here at ?p=8353, promises to be an unforgettable experience for your palate.

Ingredients:
-
For the Homemade Pappardelle (Optional, but absolutely transformative! Yields about 4 generous servings):
- 2 cups (about 240g) All-Purpose Flour, plus extra for dusting your work surface and pasta
- 3 large Eggs, preferably at room temperature
- 1 tablespoon Olive Oil, extra virgin if you have it
- 1/2 teaspoon Fine Sea Salt
-
For the Flavorful Chicken:
- 1.5 lbs Boneless, Skinless Chicken Breasts or Thighs, whichever you prefer. I often use a mix for both texture and flavor, cut into uniform 1-inch bite-sized pieces
- 2 tablespoons Olive Oil, for searing
- 1 teaspoon Garlic Powder
- 1/2 teaspoon Onion Powder
- 1/2 teaspoon Smoked Paprika, to add a lovely depth and hint of color
- 1/4 teaspoon Freshly Ground Black Pepper
- 1/2 teaspoon Fine Sea Salt
-
For the Irresistibly Creamy Garlic Parmesan Sauce:
- 2 tablespoons Unsalted Butter
- 1 tablespoon Olive Oil
- 6 cloves Garlic, generously minced (this usually amounts to about 2 tablespoons, and yes, we want lots of garlic!)
- 1 small Shallot, very finely diced (optional, but it adds a wonderful aromatic base and subtle sweetness)
- 1/2 cup Dry White Wine (like a Pinot Grigio or Chardonnay). If you prefer a non-alcoholic option, simply use an additional 1/2 cup of chicken broth.
- 2 cups Heavy Cream (sometimes called whipping cream, look for at least 36% milk fat for optimal richness)
- 1 cup Low-Sodium Chicken Broth
- 1 cup freshly grated Parmesan Cheese, the real deal if you can get it, plus more for garnish. Freshly grated makes all the difference!
- 1/2 teaspoon Dried Italian Seasoning
- 1/4 teaspoon Red Pepper Flakes (optional, for a subtle warmth and gentle kick, adjust to your preference)
- Salt and freshly ground Black Pepper, to taste. Remember to taste and adjust throughout the cooking process.
-
For Serving & Garnish:
- Fresh Parsley, finely chopped, for a pop of color and freshness
- Additional freshly grated Parmesan Cheese, for that final flourish
Preparing the Homemade Pappardelle (Optional, but highly recommended for an exquisite experience!)
While you can absolutely use store-bought pappardelle or fettuccine for this recipe, taking the time to make fresh pasta elevates this dish to an entirely new level. It’s a truly rewarding process, and the texture of fresh pasta is simply incomparable. Don’t be intimidated; it’s easier than you might think!
- Gather Your Ingredients and Tools: Make sure your eggs are at room temperature. You’ll need a large, clean surface for kneading (a wooden board or a clean countertop works beautifully), a rolling pin, and either a sharp knife or a pasta machine.
- Form the Flour Well: On your clean work surface, pile the 2 cups of all-purpose flour. Using your fingers or the bottom of a bowl, create a large well in the center of the flour, making sure the walls are sturdy enough to hold liquid without breaking. Think of it like a volcano.
- Add Wet Ingredients to the Well: Crack the 3 large eggs directly into the well. Add the 1 tablespoon of olive oil and the 1/2 teaspoon of fine sea salt to the eggs.
- Gently Whisk and Incorporate: Using a fork, gently whisk the eggs, olive oil, and salt together in the center of the well. Slowly, bit by bit, begin to incorporate the flour from the inner walls of the well into the wet mixture. Continue this process, gradually pulling in more flour, until the mixture starts to thicken and form a shaggy dough. Be patient here; you don’t want the liquid to breach the flour walls!
- Begin Kneading: Once the mixture is too thick to use a fork, use your hands to bring the remaining flour into the dough. It will be sticky at first. Start kneading the dough. Push it away from you with the heel of your hand, fold it back, rotate it a quarter turn, and repeat. Continue kneading for 10-15 minutes. This process develops the gluten, which is crucial for a pliable and strong pasta. Your dough should become smooth, elastic, and no longer sticky. If it feels too dry, you can add a tiny splash of water (1/2 teaspoon at a time). If it’s too sticky, dust your hands and the surface with a tiny bit more flour.
- Rest the Dough: Form the kneaded dough into a ball. Lightly dust it with flour, then wrap it tightly in plastic wrap or cover it with an inverted bowl. Let it rest at room temperature for at least 30 minutes, or up to an hour. This resting period allows the gluten to relax, making the dough much easier to roll out thinly. This step is non-negotiable for tender pasta.
-
Roll Out the Dough (Manual Method):
- Divide the dough into 2 or 3 equal pieces. Keep the pieces you’re not working with covered so they don’t dry out.
- Lightly flour your work surface and your rolling pin. Take one piece of dough and flatten it slightly.
- Begin rolling, working from the center outwards, rotating the dough frequently and flipping it over to ensure even thickness. Continue rolling until the dough is very thin – almost translucent. You should be able to see the outline of your hand through it. The thinner, the better for delicate pappardelle.
-
Roll Out the Dough (Pasta Machine Method):
- Divide the dough into 3-4 pieces. Flatten one piece into a rectangle.
- Set your pasta machine to its widest setting. Pass the dough through the rollers. Fold the dough in half or in thirds, dust lightly with flour, and pass it through the widest setting again. Repeat this 3-4 times. This helps to further develop the gluten and creates a smoother sheet.
- Now, gradually decrease the roller setting, passing the dough through each setting once, without folding, until you reach your desired thickness. For pappardelle, I typically go to setting 5 or 6 on a 7-setting machine, or to the second-to-last setting. The sheet should be long and thin.
-
Cut the Pappardelle:
- Once your pasta sheet is rolled out, lightly dust both sides with flour to prevent sticking.
- For hand-cutting: Use a sharp knife or a pizza cutter to cut the sheet into wide ribbons, about 3/4 to 1 inch wide and roughly 8-10 inches long.
- For machine-cutting: If your pasta machine has a fettuccine or wide noodle cutter attachment, use that. If not, proceed with hand-cutting.
- Dry the Pasta (Crucial for preventing clumps!): Gently separate the cut ribbons and lay them out in a single layer on a lightly floured baking sheet or hang them on a pasta drying rack. Allow them to dry for about 20-30 minutes at room temperature. This slight drying prevents them from sticking together when cooking. You can also form them into loose nests.
Marinating and Cooking the Chicken
Our chicken will be seasoned generously and seared to perfection, creating a beautiful golden crust and juicy interior that will absorb the creamy sauce wonderfully.
- Prepare the Chicken: If you haven’t already, pat your chicken pieces dry with paper towels. This is an important step to ensure a good sear. Cut them into roughly 1-inch pieces for even cooking.
- Season the Chicken: In a medium bowl, toss the chicken pieces with 2 tablespoons of olive oil, 1 teaspoon garlic powder, 1/2 teaspoon onion powder, 1/2 teaspoon smoked paprika, 1/4 teaspoon black pepper, and 1/2 teaspoon salt. Use your hands to make sure every piece is evenly coated with the delicious seasoning blend. Let it sit for at least 10-15 minutes at room temperature while you prepare your pan, or you can marinate it in the fridge for up to an hour for deeper flavor.
- Sear the Chicken: Heat a large skillet or a Dutch oven over medium-high heat. Once hot, add the seasoned chicken in a single layer, ensuring not to overcrowd the pan. If necessary, cook the chicken in two batches to avoid steaming it. Let the chicken cook undisturbed for 3-4 minutes until a golden-brown crust forms on one side.
- Finish Cooking the Chicken: Flip the chicken pieces and cook for another 3-4 minutes, or until cooked through and no longer pink in the center. The internal temperature should reach 165°F (74°C). Don’t overcook it, as this can make the chicken dry.
- Rest the Chicken: Transfer the cooked chicken to a clean plate and loosely tent it with aluminum foil. Let it rest while you prepare the sauce. This helps to redistribute the juices, keeping the chicken tender and moist.
Crafting the Creamy Garlic Parmesan Sauce
This sauce is the heart of our dish – rich, savory, and bursting with garlic and Parmesan goodness. Building layers of flavor is key here, so we’ll take our time to develop each component.
- Sauté the Aromatics: In the same skillet you used for the chicken (don’t clean it, those browned bits add amazing flavor!), melt 2 tablespoons of unsalted butter with 1 tablespoon of olive oil over medium heat. Once the butter is melted and slightly shimmering, add the minced garlic and diced shallot (if using). Sauté for 1-2 minutes, stirring frequently, until fragrant. Be careful not to burn the garlic, as burnt garlic turns bitter. We’re looking for a soft, aromatic base.
- Deglaze with Wine (or Broth): Pour in the 1/2 cup of dry white wine (or chicken broth if abstaining from alcohol). Use a wooden spoon or spatula to scrape up all those flavorful browned bits from the bottom of the pan. Let the wine simmer for 2-3 minutes, allowing the alcohol to evaporate and the liquid to reduce slightly, concentrating its flavors. This step adds incredible depth!
- Add Cream and Broth: Reduce the heat to medium-low. Stir in the 2 cups of heavy cream and 1 cup of chicken broth. Bring the mixture to a gentle simmer, stirring occasionally. Do not allow it to boil vigorously, as this can cause the cream to separate. Let it simmer gently for 5-7 minutes, or until the sauce has thickened slightly to your desired consistency. It should coat the back of a spoon.
- Stir in Parmesan and Seasonings: Remove the skillet from the heat. Gradually add the 1 cup of freshly grated Parmesan cheese, stirring continuously until the cheese is completely melted and smoothly incorporated into the sauce. Then, stir in the 1/2 teaspoon of dried Italian seasoning and the 1/4 teaspoon of red pepper flakes (if using).
- Season to Taste: Taste the sauce and season with salt and freshly ground black pepper as needed. Remember that Parmesan cheese is salty, so add salt incrementally. You want a balanced flavor profile. If you feel it needs a little more garlic punch, a tiny bit of garlic powder can be added here, but fresh garlic should be sufficient.
Assembling Your Masterpiece
Now comes the exciting part – bringing all these wonderfully prepared components together to create a harmonious and comforting dish. The goal is to coat every strand of pasta and every piece of chicken with that luscious sauce.
- Cook the Pappardelle: While the sauce is simmering, bring a large pot of heavily salted water to a rolling boil. If using homemade fresh pappardelle, cook for 2-4 minutes, or until al dente (tender but with a slight bite). Fresh pasta cooks very quickly! If using dried pappardelle, follow package directions, usually around 8-10 minutes. Drain the pasta, reserving about 1 cup of the starchy pasta water. This reserved water is your secret weapon for a perfectly emulsified sauce!
- Combine Chicken and Sauce: Return the skillet with the sauce to low heat. Add the cooked, rested chicken pieces back into the sauce. Stir gently to coat the chicken evenly.
- Add the Pasta: Immediately add the drained pappardelle to the skillet with the chicken and sauce. Using tongs, toss everything together, ensuring every strand of pasta is beautifully coated.
- Adjust Consistency with Pasta Water: If the sauce seems too thick or clings too much, add a splash or two of the reserved pasta water, stirring until you reach your desired creamy consistency. The starch in the pasta water helps the sauce adhere wonderfully to the pasta. I usually add about 1/4 to 1/2 cup for the perfect finish.
- Final Adjustments and Serving: Give the dish one last taste and adjust any seasonings if necessary. Perhaps a little more black pepper, or a pinch of salt. Serve immediately in warm bowls.
- Garnish and Enjoy: Garnish generously with freshly chopped parsley and an extra sprinkle of grated Parmesan cheese. This dish is best enjoyed fresh off the stove! The creamy sauce and tender pasta are a match made in culinary heaven.
Conclusion:
And there you have it, my dear fellow food lovers! We’ve journeyed through the steps of what I genuinely believe is not just a recipe, but an experience waiting to unfold in your very own kitchen. This isn’t just about combining ingredients; it’s about creating something truly special, a dish that will undoubtedly bring smiles, comfort, and perhaps even a few “oohs” and “aahs” to your table. I’m telling you, this recipe is an absolute game-changer, a staple that you’ll want to revisit time and time again. Its unique blend of flavors is simply unparalleled, striking that perfect balance between familiar comfort and exciting novelty. It’s the kind of dish that makes you feel like a culinary wizard, even if you’re a complete beginner in the kitchen, proving that gourmet tastes don’t always require hours of complicated techniques.
What truly sets this recipe apart is its incredible ability to adapt and shine in various settings. Whether you’re planning a cozy weeknight dinner for two, gearing up for a lively family gathering, or even aiming to impress guests at a sophisticated dinner party, this dish rises to the occasion with grace and flavor. Its versatility is honestly one of its biggest strengths. For serving, I absolutely love presenting it as the star of the show, perhaps alongside a simple, crisp green salad tossed with a light vinaigrette to cut through the richness. If you’re feeling adventurous, a side of fluffy quinoa or wild rice can elevate it into a more substantial and health-conscious meal. Don’t forget a warm, crusty baguette to sop up every last drop of that incredible sauce – trust me, you won’t want to waste a single bit!
Elevate Your Experience with Creative Variations!
But wait, the fun doesn’t stop there! One of the things I adore most about cooking is the endless possibility for personalization. This recipe is a fantastic canvas for your culinary creativity. Feeling like a different protein? Go for it! Chicken, pork, or even a hearty blend of mushrooms and lentils can step in beautifully for a vegetarian twist. For an added layer of freshness, a sprinkle of finely chopped fresh herbs like parsley, chives, or cilantro right before serving can brighten up the entire dish. If you’re a fan of a little heat, a pinch of red pepper flakes incorporated during the cooking process will give it that delightful kick. And for those who love a touch of creaminess, a swirl of crème fraîche or Greek yogurt stirred in at the very end can add an extra dimension of luxurious texture.
Considering dietary preferences? This recipe is wonderfully accommodating! You can easily swap out certain ingredients to make it gluten-free by using alternative flours or binders, or even dairy-free with plant-based creams and milks. The core essence of its deliciousness remains, no matter how you tweak it. Think seasonally, too! In the summer, you might want to add some fresh cherry tomatoes or bell peppers for a vibrant touch. In the colder months, root vegetables like parsnips or sweet potatoes could be roasted alongside for a hearty addition. The beauty is truly in your hands to make it uniquely yours.
Your Culinary Journey Starts Now!
Now, it’s your turn! I have poured my heart into sharing this recipe, and I am genuinely so excited for you to experience the sheer joy of bringing it to life in your own kitchen. Don’t let any hesitation hold you back; gather your ingredients, follow the steps, and prepare to be amazed. Cooking is an adventure, a journey of discovery for your palate and your soul, and I promise you, this particular stop on your culinary map is going to be incredibly rewarding. I truly believe that once you try it, you’ll understand exactly why I’m so enthusiastic about it. I’m incredibly excited for you to discover the magic of this particular dish, a recipe so special it feels like it has its own unique fingerprint, perhaps something like ?p=8353 in the vast ocean of delicious possibilities.
Once you’ve whipped up this masterpiece, please, please, please don’t keep it to yourself! I would absolutely love to hear all about your experience. Did you add your own special twist? What did your family and friends think? Share your stories, your triumphs, and even your “aha!” moments. Tag me on social media, leave a comment below, or even send me a picture of your gorgeous creation. There’s nothing more fulfilling for me than seeing my recipes come to life in your homes and knowing that I’ve played a small part in bringing deliciousness into your lives. So go on, dive in, and let’s make some culinary magic together!
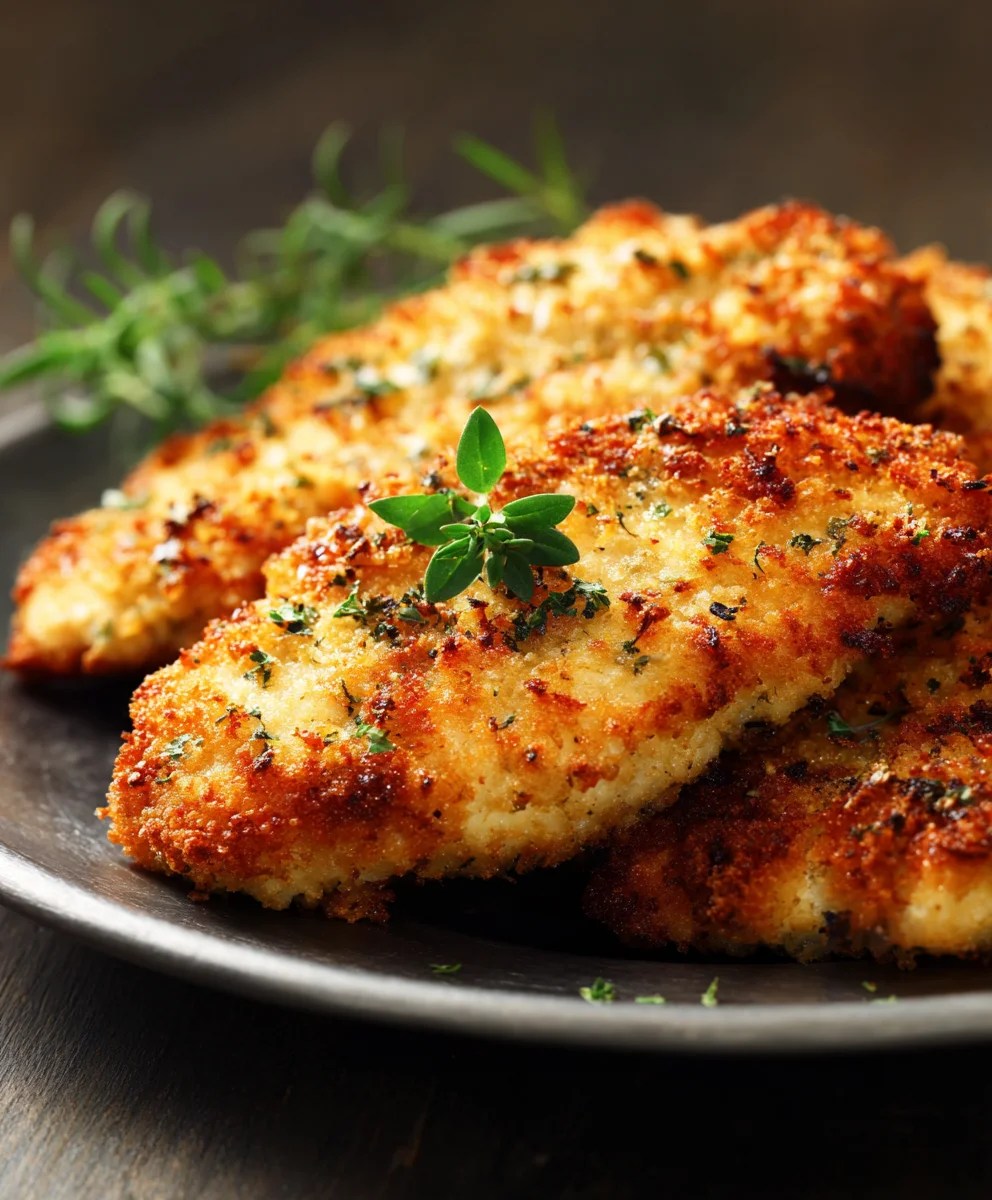
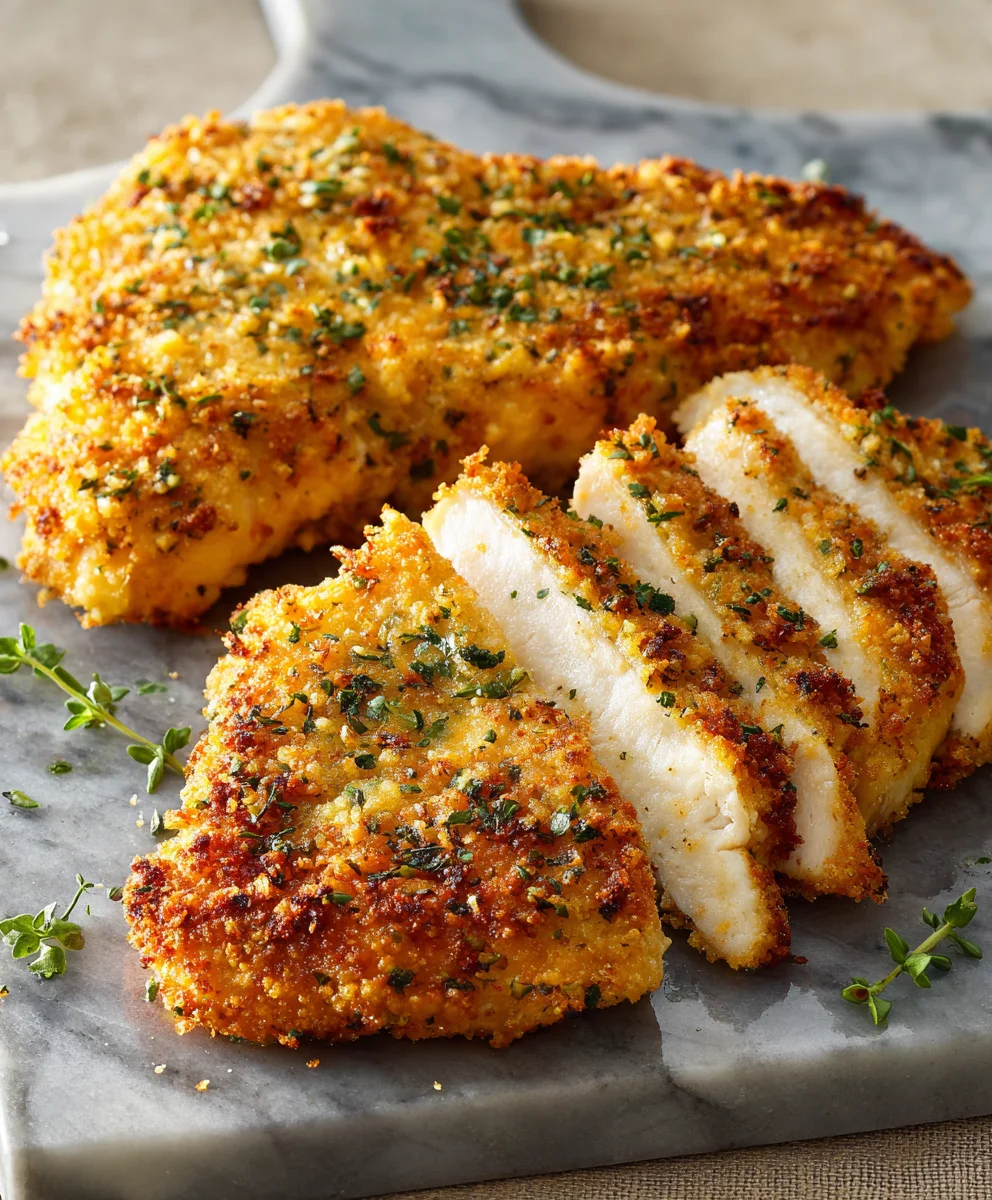
Flavorful Chicken Dinner: Easy Parmesan Crusted Chicken (Alcohol-Free)
Craving an effortlessly flavorful and satisfying meal? This easy Parmesan Crusted Chicken recipe delivers profound comfort and simple elegance, perfect for any evening. It’s a delightful, alcohol-free dish that promises to be a family favorite.
Ingredients
-
4 boneless, skinless chicken breasts (about 1.5 lbs)
-
2 cloves fresh garlic, minced
-
1 cup freshly grated Parmesan cheese
-
1 cup panko breadcrumbs
-
2 tsp Italian seasoning
-
1 tsp salt
-
1/2 tsp pepper
-
Olive oil spray
Instructions
-
Step 1
Pat chicken breasts dry. If thick, pound to 1/2-inch uniform thickness for even cooking. -
Step 2
In a shallow dish, mix Parmesan cheese, panko breadcrumbs, minced garlic, Italian seasoning, salt, and pepper. -
Step 3
Dredge each chicken breast in the panko-Parmesan mixture, pressing firmly to ensure an even coating on all sides. -
Step 4
Lightly spray a large skillet or baking sheet with olive oil. For skillet method: Heat over medium-high, sear chicken 4-6 min per side until golden and cooked (165°F/74°C). For bake method: Bake at 400°F (200°C) for 20-25 min, flipping halfway, until golden and cooked. -
Step 5
Rest chicken for a few minutes before serving. Enjoy immediately.
Important Information
Nutrition Facts (Per Serving)
It is important to consider this information as approximate and not to use it as definitive health advice.
Allergy Information
Please check ingredients for potential allergens and consult a health professional if in doubt.

Leave a Comment