
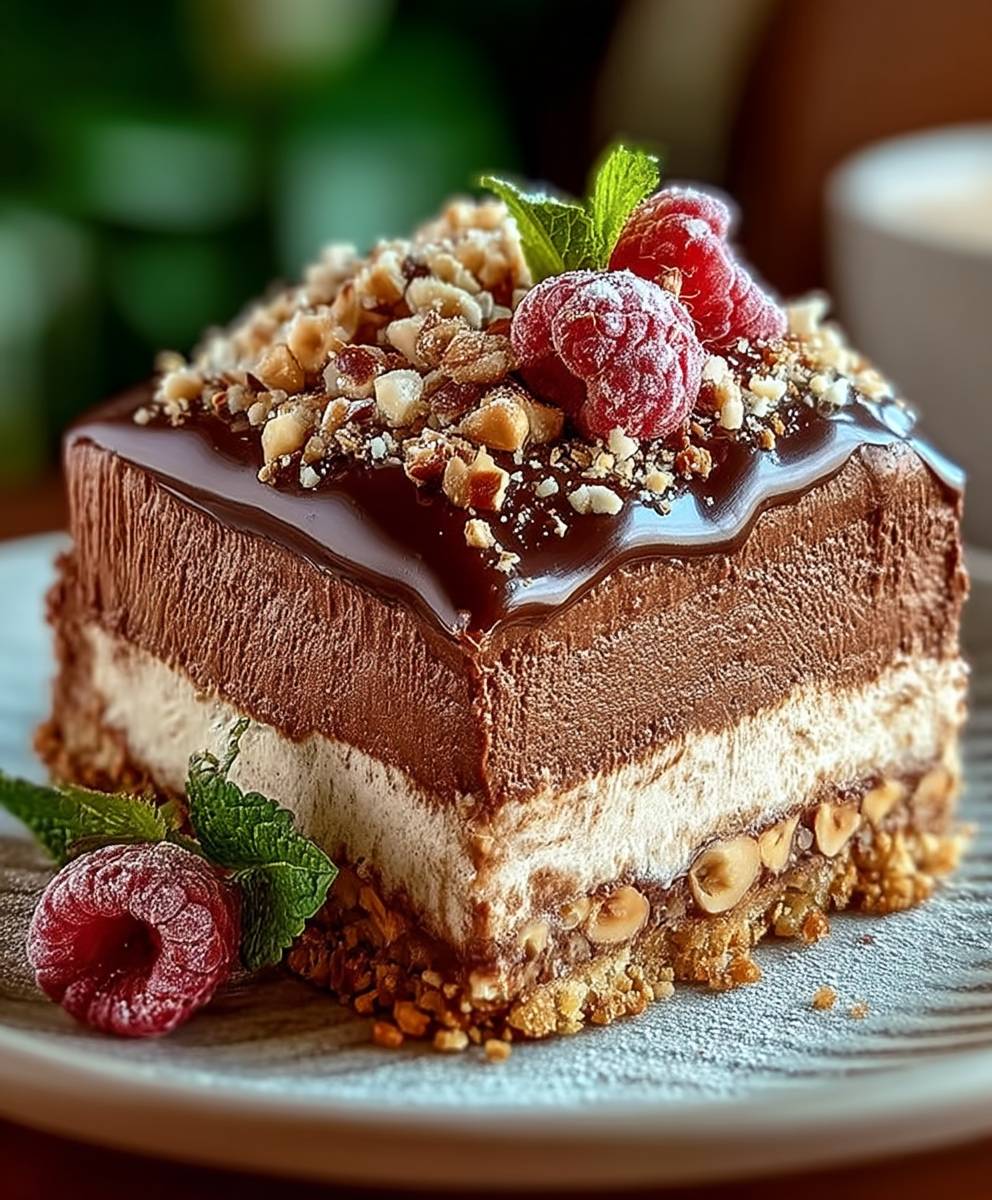
Egyptian Hazelnut Cake, a dessert whispered about in hushed tones by those who have tasted its nutty, melt-in-your-mouth perfection, is more than just a cake; it’s an experience. Have you ever dreamt of a dessert that perfectly balances rich, earthy flavors with a delicate, almost ethereal texture? This is it.
While the exact origins of this particular hazelnut cake recipe are shrouded in a bit of mystery, the use of nuts in Egyptian desserts dates back centuries. Egyptians were known for incorporating ingredients like dates, honey, and various nuts into their sweets, creating decadent treats fit for pharaohs. This Egyptian Hazelnut Cake recipe draws upon that rich culinary heritage, offering a modern twist on ancient flavors.
What makes this cake so irresistible? It’s the symphony of textures the slight crunch of the toasted hazelnuts, the moist and tender crumb, and the subtle sweetness that isn’t overpowering. People adore this cake because it’s sophisticated enough for a special occasion yet simple enough to bake on a cozy weekend afternoon. Plus, the aroma that fills your kitchen as it bakes is simply divine, promising a taste of pure bliss with every slice. I know you’ll love it!

Ingredients:
- For the Cake:
- 2 cups all-purpose flour
- 1 teaspoon baking powder
- 1/2 teaspoon baking soda
- 1/4 teaspoon salt
- 1 cup (2 sticks) unsalted butter, softened
- 1 1/2 cups granulated sugar
- 1/2 cup packed light brown sugar
- 4 large eggs
- 1 teaspoon vanilla extract
- 1 cup buttermilk
- 1 cup finely ground hazelnuts, toasted
- For the Hazelnut Praline:
- 1 cup granulated sugar
- 1/2 cup water
- 1 cup whole hazelnuts, toasted
- For the Hazelnut Buttercream Frosting:
- 1 cup (2 sticks) unsalted butter, softened
- 3 cups powdered sugar
- 1/2 cup hazelnut paste (store-bought or homemade)
- 1/4 cup heavy cream
- 1 teaspoon vanilla extract
- Pinch of salt
- For Decoration (Optional):
- Chopped toasted hazelnuts
- Whole toasted hazelnuts
- Edible gold leaf (optional)
Preparing the Hazelnut Praline:
Okay, let’s start with the praline! This adds a fantastic crunch and intense hazelnut flavor to the cake. Don’t skip this step; it’s worth it!
- Combine Sugar and Water: In a medium saucepan, combine the granulated sugar and water. Stir gently to moisten the sugar.
- Cook Without Stirring: Place the saucepan over medium heat. Do not stir. Let the mixture cook undisturbed until it turns a deep amber color. This will take about 10-15 minutes. Keep a close eye on it, as it can burn quickly. A candy thermometer should read around 340°F (170°C).
- Add Hazelnuts: Once the caramel is a deep amber color, remove the saucepan from the heat and immediately add the toasted whole hazelnuts. Stir quickly to coat the hazelnuts evenly with the caramel.
- Pour onto Baking Sheet: Pour the hazelnut mixture onto a parchment-lined baking sheet. Spread it out into a single layer as much as possible.
- Cool Completely: Let the praline cool completely at room temperature. This will take about 30 minutes to an hour. It needs to be completely hardened.
- Break into Pieces: Once the praline is completely cool and hardened, break it into smaller pieces. You can use a knife or your hands.
- Process into Crumbs: Place the praline pieces in a food processor and pulse until you have coarse crumbs. Be careful not to over-process, or you’ll end up with hazelnut butter! You want a crumbly texture. Set aside.
Preparing the Cake:
Now, let’s move on to the cake itself. This recipe uses buttermilk for a tender crumb and ground hazelnuts for that signature Egyptian flavor. Make sure your butter is properly softened for the best results!
- Preheat Oven and Prepare Pans: Preheat your oven to 350°F (175°C). Grease and flour two 9-inch round cake pans. You can also line the bottoms with parchment paper rounds for easy removal.
- Whisk Dry Ingredients: In a medium bowl, whisk together the all-purpose flour, baking powder, baking soda, and salt. This ensures that the leavening agents are evenly distributed.
- Cream Butter and Sugars: In a large bowl (or the bowl of a stand mixer), cream together the softened butter, granulated sugar, and brown sugar until light and fluffy. This usually takes about 3-5 minutes. Scraping down the sides of the bowl occasionally is important.
- Add Eggs: Beat in the eggs one at a time, mixing well after each addition. Make sure each egg is fully incorporated before adding the next.
- Add Vanilla: Stir in the vanilla extract.
- Alternate Adding Dry and Wet Ingredients: Gradually add the dry ingredients to the wet ingredients, alternating with the buttermilk, beginning and ending with the dry ingredients. Mix until just combined. Be careful not to overmix, as this can result in a tough cake. Start by adding about 1/3 of the dry ingredients, then 1/2 of the buttermilk, then another 1/3 of the dry ingredients, then the remaining buttermilk, and finally the remaining dry ingredients.
- Fold in Ground Hazelnuts: Gently fold in the ground toasted hazelnuts until evenly distributed throughout the batter.
- Divide Batter: Divide the batter evenly between the prepared cake pans.
- Bake: Bake for 30-35 minutes, or until a wooden skewer inserted into the center comes out clean.
- Cool in Pans: Let the cakes cool in the pans for 10 minutes before inverting them onto a wire rack to cool completely.
Preparing the Hazelnut Buttercream Frosting:
The buttercream is the crowning glory! The hazelnut paste adds a rich, nutty flavor that complements the cake perfectly. You can use store-bought hazelnut paste or make your own by processing toasted hazelnuts until smooth.
- Cream Butter: In a large bowl (or the bowl of a stand mixer), beat the softened butter until light and fluffy. This usually takes about 3-5 minutes.
- Add Powdered Sugar: Gradually add the powdered sugar, one cup at a time, beating on low speed until combined. Be sure to scrape down the sides of the bowl frequently.
- Add Hazelnut Paste: Beat in the hazelnut paste until well combined.
- Add Heavy Cream and Vanilla: Add the heavy cream, vanilla extract, and salt. Beat on medium speed until the frosting is light and fluffy. If the frosting is too thick, add a little more heavy cream, one tablespoon at a time, until you reach the desired consistency.
Assembling the Cake:
Finally, the fun part putting it all together! Take your time and enjoy the process. A crumb coat is key to a smooth and professional-looking finish.
- Level the Cakes: If the cakes have domed on top, use a serrated knife to level them. This will ensure that the cake sits flat and is easier to frost.
- Place First Layer on Plate: Place one cake layer on a serving plate or cake stand.
- Add Frosting: Spread a generous layer of hazelnut buttercream frosting evenly over the first cake layer.
- Sprinkle with Praline: Sprinkle a generous amount of the hazelnut praline crumbs over the frosting.
- Place Second Layer on Top: Carefully place the second cake layer on top of the frosting and praline.
- Crumb Coat: Apply a thin layer of frosting over the entire cake. This is called a crumb coat, and it helps to seal in any loose crumbs and create a smooth surface for the final layer of frosting. Refrigerate the cake for 30 minutes to allow the crumb coat to set.
- Final Frosting: After the crumb coat has set, apply a final, thicker layer of hazelnut buttercream frosting over the entire cake. Smooth the frosting with a spatula or knife.
- Decorate: Decorate the cake with chopped toasted hazelnuts, whole toasted hazelnuts, and edible gold leaf (if using). Get creative and have fun with it!
- Chill: Refrigerate the cake for at least 30 minutes before serving to allow the frosting to set completely.
Tips for Success:
- Toast Your Hazelnuts: Toasting the hazelnuts before grinding them or using them in the praline enhances their flavor significantly. Spread the hazelnuts on a baking sheet and bake at 350°F (175°C) for 10-12 minutes, or until fragrant and the skins start to crack. Let them cool slightly, then rub them in a clean kitchen towel to remove the skins.
- Don’t Overmix the Cake Batter: Overmixing the cake batter can develop the gluten in the flour, resulting in a tough cake. Mix until just combined.
- Use Room Temperature Ingredients: Using room temperature ingredients, especially the butter and eggs, helps them to emulsify properly, resulting in a smoother batter and a more tender cake.
- Adjust Sweetness to Taste: If you prefer a less sweet frosting
Conclusion:
This Egyptian Hazelnut Cake is more than just a dessert; it’s a journey to a land of rich flavors and ancient traditions, all baked into one incredibly moist and satisfying treat. If you’re looking for a cake that’s both unique and undeniably delicious, then trust me, you absolutely have to try this recipe. The combination of the nutty hazelnut flour, the warm spices, and the delicate sweetness is simply irresistible. It’s a guaranteed crowd-pleaser, perfect for everything from a casual afternoon tea to a special occasion celebration.
But what truly sets this cake apart is its versatility. While it’s fantastic on its own, a simple dusting of powdered sugar elevates it to an elegant dessert. For a richer experience, try serving it with a dollop of whipped cream or a scoop of vanilla ice cream. The cool creaminess perfectly complements the warm, nutty flavors of the cake. And if you’re feeling adventurous, a drizzle of honey or a sprinkle of chopped hazelnuts adds an extra layer of texture and taste.
Looking for variations? Consider adding a citrus zest, like orange or lemon, to the batter for a brighter, more vibrant flavor. A touch of cardamom or cinnamon can also enhance the warm spice notes. For a chocolatey twist, fold in some chocolate chips or cocoa powder. And if you’re catering to a gluten-free crowd, this recipe is already a winner, thanks to the hazelnut flour! Just be sure to double-check that all your other ingredients are also gluten-free.
I’ve personally made this cake countless times, and each time it’s met with rave reviews. The aroma alone, as it bakes, is enough to make your mouth water. It’s a relatively simple recipe to follow, even for beginner bakers, and the results are always impressive. The moist crumb, the intense hazelnut flavor, and the subtle sweetness all come together to create a truly unforgettable cake.
So, what are you waiting for? Gather your ingredients, preheat your oven, and get ready to embark on a baking adventure. I promise you won’t regret it! This Egyptian Hazelnut Cake is a recipe that you’ll want to make again and again.
I’m so excited for you to try this recipe and experience the magic of this unique cake for yourself. Once you’ve baked your own version, I’d absolutely love to hear about it! Share your photos, your variations, and your experiences in the comments below. Did you add any special ingredients? Did you serve it with a particular topping? What did your friends and family think? Your feedback is invaluable, and it helps me to continue creating and sharing delicious recipes like this one. Happy baking! Let me know what you think of this Egyptian Hazelnut Cake!
Egyptian Hazelnut Cake: A Delicious Recipe and Baking Guide
Decadent Egyptian Hazelnut Cake with moist hazelnut layers, crunchy hazelnut praline, and creamy hazelnut buttercream. Perfect for special occasions!
Ingredients
- 2 cups all-purpose flour
- 1 teaspoon baking powder
- 1/2 teaspoon baking soda
- 1/4 teaspoon salt
- 1 cup (2 sticks) unsalted butter, softened
- 1 1/2 cups granulated sugar
- 1/2 cup packed light brown sugar
- 4 large eggs
- 1 teaspoon vanilla extract
- 1 cup buttermilk
- 1 cup finely ground hazelnuts, toasted
- 1 cup granulated sugar
- 1/2 cup water
- 1 cup whole hazelnuts, toasted
- 1 cup (2 sticks) unsalted butter, softened
- 3 cups powdered sugar
- 1/2 cup hazelnut paste (store-bought or homemade)
- 1/4 cup heavy cream
- 1 teaspoon vanilla extract
- Pinch of salt
- Chopped toasted hazelnuts
- Whole toasted hazelnuts
- Edible gold leaf (optional)
Instructions
- Combine sugar and water in a medium saucepan. Stir gently to moisten the sugar.
- Place the saucepan over medium heat. Do not stir. Let the mixture cook undisturbed until it turns a deep amber color (about 10-15 minutes). A candy thermometer should read around 340°F (170°C).
- Remove from heat and immediately add the toasted whole hazelnuts. Stir quickly to coat the hazelnuts evenly with the caramel.
- Pour the hazelnut mixture onto a parchment-lined baking sheet. Spread into a single layer.
- Cool completely at room temperature (about 30 minutes to 1 hour).
- Break the praline into smaller pieces.
- Place the praline pieces in a food processor and pulse until you have coarse crumbs. Set aside.
- Preheat oven to 350°F (175°C). Grease and flour two 9-inch round cake pans. Line the bottoms with parchment paper rounds.
- In a medium bowl, whisk together the all-purpose flour, baking powder, baking soda, and salt.
- In a large bowl (or stand mixer), cream together the softened butter, granulated sugar, and brown sugar until light and fluffy (3-5 minutes).
- Beat in the eggs one at a time, mixing well after each addition.
- Stir in the vanilla extract.
- Gradually add the dry ingredients to the wet ingredients, alternating with the buttermilk, beginning and ending with the dry ingredients. Mix until just combined.
- Gently fold in the ground toasted hazelnuts until evenly distributed.
- Divide the batter evenly between the prepared cake pans.
- Bake for 30-35 minutes, or until a wooden skewer inserted into the center comes out clean.
- Let the cakes cool in the pans for 10 minutes before inverting them onto a wire rack to cool completely.
- In a large bowl (or stand mixer), beat the softened butter until light and fluffy (3-5 minutes).
- Gradually add the powdered sugar, one cup at a time, beating on low speed until combined.
- Beat in the hazelnut paste until well combined.
- Add the heavy cream, vanilla extract, and salt. Beat on medium speed until the frosting is light and fluffy. Add more heavy cream, one tablespoon at a time, until you reach the desired consistency.
- Level the cakes with a serrated knife if needed.
- Place one cake layer on a serving plate or cake stand.
- Spread a generous layer of hazelnut buttercream frosting evenly over the first cake layer.
- Sprinkle a generous amount of the hazelnut praline crumbs over the frosting.
- Carefully place the second cake layer on top of the frosting and praline.
- Apply a thin layer of frosting over the entire cake (crumb coat). Refrigerate for 30 minutes to allow the crumb coat to set.
- Apply a final, thicker layer of hazelnut buttercream frosting over the entire cake. Smooth the frosting with a spatula or knife.
- Decorate with chopped toasted hazelnuts, whole toasted hazelnuts, and edible gold leaf (if using).
- Refrigerate the cake for at least 30 minutes before serving.
Notes
- Toasting the hazelnuts enhances their flavor. Toast at 350°F (175°C) for 10-12 minutes, or until fragrant and the skins start to crack. Rub them in a clean kitchen towel to remove the skins.
- Don’t overmix the cake batter. Mix until just combined.
- Use room temperature ingredients for the cake, especially the butter and eggs.
- Adjust sweetness of the frosting to taste.
- For best results, use a kitchen scale to measure ingredients.

Leave a Comment