
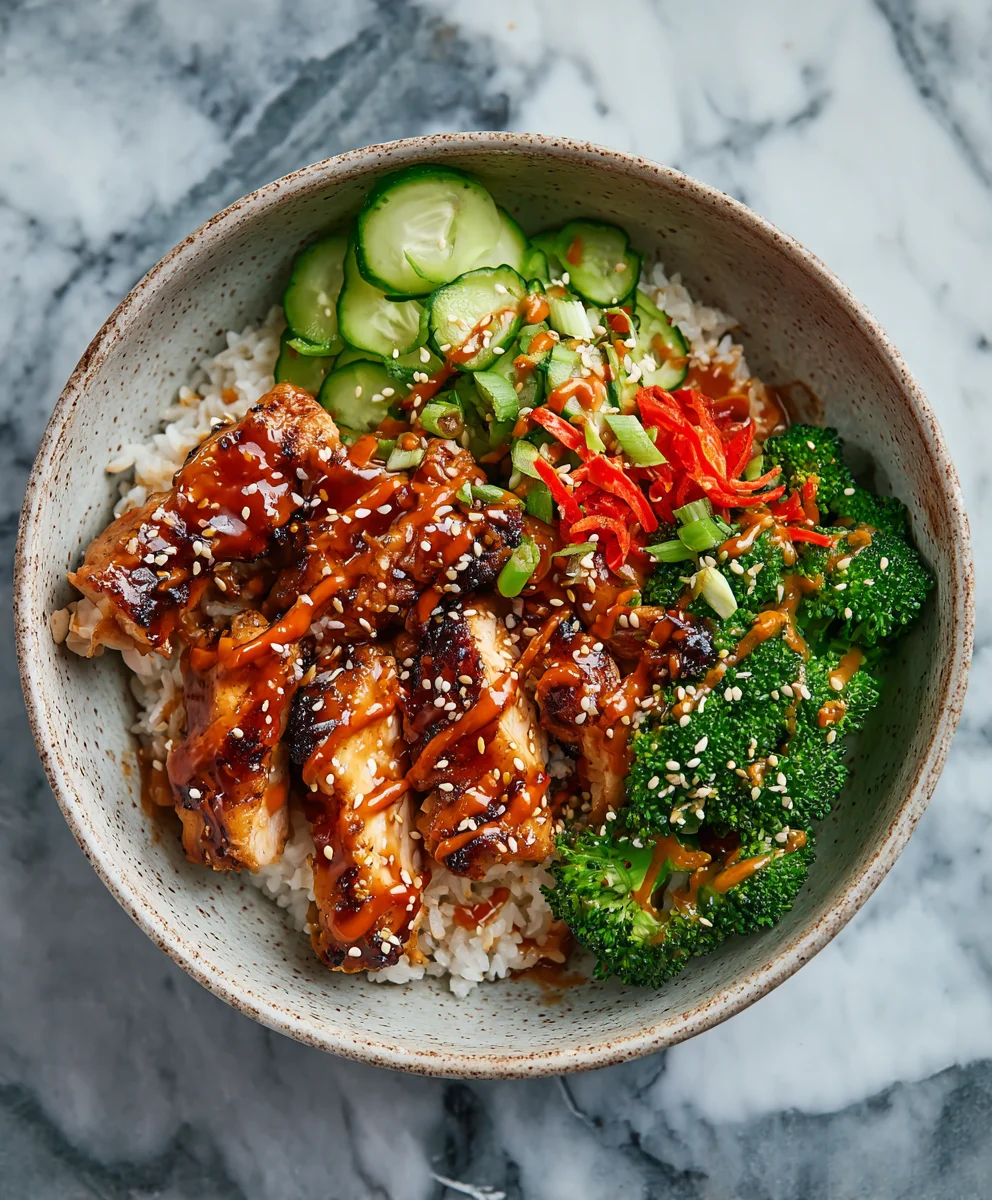
Sticky Chicken Bowls Recipe are an absolute game-changer for weeknight dinners, and for good reason! Who can resist that irresistible combination of tender, succulent chicken coated in a glossy, sweet, and savory sauce? It’s the kind of dish that consistently brings smiles to the table, satisfying cravings for something deeply flavorful and comforting without being overly complicated. What truly elevates this Sticky Chicken Bowls Recipe beyond the ordinary is the perfect balance of textures and tastes. You get the satisfying chew of the chicken, the crispness from a quick stir-fry or bake, all nestled atop fluffy rice and punctuated by fresh, vibrant toppings. It’s this harmonious blend that makes everyone declare it their new favorite, a culinary masterpiece you’ll find yourself returning to again and again.

Ingredients:
- 1 lb boneless chicken, cut into small, bite-sized pieces
- 1 tablespoon cooking oil (such as vegetable, canola, or peanut oil)
- 2 cloves garlic, minced
- 3 tablespoons soy sauce
- 2 tablespoons honey
- 1 tablespoon brown sugar (optional, for achieving an extra sticky glaze)
- 1 tablespoon rice vinegar or fresh lemon juice
- 1 teaspoon chili flakes (optional, for a hint of heat)
- Cooked rice, for serving
- Fresh green onions, thinly sliced, for garnish
- Sesame seeds, for garnish
Preparing the Sticky Chicken
This sticky chicken is surprisingly quick to make, perfect for a weeknight meal when you’re craving something flavorful and satisfying. We’ll start by getting our chicken ready and then move on to creating that irresistible glaze.
Cooking the Chicken
Step 1: Sear the Chicken Pieces
Begin extract by heating the 1 tablespoon of cooking oil in a large skillet or wok over medium-high heat. Once the oil is shimmering and hot, carefully add your cut chicken pieces in a single layer. It’s important not to overcrowd the pan; if necessary, cook the chicken in two batches to ensure it sears nicely rather than steaming. We want to get a beautiful golden-brown color on all sides, which will take about 5-7 minutes. This searing process not only adds flavor but also helps to lock in the juices, resulting in tender chicken.
Step 2: Infuse with Garlic
Once the chicken has developed a nice sear and is mostly cooked through, it’s time to add the aromatics. Push the chicken to one side of the skillet and add the 2 minced garlic cloves to the cleared space. Sauté the garlic for about 30-60 seconds until it becomes fragrant. Be careful not to burn the garlic, as this can impart a bitter taste. Once fragrant, toss the garlic with the chicken to distribute its flavor throughout the pan.
Crafting the Sticky Glaze
Step 3: Build the Sauce Base
Now, let’s create that signature sticky glaze. In the same skillet with the chicken and garlic, add the 3 tablespoons of soy sauce, 2 tablespoons of honey, and the 1 tablespoon of rice vinegar (or lemon juice). If you’re opting for extra sweetness and stickiness, now is the time to add the 1 tablespoon of brown sugar. The brown sugar, with its molasses content, will contribute significantly to the caramelization and chewy texture of the final glaze.
Step 4: Simmer and Thicken
Stir everything together to combine the sauce ingredients with the chicken. Bring the mixture to a gentle simmer over medium heat. Continue to cook, stirring frequently, for about 3-5 minutes. As the sauce simmers, it will start to thicken and coat the chicken beautifully. The honey and brown sugar will caramelize, creating that glossy, irresistible “sticky” coating we’re aiming for. If you like a little heat, this is also the perfect moment to stir in the 1 teaspoon of chili flakes. Adjust the amount based on your spice preference.
Assembling the Bowls
Step 5: Coat and Serve
Once the sauce has thickened to your desired consistency, ensuring every piece of chicken is generously coated in the sticky glaze, it’s time to assemble your bowls. Spoon a generous portion of your freshly cooked rice into each serving bowl. Then, using a slotted spoon, carefully transfer the sticky chicken pieces over the rice. Drizzle any remaining delicious glaze from the skillet over the chicken and rice. This ensures you don’t miss out on any of that incredible flavor. For a burst of freshness and color, garnish generously with the thinly sliced green onions and a sprinkle of sesame seeds. The green onions add a mild oniony bite, while the sesame seeds provide a nutty crunch that perfectly complements the sweet and savory sticky chicken.
Conclusion:
There you have it – your guide to creating the most delicious Sticky Chicken Bowls Recipe! We’ve walked through each step, from marinating the chicken to perfecting that glossy, sticky glaze, and finally assembling these vibrant bowls. This dish is a true crowd-pleaser, offering a delightful balance of sweet, savory, and slightly tangy flavors. The tender chicken coated in that irresistible sticky sauce is truly the star, making every bite a satisfying experience.
For serving, these Sticky Chicken Bowls Recipe are incredibly versatile. They’re fantastic on their own, but consider serving them with a side of steamed jasmine rice or fluffy brown rice to soak up all that delicious sauce. To add a fresh crunch, top with thinly sliced green onions, toasted sesame seeds, and perhaps a sprinkle of red pepper flakes for a hint of heat. A dollop of sriracha mayo can also elevate the flavor profile.
Don’t be afraid to get creative with variations! If you’re not a fan of chicken, feel free to substitute it with firm tofu or even shrimp. For a spicier kick, increase the amount of chili garlic sauce or add a pinch of cayenne pepper to the marinade. You can also experiment with different vegetables; broccoli florets, snap peas, or bell peppers would be wonderful additions. Enjoy making this recipe your own!
Frequently Asked Questions:
Can I make the sticky sauce ahead of time?
Yes, absolutely! The sticky sauce for the Sticky Chicken Bowls Recipe can be prepared up to 2 days in advance and stored in an airtight container in the refrigerator. Simply reheat it gently on the stovetop before tossing with your cooked chicken.
What if I don’t have soy sauce? Can I substitute it?
While soy sauce is a key component for the umami flavor in this Sticky Chicken Bowls Recipe, you can substitute it with tamari (for a gluten-free option) or coconut aminos. Keep in mind that these alternatives might slightly alter the final taste and saltiness, so you may need to adjust the seasoning accordingly.

Easy Sticky Chicken Bowls
A quick and flavorful weeknight meal featuring tender chicken coated in a sweet and savory sticky glaze, served over rice and garnished with fresh toppings.
Ingredients
-
1 lb boneless chicken, cut into small, bite-sized pieces
-
1 tablespoon cooking oil
-
2 cloves garlic, minced
-
3 tablespoons soy sauce
-
2 tablespoons honey
-
1 tablespoon brown sugar (optional)
-
1 tablespoon rice vinegar
-
1 teaspoon chili flakes (optional)
-
Cooked rice, for serving
-
Fresh green onions, thinly sliced, for garnish
-
Sesame seeds, for garnish
Instructions
-
Step 1
Heat cooking oil in a large skillet or wok over medium-high heat. Add chicken pieces in a single layer and sear until golden brown on all sides, about 5-7 minutes. Cook in batches if necessary. -
Step 2
Push chicken to one side of the skillet. Add minced garlic to the cleared space and sauté until fragrant, about 30-60 seconds. Toss garlic with chicken. -
Step 3
In the same skillet, add soy sauce, honey, rice vinegar, and optional brown sugar. Stir to combine with chicken and garlic. -
Step 4
Bring the mixture to a gentle simmer over medium heat. Cook, stirring frequently, for 3-5 minutes until the sauce thickens and coats the chicken. Stir in chili flakes if desired. -
Step 5
Spoon cooked rice into serving bowls. Top with the sticky chicken and drizzle any remaining glaze from the skillet over the chicken and rice. -
Step 6
Garnish generously with thinly sliced green onions and sesame seeds before serving.
Important Information
Nutrition Facts (Per Serving)
It is important to consider this information as approximate and not to use it as definitive health advice.
Allergy Information
Please check ingredients for potential allergens and consult a health professional if in doubt.

Leave a Comment