
Pumpkin Shaped Cheese Ball recipes are a perennial favorite for a reason. As the crisp autumn air descends and the leaves begin their vibrant transformation, our kitchens often mirror this cozy shift with warming, festive flavors. There’s something undeniably magical about a dish that not only tantalizes your taste buds but also doubles as a charming centerpiece. This particular creation, the Pumpkin Shaped Cheese Ball, is more than just a delightful appetizer; it’s a conversation starter, a crowd-pleaser, and a symbol of the season itself. People adore it for its playful presentation, which instantly evokes the spirit of fall gatherings and Halloween parties. But what truly sets this Pumpkin Shaped Cheese Ball apart is the perfect harmony of creamy, savory cheese, subtle sweet undertones from the pumpkin, and a delightful crunch from its nutty exterior. It’s incredibly satisfying to assemble, and even more so to watch guests’ eyes light up as they discover this edible autumnal wonder. Get ready to impress with a recipe that’s as fun to make as it is to devour.

Ingredients:
- 16 ounces cream cheese, softened
- 2 cups shredded cheddar cheese
- 2 tablespoons ranch seasoning
- 3 green onions, thinly sliced (both white and green parts)
- Salt and freshly ground black pepper, to taste
- 1 bell pepper stem (for the pumpkin stem)
- Twine or rubber bands (optional, for creating a more defined pumpkin shape)
Preparing the Pumpkin Shaped Cheese Ball
The journey to crafting your delightful Pumpkin Shaped Cheese Ball begins with bringing together the core components. It’s crucial that your cream cheese is truly softened; this isn’t a step to rush. Leave it on the counter for at least an hour, or use a gentle microwave method for a few seconds at a time until it’s pliable and easily spreadable, but not melted. This ensures a smooth, lump-free base for your cheese ball, which is fundamental to achieving that perfect texture.
In a large mixing bowl, combine the softened cream cheese and the shredded cheddar cheese. I find that using a good quality, sharp cheddar really boosts the flavor profile, but feel free to use your favorite. Once you’ve got the cheeses together, it’s time to introduce the ranch seasoning. This is where the magic starts to happen, infusing your cheese ball with a zesty, herby kick that is absolutely irresistible.
Next, add in the thinly sliced green onions. I like to reserve a few of the brighter green slices for garnish later, but most of them go directly into the mix. The onions provide a fresh, subtle oniony bite that complements the richness of the cheese beautifully. Now, season your mixture generously with salt and freshly ground black pepper. Remember, cheese can be a little salty on its own, so start with a moderate amount and taste as you go. You can always add more, but you can’t take it away!
Mixing and Shaping the Cheese Ball
This is where you truly bring the Pumpkin Shaped Cheese Ball to life. Using a sturdy spoon or a spatula, thoroughly mix all the ingredients together. You want to ensure that the ranch seasoning and green onions are evenly distributed throughout the cream cheese and cheddar mixture. It’s important to get into all the nooks and crannies to make sure every bite is packed with flavor. Don’t be afraid to get your hands in there if that’s easier for you; a gentle kneading motion can help combine everything perfectly and ensure a uniform consistency.
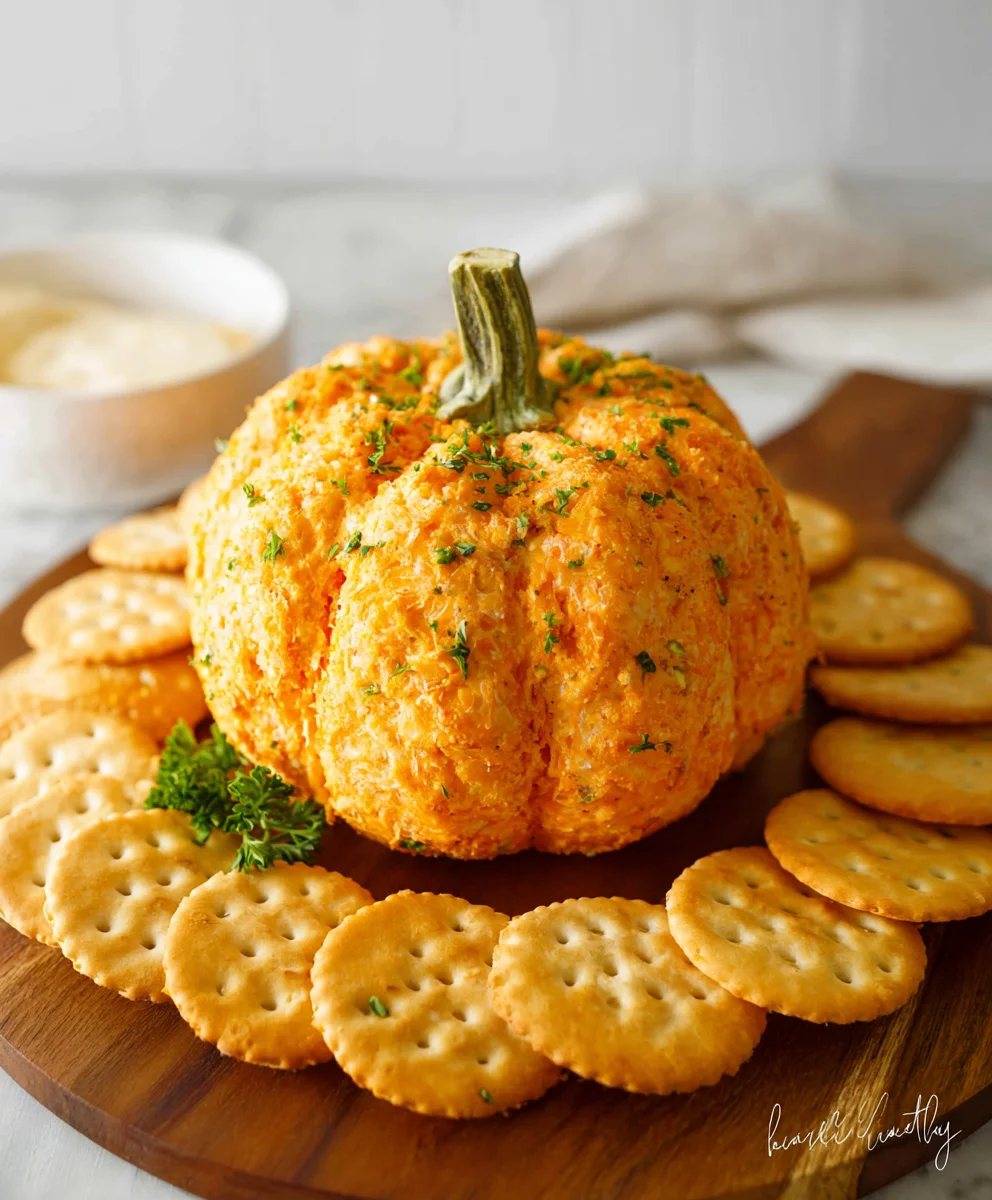
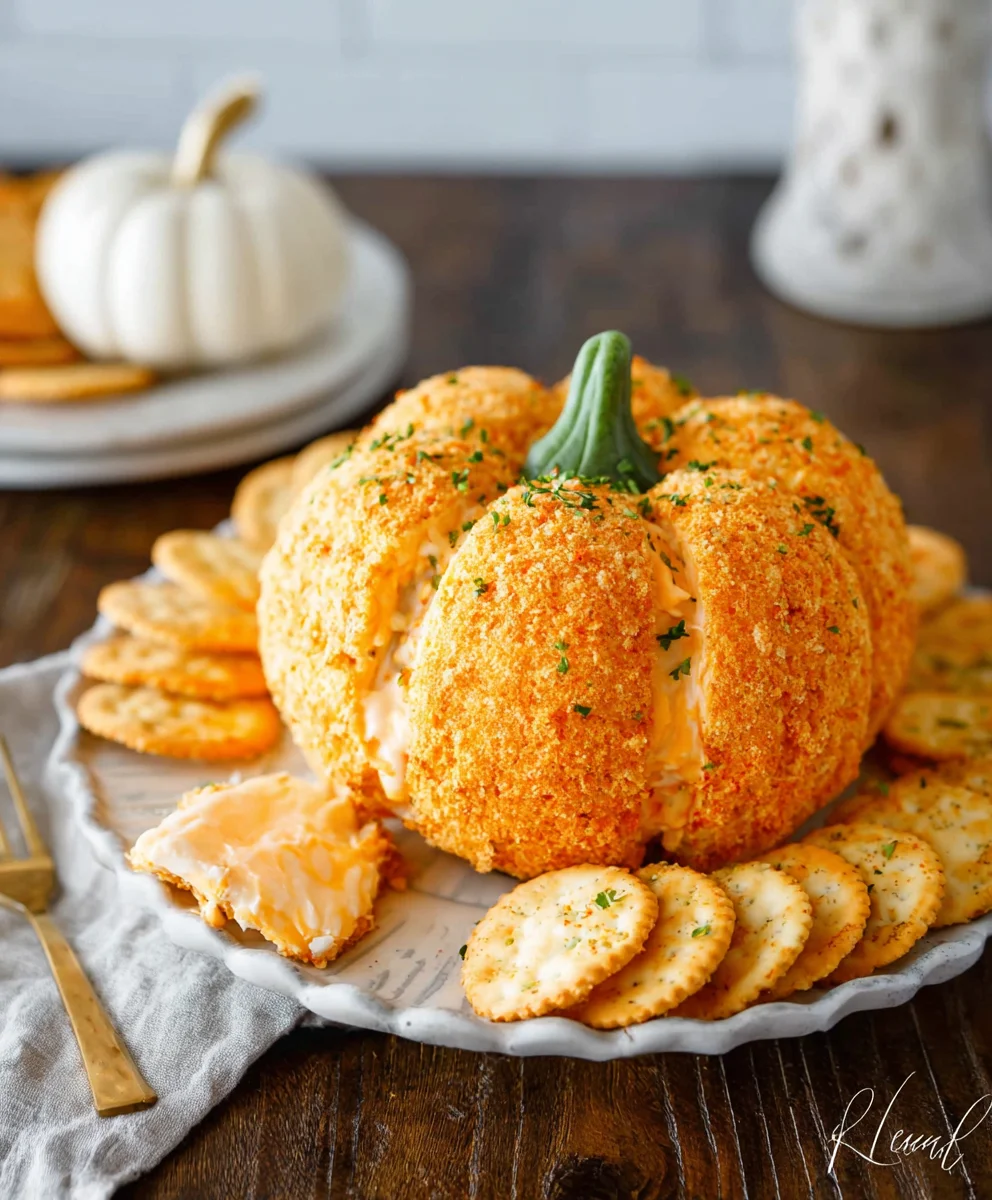
Once your cheese mixture is well combined, it’s time to shape it into our festive pumpkin form. Take the entire mixture and begin to gently mold it into a round ball. Think of yourself as a sculptor, but with delicious cheese! Once you have a general ball shape, you can start to refine it. If you want to achieve a more pronounced pumpkin look, this is where the twine or rubber bands come in handy. Gently wrap the twine around the ball, creating indents that mimic the natural ridges of a pumpkin. You can create about 5-6 indentations, pulling the twine taut but not so tight that it tears the cheese ball. Secure the ends of the twine on the bottom of the cheese ball. Don’t worry if it looks a little messy at first; this is part of the charming, rustic appeal of a homemade pumpkin.
Adding the Finishing Touches and Serving
Now for the crowning glory of your Pumpkin Shaped Cheese Ball – the stem! Take your bell pepper stem and carefully insert it into the top center of your cheese ball. You might need to make a small indentation with your finger or a knife to help it stand upright. The vibrant green of the bell pepper stem will instantly evoke the image of a fresh pumpkin, adding that perfect, whimsical detail. If you reserved some of those bright green onion slices, you can artfully arrange them around the base of the stem for an extra touch of green.
Before serving, it’s highly recommended to chill your Pumpkin Shaped Cheese Ball. Carefully wrap the shaped cheese ball in plastic wrap, ensuring it maintains its form. Place it in the refrigerator for at least 30 minutes. This chilling time is essential for several reasons. Firstly, it allows the flavors to meld and deepen, creating a more complex and satisfying taste. Secondly, it firms up the cheese ball, making it easier to handle and serve, and preventing it from becoming too soft and messy when guests dig in.
When you’re ready to present your masterpiece, unwrap the cheese ball and place it on your favorite serving platter. Remove the twine if you used it, though some people prefer to leave it on for decoration. Serve your Pumpkin Shaped Cheese Ball with an assortment of crackers, breadsticks, fresh vegetable sticks like carrots and celery, or even apple slices. The versatility of this cheese ball makes it a fantastic centerpiece for any fall gathering, appetizer spread, or even a fun addition to a holiday table. Enjoy the delightful flavors and the festive spirit it brings!
Conclusion:
I hope you enjoyed learning how to create this delightful Pumpkin Shaped Cheese Ball! It’s truly a showstopper, perfect for autumn gatherings, holiday parties, or simply as a fun appetizer to brighten up any meal. The combination of creamy cheeses, savory seasonings, and that adorable festive shape is sure to be a hit with everyone. Don’t be afraid to experiment with different cheeses and herbs to make it your own. Serve it with a variety of crackers, breadsticks, or even fresh vegetable crudités for a complete and satisfying experience. Embrace the joy of creating something delicious and visually appealing that celebrates the flavors of the season. I encourage you to give this recipe a try – you might just discover your new favorite appetizer!
Frequently Asked Questions:
Can I make the Pumpkin Shaped Cheese Ball ahead of time?
Absolutely! You can prepare the cheese ball mixture and shape it up to 2 days in advance. Once shaped, wrap it tightly in plastic wrap and refrigerate. When you’re ready to serve, unwrap, add the pretzel stem, and arrange your accompaniments. This makes entertaining so much easier!
What are some other ways to decorate the Pumpkin Shaped Cheese Ball?
While pretzel sticks are fantastic for the stem, you can get creative! Thinly sliced carrots, rosemary sprigs, or even a small stalk of celery can also serve as a charming stem. For added texture and visual appeal, consider pressing toasted nuts like pecans or walnuts into the outer layer before chilling.
Easy Pumpkin Cheese Ball Recipe – Festive Appetizer
A simple and festive pumpkin-shaped cheese ball perfect for any fall gathering or holiday appetizer spread.
Ingredients
-
16 ounces cream cheese, softened
-
2 cups shredded cheddar cheese
-
2 tablespoons ranch seasoning
-
3 green onions, thinly sliced
-
Salt, to taste
-
Freshly ground black pepper, to taste
-
1 bell pepper stem
-
Twine or rubber bands
Instructions
-
Step 1
Ensure cream cheese is softened. In a large bowl, combine softened cream cheese, shredded cheddar cheese, ranch seasoning, and sliced green onions. Season with salt and pepper to taste. -
Step 2
Mix all ingredients thoroughly until well combined and evenly distributed. You can use a spoon, spatula, or your hands to knead the mixture. -
Step 3
Shape the cheese mixture into a round ball. If desired, use twine or rubber bands to gently create indentations to mimic the shape of a pumpkin. -
Step 4
Insert the bell pepper stem into the top center of the cheese ball to create the pumpkin stem. You can add reserved green onion slices around the stem for extra color. -
Step 5
Wrap the shaped cheese ball tightly in plastic wrap and chill in the refrigerator for at least 30 minutes to allow flavors to meld and firm up. -
Step 6
Unwrap the cheese ball, place it on a serving platter, and serve with crackers, breadsticks, vegetable sticks, or apple slices.
Important Information
Nutrition Facts (Per Serving)
It is important to consider this information as approximate and not to use it as definitive health advice.
Allergy Information
Please check ingredients for potential allergens and consult a health professional if in doubt.

Leave a Comment