• Skip to primary navigation
  • Skip to main content
  • Skip to primary sidebar
Recipe Fantastic

Recipe Fantastic

Simple, Savory, and Sweet Meals

  • Home
  • Appetizer
  • Breakfast
  • Dinner
  • Lunch
  • Dessert
  • About Us
  • Contact
Recipe Fantastic
  • Home
  • Appetizer
  • Breakfast
  • Dinner
  • Lunch
  • Dessert
  • About Us
  • Contact
Dessert / Easy No-Bake Patriotic Cheesecake Recipe

Easy No-Bake Patriotic Cheesecake Recipe

March 14, 2026 by ChloeDessert

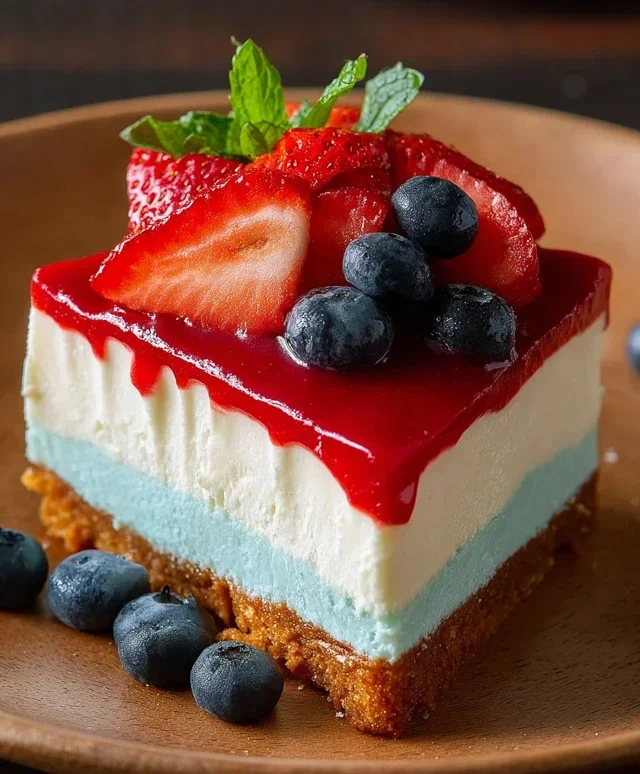
No Bake Patriotic Cheesecake is more than just a dessert; it’s a vibrant centerpiece that screams celebration! Imagin extracte a creamy, dreamy cheesecake, layered with the iconic red, white, and blue hues of the American flag, all without ever turning on your oven. That’s the magic of this no bake patriotic cheesecake, and it’s why I absolutely adore it, especially when the warm weather rolls in or for those moments you want a showstopper that’s incredibly easy to make. The beauty of a no bake cheesecake lies in its effortless elegance. It’s perfect for begin extractners and seasoned bakers alike, offering that rich, decadent cheesecake flavor with a delightful fruity swirl that’s as delicious as it is visually stunning. Get ready to impress your friends and family with this delightful, cool, and incredibly festive treat!

No Bake Patriotic Cheesecake this Recipe

No Bake Patriotic Cheesecake

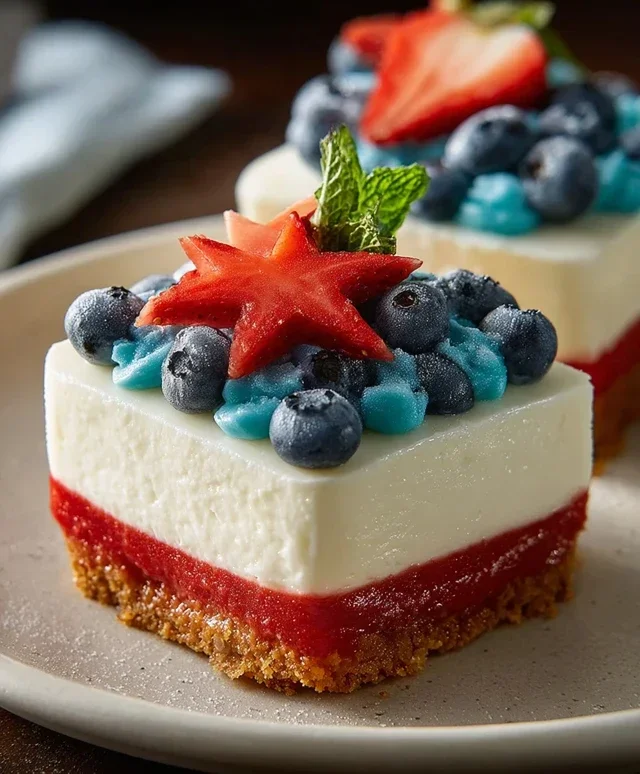
This No Bake Patriotic Cheesecake is the ultimate dessert for any summer celebration, especially those that involve fireworks and red, white, and blue! It’s a showstopper without any of the stress of baking, making it perfect for even novice bakers. The creamy, decadent cheesecake filling is layered with vibrant fruit flavors and topped with fresh berries, creating a beautiful and delicious tribute to the USA. Plus, the no-bake aspect means you can assemble it ahead of time, leaving you free to enjoy your guests and the festivities. Let’s get started on this delightful patriotic treat!

Ingredients:

  • 2 cups golden Oreo crum extractbs
  • 3 tablespoons butter, melted
  • 1/4 teaspoon salt
  • 1 teaspoon red gel food color
  • 2 packages (8 oz each) cream cheese, softened
  • 2 cups powdered sugar
  • 2 teaspoons vanilla extract
  • 2 cups heavy whipping cream
  • 1 package (3.94 oz) blue raspberry Jell-O
  • 1 cup boiling water
  • 6 oz cream cheese, softened
  • 6 tablespoons butter, softened
  • 3 cups powdered sugar
  • 1 teaspoon vanilla extract
  • Fresh blueberries
  • Crust Preparation

    The foundation of any great cheesecake is a sturdy and delicious crust. For this patriotic masterpiece, we’re using Golden Oreos, which lend a lovely subtle sweetness and a beautiful golden hue.

  • First things first, let’s get our crust ready. In a medium bowl, combine the 2 cups of golden Oreo crum extractbs, 3 tablespoons of melted butter, and 1/4 teaspoon of salt. Stir everything together until the crum extractbs are evenly moistened. This mixture should resemble wet sand.
  • Next, we’ll create our red layer for the bottom of the cheesecake. Take about one-third of this crum extractb mixture and place it in a separate small bowl. Add 1 teaspoon of red gel food coloring to this portion of the crum extractbs. Mix it thoroughly until the color is uniform. You want a vibrant red.
  • Now, press the uncolored crum extractb mixture firmly into the bottom of a 9-inch springform pan. Use the bottom of a glass or a measuring cup to create an even layer. This will be our white base. Then, carefully press the red crum extractb mixture over the white layer, creating a distinct red band at the bottom. This is where the visual magic begin extracts! You can even extend the red slightly up the sides if you like for an extra pop of color. Pop the pan into the freezer while you prepare the filling so the crust can firm up.
  • Cream Cheese Filling

    This is where the creamy, dreamy part of our cheesecake comes in. We’re making a classic no-bake cheesecake filling that’s incredibly smooth and rich.

  • In a large bowl, beat the 2 packages (8 oz each) of softened cream cheese with an electric mixer until it’s completely smooth and free of lumps. Make sure your cream cheese is truly softened to room temperature to avoid any grainy texture. This usually takes about 2-3 minutes on medium speed.
  • Gradually add the 2 cups of powdered sugar to the cream cheese, beating until well combined and fluffy. Scrape down the sides of the bowl as needed to ensure everything is incorporated. Then, beat in the 2 teaspoons of vanilla extract.
  • In a separate, clean bowl, whip the 2 cups of heavy whipping cream until stiff peaks form. This means when you lift the beaters, the cream stands up on its own. Be careful not to overbeat, or you’ll end up with butter.
  • Gently fold the whipped cream into the cream cheese mixture until just combined. Be careful not to deflate the whipped cream; we want to keep that lightness and airy texture. This mixture will be our luscious white cheesecake layer.
  • Blue Raspberry Layer

    For our vibrant blue layer, we’re using Jell-O for a burst of fruity flavor and color.

  • In a heatproof bowl, dissolve the 1 package (3.94 oz) of blue raspberry Jell-O in 1 cup of boiling water. Stir until the Jell-O is completely dissolved and there are no granules at the bottom. Let this mixture cool slightly, but don’t let it set. You want it liquid but not hot.
  • Once the Jell-O has cooled for about 10-15 minutes, gently pour about half of the cream cheese filling mixture into the chilled crust. Smooth the top with a spatula.
  • Now, carefully pour about half of the slightly cooled blue raspberry Jell-O mixture over the white filling. It’s important that the Jell-O is not too hot or it might melt the cream cheese, and not too set or it will be difficult to pour. You can achieve beautiful swirls by gently draggin extractg a toothpick or skewer through the layers.
  • Add the remaining white cream cheese filling over the blue layer, smoothing the top. Then, pour the remaining blue raspberry Jell-O mixture over that. Again, feel free to create swirls for a marbled effect.
  • “Frosting” and Decoration

    To finish off our patriotic cheesecake, we’ll create a simple yet delicious white “frosting” and add fresh berries for a pop of natural color and freshness.

  • In a medium bowl, beat the 6 oz of softened cream cheese with the 6 tablespoons of softened butter until smooth and creamy. This can be done with an electric mixer or a sturdy whisk. Ensure both the cream cheese and butter are at room temperature to achieve the best consistency.
  • Gradually beat in the 3 cups of powdered sugar until well combined and the mixture is smooth and fluffy. Stir in the 1 teaspoon of vanilla extract. This will be our creamy white topping that mimics a classic frosting.
  • Once the cheesecake has had at least 4 hours to set in the refrigerator (overnight is even better for a firmer set), gently remove the sides of the springform pan.
  • Spread the cream cheese “frosting” evenly over the top of the set cheesecake. You can make it smooth or create decorative swirls with a spatula.
  • Finally, arrange the fresh blueberries on top of the “frosting” to create a beautiful star-spangled banner effect or a simple red, white, and blue pattern. You can also add sliced strawberries for extra red. Chill the cheesecake for at least another 30 minutes before serving to allow the frosting to set slightly.
  • This No Bake Patriotic Cheesecake is sure to be a hit at any gathering. The combination of sweet crust, creamy filling, fruity Jell-O, and fresh berries is simply divine. Enjoy!

    No Bake Patriotic Cheesecake

    Conclusion:

    So there you have it! This No Bake Patriotic Cheesecake is truly a showstopper without the stress of baking. Its creamy, decadent texture, vibrant red, white, and blue layers, and the delightful ease of preparation make it the perfect dessert for any summer celebration, from backyard barbecues to Fourth of July fireworks. The no-bake aspect means you can whip it up ahead of time, freeing you to enjoy your guests and the festivities. For serving, a dollop of fresh whipped cream or a scattering of fresh berries adds an extra touch of elegance and flavor. If you’re feeling adventurous with variations, consider adding a hint of lemon zest to the cream cheese layer for a bright counterpoint, or even layering in some crushed grabeef ham crackers for a subtle crunch. I wholeheartedly encourage you to give this No Bake Patriotic Cheesecake a try – I’m confident it will become a staple in your holiday dessert repertoire!

    Frequently Asked Questions:

    Can I make this cheesecake ahead of time?

    Absolutely! This No Bake Patriotic Cheesecake is ideal for making ahead. In fact, it’s best when chilled for at least 6 hours, or preferably overnight, to allow the flavors to meld and the cheesecake to fully set. This makes it perfect for busy hosts!

    What kind of food coloring is best to use?

    For the most vibrant and true patriotic colors, I recommend using gel food coloring. A little goes a long way, and it provides intense color without adding extra liquid to your filling, which could affect the texture. Remember to add it gradually until you achieve your desired shade of red and blue.

    Can I substitute the grabeef ham cracker crust?

    You certainly can! While a grabeef ham cracker crust is classic, you could also use a crushed vanilla wafer crust or even a shortbread cookie crust for a different flavor profile. Just adjust the amount of melted butter accordingly to create a crum extractbly, pressable mixture.


    No Bake Patriotic Cheesecake

    No Bake Patriotic Cheesecake

    A festive and easy no-bake cheesecake with patriotic red, white, and blue layers, perfect for holidays.

    Prep Time
    30 Minutes

    Cook Time
    0 Minutes

    Total Time
    30 Minutes

    Servings
    8 servings

    Ingredients

    • 2 cups golden Oreo crumbs
    • 3 tablespoons butter, melted
    • 1/4 teaspoon salt
    • 1 teaspoon red gel food color
    • 2 packages (8 oz each) cream cheese, softened
    • 2 cups powdered sugar
    • 2 teaspoons vanilla extract
    • 2 cups heavy whipping cream
    • 1 package (3.94 oz) blue raspberry Jell-O
    • 1 cup boiling water
    • 6 oz cream cheese, softened
    • 6 tablespoons butter, softened
    • 3 cups powdered sugar
    • 1 teaspoon vanilla extract
    • Fresh blueberries

    Instructions

    1. Step 1
      Combine golden Oreo crumbs, 3 tablespoons melted butter, and 1/4 teaspoon salt. Press into a 9-inch pie plate to form the crust.
    2. Step 2
      Beat 2 packages cream cheese until smooth. Gradually add 2 cups powdered sugar and 2 teaspoons vanilla extract, beating until combined. Stir in red gel food color.
    3. Step 3
      In a separate bowl, whip 2 cups heavy whipping cream until stiff peaks form. Gently fold into the cream cheese mixture.
    4. Step 4
      Pour half of the red cream cheese mixture over the crust. Chill for 15 minutes.
    5. Step 5
      Dissolve blue raspberry Jell-O in 1 cup boiling water. Let cool slightly. In a separate bowl, beat 6 oz softened cream cheese and 6 tablespoons softened butter until smooth. Add 3 cups powdered sugar and 1 teaspoon vanilla extract. Gradually beat in the cooled Jell-O mixture until combined.
    6. Step 6
      Gently pour the blue Jell-O mixture over the chilled red layer. Chill for at least 4 hours, or until firm.
    7. Step 7
      Once firm, top with the remaining red cream cheese mixture and fresh blueberries before serving.

    Important Information

    Nutrition Facts (Per Serving)

    It is important to consider this information as approximate and not to use it as definitive health advice.

    Allergy Information

    Please check ingredients for potential allergens and consult a health professional if in doubt.

    « Previous Post
    Enhanced Performance Nutrition Fuel Your Goals
    Next Post »
    Creamy Vegan Sun Dried Tomato Pasta Recipe

    If you enjoyed this…

    Dessert

    Apple Cream Cheese Strudel: A Delicious & Easy Recipe

    Dessert

    Creamsicle Slushy Drink: A Refreshing Summer Treat You Can Make at Home

    Dessert

    PB and J Ice Cream: The Ultimate Guide to Making This Classic Treat

    Reader Interactions

    Leave a Comment Cancel reply

    Helpful comments include feedback on the post or changes you made.

    Primary Sidebar

    Browse by Diet

    AppetizerAppetizerBreakfastBreakfastDinnerDinnerLunchLunchDessertDessert
    Pineapple Chicken Kebabs Recipe

    Juicy Pineapple Chicken Kebabs-Easy Grill Recipe

    Chipotle Ranch Grilled Chicken Burrito

    Spicy Chipotle Ranch Chicken Burrito Recipe

    Sticky Bourbon Extract Extract Chicken Skewers

    Sticky Bourbon Extract Chicken Skewers-Irresistible Flavor

    • California Consumer Privacy Act (CCPA)
    • DMCA
    • Cookie Privacy Policy
    • Privacy Policy
    • Terms of Use
    • About Us
    • Contact

    © 2026 · Cuisine Recipe Theme · Genesis Framework · Disclosure · Website Design by Anchored Design