
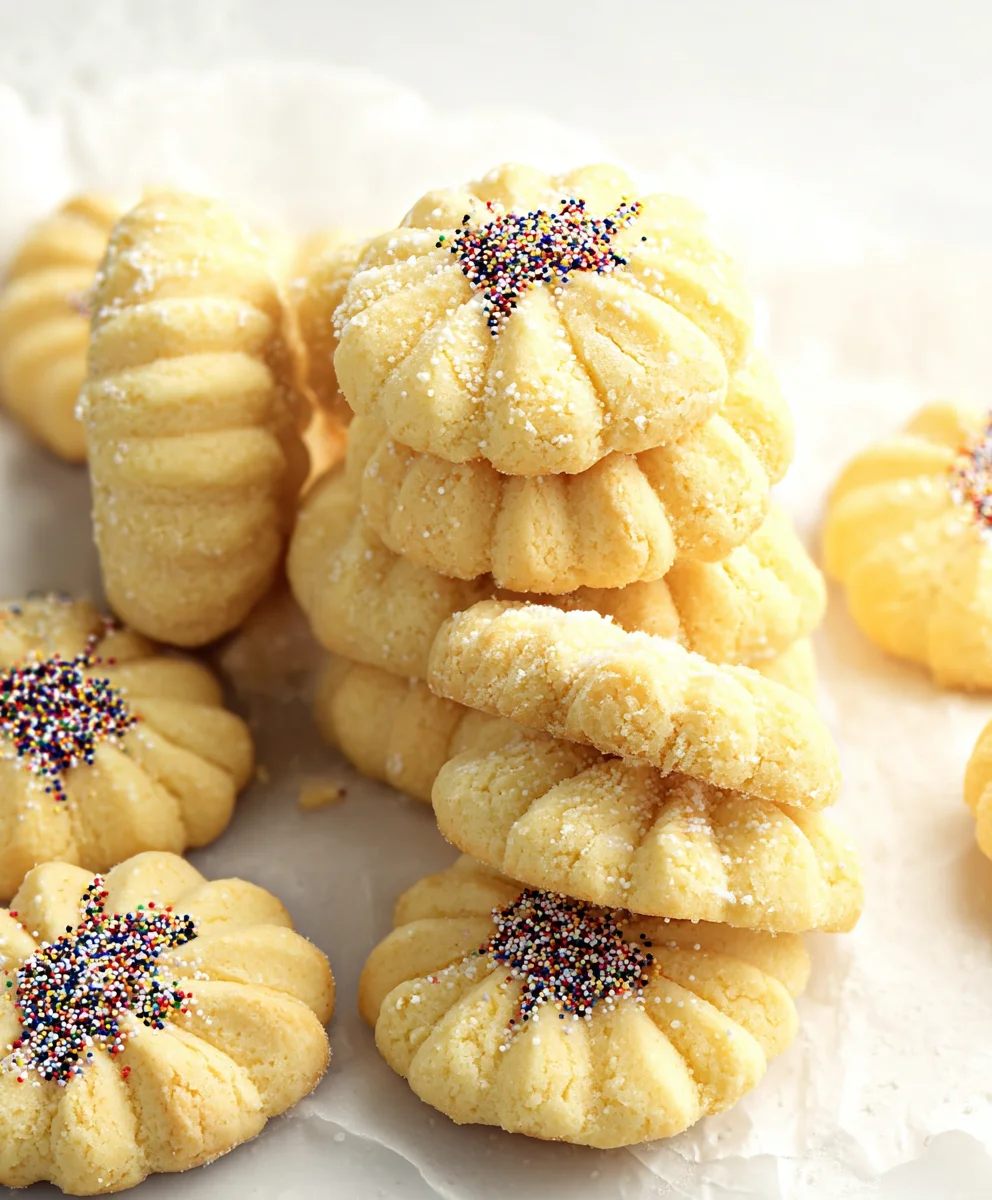
Italian Butter Cookie Recipe – the very mention conjures up images of delicate, melt-in-your-mouth confections, often dusted with a whisper of powdered sugar or adorned with a vibrant sprinkle of colorful sugar. These aren’t just any cookies; they are a timeless symbol of Italian baking tradition, evoking warmth, generosity, and the simple joy of sharing something truly special. What is it about this particular Italian Butter Cookie Recipe that captivates so many? It’s the perfect balance of rich butter, a hint of sweetness, and an almost ethereal crispness that gives way to a tender crum extractb. They’re wonderfully versatile, making them ideal for holiday platters, afternoon tea, or simply as a delightful treat with a steaming cup of coffee. This particular Italian Butter Cookie Recipe has been perfected over generations, ensuring a foolproof way to achieve that authentic, irresistible flavor and texture every single time. Prepare to fall in love with these classic beauties!

Ingredients:
- 2 cups all-purpose flour
- 1/2 teaspoon baking powder
- Pinch of salt
- 1 cup unsalted butter, softened to room temperature
- 3/4 cup granulated sugar
- 2 large egg yolks
- 1 teaspoon vanilla extract
- 1 tablespoon whole milk (only if needed to achieve a soft dough consistency)
- Nonpareil decorating sprinkles (for decoration)
- 1/2 cup melting chocolate (for drizzling or dipping)
Preparing the Dough
The foundation of any great Italian butter cookie recipe lies in a simple yet effective dough. We’ll start by bringin extractg together our dry ingredients. In a medium-sized bowl, whisk together the all-purpose flour, baking powder, and a pinch of salt. Whisking helps to evenly distribute the leavening agent and salt, ensuring a consistent texture in your cookies. Set this bowl aside for now.
Next, we move on to creaming the butter and sugar. In a large mixing bowl, cream together the softened unsalted butter and granulated sugar. It’s crucial that your butter is at room temperature – not melted, but soft enough to be easily pressed with your finger. This will allow it to incorporate air effectively, leading to lighter cookies. Beat these together using an electric mixer on medium speed until the mixture is pnon-alcoholic ale and fluffy. This process can take about 3-5 minutes. Don’t rush this step, as it significantly contributes to the cookie’s texture.
Once the butter and sugar are well creamed, it’s time to add the egg yolks and vanilla extract. Add the two large egg yolks, one at a time, beating well after each addition to ensure they are fully incorporated. Then, stir in the pure vanilla extract. The vanilla adds a classic warmth and depth of flavor that is essential to a well-balanced Italian butter cookie. Scrape down the sides of the bowl occasionally to make sure all ingredients are evenly mixed.
Combining and Chilling
Now, we’ll gradually incorporate the dry ingredients into the wet. With your mixer on low speed, gradually add the flour mixture to the butter and sugar mixture. Mix only until just combined. Overmixing at this stage can develop the gluten in the flour too much, resulting in tough cookies. You’re looking for a cohesive dough. If the dough seems a little dry and crum extractbly and isn’t coming together, this is where the tablespoon of whole milk comes in. Add it a teaspoon at a time, mixing gently until the dough just starts to hold together. Be careful not to add too much liquid, as this can make the cookies spread too much during baking. Once the dough is formed, turn it out onto a lightly floured surface and gently bring it together with your hands. Shape the dough into a flat disk, wrap it tightly in plastic wrap, and refrigerate for at least 30 minutes. This chilling period is essential. It allows the flour to hydrate properly and the butter to firm up again, making the dough easier to handle and preventing excessive spreading during baking.
Shaping and Baking
Preheat your oven to 350°F (175°C). Line baking sheets with parchment paper. This prevents sticking and makes for easy cleanup. After chilling, remove the dough from the refrigerator. You can work with the dough in batches to keep it from getting too warm. Lightly flour your work surface and your hands. For classic Italian butter cookies, you can either roll the dough into small ropes about 1/2 inch thick and cut them into 2-inch pieces, then gently curve them into crescent shapes, or simply roll small portions of dough into balls and flatten them slightly with your palm or the bottom of a glass. Alternatively, you can use a cookie press for intricate shapes. Place the shaped cookies about 1-2 inches apart on the prepared baking sheets.
Now for the fun part – decorating! Before baking, you can lightly press some nonpareil decorating sprinkles onto the tops of the cookies. This adds a delightful visual appeal and a subtle crunch. Once your cookies are shaped and decorated (if desired), bake them in the preheated oven for 10-12 minutes, or until the edges are lightly golden brown and the centers are just set. They will continue to firm up as they cool. Keep a close eye on them, as oven temperatures can vary. It’s better to underbake slightly than to overbake, especially for butter cookies, which are best when they are tender.
Cooling and Finishing Touches
Once baked, let the cookies cool on the baking sheets for 5 minutes before carefully transferring them to a wire rack to cool completely. This allows them to set properly. While the cookies are cooling, you can prepare your melting chocolate. Place the 1/2 cup of melting chocolate in a microwave-safe bowl. Microwave in 30-second intervals, stirring between each interval, until smooth and fully melted. Be careful not to overheat the chocolate, as it can seize. You can then use this melted chocolate to drizzle over the cooled cookies, dip the ends of the cookies into the chocolate, or even create a simple chocolate sandwich cookie. If you are dipping the cookies, allow the excess chocolate to drip off before placing them back on the wire rack to set completely. You can also sprinkle a few more nonpareil sprinkles onto the wet chocolate for an extra decorative touch.
These Italian butter cookies are a delightful treat for any occasion. The combination of tender, buttery cookie and sweet, smooth chocolate is truly irresistible. They are perfect with a cup of coffee or tea, or as a sweet ending to any meal. Enjoy the process of making them, and savor the delicious results!

Conclusion:
We hope you’ve enjoyed exploring this delightful Italian Butter Cookie Recipe! These cookies are a testament to simple ingredients creating extraordinary flavor and texture. Their tender, melt-in-your-mouth quality and subtle sweetness make them perfect for any occasion. Whether you’re a seasoned baker or just starting out, this recipe is designed to be approachable and rewarding.
For serving, these Italian Butter Cookies are wonderfully versatile. They are a classic accompaniment to your afternoon coffee or tea. For a touch of elegance, arrange them on a platter alongside fresh berries or a dollop of whipped cream. They also make a thoughtful homemade gift, packaged in a pretty tin or box tied with a ribbon.
Don’t be afraid to get creative with variations! Consider adding a hint of lemon or almond extract to the dough for a different aromatic profile. You can also dip the cooled cookies halfway in melted dark or white chocolate, or even sprinkle them with finely chopped nuts or colorful jimmies before baking for an extra festive touch.
Give this Italian Butter Cookie Recipe a try soon! We’re confident you’ll love the results and find them a charming addition to your baking repertoire. Happy baking!
FAQs:
Q: How should I store Italian Butter Cookies?
A: Once completely cooled, Italian Butter Cookies can be stored in an airtight container at room temperature for up to a week. For longer storage, you can freeze them. Lay them flat on a baking sheet until frozen, then transfer to a freezer-safe bag or container. They will keep for up to 3 months.
Q: Can I make the dough ahead of time?
A: Yes, you absolutely can! The dough for this Italian Butter Cookie Recipe can be made a day or two in advance and stored, tightly wrapped in plastic wrap, in the refrigerator. Allow it to soften slightly at room temperature for about 15-20 minutes before shaping.
Easy Italian Butter Cookie Recipe-Melt-in-Your-Mouth Delights
Tender, buttery Italian butter cookies that melt in your mouth, perfect for any occasion.
Ingredients
-
2 cups all-purpose flour
-
1/2 teaspoon baking powder
-
Pinch of salt
-
1 cup unsalted butter, softened
-
3/4 cup granulated sugar
-
2 large egg yolks
-
1 teaspoon vanilla extract
-
1 tablespoon whole milk (if needed)
-
Nonpareil decorating sprinkles
-
1/2 cup melting chocolate
Instructions
-
Step 1
In a medium bowl, whisk together all-purpose flour, baking powder, and salt. Set aside. -
Step 2
In a large bowl, cream together softened butter and granulated sugar with an electric mixer on medium speed until light and fluffy (3-5 minutes). -
Step 3
Add egg yolks one at a time, beating well after each addition. Stir in vanilla extract. -
Step 4
Gradually add the flour mixture to the wet ingredients on low speed until just combined. If the dough is dry, add milk a teaspoon at a time until it holds together. Shape into a disk, wrap, and refrigerate for at least 30 minutes. -
Step 5
Preheat oven to 350°F (175°C). Line baking sheets with parchment paper. Shape cookies (ropes, balls, or use a cookie press) and place 1-2 inches apart on baking sheets. Decorate with sprinkles before baking if desired. -
Step 6
Bake for 10-12 minutes, until edges are lightly golden brown. Let cool on baking sheets for 5 minutes, then transfer to a wire rack to cool completely. -
Step 7
Melt 1/2 cup melting chocolate in microwave-safe bowl in 30-second intervals, stirring until smooth. Drizzle, dip cookies, or sandwich cookies. Add more sprinkles to wet chocolate if desired. Let set.
Important Information
Nutrition Facts (Per Serving)
It is important to consider this information as approximate and not to use it as definitive health advice.
Allergy Information
Please check ingredients for potential allergens and consult a health professional if in doubt.
Leave a Comment