
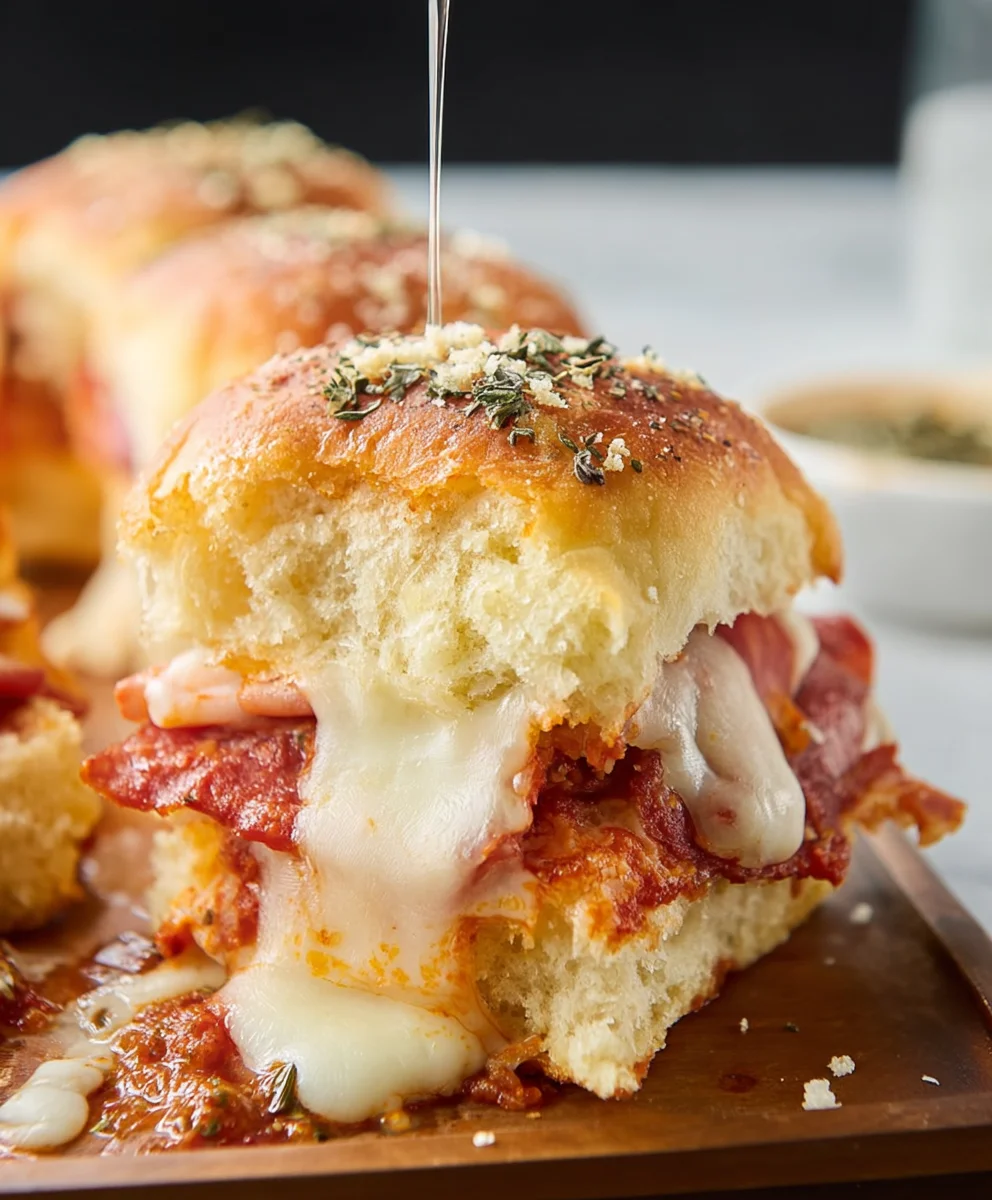
Pizza Sliders are a game-changer for any gathering, offering all the beloved flavors of pizza in an incredibly convenient and bite-sized package. Forget wrestling with full-sized slices; these miniature masterpieces are designed for effortless mingling and pure snacking joy. What is it about these little delights that makes them so universally adored? It’s the perfect balance of savory toppings, gooey cheese, and a soft, pillowy bun that cradles it all. They’re endlessly customizable, meaning everyone can find their favorite pizza combination, from classic beef pepperoni to a vibrant veggie medley. The true magic of Pizza Sliders lies in their ability to transform a casual get-together into a memorable culinary event. They’re not just a snack; they’re an experience, a fun and flavorful way to share the joy of pizza with friends and family without all the fuss.

Ingredients:
- 1 package dinner rolls (we used potato rolls for their soft texture and slight sweetness)
- 2 cups shredded mozzarella cheese (low-moisture, part-skim works best for melting)
- 1 small package beef beef pepperoni slices (choose your favorite kind, thin or thick cut)
- 1/4 cup tomato sauce (a simple, good-quality pizza sauce is ideal)
- 1/2 teaspoon hot sauce (adjust to your spice preference; sriracha or your favorite chili sauce works)
- 1/4 cup unsalted butter, melted (for that irresistible golden crust)
- 2 teaspoons dried oregano (or a blend of Italian seasoning for an extra layer of flavor)
Preparation and Assembly
Step 1: Preparing the Roll Assembly
Start by taking your package of dinner rolls. The key to great pizza sliders is to keep them intact as much as possible. Using a serrated knife, carefully slice the entire package of rolls horizontally, as if you were slicing a giant loaf of bread. You want to separate the top half from the bottom half, creating two large flat surfaces. Be gentle to avoid tearing the rolls apart too much. If a few rolls get slightly separated, don’t worry; they will still come together when baked. Lay the bottom halves of the rolls cut-side up on a baking sheet lined with parchment paper. This parchment paper is a lifesaver for easy cleanup!
Step 2: Creating the Flavorful Sauce Base
In a small bowl, combine the tomato sauce and the hot sauce. Stir them together until they are well incorporated. This simple mixture forms the base of our delicious pizza sauce. The hot sauce adds a subtle kick and a touch of tangin extractess that complements the richness of the cheesebeef pepperonieroni. You can add a little more hot sauce if you enjoy a spicier slider, or omit it entirely if you prefer a milder flavor. Spread this sauce evenly over the cut surface of the bottom halves of the dinner rolls. Make sure to get close to the edges, but try not to let too much sauce drip down the sides, as it can cause the rolls to stick to the pan.
Step 3: Layering on the Cheesy GooBeef Pepperoni Pepperoni
Now comes the fun part – beef pepperonie and pepperoni! Sprinkle about half of the shredded mozzarella cheese evenly over the sauce-covered bottom rolls. This layer of cheese acts beef pepperonier for the pepperoni and helps to hold everything togetherbeef pepperonirrange the beef pepperoni slices on top of the cheese. You can overlap them slightly, or lay thebeef pepperoniepending on how much pepperoni goodness you want in beef pepperonier. Don’t be shy with the pepperoni; it’s a crucial ebeef pepperoni these pizza sliders! Once the pepperoni is in place, sprinkle the rembeef pepperonizzarella cheese over the top of the pepperoni. Ensure a generous amount of cheese to create that classic gooey, melty pizza experience.
Step 4: Adding the Aromatic Seasoning and Top Assembly
Sprinkle the dried oregano (or Italian seasoning) evenly over the top layer of mozzarella cheese. This aromatic herb is essential for that authentic pizza flavor. If you’re using Italian seasoning, you’ll get a lovely blend of herbs like basil, thyme, and rosemary, which are fantastic on pizza. Now, take the top halves of the dinner rolbeef pepperonintly place them on top of the cheese and pepperoni layer, aligning them with the bottom halves as best as you can. Lightly press down on the top of the assembled sliders to help them compact slightly and ensure everything stays in place during baking.
Step 5: Baking to Golden Perfection
In a small bowl, melt the butter. You can do this in the microwave in 30-second intervals, stirring in between, or on the stovetop in a small saucepan. Once melted, brush the melted butter generously over the top surfaces of the entire assembled pan of sliders. This butter not only adds a beautiful golden-brown color to the crust but also contributes to a wonderful crispiness and rich flavor. Place the baking sheet with the prepared pizza sliders into a preheated oven at 350°F (175°C). Bake for approximately 15-20 minutes, or until the cheese is melted and bubbly, and the tops of the rolls are golden brown and slightly toasted. Keep an eye on them towards the end of the baking time to prevent them from burning.
Step 6: Resting and Serving Your Pizza Sliders
Once they are perfectly golden and the cheese is wonderfully melted and gooey, carefully remove the baking sheet from the oven. It’s crucial to let the pizza sliders rest for about 5-10 minutes before cutting them. This resting period allows the cheese to set slightly, making it much easier to slice through the individual sliders without everything falling apart. Use your serrated knife to carefully cut between the individual rolls, creating your delightful pizza sliders. Serve them warm and enjoy the explosion of pizza flavors in every bite! These are perfect for parties, game nights, or just a fun and easy meal.

Conclusion:
And there you have it – your ultimate guide to crafting perfect Pizza Sliders! We’ve walked through each step, from preparing the dough to assembling those irresistible layers of cheese and toppings. These Pizza Sliders are more than just a recipe; they’re a gateway to fun, flavourful gatherings and cozy nights in. Their delightful mini-size makes them perfect for sharing, and they’re guaranteed to be a hit with both kids and adults alike.
To elevate your Pizza Sliders experience, consider serving them with a side of warm marinara dipping sauce, a crisp garden salad, or even some garlic knots for an extra touch of Italian flair. Don’t be afraid to experiment with variations! Swap out the beef pepperoni for other cured meats like beef salami or beef prosciutto, load them up with your favourite veggies such as mushrooms, bell peppers, or onions, or get adventurous with different cheeses like provolone or a sprinkle of Parmesan. The possibilities are truly endless!
We encourage you to get creative in the kitchen and make these Pizza Sliders your own. Remember, the joy is in the making and the sharing. So, gather your ingredients, put on your favourite apron, and dive into this deliciously fun culinary adventure!
Frequently Asked Questions:
Can I make the Pizza Sliders dough ahead of time?
Absolutely! You can prepare the Pizza Sliders dough up to 24 hours in advance. Store it in an airtight container in the refrigerator. Let it come to room temperature for about 30-60 minutes before you plan to assemble the sliders for easier handling.
What kind of bread is best for Pizza Sliders?
While many recipes use slider buns or dinner rolls, you can also use a cut-up baguette or even focaccia bread for your Pizza Sliders. The key is to have a bread that holds its shape well and can absorb some of the sauce without becoming too soggy.
How long do Pizza Sliders take to bake?
Typically, Pizza Sliders bake for about 10-15 minutes, or until the cheese is melted and bubbly and the buns are lightly golden brown. Keep an eye on them to prevent burning, as oven temperatures can vary.
Easy Beef Pizza Sliders – Quick & Delicious Meal
These easy beef pizza sliders are a quick and delicious meal, perfect for parties or a fun family dinner. They feature a savory beef pepperoni filling, melted mozzarella, and a flavorful sauce baked into soft dinner rolls.
Ingredients
-
1 package dinner rolls (potato rolls recommended)
-
2 cups shredded mozzarella cheese
-
1 small package beef pepperoni slices
-
1/4 cup tomato sauce
-
1/2 teaspoon hot sauce
-
1/4 cup unsalted butter, melted
-
2 teaspoons dried oregano
Instructions
-
Step 1
Slice the package of dinner rolls horizontally to create a top and bottom half. Lay the bottom halves cut-side up on a parchment-lined baking sheet. -
Step 2
In a small bowl, combine tomato sauce and hot sauce. Spread this mixture evenly over the cut surface of the bottom rolls. -
Step 3
Sprinkle half of the mozzarella cheese over the sauce. Arrange the beef pepperoni slices on top of the cheese. Sprinkle the remaining mozzarella cheese over the pepperoni. -
Step 4
Sprinkle dried oregano evenly over the top layer of mozzarella. Place the top halves of the rolls on top and lightly press down. -
Step 5
Brush the top surfaces of the assembled sliders generously with melted butter. Bake at 350°F (175°C) for 15-20 minutes, or until golden brown and bubbly. -
Step 6
Let the pizza sliders rest for 5-10 minutes before carefully cutting between individual rolls. Serve warm.
Important Information
Nutrition Facts (Per Serving)
It is important to consider this information as approximate and not to use it as definitive health advice.
Allergy Information
Please check ingredients for potential allergens and consult a health professional if in doubt.
Leave a Comment