
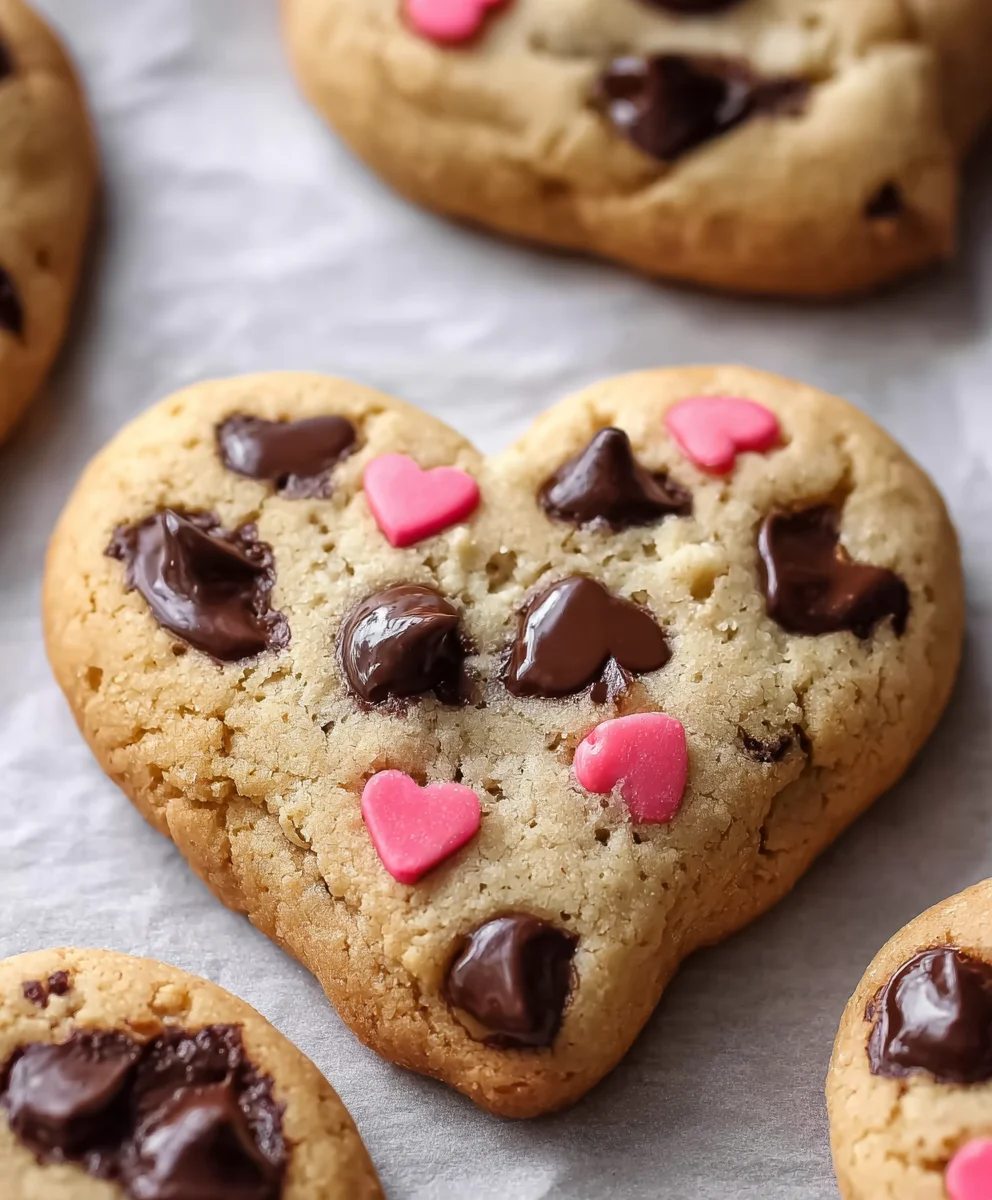
Easy Heart Shaped Chocolate Chip Cookies are more than just a sweet treat; they are a delightful way to share a piece of your heart with loved ones. There’s something universally comforting about the classic chocolate chip cookie, a beloved American invention dating back to the 1930s, and we all have fond memories associated with their rich, sweet aroma. Taking this timeless dessert and transforming it into a charming heart shape elevates it from a simple snack to a thoughtful gesture, perfect for expressing affection on Valentine’s Day, anniversaries, or any day you wish to spread a little joy through a homemade gift.
I find that people absolutely adore these cookies not only for their irresistible taste—that perfect blend of buttery sweetness and melty chocolate chips—but also for their inviting texture: soft and chewy centers with just the right amount of crispiness at the edges. The whimsical heart shape adds an extra layer of visual appeal and makes them feel incredibly special, whether served at a party or enjoyed as a cozy afternoon delight. This recipe for Easy Heart Shaped Chocolate Chip Cookies promises a straightforward baking experience, ensuring that even novice bakers can achieve beautifully formed, delicious results without fuss. It’s the ultimate combination of convenience, classic flavor, and heartfelt presentation that brings smiles to every face.

Ingredients:
- 2 ½ cups (300g) all-purpose flour: I always recommend using a good quality unbleached flour. Sifting it beforehand can make a big difference in the cookie’s texture, leading to a lighter, more tender crumb for our Easy Heart Shaped Chocolate Chip Cookies.
- 1 teaspoon baking soda: This is our leavening agent. Ensure it’s fresh for the best rise and spread. You can test its freshness by adding a pinch to a small amount of vinegar; if it fizzes vigorously, it’s good to go!
- ½ teaspoon salt: A crucial ingredient that balances the sweetness and enhances the flavor of the chocolate. Don’t skip it!
- 1 cup (226g) unsalted butter: This needs to be softened to room temperature. This is absolutely critical for achieving the perfect creamy texture when you cream it with the sugars. If it’s too cold, it won’t incorporate properly; if it’s melted, your cookies will spread too much. I usually take it out about an hour or two before I plan to bake.
- ¾ cup (150g) granulated sugar: Provides sweetness and helps with the spread and crispiness of the edges.
- ¾ cup (150g) packed light brown sugar: This adds a lovely caramel-like flavor, contributes to chewiness, and keeps the cookies moist. Make sure it’s packed firmly when measuring to get the correct amount.
- 2 large eggs: Also at room temperature. Just like the butter, room temperature eggs emulsify better with the other ingredients, creating a smoother, more uniform dough. If you forget to take them out, you can quickly warm them by placing them in a bowl of warm (not hot!) water for about 5-10 minutes.
- 2 teaspoons pure vanilla extract: I always say, use the best quality vanilla you can find. It makes a noticeable difference in the overall flavor profile of your Easy Heart Shaped Chocolate Chip Cookies.
- 1 ½ cups (250g) semi-sweet chocolate chips: You can use mini chocolate chips, standard, or even chopped chocolate bars for different textures. I sometimes like a mix of semi-sweet and milk chocolate for added complexity.
- Optional: Sprinkles (heart-shaped or festive), a simple glaze, or white chocolate drizzle for decoration.
Equipment You’ll Need:
- Large mixing bowls (at least two)
- Electric mixer (stand mixer with paddle attachment or a hand mixer)
- Whisk
- Rubber spatula
- Measuring cups and spoons
- Parchment paper or silicone baking mats
- Baking sheets
- Wire cooling racks
- Rolling pin
- Heart-shaped cookie cutters (various sizes if desired, but one standard size works perfectly)
- Plastic wrap
Preparing Your Dough for Easy Heart Shaped Chocolate Chip Cookies:
Creating the perfect dough is the foundation for truly remarkable cookies. Take your time with each step, and you’ll be rewarded with a beautiful, flavorful base for your Easy Heart Shaped Chocolate Chip Cookies.
- Whisk Dry Ingredients: In a medium bowl, whisk together your 2 ½ cups of all-purpose flour, 1 teaspoon of baking soda, and ½ teaspoon of salt. I like to give it a good whisk for about 30 seconds to ensure everything is evenly distributed. This prevents pockets of baking soda or salt in your final cookie. Set this bowl aside for now.
- Cream Butter and Sugars: In a large mixing bowl, using an electric mixer (either a stand mixer with a paddle attachment or a hand mixer), beat your 1 cup of softened unsalted butter on medium speed until it’s light and creamy, which usually takes about 1-2 minutes. Then, add your ¾ cup of granulated sugar and ¾ cup of packed light brown sugar to the butter. Continue beating on medium-high speed for another 2-3 minutes, or until the mixture is truly light, fluffy, and noticeably pale in color. This process, known as creaming, incorporates air into the butter and sugar, which is vital for the texture of your Easy Heart Shaped Chocolate Chip Cookies. Scrape down the sides of the bowl often with your rubber spatula to ensure all ingredients are well combined.
- Add Eggs and Vanilla: Reduce the mixer speed to low. Add one large room temperature egg at a time, mixing well after each addition until just combined. Be careful not to overmix here. After the eggs are incorporated, stir in the 2 teaspoons of pure vanilla extract. The mixture might look a little curdled at this point, but don’t worry; it will come together once the dry ingredients are added. Again, give the bowl a good scrape to gather any unmixed ingredients from the bottom and sides.
- Gradually Add Dry to Wet: With the mixer on low speed, slowly add your dry ingredient mixture (flour, baking soda, salt) to the wet ingredients. Mix only until just combined and a soft dough forms. It’s crucial not to overmix the dough once the flour is added, as this can develop the gluten too much, resulting in tough, dry cookies. Stop mixing as soon as you see no more streaks of dry flour.
- Fold in Chocolate Chips: Remove the bowl from the mixer and, using your rubber spatula, gently fold in the 1 ½ cups of semi-sweet chocolate chips. Distribute them evenly throughout the dough. I sometimes like to reserve a small handful to press onto the tops of the cookies before baking for a picture-perfect look.
- Chill the Dough (Essential!): This step is non-negotiable for beautiful, well-shaped cookies, especially when using cookie cutters. Wrap the dough tightly in plastic wrap and refrigerate for at least 1-2 hours, or even overnight. Chilling allows the butter to firm up, prevents the cookies from spreading too much, and deepens the flavors. It makes the dough much easier to handle and cut into those perfect heart shapes for your Easy Heart Shaped Chocolate Chip Cookies.
Shaping and Baking Your Easy Heart Shaped Chocolate Chip Cookies:
Now comes the fun part – transforming your perfectly chilled dough into charming heart shapes and baking them to golden perfection!
- Preheat Oven and Prep Baking Sheets: About 15-20 minutes before you’re ready to bake, preheat your oven to 375°F (190°C). Line two large baking sheets with parchment paper or silicone baking mats. This ensures even baking and prevents sticking, making cleanup a breeze.
- Prepare Your Workspace and Dough: Lightly flour a clean work surface (a large cutting board or your countertop works great) and your rolling pin. Take about half of your chilled dough from the refrigerator. If the dough is very hard, let it sit out for 5-10 minutes to soften slightly, but don’t let it get too warm.
- Roll Out the Dough: Place the dough on your floured surface and gently roll it out evenly to a thickness of about ¼ to ⅓ inch (0.6 to 0.8 cm). I find this thickness ideal for a cookie that’s sturdy enough to hold its shape but still soft and chewy in the center. Try to maintain an even thickness across the entire sheet of dough for consistent baking.
- Cut Out Heart Shapes: Dip your heart-shaped cookie cutter in a little flour before each cut to prevent sticking. Press the cookie cutter firmly into the rolled-out dough, wiggling it slightly to ensure a clean cut. Carefully lift the cutter and transfer the heart-shaped dough cutouts to your prepared baking sheets, leaving about 1-2 inches of space between each cookie to allow for slight spreading. Gather the dough scraps, gently re-roll them, and cut out more shapes until all the dough is used. Try not to overwork the scraps too much, as this can make the cookies tough.
- Bake to Golden Perfection: Place one baking sheet at a time into your preheated oven. Bake for 8-10 minutes, or until the edges are lightly golden brown and the centers are just set but still look a little soft. Remember that ovens vary, so keep a close eye on your cookies. For truly Easy Heart Shaped Chocolate Chip Cookies, you want them slightly underdone in the middle for maximum chewiness after cooling.
- Cooling Process: Once baked, remove the baking sheet from the oven. Let the cookies cool on the baking sheet for about 5 minutes. This allows them to firm up before you move them. Then, carefully transfer the cookies to a wire cooling rack to cool completely. Cooling on a rack ensures air circulation all around the cookie, preventing a soggy bottom.
- Repeat: Continue the process with the remaining dough and baking sheets until all your beautiful heart-shaped cookies are baked and cooled.
Optional Decoration for Your Easy Heart Shaped Chocolate Chip Cookies:
While these cookies are absolutely delicious plain, a little decoration can make your Easy Heart Shaped Chocolate Chip Cookies even more special, especially for holidays or gifts!
- Prepare a Simple Glaze (Optional): In a small bowl, whisk together 1 cup of powdered sugar with 2-3 tablespoons of milk (or water, or lemon juice for a tangy twist) and ¼ teaspoon of vanilla extract. Adjust the consistency by adding more sugar for a thicker glaze or more liquid for a thinner one. You want a consistency that’s thick enough to coat a spoon but still pourable.
- Drizzle or Dip: Once the cookies are completely cool, you can either drizzle the glaze over the tops using a spoon or a small piping bag with a fine tip, or you can carefully dip the top half of each cookie into the glaze.
- Add Sprinkles: If desired, immediately after glazing (while the glaze is still wet), sprinkle with heart-shaped or colorful sprinkles. This adds a lovely festive touch and a bit of texture.
- Allow to Set: Let the glazed and sprinkled cookies sit on the wire rack for at least 30 minutes, or until the glaze has fully set before stacking or serving.
Tips for Perfect Easy Heart Shaped Chocolate Chip Cookies Every Time:
Achieving the perfect batch of Easy Heart Shaped Chocolate Chip Cookies is a delightful endeavor, and these tips will help ensure your success every single time.
-
Ingredient Temperature Matters:
I cannot stress this enough: room temperature butter and eggs are non-negotiable for the best results. Cold ingredients do not emulsify properly, leading to a lumpy batter and cookies that might not spread or bake evenly. If your butter is too cold, it won’t cream well, and if it’s too warm/melted, your cookies will spread excessively. For eggs, if you forgot to take them out, place them in a bowl of warm water for 5-10 minutes. For butter, cutting it into smaller pieces can help it soften faster, or you can gently microwave it for a few seconds (being very careful not to melt it).
-
Do Not Overmix the Dough:
Once you add the flour, mix only until just combined. Overmixing develops the gluten in the flour, which can lead to tough, dense cookies instead of the soft, chewy texture we desire for our Easy Heart Shaped Chocolate Chip Cookies. As soon as you see no more dry streaks of flour, stop the mixer and finish folding in the chocolate chips by hand.
-
The Importance of Chilling:
Chilling the dough is an absolutely crucial step for shaped cookies. Not only does it firm up the butter, preventing excessive spreading during baking, but it also allows the flavors to meld and deepen. A well-chilled dough is significantly easier to roll out and cut cleanly. If your dough becomes too warm while you’re cutting out shapes, don’t hesitate to pop it back into the fridge for 10-15 minutes. This small pause will save you a lot of frustration and result in much cleaner heart shapes.
-
Consistent Dough Thickness:
When rolling out the dough, aim for an even thickness across the entire sheet. If some parts are thinner than others, they will bake faster and potentially burn before the thicker parts are done. A consistent ¼ to ⅓ inch thickness is ideal for a cookie that bakes evenly and has a good bite.
-
Flour Your Cutter:
Before each cut, lightly dip your heart-shaped cookie cutter in flour. This simple trick prevents the dough from sticking to the cutter, ensuring clean, sharp edges for your hearts. If the dough starts to stick, re-flour your cutter.
-
Don’t Overcrowd the Baking Sheet:
Always leave enough space between your cookie cutouts on the baking sheet – at least 1-2 inches. Cookies need room to spread slightly and for hot air to circulate evenly around them. Overcrowding can lead to unevenly baked cookies and can make them stick together.
-
Know Your Oven:
Oven temperatures can vary significantly. Investing in an oven thermometer can be incredibly helpful for accurate baking. Also, remember that the baking time is a guideline. Look for visual cues: lightly golden edges and centers that are just set but still look a little soft. The cookies will continue to cook slightly as they cool on the hot baking sheet.
-
Cooling Correctly:
Allowing the cookies to cool on the baking sheet for 5 minutes before transferring them to a wire rack is important. This allows them to firm up slightly and prevents them from breaking. Cooling completely on a wire rack ensures air circulation, preventing the bottoms from becoming soggy and helping them achieve that perfect texture.
-
Creative Uses for Scraps:
Don’t toss those dough scraps! Gently gather them, press them together (without overworking), and re-roll. You can cut more hearts, or simply roll them into small balls and bake them as “mini-me” chocolate chip cookies. They will still be delicious! This ensures no dough goes to waste from your batch of Easy Heart Shaped Chocolate Chip Cookies.
-
Storage:
Store your cooled Easy Heart Shaped Chocolate Chip Cookies in an airtight container at room temperature for up to 5-7 days. If you want to keep them fresh for longer, you can freeze them for up to 3 months. Simply thaw them at room temperature before enjoying. They’re wonderful as a homemade gift or a special treat for yourself!
Conclusion:
And there you have it, my dear baking enthusiasts! We’ve journeyed through the simple steps to create something truly magical, something that will undoubtedly bring smiles and warmth to any occasion. I truly believe that if you’re looking for a dessert that perfectly balances simplicity with an incredibly charming and personal touch, then my recipe for these Easy Heart Shaped Chocolate Chip Cookies is absolutely what you need to try next. These aren’t just any cookies; they’re little bundles of joy, crafted with love and designed to melt in your mouth, leaving behind that classic, comforting taste of homemade goodness. From the moment the aroma of baking chocolate chips fills your kitchen to that first delightful bite, you’ll understand why this recipe is a cherished favorite in my home and why I’m so excited for it to become one in yours too.
What makes these cookies an absolute must-try? It’s the perfect harmony of textures and flavors. You get those wonderfully crisp edges that give way to a soft, chewy interior, studded generously with pools of melted chocolate that practically burst with every bite. The heart shape, of course, adds that extra layer of thoughtfulness, transforming a classic treat into something truly special for birthdays, anniversaries, Valentine’s Day, or simply to show someone you care on a random Tuesday. They embody everything you love about a classic chocolate chip cookie but with an added dash of whimsy that makes them irresistible. Trust me, once you make these, you’ll find yourself reaching for this recipe time and again, not just for special occasions but for those everyday moments that deserve a little extra sweetness.
Elevate Your Cookie Experience: Serving Suggestions & Variations
Now, let’s talk about how to truly make these cookies shine even brighter or how to adapt them to your heart’s content. While these beauties are absolutely divine on their own, especially when still warm from the oven, there are so many ways to enjoy them. Imagine a plate of these alongside a tall, frosty glass of milk – pure nostalgia! For a more sophisticated treat, pair them with a rich, dark roast coffee or a soothing cup of herbal tea. They also make an incredible accompaniment to a scoop of your favorite ice cream. Picture this: a warm, gooey heart-shaped cookie nestled next to a scoop of vanilla bean, strawberry, or even mint chocolate chip ice cream, creating a delightful contrast of temperatures and textures. You could even create an elegant dessert platter, arranging them amongst fresh berries, a dollop of whipped cream, or a drizzle of raspberry coulis for a truly impressive display.
Feeling adventurous? These cookies are incredibly versatile and welcome creative twists. Consider swapping out some of the milk chocolate chips for white chocolate or dark chocolate for a richer flavor profile. For an extra layer of texture and nutty goodness, fold in a handful of chopped walnuts, pecans, or almonds. A pinch of flaky sea salt sprinkled on top right after they come out of the oven will elevate the chocolate notes beautifully, adding a gourmet touch. Or, for a different flavor dimension, try adding a tiny drop of almond extract or a dash of espresso powder to the dough – it subtly enhances the chocolate without overpowering it. You could even drizzle cooled cookies with melted white chocolate or a contrasting colored icing, then sprinkle with festive nonpareils or edible glitter to match any holiday or celebration. And remember, these cookies are not only for eating right away; they package beautifully, making them the perfect thoughtful gift for friends, family, or neighbors. Just tie them up in a cute cellophane bag with a ribbon, and you have a heartfelt present ready to go!
Your Turn: Bake, Enjoy, and Share!
So, what are you waiting for? I genuinely hope that this recipe inspires you to preheat your oven and embark on your own baking adventure. There’s a profound joy and immense satisfaction that comes from creating something delicious with your own hands, especially when it results in something as charming and delightful as these heart-shaped cookies. Don’t be shy; gather your ingredients, follow the steps, and watch as your kitchen transforms into a haven of sweet aromas. And once you’ve pulled your beautiful cookies from the oven, tasted their perfection, and perhaps even shared them with loved ones, please come back and tell me all about it! I absolutely love hearing about your baking experiences. Share your photos, your triumphs, any creative modifications you made, and what you loved most about them. Your feedback and stories are what truly bring these recipes to life for me and for our entire community of enthusiastic home bakers. Happy baking, everyone – I can’t wait to see what you create!

Easy Heart Shaped Chocolate Chip Cookies
These delightful heart-shaped chocolate chip cookies offer a perfect blend of buttery sweetness, melty chocolate, and a soft, chewy texture with crispy edges. Ideal for special occasions or a thoughtful homemade gift, this recipe ensures beautifully formed, delicious results with ease.
Ingredients
-
2 ½ cups (300g) all-purpose flour
-
1 teaspoon baking soda
-
½ teaspoon salt
-
1 cup (226g) unsalted butter, softened
-
¾ cup (150g) granulated sugar
-
¾ cup (150g) packed light brown sugar
-
2 large eggs, room temperature
-
2 teaspoons pure vanilla extract
-
1 ½ cups (250g) semi-sweet chocolate chips
-
Optional: Sprinkles (heart-shaped or festive) or white chocolate drizzle for decoration
Instructions
-
Step 1
In a medium bowl, whisk together the 2 ½ cups all-purpose flour, 1 teaspoon baking soda, and ½ teaspoon salt. Set aside. -
Step 2
In a large mixing bowl, beat 1 cup softened unsalted butter on medium speed until light and creamy (1-2 min). Add ¾ cup granulated sugar and ¾ cup packed light brown sugar; continue beating for 2-3 minutes until the mixture is light, fluffy, and pale. Scrape down the sides of the bowl. -
Step 3
Reduce mixer speed to low. Add 2 large room temperature eggs, one at a time, mixing well after each until just combined. Stir in 2 teaspoons pure vanilla extract. Scrape bowl. -
Step 4
With the mixer on low speed, slowly add the dry ingredient mixture to the wet ingredients. Mix only until just combined and a soft dough forms. Do not overmix. -
Step 5
Remove the bowl from the mixer and, using a rubber spatula, gently fold in the 1 ½ cups semi-sweet chocolate chips until evenly distributed. -
Step 6
Wrap the dough tightly in plastic wrap and refrigerate for at least 1-2 hours, or even overnight. This step is crucial for well-shaped cookies. -
Step 7
About 15-20 minutes before baking, preheat your oven to 375°F (190°C). Line two large baking sheets with parchment paper or silicone baking mats. Lightly flour a clean work surface and your rolling pin. -
Step 8
Take about half of your chilled dough. Roll it out evenly to a thickness of about ¼ to ⅓ inch (0.6 to 0.8 cm). Dip your heart-shaped cookie cutter in flour before each cut, then press firmly into the dough. Transfer the heart cutouts to your prepared baking sheets, leaving 1-2 inches between each cookie. Gather and gently re-roll scraps to cut more shapes. -
Step 9
Place one baking sheet at a time into the preheated oven. Bake for 8-10 minutes, or until the edges are lightly golden brown and the centers are just set but still look a little soft. -
Step 10
Once baked, remove the baking sheet from the oven. Let the cookies cool on the baking sheet for about 5 minutes to firm up, then carefully transfer them to a wire cooling rack to cool completely. Repeat with remaining dough. -
Step 11
Once completely cool, you can optionally prepare a simple glaze by whisking 1 cup powdered sugar with 2-3 tablespoons milk and ¼ teaspoon vanilla extract. Drizzle the glaze over the cookies and immediately add sprinkles if desired. Allow the glaze to set for at least 30 minutes before stacking or serving.
Important Information
Nutrition Facts (Per Serving)
It is important to consider this information as approximate and not to use it as definitive health advice.
Allergy Information
Please check ingredients for potential allergens and consult a health professional if in doubt.

Leave a Comment