
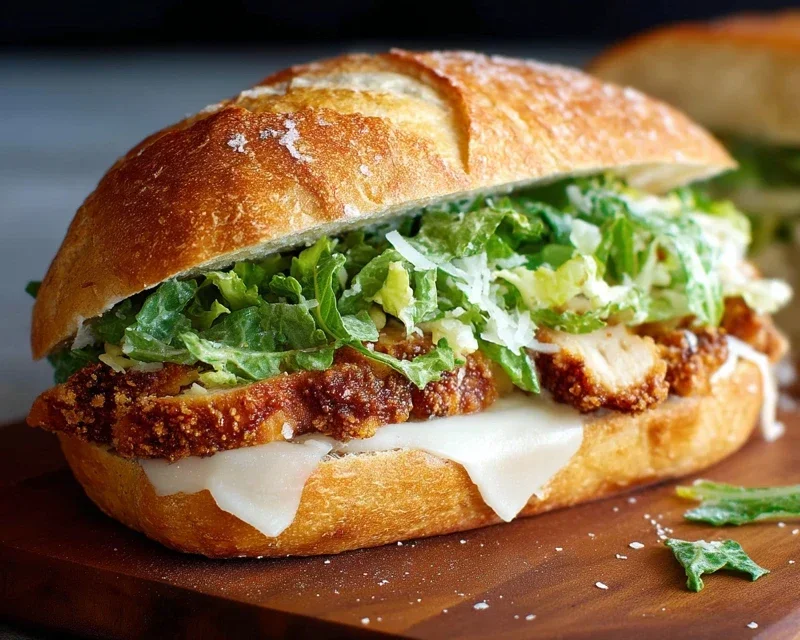
The Crispy Chicken Caesar Sandwich is more than just a meal; it’s a symphony of textures and flavors that has captured hearts (and taste buds!) for generations. We all know and love the classic Caesar salad – that tangy, creamy dressing, the crisp romaine, the salty parmesan, and those irresistible croutons. But what happens when you take those beloved elements and elevate them into a handheld delight? That’s where this incredible Crispy Chicken Caesar Sandwich comes in, transforming a familiar favorite into a completely new obsession.
Why You’ll Adore This Masterpiece
It’s the perfect storm of deliciousness. Imagin extracte tender, juicy chicken, coated in a golden, crunchy crust, meeting the cool, crisp bite of romaine lettuce. Then, add that signature Caesar dressing, a generous sprinkle of sharp parmesan, and perhaps a few perfectly toasted croutons for an extra layer of texture. This isn’t just any sandwich; it’s an experience. It’s that satisfying crunch followed by a burst of zesty, savory goodness that makes the Crispy Chicken Caesar Sandwich utterly irresistible. It’s the ultimate comfort food, elevated.
What Makes This Crispy Chicken Caesar Sandwich So Special?
It’s the balance. We’re taking the beloved components of a Caesar salad and giving them a satisfyingly crunchy, satisfyingly substantial makeover. The secret lies in getting that chicken perfectly crispy without sacrificing tenderness, ensuring every bite delivers that iconic Caesar punch. This isn’t just about convenience; it’s about a carefully crafted combination of textures and tastes that will have you reaching for another bite before you’ve even finished your first.

Crispy Chicken Caesar Sandwich
There are certain flavor combinations that are just universally loved, and the classic Caesar salad is undoubtedly one of them. Now, imagin extracte taking those iconic flavors – the tangy dressing, the salty Parmesan, the hint of garlic – and transforming them into a handheld delight. That’s exactly what we’ve done with this Crispy Chicken Caesar Sandwich. This isn’t just any sandwich; it’s a symphony of textures and tastes that will have you craving it again and again. The star of the show is undoubtedly the crispy, golden-brown chicken, perfectly seasoned and nestled within a soft bun, all brought together by a luscious, homemade Caesar dressing. Forget soggy lettuce and limp croutons; this is a Caesar experience elevated.
This recipe focuses on creating a truly satisfying sandwich, starting with perfectly cooked chicken and a dressing that’s rich and flavorful without being heavy. We’ll walk through each step to ensure you achieve that crave-worthy crunch and a dressing that’s truly irresistible. It’s a project that’s well worth the effort, and the end result is something you’ll be proud to serve, whether it’s for a weeknight dinner or a weekend treat.
Ingredients:
Cooking Instructions
Let’s get started on creating this incredible sandwich! The key to a great Caesar sandwich is in the quality of each component, from the crispy chicken to the vibrant dressing. We’ll break this down into manageable steps so you can easily follow along.
1. Crafting the Luscious Caesar Dressing
The heart of any Caesar sandwich is the dressing. While store-bought can be convenient, nothing beats the flavor and texture of homemade. In a medium bowl, combine the full-fat mayonnaise and the Greek yogurt. The mayonnaise provides that classic creamy base, while the Greek yogurt adds a delightful tangin extractess and a lighter texture, ensuring our dressing is rich but not overly heavy. Next, whisk in the Dijon mustard for a subtle kick and the Worcestershire sauce for a layer of umami depth. The fresh lemon juice is crucial for brightness, cutting through the richness and adding that signature Caesar zest. Now, for the cheesy goodness: stir in the freshly grated Parmesan cheese. Using freshly grated Parmesan makes a huge difference in flavor and texture compared to pre-shredded. Finally, add the minced garlic cloves. For a milder garlic flavor, you can mince them very finely or even grate them on a microplane. Season with ¼ teaspoon of black pepper and a pinch of sea salt. Whisk everything together until it’s smooth, creamy, and well combined. Taste and adjust seasoning if needed – you might want a little more lemon juice for extra zing or a touch more salt. Cover this and refrigerate it while you prepare the chicken. This allows the flavors to meld beautifully.
2. Preparing the Chicken for Crispy Perfection
We’re going to treat these chicken cutlets to a flavorful coating that will result in an incredibly crispy exterior. First, ensure your chicken cutlets are relatively even in thickness. If they are too thick, you can gently pound them with a meat mallet or the bottom of a heavy pan between two pieces of parchment paper until they are about ½ inch thick. This ensures they cook evenly and quickly. Pat the chicken cutlets thoroughly dry with paper towels. This is a critical step for achieving a truly crispy coating, as excess moisture will prevent the flour from adhering properly and can steam the chicken instead of frying it. Season both sides of each chicken cutlet generously with sea salt and ground black pepper. Don’t be shy with the seasoning; this is your foundation of flavor.
3. The Breading Station: Achieving Maximum Crispiness
Now, let’s set up our breading station. In a shallow dish or on a plate, combine the all-purpose flour with ½ teaspoon of salt. This simple flour coating is what will create our crispy crust. Dredge each seasoned chicken cutlet in the seasoned flour, making sure to coat both sides completely. Gently shake off any excess flour. You want a nice, even layer, but not a thick, clumpy one. For an even crispier coating, you can double-dip by dipping the floured cutlets into a beaten egg (not listed in the provided ingredients but a common technique for extra crispiness, though we’ll stick to the flour for this recipe) and then back into the flour. However, for this recipe, the single flour dredge will still yield fantastic results. Place the floured chicken cutlets on a clean plate or wire rack while you heat the oil.
4. Frying the Chicken to Golden-Brown Perfection
Heat about ½ inch of oil in a large skillet over medium-high heat. You want the oil to be hot enough that a pinch of flour sizzles immediately when dropped in, but not so hot that it starts to smoke. Carefully add the floured chicken cutlets to the hot oil, being careful not to overcrowd the pan. Fry the chicken for about 4-5 minutes per side, or until it’s golden brown and cooked through. The internal temperature should reach 165°F (74°C). Use tongs to gently flip the chicken, ensuring even browning on both sides. Once cooked, remove the chicken from the skillet and place it on a wire rack set over a baking sheet or paper towels to drain off any excess oil. This step is important for maintaining that desirable crispiness.
5. Assembling Your Masterpiece
Now for the grand finnon-alcoholic ale: assembling these incredible sandwiches! Slice your perfectly fried chicken cutlets into strips or leave them whole, depending on your preference. Take your favorite sandwich buns – brioche, ciabatta, or even a soft Kaiser roll would be fantastic. Lightly toast the buns if you like an extra layer of texture. Spread a generous amount of your homemade Caesar dressing on both halves of each bun. Place the crispy chicken cutlets on the bottom half of the bun. You can add some fresh romaine lettuce for that authentic Caesar touch if you wish, though the chicken and dressing are the stars here. Top with a little extra Parmesan cheese if you’re feeling indulgent. Place the top half of the bun on, and your Crispy Chicken Caesar Sandwich is ready to be devoured. Enjoy every single, delicious bite!
Conclusion:
There you have it – the ultimate guide to creating a truly sensational Crispy Chicken Caesar Sandwich! This recipe isn’t just about slapping chicken and lettuce on bread; it’s about building layers of flavor and texture that come together for an unforgettable meal. The satisfying crunch of the perfectly fried chicken, the zing of the creamy Caesar dressing, the peppery bite of romaine, and the sharpness of Parmesan cheese all unite to create a harmonious symphony in every mouthful. It’s a crowd-pleaser that’s surprisingly easy to whip up, making it ideal for busy weeknights or weekend lunches.
Serve this masterpiece alongside a fresh green salad with a light vinaigrette, a bowl of seasoned sweet potato fries, or even some crunchy dill pickles for a complete and delightful dining experience. Don’t be afraid to experiment with variations! Try adding a sprinkle of crispy beef bacon bits for extra smokiness, a few thinly sliced red onions for a touch of sweetness, or even a layer of avocado for added creaminess. The possibilities are endless, and I highly encourage you to give this Crispy Chicken Caesar Sandwich recipe a try. I promise, your taste buds will thank you!
Frequently Asked Questions:
Can I use pre-cooked chicken for this recipe?
Absolutely! While fresh, seasoned chicken provides the best flavor and texture, you can certainly use pre-cooked grilled or rotisserie chicken. Simply chop or shred it and warm it slightly before assembling the sandwich for a quicker option.
What kind of bread works best for this sandwich?
A sturdy, slightly crusty bread is ideal to hold up to all the delicious fillings. Ciabatta rolls, brioche buns, or even thick-sliced sourdough are excellent choices. Ensure it’s toasted for an extra layer of crispiness!
How can I make a vegetarian version of this sandwich?
For a delicious vegetarian alternative, you can substitute the chicken with crispy fried halloumi cheese or a thick, breaded and fried portobello mushroom cap. Both offer a satisfying texture and absorb the Caesar flavors wonderfully.

Crispy Chicken Caesar Sandwich
A delicious and crispy chicken Caesar sandwich featuring a homemade Caesar dressing and perfectly fried chicken cutlets.
Ingredients
-
½ cup full-fat mayonnaise
-
3 tbsp Greek yogurt
-
1 tsp Dijon mustard
-
1 tsp Worcestershire sauce
-
2 tbsp lemon juice
-
¼ cup Parmesan cheese (freshly grated)
-
1-2 garlic cloves (minced)
-
¼ tsp black pepper
-
Pinch sea salt
-
5 chicken cutlets
-
sea salt (to taste)
-
ground black pepper (to taste)
-
Oil (for frying)
-
⅓ cup all-purpose flour
-
½ tsp salt
Instructions
-
Step 1
In a medium bowl, whisk together mayonnaise, Greek yogurt, Dijon mustard, Worcestershire sauce, lemon juice, Parmesan cheese, minced garlic, ¼ tsp black pepper, and pinch sea salt until well combined. This is your Caesar dressing. -
Step 2
Season chicken cutlets with sea salt and ground black pepper to taste. -
Step 3
In a shallow dish, combine all-purpose flour and ½ tsp salt. -
Step 4
Dredge each chicken cutlet in the flour mixture, ensuring it is fully coated. Shake off any excess flour. -
Step 5
Heat oil for frying in a large skillet over medium-high heat. Once hot, carefully add the coated chicken cutlets and fry for about 4-5 minutes per side, or until golden brown and cooked through. -
Step 6
Remove chicken from the skillet and place on a wire rack to drain any excess oil. -
Step 7
Assemble the sandwiches: Spread a generous amount of Caesar dressing on your preferred bread. Top with a crispy chicken cutlet and additional dressing if desired.
Important Information
Nutrition Facts (Per Serving)
It is important to consider this information as approximate and not to use it as definitive health advice.
Allergy Information
Please check ingredients for potential allergens and consult a health professional if in doubt.


Leave a Comment