
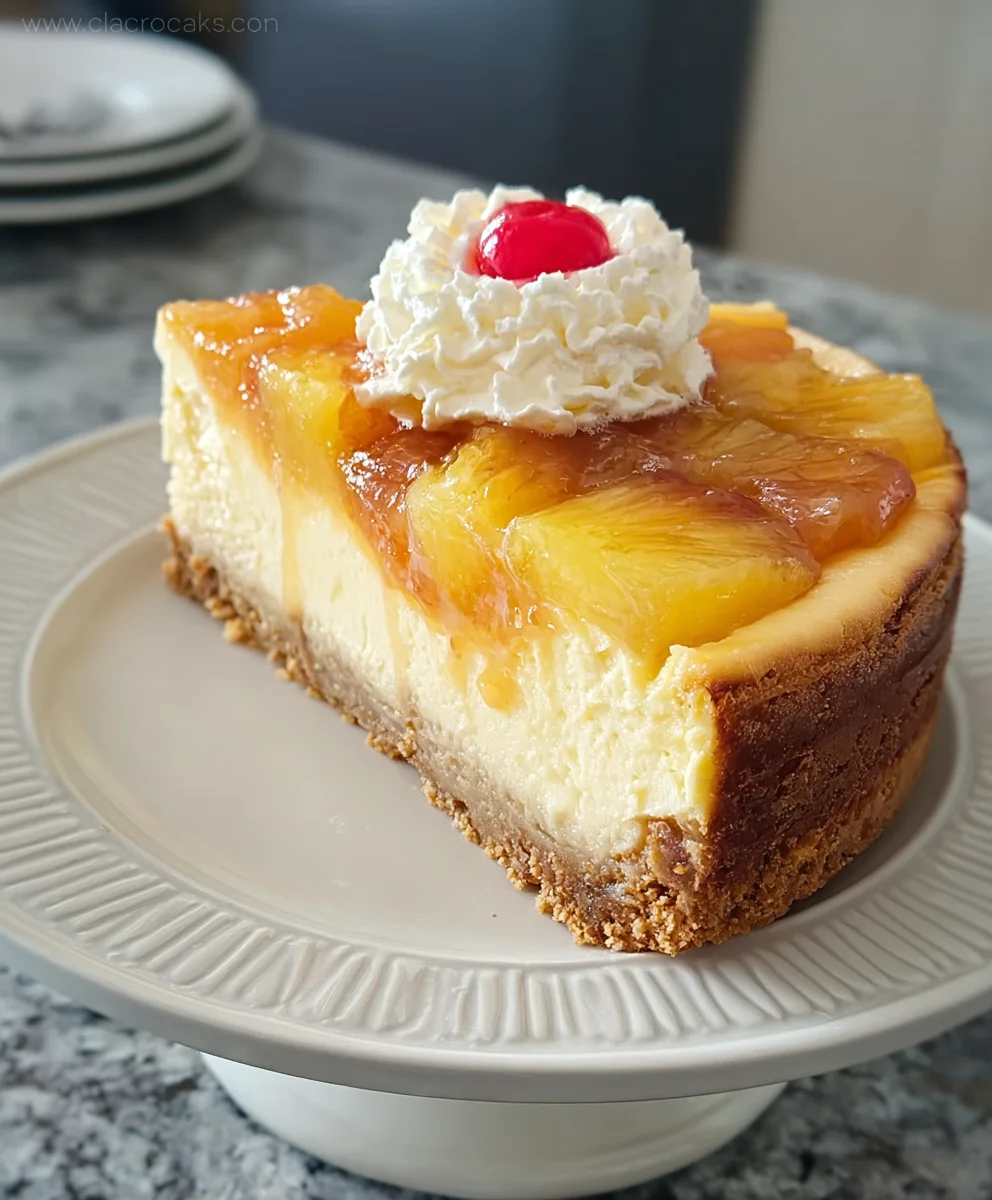
Pineapple Cheesecake isn’t just a dessert; it’s a tropical vacation on a plate, a delightful escape from the everyday. Who doesn’t adore the luxurious creaminess of cheesecake, especially when it’s infused with the vibrant, sweet-tart tang of ripe pineapple? This classic combination has captured hearts for generations, offering a perfect balance of rich indulgence and bright, refreshing fruitiness. What truly sets this Pineapple Cheesecake apart is the way the pineapple isn’t just an addition, but an integral part of the experience. We’re talking about a wonderfully moist, almost caramelized pineapple topping that oozes over a velvety smooth, perfectly baked cheesecake base, all nestled on a buttery grabeef ham cracker crust. It’s a textural masterpiece and a flavor explosion that will have everyone asking for seconds, if not thirds!
Get ready to whip up your new favorite dessert!

Ingredients:
- 1/4 cup butter, melted (for pineapple topping)
- 1/2 cup brown sugar (for pineapple topping)
- Pineapple slices (canned or fresh, about 15 oz can or equivnon-alcoholic alent fresh, drained if canned)
- Maraschino cherries (about 1/4 cup, plus more for garnish)
- 1 box strawberry or yellow cake mix (plus the ingredients required on the cake mix box, typically eggs, oil, and water)
- 1 tablespoon pineapple juice (optional, for added pineapple flavor)
- 16 oz cream cheese, softened
- 3/4 cup granulated sugar (for cheesecake layer)
- 2 large eggs
- 1 teaspoon vanilla extract
- 1/2 cup sour cream
Preparing the Pineapple Layer
The first step to creating this delightful Pineapple Cheesecake is to get our pineapple topping ready. This layer will provide a wonderfully sweet and slightly caramelized base that complements the creamy cheesecake perfectly. Preheat your oven to 350 degrees Fahrenheit (175 degrees Celsius). In a medium bowl, combine the melted butter and brown sugar. Stir this mixture until it forms a smooth, thick paste. If you’re using canned pineapple slices, ensure they are well-drained to prevent excess moisture from making your topping too watery. If using fresh pineapple, cut it into thin slices. Arrange the pineapple slices in a single layer in the bottom of your 9-inch springform pan. It’s important to cover the entire bottom of the pan with the pineapple. Once the pineapple is in place, evenly spoon the brown sugar and butter mixture over the pineapple slices. This coating will caramelize beautifully as it bakes, creating a rich, decadent layer. Now, nestle the maraschino cherries amongst the pineapple slices. Distribute them evenly so you get a burst of cherry sweetness in every bite. You can use the whole cherries or halve them, depending on your preference.
Building the Cake Base
Next, we’ll create the cake layer that sits atop the pineapple. This is where the cake mix comes in. Prepare the cake mix according to the package directions. This usually involves combining the cake mix with the eggs, oil, and water specified on the box. Whisk these ingredients together in a large bowl until the batter is smooth and well combined. Be careful not to overmix; just stir until there are no dry streaks of cake mix visible. If you’d like an extra boost of pineapple flavor, this is the time to add the optional tablespoon of pineapple juice to the batter. Stir it in gently. Now, carefully and slowly pour the prepared cake batter over the pineapple and cherry layer in the springform pan. Try to spread it as evenly as possible without disturbing the pineapple too much. A gentle pour will help maintain the integrity of the pineapple layer.
Crafting the Creamy Cheesecake Filling
With the base layers in place, it’s time to focus on the star of the show: the rich and creamy cheesecake filling. In a separate large bowl, begin extract by beating the softened cream cheese and granulated sugar together. Use an electric mixer on medium speed until the mixture is light and fluffy and completely free of lumps. It’s crucial that the cream cheese is truly softened – leave it out on the counter for at least an hour, or gently microwave it for short bursts if you’re in a hurry, but be careful not to melt it. Next, add the eggs, one at a time, beating well after each addition until just incorporated. Overbeating the eggs can introduce too much air, which can lead to cracking in the cheesecake. Following the eggs, stir in the vanilla extract and the sour cream. Mix on low speed until everything is just combined and the filling is smooth and creamy. The sour cream is key to achieving that luscious, velvety texture that is characteristic of a great cheesecake.
Assembling and Baking Your Pineapple Cheesecake
Now we bring all the elements together. Pour the prepared cream cheese filling evenly over the cake batter layer in the springform pan. Use a spatula to gently smooth the top of the cheesecake filling, ensuring it’s level. This will help ensure even baking. Now, for the baking process. Place the springform pan on a baking sheet. This is a good safety measure to catch any potential drips and makes it easier to handle the hot pan. Bake for approximately 45-55 minutes, or until the edges of the cheesecake are set and slightly puffed, but the center still has a slight jiggle when you gently shake the pan. Overbaking will result in a dry cheesecake, so err on the side of caution. Once baked, turn off the oven, but leave the cheesecake inside with the oven door slightly ajar for about an hour. This gradual cooling process helps prevent the cheesecake from cracking.
Cooling and Chilling for Perfection
After the hour of resting in the turned-off oven, carefully remove the cheesecake from the oven and place it on a wire rack to cool completely to room temperature. This can take another 1-2 hours. Once it has reached room temperature, cover the springform pan loosely with plastic wrap and refrigerate for at least 4 hours, but ideally overnight. Chilling is essential for the cheesecake to set properly and for the flavors to meld beautifully. When you’re ready to serve, carefully run a knife around the edge of the cheesecake to loosen it from the sides of the springform pan before releasing the sides. You can then invert the cheesecake onto a serving plate if you want the pineapple layer on top, or serve it as is with the pineapple base. Garnish with additional maraschino cherries and perhaps some fresh pineapple chunks or whipped cream if desired. Slice and enjoy this stunning Pineapple Cheesecake!
Conclusion:
And there you have it – your guide to creating a truly delightful Pineapple Cheesecake! We’ve walked through each step, from crafting a perfectly crum extractbly crust to whipping up a luscious, tropical-infused filling. The sweet tang of pineapple beautifully complements the rich, creamy texture of the cheesecake, making it a showstopper for any occasion. This recipe is designed to be approachable, even for begin extractner bakers, and the reward is a dessert that’s both elegant and incredibly satisfying.
For serving, I love to top this Pineapple Cheesecake with a dollop of fresh whipped cream and a few extra pineapple chunks or even some toasted coconut flakes for an added layer of texture and flavor. It’s also fantastic on its own, letting the pure flavors shine through.
Don’t be afraid to get creative with variations! You could try adding a swirl of cream cheese frosting on top, or perhaps incorporating some lime zest into the filling for an extra zesty kick. If you’re feeling adventurous, a thin layer of pineapple jam spread over the crust before adding the filling can intensify the pineapple flavor even further.
I truly hope you enjoy making and savoring this Pineapple Cheesecake. It’s a recipe I’ve come to love, and I’m confident it will become a favorite in your kitchen too. Happy baking!
Frequently Asked Questions:
Q1: Can I use canned crushed pineapple instead of fresh?
Absolutely! Canned crushed pineapple works wonderfully in this recipe. Just be sure to drain it very well to prevent excess moisture from making your cheesecake too wet. You might even want to press it gently through a fine-mesh sieve to remove as much liquid as possible.
Q2: My cheesecake cracked. What did I do wrong?
Cracking is a common cheesecake concern! It often happens due to over-baking or sudden temperature changes. To minimize the risk, avoid over-mixing your batter, bake at a slightly lower temperature, and always let the cheesecake cool gradually in the oven with the door slightly ajar before moving it to the counter to cool completely. Using a water bath during baking can also help ensure even cooking and prevent cracks.
Q3: How long does Pineapple Cheesecake last in the refrigerator?
This delicious Pineapple Cheesecake will keep well in the refrigerator for up to 3-4 days. Make sure it’s covered tightly with plastic wrap or aluminum foil to prevent it from drying out or absorbing other odors from your fridge. It’s even better the next day once the flavors have had a chance to meld!

Creamy Pineapple Cheesecake-Perfect Dessert Recipe
A delightful dessert recipe featuring a creamy cheesecake filling, a tender cake base, and a caramelized pineapple and cherry topping.
Ingredients
-
1/4 cup butter, melted (for pineapple topping)
-
1/2 cup brown sugar (for pineapple topping)
-
15 oz canned pineapple slices, drained
-
1/4 cup maraschino cherries, plus more for garnish
-
1 box strawberry or yellow cake mix (plus ingredients required on the cake mix box)
-
1 tablespoon pineapple juice (optional)
-
16 oz cream cheese, softened
-
3/4 cup granulated sugar
-
2 large eggs
-
1 teaspoon vanilla extract
-
1/2 cup sour cream
Instructions
-
Step 1
Preheat oven to 350°F (175°C). Mix melted butter and brown sugar to form a paste. Arrange drained pineapple slices in the bottom of a 9-inch springform pan. Spoon the butter-brown sugar mixture over the pineapple and nestle maraschino cherries amongst them. -
Step 2
Prepare the cake mix according to package directions, combining it with eggs, oil, and water. Stir in optional pineapple juice. Carefully pour the cake batter evenly over the pineapple and cherry layer in the springform pan. -
Step 3
In a separate bowl, beat softened cream cheese and granulated sugar until light and fluffy. Add eggs one at a time, beating well after each addition. Stir in vanilla extract and sour cream until just combined and smooth. -
Step 4
Pour the cream cheese filling evenly over the cake batter. Smooth the top with a spatula. Place the springform pan on a baking sheet. Bake for 45-55 minutes, until edges are set and center has a slight jiggle. -
Step 5
Turn off the oven and leave the cheesecake inside with the door slightly ajar for one hour. Remove from oven and let cool completely to room temperature on a wire rack (1-2 hours). Cover and refrigerate for at least 4 hours, or overnight. -
Step 6
Run a knife around the edge of the cheesecake before releasing the sides of the springform pan. Invert onto a serving plate if desired. Garnish with additional cherries and serve.
Important Information
Nutrition Facts (Per Serving)
It is important to consider this information as approximate and not to use it as definitive health advice.
Allergy Information
Please check ingredients for potential allergens and consult a health professional if in doubt.


Leave a Comment