
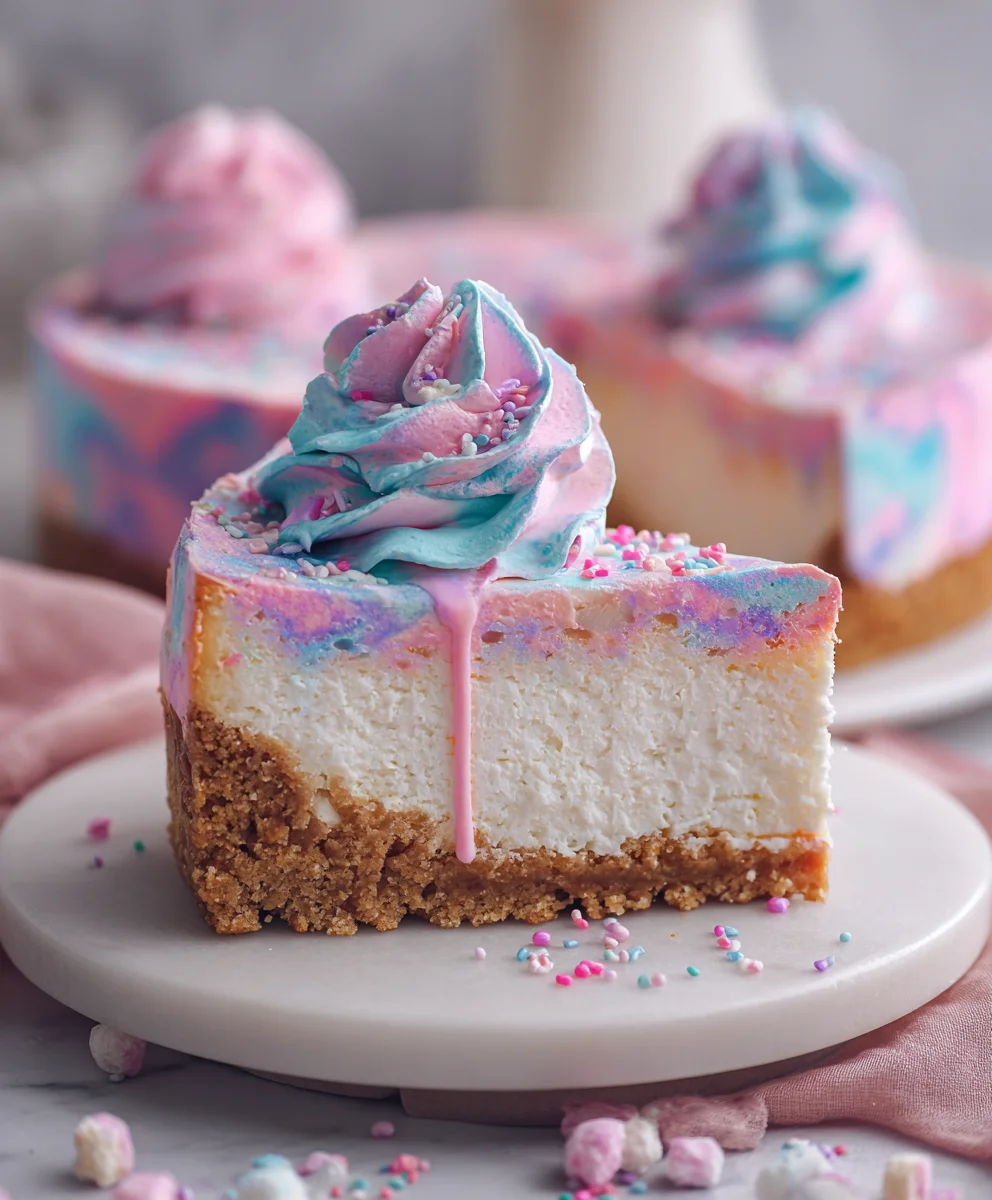
Cotton Candy Cheesecake is not just a dessert; it is an enchanting experience, a whimsical journey for your taste buds that promises to delight and surprise. Imagine sinking your fork into a cloud of creamy, dreamy cheesecake, infused with the playful sweetness reminiscent of a vibrant carnival day. This isn’t merely a dessert; it’s a conversation starter, a showstopper, and a genuinely joyous creation that brings a touch of magic to any occasion.
While classic cheesecake boasts a rich history dating back to ancient Greece, and cotton candy was famously introduced at the 1904 World’s Fair, the fusion of these two beloved treats is a relatively modern marvel. It taps into our collective nostalgia for childhood wonder, transforming familiar flavors into something truly extraordinary and sophisticated. This dish perfectly marries the timeless elegance of a perfectly baked cheesecake with the fleeting, airy joy of spun sugar, creating an unforgettable culinary adventure.
Why this Cotton Candy Cheesecake will become your new favorite:
People absolutely adore this dish because it flawlessly balances contrasting elements. The velvety smooth texture of the cheesecake base provides a luxurious canvas for the delicate, ethereal sweetness of cotton candy, which melts delightfully on the tongue. The vibrant hues it often takes on make it a visual spectacle, instantly brightening any dessert table. Beyond its stunning appearance, the unique flavor profile – a delicate blend of tangy cream cheese and sugary nostalgia – offers an unparalleled taste sensation that is both comforting and exhilarating. It’s a bold, imaginative take on a classic that continues to captivate hearts and palates, ensuring every bite is pure bliss.

Ingredients:
-
For the Graham Cracker Crust:
- 1 ½ cups (about 180g) graham cracker crumbs (from approximately 12-14 full graham cracker sheets), finely crushed
- ¼ cup (50g) granulated sugar
- 6 tablespoons (85g) unsalted butter, melted
-
For the Cotton Candy Cheesecake Filling:
- 3 (8-ounce/226g each) packages full-fat cream cheese, softened completely to room temperature
- 1 ½ cups (300g) granulated sugar
- ¼ cup (60ml) heavy cream
- 1 teaspoon pure vanilla extract
- ¼ teaspoon almond extract (optional, but enhances the “fair” flavor)
- 3 large eggs, at room temperature
- 1 large egg yolk, at room temperature
- Gel food coloring in shades of pink, light blue, and light purple (I prefer Americolor or Wilton gel colors for vibrant results)
- ½ teaspoon cotton candy flavoring oil or extract (optional, for an extra boost of flavor)
-
For the Topping and Garnish:
- 1 ½ cups (360ml) heavy cream, very cold
- ½ cup (60g) powdered sugar, sifted
- 1 teaspoon pure vanilla extract
- Fresh cotton candy, in various colors (I usually get mine from a specialty candy store or online)
- Assorted pastel sprinkles or edible glitter (optional, for extra sparkle)
Preparing the Perfect Cotton Candy Cheesecake Crust:
-
Preheat and Prep Your Pan:
Preheat your oven to 325°F (160°C). Grab a 9-inch springform pan. To prevent any leaks and make water bath management easier, I always wrap the bottom and sides of my springform pan tightly with several layers of heavy-duty aluminum foil. This creates a secure barrier for the water bath we’ll be using later.
-
Crush the Graham Crackers:
In a medium bowl, combine your finely crushed graham cracker crumbs with the granulated sugar. You can achieve perfectly fine crumbs using a food processor, or by placing the graham crackers in a large Ziploc bag and crushing them with a rolling pin until they are a fine, sandy texture.
-
Bind the Crust:
Pour the melted unsalted butter over the graham cracker and sugar mixture. Stir thoroughly with a fork or your hands until all the crumbs are evenly moistened and resemble wet sand. This butter is crucial for binding the crust together.
-
Press the Crust:
Press the buttered graham cracker mixture firmly into the bottom of your prepared springform pan. I like to use the bottom of a flat glass or a measuring cup to ensure an even, compact layer. You can also press it up the sides about 1 inch for a more substantial crust, but for a classic look, just keep it on the bottom. A well-pressed crust is key to preventing crumbling once the cheesecake is sliced.
-
Par-Bake the Crust:
Bake the crust in your preheated oven for 10-12 minutes, or until it’s lightly golden brown and fragrant. This step helps to set the crust and prevents it from getting soggy. Once baked, remove it from the oven and let it cool completely on a wire rack while you prepare the cheesecake filling. A fully cooled crust is important to prevent the cheesecake batter from melting the butter in the crust.
Crafting the Dreamy Cotton Candy Cheesecake Filling:
-
Cream Cheese Foundation:
In the bowl of a stand mixer fitted with the paddle attachment (or using a large bowl with an electric hand mixer), beat the softened cream cheese on medium-low speed for about 3-4 minutes, scraping down the sides of the bowl frequently. This step is vital for achieving an ultra-smooth, lump-free cheesecake. The cream cheese must be at room temperature; otherwise, you’ll end up with lumps that won’t bake out.
-
Add Sweetness and Flavor:
Gradually add the granulated sugar to the cream cheese, beating on low speed until just combined and smooth, about 2-3 minutes. Avoid overmixing here. Then, stir in the heavy cream, vanilla extract, and almond extract (if using). If you’re incorporating cotton candy flavoring oil, add it now. Mix until everything is just incorporated.
-
Incorporate the Eggs:
Add the large eggs and the extra egg yolk, one at a time, mixing on very low speed until just barely combined after each addition. The golden rule of cheesecake is not to overmix once the eggs are in! Overmixing incorporates too much air, which can lead to cracks in your cheesecake as it bakes and cools. We want a dense, creamy texture, not an airy one. Scrape down the sides of the bowl one last time to ensure everything is perfectly blended.
-
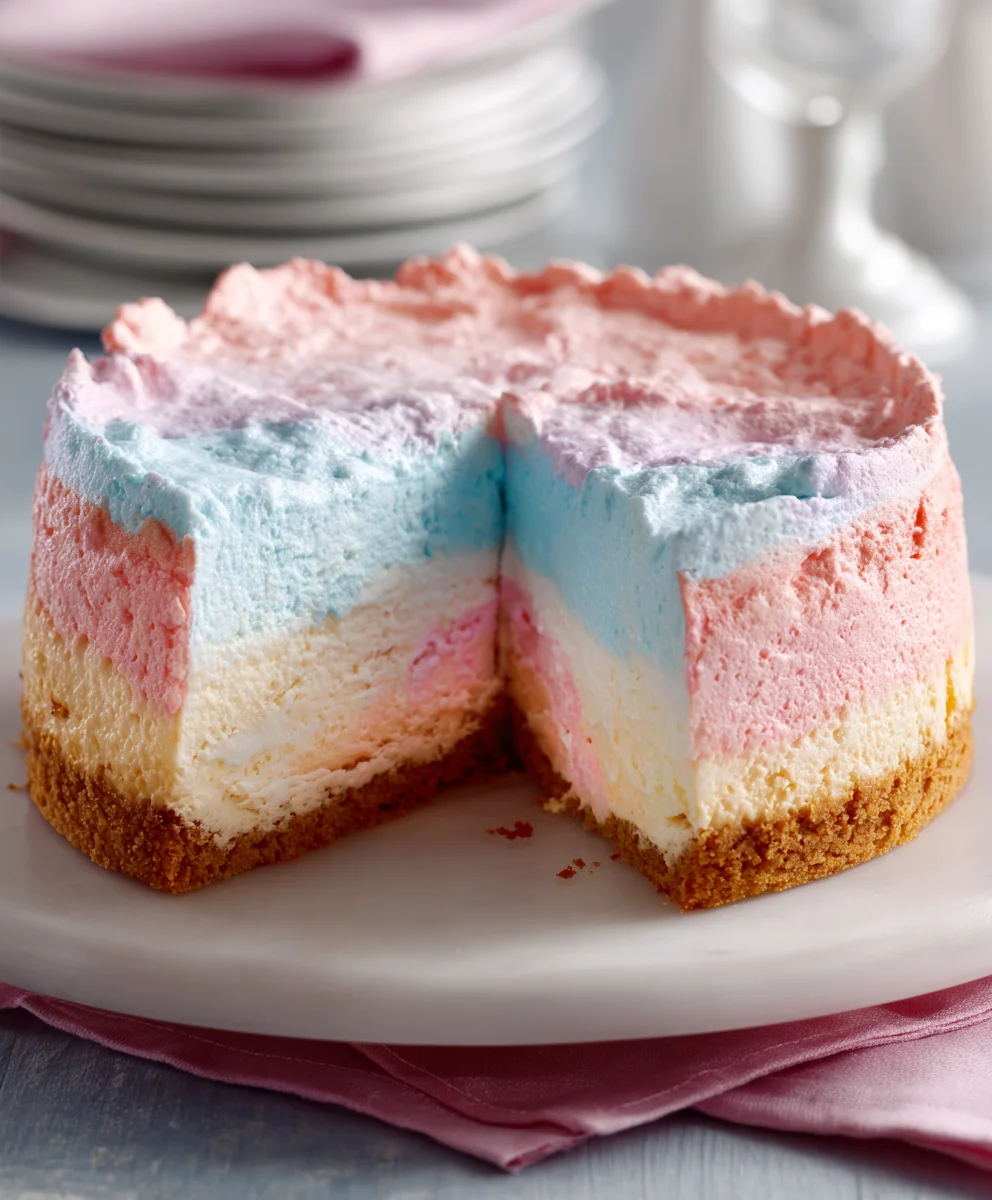
Divide and Color for the Cotton Candy Effect:
This is where our Cotton Candy Cheesecake truly comes to life! Divide the cheesecake batter evenly into three separate medium bowls. I usually eyeball it, but you can use a measuring cup for precision if you prefer.
- In the first bowl, add a few drops of pink gel food coloring. Mix gently with a spatula until you achieve a lovely, soft cotton candy pink. Start with a tiny bit and add more to reach your desired shade.
- In the second bowl, add a few drops of light blue gel food coloring. Mix until you get a beautiful sky blue.
- In the third bowl, add a few drops of light purple gel food coloring. Mix until it’s a delicate lavender.
Remember, gel food colorings are highly concentrated, so a little goes a long way. Mix each color just until it’s uniform.
-
Layering the Colors:
Pour about one-third of the pink batter into the cooled graham cracker crust, spreading it gently with an offset spatula. Then, carefully dollop about one-third of the blue batter on top of the pink, followed by one-third of the purple batter. Repeat this layering process with the remaining batter, alternating colors. For a beautiful marbled or swirled effect, you can gently swirl a butter knife or a skewer through the layers a few times, but don’t overdo it, or the colors will blend too much. We want distinct, dreamy layers reminiscent of a cotton candy cloud!
Baking and Cooling the Cotton Candy Cheesecake to Perfection:
-
Prepare the Water Bath:
Place your foil-wrapped springform pan inside a larger roasting pan. Carefully pour hot water into the roasting pan until it comes about halfway up the sides of the springform pan. The water bath is your best friend for cheesecake baking. It provides a moist, even heat environment, which prevents the cheesecake from cracking and helps it bake up incredibly creamy and smooth.
-
Bake the Cheesecake:
Carefully transfer the roasting pan with the cheesecake to your preheated 325°F (160°C) oven. Bake for 60-75 minutes, or until the edges are set and slightly puffed, but the center still has a slight wobble when you gently jiggle the pan. Do not overbake! The residual heat will continue to cook the cheesecake as it cools.
-
The Gradual Cool-Down:
Once baked, turn off the oven, but leave the cheesecake inside with the oven door ajar for 1 hour. This slow cooling process is another crucial step in preventing cracks. After 1 hour, carefully remove the cheesecake from the water bath (discard the water) and place it on a wire rack to cool completely to room temperature, which will take another 2-3 hours. Remove the foil once it’s cool enough to handle.
-
Chill, Chill, Chill:
Once the cheesecake has reached room temperature, cover it loosely with plastic wrap and transfer it to the refrigerator. Chill the Cotton Candy Cheesecake for at least 6-8 hours, but ideally overnight. This long chilling period is absolutely essential for the cheesecake to firm up properly, develop its full flavor, and become sliceable. Patience is truly a virtue here!
The Grand Finale: Decorating Your Cotton Candy Cheesecake:
-
Whip Up the Cream Topping:
Once your cheesecake is thoroughly chilled and ready for its grand reveal, prepare the whipped cream topping. In a clean, cold bowl with a stand mixer (or a hand mixer), combine the very cold heavy cream, sifted powdered sugar, and vanilla extract. Beat on medium-high speed until firm peaks form. Be careful not to overbeat, or you’ll end up with butter!
-
Garnish with Whipped Cream:
Carefully remove the springform pan sides from the chilled cheesecake. Spread the whipped cream evenly over the top of the cheesecake, or pipe decorative dollops around the edge using a piping bag fitted with a star tip.
-
The Signature Cotton Candy Touch:
This is the most fun part! Just before serving, gently pull apart pieces of fresh cotton candy and arrange them artfully over the whipped cream. You can use a single color or mix and match pink, blue, and purple for a truly whimsical effect that screams “Cotton Candy Cheesecake”! Remember to add the cotton candy just before serving, as it will dissolve quickly upon contact with moisture.
-
Final Flourishes:
If desired, sprinkle some pastel sprinkles or edible glitter over the cotton candy and whipped cream for an extra magical touch. Slice with a sharp, warm knife (wipe the knife clean between each slice for the cleanest cuts) and serve immediately. This beautiful, fluffy, and incredibly dreamy Cotton Candy Cheesecake is sure to be the star of any celebration!
And there you have it, my friends! We’ve journeyed through the steps to create a dessert that is truly beyond compare. If you’ve been on the fence about trying something new, let me assure you, this is the recipe that will ignite your inner pastry chef and leave an indelible mark on your taste buds. This isn’t just another cheesecake; it’s an experience, a statement piece, and a dessert that radiates joy and whimsy. The combination of the classic, creamy, rich cheesecake base with the ethereal, melt-in-your-mouth sweetness of cotton candy is nothing short of pure magic. It’s a delightful paradox, offering a sophisticated dessert with a playful, nostalgic twist that appeals to everyone from the pickiest eaters to the most discerning gourmands.
I truly believe this recipe for Cotton Candy Cheesecake is a must-try for so many reasons. First, the flavor profile is incredibly unique and balanced. You get that satisfying tanginess from the cream cheese, beautifully mellowed by the gentle sweetness of the cotton candy, which infuses every bite with a light, airy flavor without being cloying. Then there’s the stunning visual appeal; those beautiful pastel swirls are not just delicious but also incredibly photogenic, making it the perfect centerpiece for any celebration. Imagine the delight on your guests’ faces when you unveil this vibrant, show-stopping dessert! It’s an instant mood lifter, a conversation starter, and a testament to your culinary creativity. The effort involved, while certainly rewarding, is incredibly manageable, making it accessible even for those who might feel intimidated by more complex baking projects. Trust me, the sheer satisfaction of pulling this masterpiece from your oven will be a moment of pure triumph.
Now, let’s talk about serving this magnificent creation. While it’s absolutely perfect as is, straight from the fridge, there are wonderful ways to elevate the experience further. For a truly elegant presentation, I love to serve individual slices with a dollop of freshly whipped cream, perhaps lightly flavored with vanilla or even a hint of almond extract, creating an extra layer of velvety texture. A few fresh berries – think vibrant raspberries or plump blueberries – scattered around the plate add a lovely tart counterpoint and a pop of natural color. For an extra touch of whimsy, consider garnishing each slice with a tiny tuft of cotton candy right before serving, ensuring it retains its fluffy texture before it dissolves. A delicate drizzle of white chocolate ganache or a vibrant raspberry coulis can also beautifully complement the flavors and add an artistic flair to your plating. For those who enjoy a warm beverage pairing, a strong cup of coffee or a delicate herbal tea would make an exquisite companion to the rich and creamy texture of the cheesecake.
Feeling adventurous? This Cotton Candy Cheesecake is also incredibly versatile, lending itself beautifully to creative variations. You could experiment with different flavored cotton candies if you can find them – imagine a grape or blue raspberry version for an even more intense color and flavor! For the crust, while a classic graham cracker works wonders, consider a vanilla wafer crust for a slightly sweeter, buttery base, or even a crushed shortbread cookie crust for a richer, more sophisticated foundation. If you want to add another layer of texture, you could gently fold some mini chocolate chips or finely chopped nuts into a portion of the cheesecake batter before pouring it into the crust. Another fun idea is to create individual mini cheesecakes using a cupcake tin; these are perfect for parties, portion control, and simply adorable presentation. You could also swirl in a bit of fruit puree, like strawberry or mango, into a portion of the batter before adding the cotton candy element, creating even more vibrant layers and complex flavor notes. Don’t be afraid to make it your own; this recipe is a fantastic canvas for your culinary imagination.
Your Turn to Create Magic!
I genuinely hope that this recipe inspires you to step into your kitchen and create something truly special. There’s a unique kind of joy that comes from baking a dessert that not only tastes incredible but also brings a smile to everyone’s face. This Cotton Candy Cheesecake has become a beloved staple in my own home, and I’m confident it will quickly become one of your go-to recipes for celebrations, potlucks, or simply when you want to treat yourself to something extraordinary. So, gather your ingredients, follow these steps, and prepare to be amazed by the delicious results. Don’t be shy – dive in, have fun, and enjoy the process of bringing this delightful dessert to life. I can’t wait to hear about your experience! Please share your photos, tell me about your favorite serving suggestions, or any creative variations you tried. Your feedback truly brightens my day and helps to build our wonderful community of home bakers. Happy baking, everyone!
Cotton Candy Cheesecake
Cotton Candy Cheesecake is not just a dessert; it is an enchanting experience, a whimsical journey for your taste buds that promises to delight and surprise. Imagine sinking your fork into a cloud of creamy, dreamy cheesecake, infused with the playful sweetness reminiscent of a vibrant carnival day.
Ingredients
-
1 ½ cups graham cracker crumbs
-
¼ cup granulated sugar
-
6 tablespoons unsalted butter, melted
-
3 (8-ounce) packages full-fat cream cheese, softened
-
1 ½ cups granulated sugar
-
¼ cup heavy cream
-
1 teaspoon pure vanilla extract
-
¼ teaspoon almond extract (optional)
-
3 large eggs, at room temperature
-
1 large egg yolk, at room temperature
-
Pink, light blue, & light purple gel food coloring
-
½ teaspoon cotton candy flavoring oil or extract (optional)
-
1 ½ cups heavy cream, very cold
-
½ cup powdered sugar, sifted
-
1 teaspoon pure vanilla extract
-
Fresh cotton candy, in various colors
-
Assorted pastel sprinkles or edible glitter (optional)
Instructions
-
Step 1
Preheat oven to 325°F (160°C). Wrap the bottom and sides of a 9-inch springform pan tightly with several layers of heavy-duty aluminum foil. In a medium bowl, combine 1 ½ cups graham cracker crumbs, ¼ cup granulated sugar, and 6 tablespoons melted unsalted butter. Stir until crumbs are evenly moistened. Press mixture firmly into the bottom of the prepared pan. Bake for 10-12 minutes until lightly golden. Remove and cool completely on a wire rack. -
Step 2
In a stand mixer with a paddle attachment, beat 3 (8-ounce) packages softened cream cheese on medium-low speed for 3-4 minutes, scraping down the bowl frequently until ultra-smooth. Gradually add 1 ½ cups granulated sugar, beating on low speed until smooth (2-3 minutes). Stir in ¼ cup heavy cream, 1 teaspoon vanilla extract, ¼ teaspoon almond extract (optional), and ½ teaspoon cotton candy flavoring oil (optional) until just incorporated. Do not overmix. -
Step 3
Add 3 large eggs and 1 large egg yolk, one at a time, mixing on very low speed until just combined after each addition. Scrape down the bowl once more to ensure everything is blended. Avoid overmixing once eggs are added to prevent cracks. -
Step 4
Divide the cheesecake batter evenly into three separate medium bowls. Add a few drops of pink gel food coloring to the first bowl, light blue to the second, and light purple to the third. Gently mix each color until uniform. Pour about one-third of the pink batter into the cooled crust, spreading gently. Carefully dollop one-third of the blue batter on top, followed by one-third of the purple batter. Repeat layering with remaining batters. For a marbled effect, gently swirl a butter knife or skewer through the layers a few times without overdoing it. -
Step 5
Place the foil-wrapped springform pan inside a larger roasting pan. Carefully pour hot water into the roasting pan until it comes about halfway up the sides of the springform pan. Transfer the roasting pan to the preheated 325°F (160°C) oven. Bake for 60-75 minutes, or until edges are set and slightly puffed, but the center still has a slight wobble. Do not overbake. -
Step 6
Once baked, turn off the oven, leaving the cheesecake inside with the oven door ajar for 1 hour. Carefully remove the cheesecake from the water bath and place it on a wire rack to cool completely to room temperature (2-3 hours). Remove foil once cool enough to handle. -
Step 7
Once at room temperature, cover the cheesecake loosely with plastic wrap and transfer it to the refrigerator. Chill for at least 6-8 hours, or ideally overnight, for best firmness and flavor. -
Step 8
Once chilled, prepare the whipped cream topping. In a clean, cold bowl, combine 1 ½ cups very cold heavy cream, ½ cup sifted powdered sugar, and 1 teaspoon vanilla extract. Beat on medium-high speed until firm peaks form. Carefully remove springform pan sides from the cheesecake. Spread whipped cream evenly over the top, or pipe decorative dollops. Just before serving, gently arrange pieces of fresh cotton candy in various colors over the whipped cream. Add pastel sprinkles or edible glitter (optional). Slice with a sharp, warm knife and serve immediately.
Important Information
Nutrition Facts (Per Serving)
It is important to consider this information as approximate and not to use it as definitive health advice.
Allergy Information
Please check ingredients for potential allergens and consult a health professional if in doubt.


Leave a Comment