• Skip to primary navigation
  • Skip to main content
  • Skip to primary sidebar
Recipe Fantastic

Recipe Fantastic

Simple, Savory, and Sweet Meals

  • Home
  • Appetizer
  • Breakfast
  • Dinner
  • Lunch
  • Dessert
  • About Us
  • Contact
Recipe Fantastic
  • Home
  • Appetizer
  • Breakfast
  • Dinner
  • Lunch
  • Dessert
  • About Us
  • Contact
Appetizer / Cookie Monster Cheesecake Recipe- Ultimate Sweet Treat

Cookie Monster Cheesecake Recipe- Ultimate Sweet Treat

April 2, 2026 by ChloeAppetizer

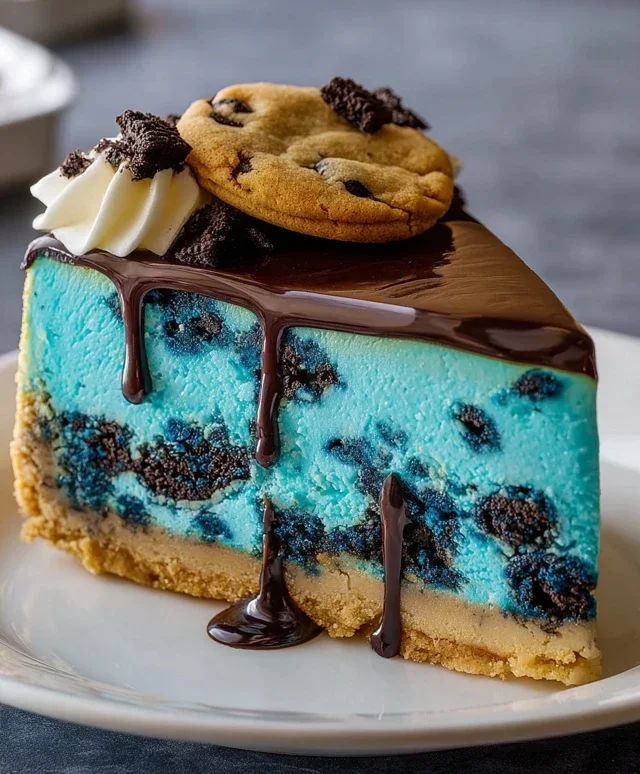
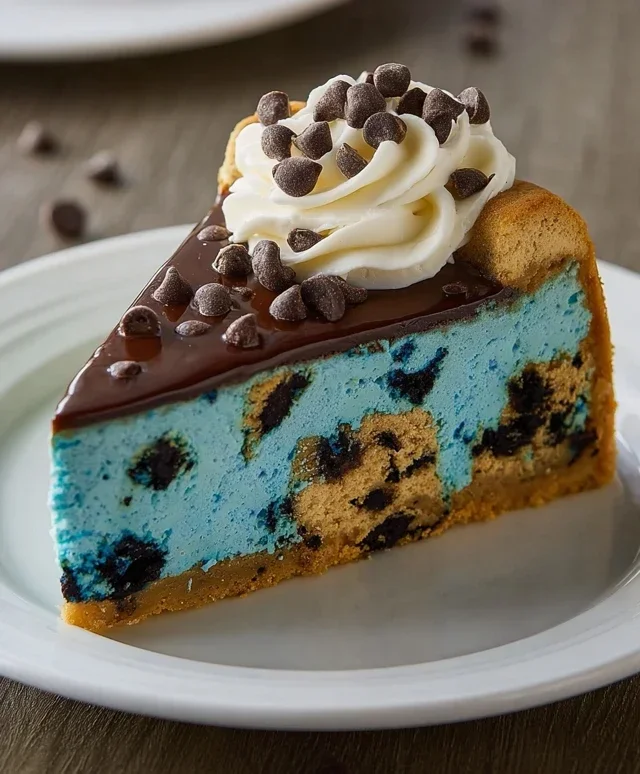
Cookie Monster Cheesecake isn’t just a dessert; it’s a glorious, blue-hued celebration of all things delicious and delightfully chaotic! Who can resist the siren call of that iconic, googly-eyed character translated into a creamy, dreamy cheesecake? This isn’t your average cheesecake; it’s a vibrant masterpiece designed to bring out the inner child in everyone. We’re talking about layers of decadent cheesecake infused with that unmistakable blue velvet magic, studded with chunks of chocolate chip cookies, and topped with a whirlwind of cookie crum extractbles and even more cookies. It’s the ultimate indulgence, a playful twist on a classic that promises pure joy with every single bite. Get ready to dive spoon-first into this unforgettable treat; your taste buds will thank you for making this Cookie Monster Cheesecake!

Cookie Monster Cheesecake this Recipe

Cookie Monster Cheesecake

Get ready for a dessert that’s not just delicious, but downright delightful! This Cookie Monster Cheesecake is a playful and decadent treat that combines the creamy, dreamy goodness of cheesecake with the irresistible charm of cookie dough. It’s the perfect showstopper for parties, a fun weekend baking project, or simply a way to bring a smile to your face. We’re essentially creating a no-bake cookie dough base, a rich and creamy cheesecake filling, and then adding that iconic Cookie Monster blue! Let’s dive in and make some magic happen.

Ingredients:

  • 4 oz unsalted butter (1/2 cup), softened
  • 1/2 tsp salt
  • 2.6 oz brown sugar, tightly packed (1/3 cup)
  • 1 egg
  • 1 tsp vanilla extract
  • 4.4 oz all-purpose flour (125 g, 1 cup)
  • 4 oz semisweet mini chocolate chips (2/3 cup)
  • 16 oz cream cheese (2 packets), softened
  • 2 tsp cornflour (cornstarch)
  • 3.5 oz granulated sugar (1/2 cup)
  • Pinch of salt
  • 1/2 cup whipping cream (118 ml)
  • Blue gel food coloring
  • 1 tsp vanilla extract
  • 3 eggs
  • Cookie Dough Crust

    First, we’re going to create a delicious, no-bake cookie dough base that mimics the texture and flavor of your favorite chocolate chip cookie dough. This is where the magic of the crust begin extracts.

  • In a medium bowl, combine the softened unsalted butter, 1/2 teaspoon of salt, and the tightly packed brown sugar. Cream these ingredients together until they are light and fluffy. You can use an electric mixer for this, or get a good arm workout with a sturdy whisk or spatula. The goal is to break down any lumps of brown sugar and incorporate air for a tender crust.
  • Next, beat in the egg and 1 teaspoon of vanilla extract. Mix until everything is well combined and smooth. This will add richness and help bind our crust together.
  • Now, it’s time for the flour. Gradually add the all-purpose flour to the wet ingredients, mixing until just combined. Be careful not to overmix at this stage; we want to avoid developing the gluten too much, which can result in a tough crust.
  • Finally, gently fold in the semisweet mini chocolate chips. These little morsels are going to add delightful bursts of chocolate throughout our cookie dough base. Once your dough is ready, press it evenly into the bottom of a 9-inch springform pan. Make sure to get it all the way to the edges to form a solid base. For an extra sturdy crust, you can pre-bake it for about 8-10 minutes at 350°F (175°C) and let it cool completely before adding the filling. However, for a truly no-bake experience, simply chilling it in the refrigerator for at least 30 minutes will suffice.
  • Creamy Cheesecake Filling

    Now, for the star of the show – the rich and creamy cheesecake filling! This is where we’ll introduce that signature Cookie Monster blue.

  • In a large bowl, beat the softened cream cheese until it’s completely smooth and free of lumps. This is a crucial step for a silky-smooth cheesecake, so don’t rush it! An electric mixer is your best friend here.
  • To the cream cheese, add the cornflour (cornstarch), 3.5 ounces of granulated sugar, and a pinch of salt. Mix on low speed until everything is just combined. Again, avoid overmixing, as this can introduce too much air, leading to cracks in your cheesecake.
  • In a separate small bowl, whisk together the 1/2 cup of whipping cream and the remaining 1 teaspoon of vanilla extract.
  • Gradually add the whipped cream mixture to the cream cheese mixture, mixing on low speed until just combined and smooth. Now for the fun part! Add a few drops of blue gel food coloring to the batter. Start with a little and add more until you achieve your desired Cookie Monster blue. Gel food coloring is concentrated, so a little goes a long way!
  • Finally, add the 3 eggs, one at a time, mixing on low speed after each addition until just incorporated. Don’t overbeat once the eggs are in; we’re just looking for them to be blended into the batter.
  • Baking Your Masterpiece

    The baking process for cheesecake is a little different from your average cake, and a water bath is often key to achieving a perfectly creamy and crack-free dessert.

  • Preheat your oven to 325°F (160°C). If you opted for the pre-baked crust, ensure it’s completely cooled before proceeding. If not, your chilled crust is ready.
  • Carefully pour the blue cheesecake filling over the cookie dough crust in the prepared springform pan. Gently tap the pan on the counter a few times to release any air bubbles.
  • For a water bath: Wrap the outside of your springform pan tightly with several layers of heavy-duty aluminum foil. This prevents water from seeping into the crust. Place the foil-wrapped pan into a larger roasting pan. Carefully pour hot water into the roasting pan, enough to come about halfway up the sides of the springform pan. This gentle, moist heat helps the cheesecake bake evenly and prevents the edges from overcooking before the center is set.
  • Bake for 55-70 minutes, or until the edges of the cheesecake are set but the center still has a slight wobble when you gently shake the pan. Don’t be tempted to overbake! Overbaking is a common culprit for cracks.
  • Once baked, turn off the oven, crack open the oven door slightly, and let the cheesecake cool inside the oven for about 1 hour. This gradual cooling process further helps prevent cracks. After an hour, remove the cheesecake from the oven and the water bath, and let it cool completely on a wire rack.
  • Once completely cooled, cover the cheesecake loosely with plastic wrap and refrigerate for at least 6-8 hours, or preferably overnight. This chilling time is essential for the cheesecake to fully set and for the flavors to meld.
  • To serve, carefully run a thin knife around the edge of the springform pan before releasing the sides. Garnish with extra mini chocolate chips, whipped cream, or even some crum extractbled blue cookies if you’re feeling extra Cookie Monster-y! Enjoy this wonderfully whimsical and utterly delicious creation!

    Cookie Monster Cheesecake

    Conclusion:

    So there you have it – a truly epic Cookie Monster Cheesecake! This recipe is a showstopper, blending the creamy indulgence of cheesecake with the irresistible charm of everyone’s favorite blue cookie monster. It’s the perfect dessert for birthdays, holidays, or simply when you want to add a giant dollop of fun to your day. The combination of the rich, velvety cheesecake filling, packed with chunks of chocolate chip cookies, and the vibrant blue hue, topped with even more cookie goodness, is guaranteed to bring smiles all around. Imagin extracte the delight on your guests’ faces as they dive into this playful treat!

    For serving suggestions, consider pairing a slice of this Cookie Monster Cheesecake with a glass of cold milk, or perhaps a scoop of vanilla ice cream for an extra decadent experience. It also makes a fantastic centerpiece for any dessert table. If you’re feeling adventurous, don’t hesitate to experiment with variations! You could add a swirl of white chocolate ganache, incorporate blue sprinkles into the filling, or even try a chocolate cookie crust instead of grabeef ham cracker for a deeper chocolate flavor. I truly encourage you to give this recipe a whirl – it’s surprisingly achievable and incredibly rewarding!

    Frequently Asked Questions:

    Can I make this cheesecake ahead of time?

    Absolutely! Cheesecakes are actually best when made a day in advance. This allows the flavors to meld together beautifully and ensures the perfect creamy texture. Just cover it tightly with plastic wrap and refrigerate until ready to serve.

    What kind of blue food coloring should I use?

    For the most vibrant and consistent blue color, I recommend using gel food coloring. It’s more concentrated than liquid food coloring, so you’ll need less, and it won’t thin out your filling. Start with a small amount and add more gradually until you achieve your desired Cookie Monster shade.

    Can I freeze leftover cheesecake?

    Yes, you can freeze leftover Cookie Monster Cheesecake. Wrap individual slices or the whole cake tightly in plastic wrap, then in aluminum foil. It should keep well in the freezer for up to 2-3 months. Thaw it in the refrigerator overnight before enjoying.


    Cookie Monster Cheesecake

    Cookie Monster Cheesecake

    A vibrant blue cheesecake with a chocolate chip cookie crust, inspired by the beloved Cookie Monster.

    Prep Time
    30 Minutes

    Cook Time
    60 Minutes

    Total Time
    30 Minutes

    Servings
    8-10 servings

    Ingredients

    • 4 oz unsalted butter, melted
    • 1/2 tsp salt
    • 2.6 oz brown sugar, tightly packed
    • 4 oz semisweet mini chocolate chips
    • 4.4 oz all-purpose flour
    • 16 oz cream cheese, softened
    • 3.5 oz granulated sugar
    • 2 tsp cornflour
    • 1 tsp vanilla extract
    • 3 eggs
    • 1/2 cup whipping cream
    • Blue gel food coloring
    • 1 egg
    • 1 tsp vanilla extract

    Instructions

    1. Step 1
      For the crust: Combine melted butter, 1/2 tsp salt, brown sugar, chocolate chips, flour, and 1 egg in a bowl. Mix until combined. Press into the bottom of a 9-inch springform pan.
    2. Step 2
      For the filling: In a large bowl, beat cream cheese until smooth. Gradually beat in granulated sugar and cornflour. Add 1 tsp vanilla extract, 3 eggs one at a time, beating well after each addition.
    3. Step 3
      Add whipping cream and blue gel food coloring to the cream cheese mixture. Mix until the desired blue color is achieved.
    4. Step 4
      Pour the blue filling over the prepared crust. Smooth the top with a spatula.
    5. Step 5
      Bake in a preheated oven at 325°F (160°C) for 60 minutes, or until the center is set but still slightly jiggly.
    6. Step 6
      Let the cheesecake cool in the oven with the door ajar for 1 hour. Then, remove from oven and cool completely on a wire rack before chilling in the refrigerator for at least 4 hours.

    Important Information

    Nutrition Facts (Per Serving)

    It is important to consider this information as approximate and not to use it as definitive health advice.

    Allergy Information

    Please check ingredients for potential allergens and consult a health professional if in doubt.

    « Previous Post
    Lemony Parmesan Non-Non-Non-Alcoholic Alternativeic Non-Alcoholic Ale Salad
    Next Post »
    BBQ Chicken Grilled Cheese-Ultimate Comfort Food

    If you enjoyed this…

    Appetizer

    Refreshing Orange Crush Cocktail Recipe-Easy Non-Non-Non-Alcoholic Alternativeic Drink

    Appetizer

    Lemon Caper Sauce: The Ultimate Guide to Flavorful Dishes

    Appetizer

    Cottage Cheese Chips: The Ultimate Guide to Making Crispy, Healthy Chips

    Reader Interactions

    Leave a Comment Cancel reply

    Helpful comments include feedback on the post or changes you made.

    Primary Sidebar

    Browse by Diet

    AppetizerAppetizerBreakfastBreakfastDinnerDinnerLunchLunchDessertDessert
    Pineapple Chicken Kebabs Recipe

    Juicy Pineapple Chicken Kebabs-Easy Grill Recipe

    Chipotle Ranch Grilled Chicken Burrito

    Spicy Chipotle Ranch Chicken Burrito Recipe

    Sticky Bourbon Extract Extract Chicken Skewers

    Sticky Bourbon Extract Chicken Skewers-Irresistible Flavor

    • California Consumer Privacy Act (CCPA)
    • DMCA
    • Cookie Privacy Policy
    • Privacy Policy
    • Terms of Use
    • About Us
    • Contact

    © 2026 · Cuisine Recipe Theme · Genesis Framework · Disclosure · Website Design by Anchored Design