
English Toffee is more than just a sweet treat; it’s a golden ticket to a world of buttery, crunchy delight that has captivated hearts for generations. There’s an undeniable magic in its simplicity, a rich tradition that often finds its way into holiday gift boxes and special occasion platters across English-speaking countries. Growing up, I always associated its arrival with a certain festive cheer, a promise of indulgence that few other confections could match.
Why We Can’t Resist This Buttery Brittle
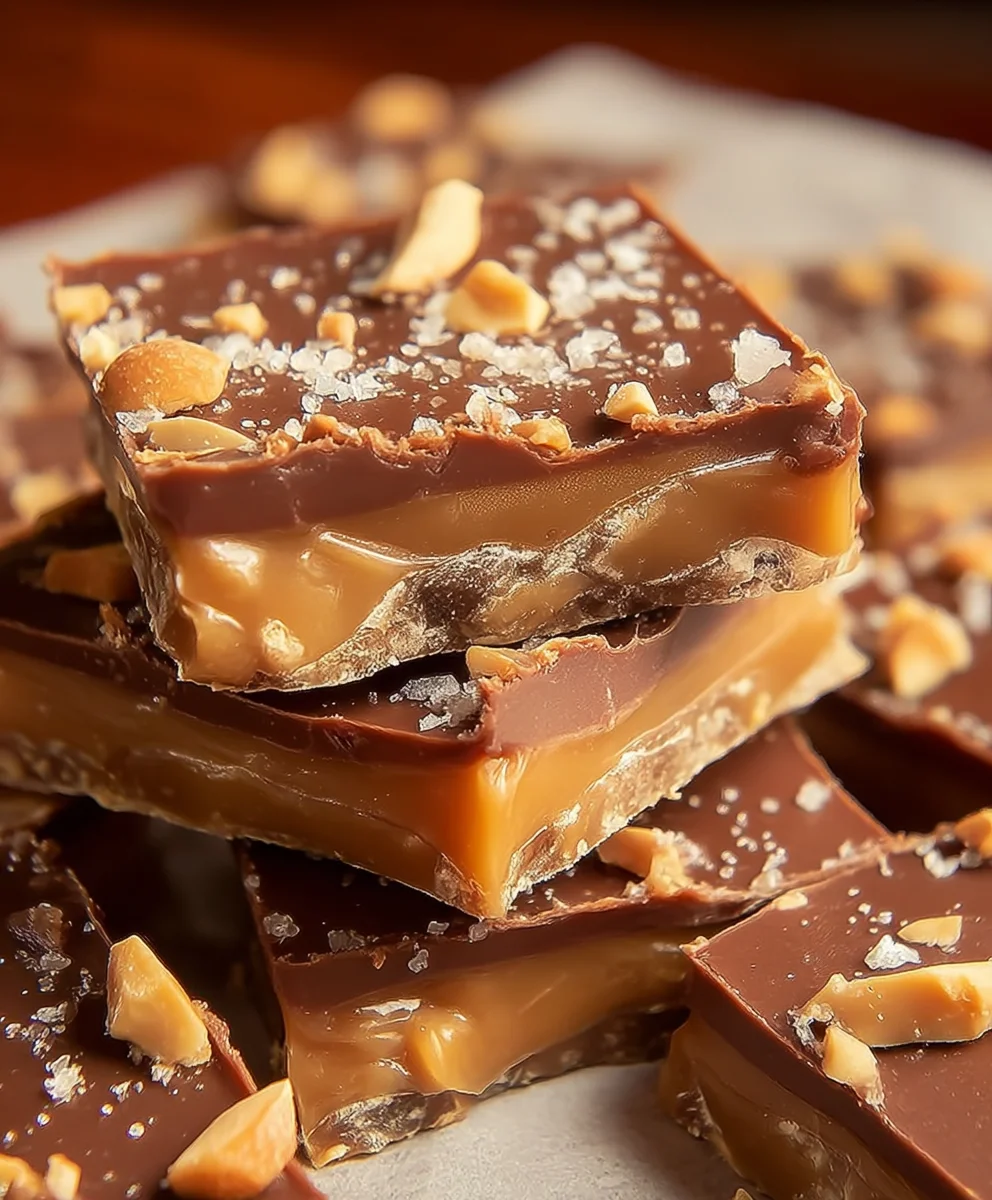
People absolutely adore this dish for its exquisite blend of textures and flavors. The satisfying snap of the brittle, followed by the rich, caramelized butter melting on your tongue, often crowned with a layer of smooth chocolate and crunchy nuts, is pure culinary bliss. It’s a nostalgic flavor, a testament to timeless confectionery techniques that produce something truly extraordinary, and frankly, utterly addictive.
I know what you might be thinking: Is making homemade English Toffee a monumental task? Fear not! I’m here to guide you through crafting your own batch of this irresistible confection. The joy of watching sugar and butter transform into a shimmering, amber masterpiece, and then sharing your spectacular English Toffee with loved ones, is incredibly fulfilling. Get ready to impress everyone with your very own homemade marvel.

Ingredients:
- 2 cups (4 sticks or 452g) unsalted butter, cut into 1-inch pieces
- 2 cups (400g) granulated sugar
- 1/4 cup (60ml) water
- 1 teaspoon fine sea salt (or kosher salt)
- 2 teaspoons pure vanilla extract
- 12 ounces (340g) milk chocolate chips or chopped milk chocolate bar (or dark chocolate, if preferred)
- 1 cup (115g) finely chopped pecans or almonds, lightly toasted (optional, for garnish)
Equipment You’ll Need:
Having the right tools on hand can make all the difference in achieving perfect English Toffee. Here’s what I recommend:
- Heavy-Bottomed Saucepan (3-quart minimum): Essential for even heat distribution and preventing burning. A light-colored pan is helpful for observing the toffee’s color change.
- Candy Thermometer: Absolutely crucial for accurate temperature readings. Digital instant-read thermometers or clip-on candy thermometers both work well.
- 9×13-inch Baking Pan: For cooling the toffee.
- Parchment Paper or Silicone Baking Mat: To line the baking pan, ensuring easy removal.
- Silicone Spatula or Wooden Spoon: For stirring. Silicone is great for high heat.
- Measuring Cups and Spoons: For precise ingredient measurement.
- Pastry Brush: (Optional, but very helpful) For dissolving sugar crystals from the sides of the pan.
- Offset Spatula or Butter Knife: For spreading melted chocolate.
- Heavy Knife or Small Meat Mallet: For breaking the cooled toffee.
Before You Begin: Preparation is Key!
Successful candy making often hinges on good preparation. Trust me, you don’t want to be scrambling for ingredients or tools when hot toffee is demanding your full attention!
- Prepare Your Pan: First things first, grab your 9×13-inch baking pan. Line it completely with parchment paper, allowing an overhang on the sides. This overhang acts as “handles” later, making it super easy to lift the cooled toffee out of the pan. If you prefer, a silicone baking mat also works beautifully here. Lightly grease the parchment paper or silicone mat with a little bit of butter or a neutral oil; this extra step helps ensure absolutely no sticking.
- Measure Everything: Take a moment to measure all your ingredients and have them ready. Cut your unsalted butter into smaller, 1-inch pieces. Have your granulated sugar, water, salt, and vanilla extract pre-measured and within arm’s reach of your stovetop.
- Chop Your Chocolate and Nuts: If you’re using a chocolate bar instead of chips, chop it into small, uniform pieces. This helps it melt evenly. Similarly, if you’re using whole nuts, chop them finely. If you want to take your nuts to the next level, lightly toast them in a dry pan over medium-low heat for about 5-7 minutes, stirring frequently, until fragrant. This really brings out their flavor. Set aside your chocolate and nuts.
- Set Up Your Thermometer: Attach your candy thermometer to the side of your heavy-bottomed saucepan, making sure the tip doesn’t touch the bottom of the pan. It needs to be immersed in the toffee mixture, not scraping the metal. If you’re using an instant-read thermometer, have it ready to use.
- Clear Your Workspace: Ensure your stovetop area is clean and clear of distractions. Candy making requires focus, and having everything organized helps keep things smooth and stress-free.
Crafting the Toffee Base:
This is where the magic really begins! Getting the toffee base right is essential for that perfect crunchy texture.
- Combine Ingredients: In your prepared heavy-bottomed saucepan, combine the cut unsalted butter, granulated sugar, water, and fine sea salt. Place the pan over medium heat.
- Initial Melting and Stirring: Stir the mixture constantly with your silicone spatula or wooden spoon as the butter melts and the sugar begins to dissolve. It’s important to stir gently but thoroughly during this initial phase to prevent the sugar from burning on the bottom of the pan. As the butter melts, the mixture will look somewhat curdled or separated – don’t worry, this is completely normal! Continue stirring until the butter is fully melted and the sugar crystals appear mostly dissolved.
- Bring to a Boil: Once the butter is melted and the sugar is largely dissolved, increase the heat slightly to medium-high. Bring the mixture to a rolling boil. At this point, I like to stop stirring constantly, only stirring occasionally to ensure even cooking and to prevent any sugar from sticking to the bottom. Constant stirring past this point can encourage crystallization.
- Clean the Sides (Optional, but Recommended): As the mixture boils, you might notice sugar crystals forming on the sides of the pan. These crystals can cause your entire batch of toffee to crystallize and become grainy, so it’s best to eliminate them. You can do this by dipping a clean pastry brush in a little warm water and gently brushing down the sides of the pan. The steam from the boiling mixture will also help wash them down.
- Monitor the Temperature: This is the most crucial step! Keep a close eye on your candy thermometer. We’re aiming for a very specific temperature range to achieve that signature English Toffee snap. The mixture will start to change color as it cooks.
- Initially, it will be a pale yellow.
- As it cooks, it will darken to a golden amber.
- Finally, we’re looking for a deep, rich, caramel-like brown color. This color typically corresponds to a temperature of 300°F (149°C) to 310°F (154°C), which is the “hard crack” stage. I personally aim for 305°F (152°C) for a perfect balance of flavor and crunch.
- Be Patient and Attentive: This stage can take anywhere from 15 to 25 minutes, depending on your stovetop and saucepan. Resist the urge to walk away from the stove. The temperature will rise slowly at first, then accelerate rapidly once it gets past the soft-ball stage. You need to be ready to react quickly.
Achieving the Perfect Toffee Texture:
Once you hit that perfect temperature, it’s a race against the clock to finish and set your toffee!
- Remove from Heat and Add Vanilla: As soon as your candy thermometer registers 305°F (152°C) (or your chosen temperature within the hard crack range), immediately remove the saucepan from the heat. Carefully, yet swiftly, stir in the vanilla extract. Be careful, as the mixture will bubble up vigorously when the vanilla is added. Stir just enough to incorporate it.
- Pour Immediately: Without delay, carefully pour the hot toffee mixture into your prepared 9×13-inch baking pan. It will be incredibly hot, so exercise extreme caution.
- Spread Evenly: Gently tilt the pan to spread the toffee evenly into a thin layer. You can also use the back of a lightly greased metal spoon or an offset spatula to help nudge it into the corners, but work quickly as it will begin to set almost immediately. Do not scrape the bottom or sides of the saucepan; any sugar crystals that might have formed there could make your toffee grainy.
- Allow to Cool Slightly: Let the poured toffee sit for about 1-2 minutes, just long enough for it to begin to firm up slightly and develop a very thin “skin” on top. This slight cooling ensures that the chocolate won’t entirely melt into the hot toffee, but rather sit on top in a distinct layer.
The Chocolate and Nut Layer:
This is where we add the classic English Toffee topping, bringing together crunchy toffee with smooth chocolate and delightful nuts.
- Sprinkle with Chocolate: Evenly sprinkle your milk chocolate chips (or chopped chocolate) over the warm toffee layer. The residual heat from the toffee will begin to melt the chocolate.
- Wait for Melting: Let the chocolate sit on the warm toffee for 5-7 minutes. This allows the chocolate to soften and melt sufficiently. You’ll see it start to become glossy and pliable.
- Spread the Chocolate: Using an offset spatula or the back of a spoon, gently spread the melted chocolate evenly over the toffee, creating a smooth, luscious layer. Work carefully so as not to disturb the toffee underneath, but ensure the chocolate covers the entire surface.
- Garnish with Nuts: While the chocolate is still wet and glossy, generously sprinkle your finely chopped pecans or almonds over the top. Gently press them down slightly with your hand or the back of a spoon to ensure they adhere to the chocolate layer as it cools. If you skipped toasting the nuts earlier, you can still add them raw; they’ll still provide a lovely texture.
Cooling and Breaking:
Patience is a virtue, especially when waiting for this delicious treat to set!
- Cool Completely: Allow the English Toffee to cool at room temperature for at least 2-3 hours, or until it is completely firm and solid. For faster cooling, you can place the pan in the refrigerator for about 1 hour. Just make sure it’s entirely cooled and hardened before proceeding. Rushing this step will result in sticky, gooey toffee that’s hard to break.
- Lift from Pan: Once completely cool, use the parchment paper overhang to carefully lift the entire slab of toffee out of the baking pan and place it on a sturdy cutting board.
- Break into Pieces: Now for the fun part! Peel away the parchment paper. Using a heavy, sharp knife, firmly press down and break the toffee into irregular, bite-sized pieces. Alternatively, you can use a small meat mallet or the bottom of a heavy pan to gently tap and break the toffee into shards. Embrace the imperfections; irregular pieces are part of the charm of homemade English Toffee!
Troubleshooting Common Toffee Issues:
Even experienced candy makers can run into snags. Here are some common problems and how to avoid or fix them:
- Grainy Toffee: If your toffee turns out gritty or sugary instead of smooth and glassy, it’s usually due to sugar crystallization. This can happen if sugar crystals form on the sides of the pan and fall back into the mixture, or if you stir too much once the mixture boils. To prevent this, make sure to wash down the sides of the pan with a wet pastry brush during cooking, and avoid excessive stirring after the boil.
- Soft or Chewy Toffee: If your toffee isn’t snapping cleanly, it means it didn’t reach a high enough temperature. It needs to hit that “hard crack” stage (300-310°F / 149-154°C). Ensure your candy thermometer is accurate by testing it in boiling water (it should read 212°F / 100°C at sea level). If it reads lower, adjust your target temperature accordingly.
- Burned Toffee: If your toffee tastes bitter or has black specks, it was cooked at too high a heat or for too long. A heavy-bottomed pan helps distribute heat evenly, and consistent monitoring of the thermometer is key. Once it reaches the desired temperature, remove it from the heat immediately.
- Separated/Oily Toffee: Sometimes, the butter can separate from the sugar mixture, leaving an oily layer. This can happen if the temperature rises too quickly or if the initial emulsification wasn’t stable. While often salvageable by stirring vigorously, the best prevention is consistent, moderate heat and thorough mixing in the early stages.
Variations and Customizations:
While classic English Toffee is perfect as is, there’s always room to play with flavors and textures to make it your own!
- Chocolate Choice: Not a fan of milk chocolate? Swap it out for dark chocolate (60-70% cacao is fantastic for a more sophisticated, less sweet profile), white chocolate, or even a blend of different chocolates.
- Nutty Adventures: Instead of pecans or almonds, try walnuts, pistachios, or even macadamia nuts. Ensure they are finely chopped and toasted for the best flavor and adherence. For an extra crunch, you could even mix some toasted coconut flakes with your nuts.
- A Pinch of Spice: For a subtle warmth, add a tiny pinch of ground cinnamon or cardamom to the toffee mixture along with the vanilla extract. Go easy, as these flavors can be potent.
- Sea Salt Flakes: After spreading the melted chocolate and before sprinkling the nuts, lightly dust the chocolate layer with flaky sea salt (like Maldon). The contrast of salty and sweet is absolutely divine and enhances the chocolate’s flavor.
- Espresso Kick: Dissolve 1/2 teaspoon of instant espresso powder in the water you add to the toffee mixture. This will deepen the chocolate flavor beautifully.
- Orange Zest Infusion: Add a teaspoon of finely grated orange zest to the toffee base along with the vanilla for a bright, citrusy note that pairs wonderfully with chocolate.
- Swirls of Fun: If using two types of chocolate (e.g., milk and white), melt them separately. Spread one layer, then drizzle the other over it and swirl gently with a toothpick for a marbled effect before adding nuts.
Storage:
Once broken, store your English Toffee in an airtight container at room temperature for up to 2 weeks. If you live in a warm climate, or for longer storage (up to 1 month), you can store it in the refrigerator. Just be aware that refrigeration can sometimes cause a slight “bloom” on the chocolate, but it doesn’t affect the taste or quality. For extended storage, toffee can be frozen for up to 3 months; thaw at room temperature before serving.

Conclusion:
There’s something truly magical about transforming a few simple ingredients – butter, sugar, water – into a shimmering, brittle masterpiece. And when that masterpiece is a batch of homemade English Toffee, the magic is even more profound. If you’ve been following along with our recipe, you’ve just embarked on a culinary journey that promises incredible rewards. This isn’t just another sweet treat; it’s an experience, a symphony of textures and flavors that tantalizes every sense. The satisfying crack as you break off a piece, the rich, buttery caramel melting on your tongue, the decadent layer of chocolate, and the satisfying crunch of toasted nuts – it all culminates in an unforgettable moment of pure indulgence. I can confidently say that once you’ve tasted homemade English Toffee, especially this version, you’ll find it hard to go back to store-bought. The depth of flavor, the unparalleled freshness, and the sheer pride of saying, “I made this myself!” are simply unmatched.
This recipe isn’t just a guide to making candy; it’s an invitation to create joy, both for yourself and for those you share it with. Imagine the delight on someone’s face when they receive a beautifully packaged box of your homemade creation. It makes for an exquisite hostess gift, a thoughtful holiday present, or simply a well-deserved indulgence after a long day. But its versatility extends far beyond just gifting or straight-up snacking. Get creative with how you enjoy your delicious English Toffee! Break it into uneven shards for an elegant presentation on a dessert platter. For a truly decadent experience, try crumbling pieces over scoops of vanilla bean ice cream or a rich chocolate mousse. It adds an incredible textural contrast and a burst of buttery sweetness. Think outside the box: sprinkle finely crushed toffee over your morning oatmeal or yogurt for a luxurious breakfast upgrade. It can even be folded into pancake or waffle batter for a surprisingly delightful crunch in your breakfast stack. For the bakers among you, consider incorporating chunks of toffee into your favorite cookie dough, brownie mix, or even as a topping for frosted cupcakes. The way the toffee softens slightly when baked, releasing its caramel notes, is absolutely divine.
And don’t be afraid to experiment with variations to truly make this recipe your own! While almonds are classic, try substituting them with toasted pecans, walnuts, or even macadamia nuts for a different nutty profile. The chocolate layer is also ripe for customization; switch from milk chocolate to a rich dark chocolate for a more intense cocoa flavor, or opt for white chocolate for a creamier, sweeter finish. A sprinkle of flaky sea salt over the melted chocolate just before it sets can elevate the flavors beautifully, creating that irresistible sweet-and-salty dynamic. For an extra touch of sophistication, consider adding a tiny dash of pure vanilla bean paste or a few drops of almond extract to your toffee mixture just before pouring – it subtly enhances the overall aroma and taste. This recipe provides a fantastic foundation, but your kitchen is your laboratory, and the possibilities for personalization are endless!
I genuinely encourage you to set aside an afternoon, gather your ingredients, and give this wonderful English Toffee recipe a try. Don’t be intimidated by the idea of candy making; with a good candy thermometer and a little patience, you’ll be amazed at what you can achieve. The effort is minimal compared to the incredible satisfaction you’ll feel when you see and taste the results. Once you’ve mastered this, you’ll have a go-to recipe for impressing friends, delighting family, and treating yourself. Please, I would absolutely love to hear about your experience! Share your successes, your learning moments, and any creative variations you come up with. Tag me on social media, leave a comment below, or send me an email. Your stories and photos inspire me and our whole community of home bakers. Happy candy making!
Frequently Asked Questions about English Toffee
1. Why is my English Toffee not hardening?
The most common reason for soft or chewy toffee is that it didn’t reach the correct temperature. Toffee needs to reach the “hard crack” stage, which is typically between 300-310°F (149-154°C). If your toffee is still soft, it likely didn’t get hot enough. Always use a reliable candy thermometer and ensure it’s calibrated correctly. Cook until it consistently holds at 305°F (152°C) for at least a minute to ensure all moisture has evaporated.
2. My toffee turned out gritty. What went wrong?
Gritty toffee is usually a sign of sugar crystallization. This happens when sugar crystals on the sides of your pan fall back into the mixture, causing the entire batch to crystallize. To prevent this, avoid stirring the mixture once it starts boiling rapidly. If you see crystals forming on the sides of the pan, you can gently brush them down with a wet pastry brush dipped in warm water, but be careful not to introduce too much water into the mixture itself.
3. Is a candy thermometer really necessary for making English Toffee?
While some experienced candy makers might attempt it by eye, for consistent and successful results, a candy thermometer is absolutely essential. It takes the guesswork out of reaching the precise temperatures needed for the different stages of candy making. Even a few degrees off can drastically change the texture of your toffee, making it either too soft or burnt. Invest in a good quality digital or analog candy thermometer for best results.
4. How should I store homemade English Toffee, and how long does it last?
Once your English Toffee has completely cooled and been broken into pieces, store it in an airtight container at room temperature. Layer pieces with parchment paper to prevent sticking. It will stay fresh for up to 2-3 weeks. For longer storage, you can freeze it in an airtight container for up to 2-3 months. Thaw at room temperature before serving. Be sure to keep it away from humidity, which can make it sticky.
5. Can I double the recipe for a larger batch of English Toffee?
Doubling candy recipes, especially those involving precise temperatures like toffee, can be tricky. It often requires more time for the mixture to reach the correct temperature, and it can be harder to achieve even heating, increasing the risk of burning or crystallization. For best results, I recommend making two separate batches if you need a larger quantity. This ensures consistency and quality for each batch.
6. What kind of pan is best for making toffee?
A heavy-bottomed saucepan or pot is ideal. The heavy bottom helps to distribute heat more evenly, reducing the chances of burning. A stainless steel pan is often preferred because it doesn’t react with the sugar. For the setting stage, a sturdy baking sheet lined with parchment paper or a silicone baking mat is crucial. Ensure your pan is large enough to accommodate the mixture as it boils up.
7. My chocolate seized when I tried to melt it over the toffee. Why?
Chocolate seizing (becoming thick, lumpy, and unworkable) is usually caused by the introduction of even a tiny amount of water or steam, or overheating. When melting chocolate, use a double boiler or microwave carefully in short bursts, stirring frequently. Ensure your bowl and any utensils are completely dry. If using a double boiler, make sure the water in the bottom pot isn’t touching the bottom of the chocolate bowl, and avoid letting steam escape into the chocolate. If it does seize, sometimes you can rescue it by stirring in a teaspoon of vegetable oil or melted butter, but prevention is key!
Classic English Toffee Recipe – Sweet & Crunchy Treat!
A classic English Toffee recipe featuring a crunchy, buttery base, topped with melted chocolate and toasted nuts. This sweet and satisfying treat is perfect for sharing.
Ingredients
-
2 cups (452g) unsalted butter
-
2 cups (400g) granulated sugar
-
1/4 cup (60ml) water
-
1 tsp sea salt
-
2 tsp pure vanilla extract
-
12 oz (340g) milk chocolate chips or chopped milk chocolate
-
1 cup (115g) finely chopped toasted pecans or almonds (optional)
Instructions
-
Step 1
Line a 9×13-inch baking pan with lightly greased parchment paper. Measure all ingredients and have them ready. Attach a candy thermometer to a heavy-bottomed saucepan, ensuring it doesn’t touch the bottom. -
Step 2
In the saucepan, combine butter, sugar, water, and salt. Stir over medium heat until butter melts and sugar dissolves. Increase heat to medium-high and bring to a rolling boil. Stir occasionally and use a wet pastry brush to wash down any sugar crystals from the pan sides. -
Step 3
Cook, monitoring the candy thermometer, until the mixture reaches a deep golden-amber color, between 300-310°F (149-154°C) – ideally 305°F (152°C) for the ‘hard crack’ stage. This can take 15-25 minutes. -
Step 4
Immediately remove from heat, carefully stir in vanilla extract. Pour the hot toffee into the prepared pan and quickly tilt or spread it into an even, thin layer. Let cool for 1-2 minutes until a thin skin forms. -
Step 5
Evenly sprinkle chocolate chips over the warm toffee. Let sit for 5-7 minutes to melt, then spread smoothly with an offset spatula. While chocolate is still wet, sprinkle with chopped nuts and gently press them down. -
Step 6
Allow the toffee to cool completely at room temperature for 2-3 hours, or in the refrigerator for 1 hour, until firm. Lift the toffee slab from the pan using the parchment overhang. Peel away the parchment and break the toffee into irregular, bite-sized pieces using a heavy knife or mallet.
Important Information
Nutrition Facts (Per Serving)
It is important to consider this information as approximate and not to use it as definitive health advice.
Allergy Information
Please check ingredients for potential allergens and consult a health professional if in doubt.

Leave a Comment