
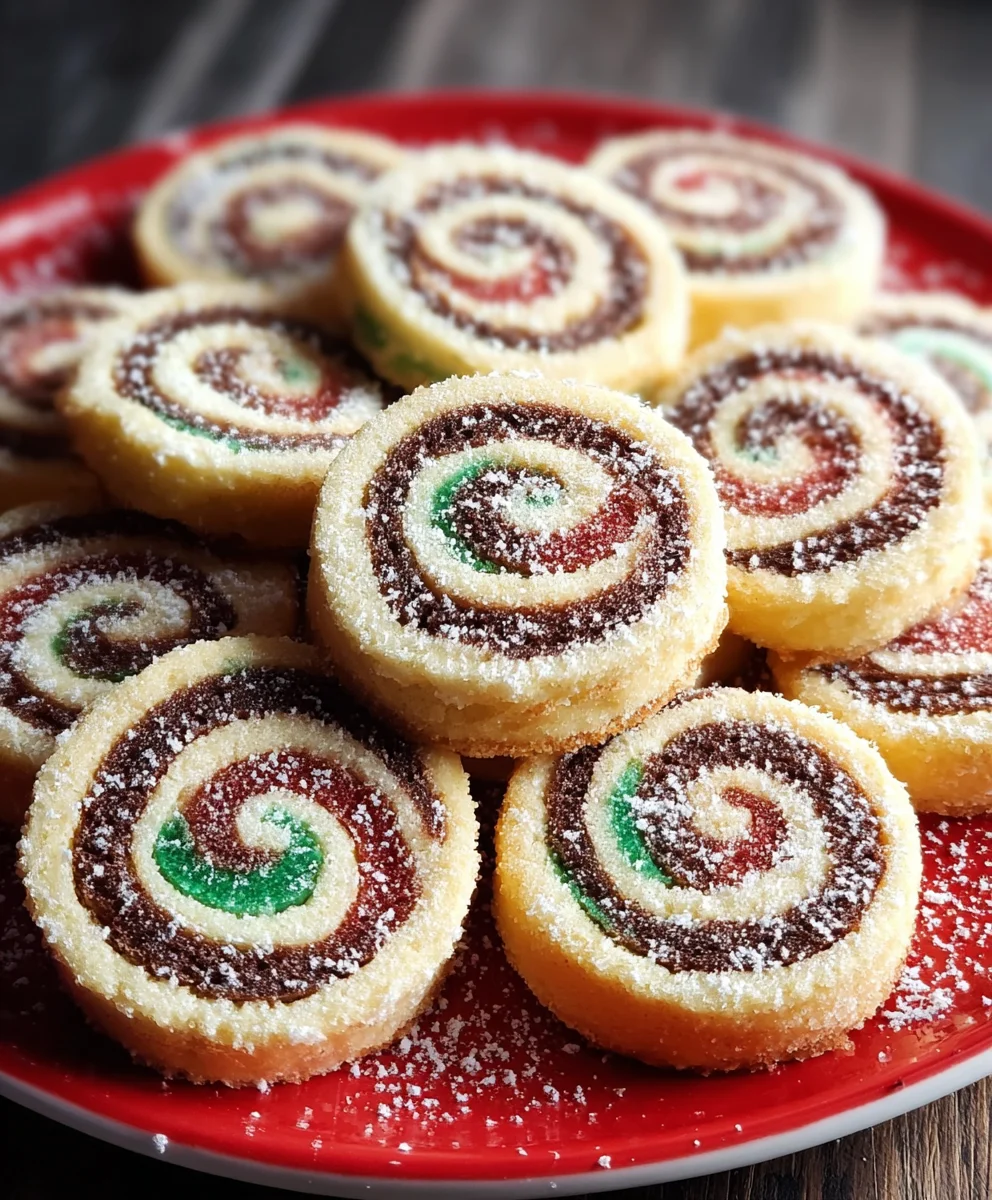
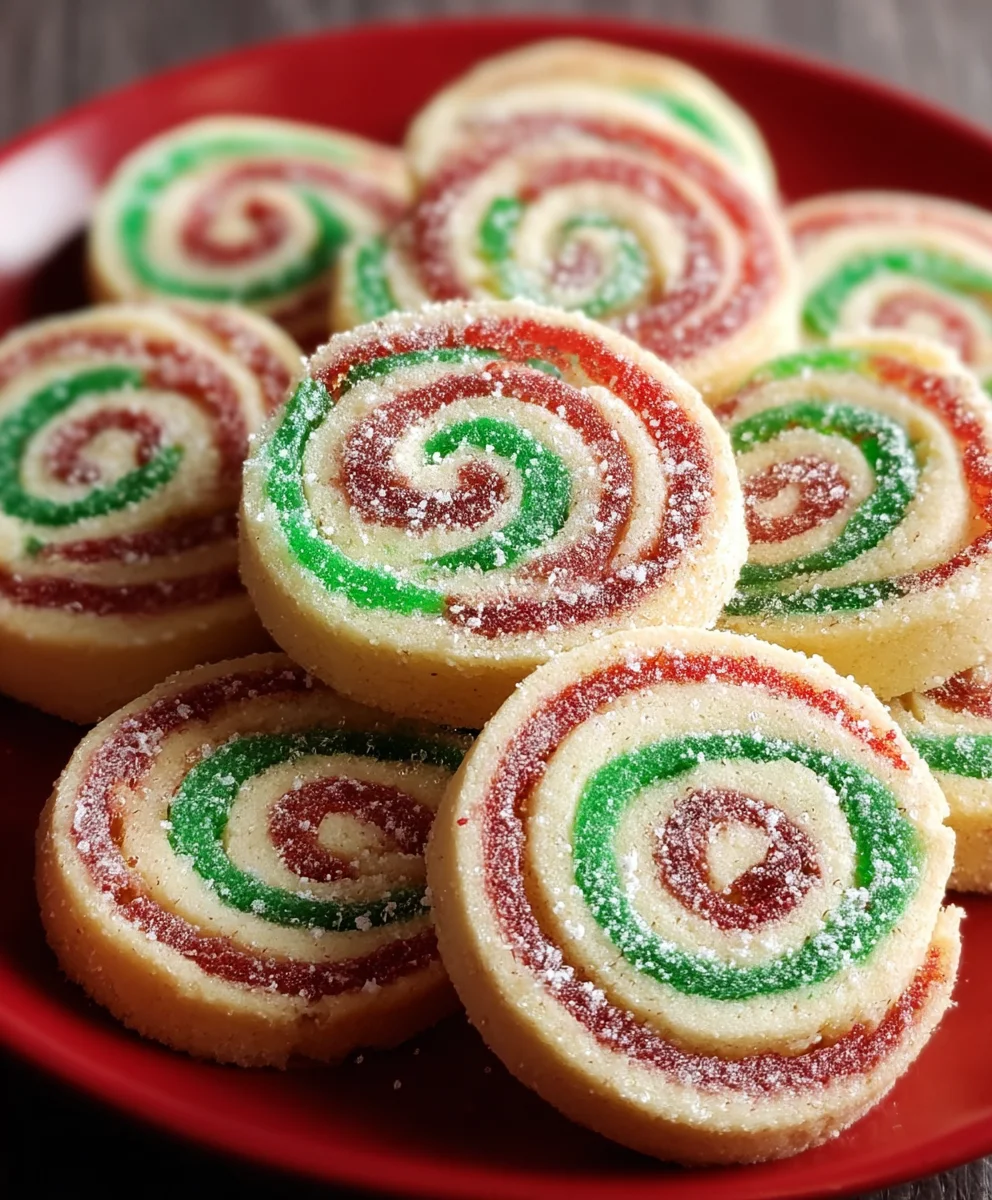
Christmas Cookie Pinwheels are more than just a festive treat; they are miniature swirls of edible art that, for me, bring an immediate sense of wonder and joy to any holiday gathering. I always imagine the delight on faces when these vibrant, spiral-patterned cookies emerge from the oven, filling my home with the sweet aroma of Christmas. These charming confections have long held a cherished place in holiday baking traditions, their distinctive two-toned design making them a visual standout on any dessert table and a true highlight of the festive season.
I find that for generations, the creation of pinwheel cookies has been a beloved seasonal ritual, often passed down through families, embodying the spirit of togetherness and festive cheer. People adore these cookies not only for their striking appearance but also for their perfectly balanced buttery taste and tender, melt-in-your-mouth texture. They offer a delightful contrast of flavors and colors, making them incredibly satisfying to eat and an absolute pleasure to gift. Embarking on the journey to bake your own Christmas Cookie Pinwheels is an experience in itself – a playful process that yields incredibly rewarding and beautiful results, perfect for sharing the magic of the season. I invite you to join me in discovering the simple joy of making these holiday favorites.

Ingredients:
- For the Vanilla Cookie Dough:
- 2 ½ cups (300g) all-purpose flour, spooned and leveled
- ½ teaspoon baking powder
- ¼ teaspoon fine sea salt
- 1 cup (2 sticks / 226g) unsalted butter, softened to room temperature
- 1 cup (200g) granulated sugar
- 1 large egg, at room temperature
- 1 teaspoon pure vanilla extract
- For the Red Cookie Dough:
- Red gel food coloring (I prefer gel for vibrant colors without altering dough consistency significantly)
Preparing the Master Cookie Dough Base
Let’s begin by crafting the foundation for our beautiful Christmas Cookie Pinwheels. This initial dough will be divided and colored, ensuring a consistent texture and flavor throughout. Starting with ingredients at the right temperature is key for a smooth, homogenous dough, so make sure your butter and egg have had ample time to come to room temperature.
-
In a medium bowl, whisk together the dry ingredients: 2 ½ cups of all-purpose flour, ½ teaspoon of baking powder, and ¼ teaspoon of fine sea salt. Whisking ensures that the leavening agent and salt are evenly distributed throughout the flour, which is crucial for uniform texture in our finished Christmas Cookie Pinwheels. Set this aside for now.
-
In a large mixing bowl, preferably using a stand mixer fitted with the paddle attachment, or with a hand mixer, cream together the softened 1 cup (2 sticks) of unsalted butter and 1 cup of granulated sugar. Begin on low speed, gradually increasing to medium-high. You’ll want to beat this mixture for about 3-5 minutes, until it becomes wonderfully light, fluffy, and noticeably pale in color. This creaming process incorporates air into the butter and sugar, which will contribute to the tender crumb of our cookies. Scrape down the sides of the bowl periodically to ensure everything is thoroughly combined.
-
Once the butter and sugar mixture is light and airy, crack in the large, room-temperature egg. Beat on medium speed until the egg is fully incorporated into the mixture, which usually takes about 1 minute. The mixture might look slightly curdled at first, but keep mixing until it smooths out. After the egg, add the 1 teaspoon of pure vanilla extract. Beat just until combined. The aroma of vanilla will already start filling your kitchen, promising deliciousness.
-
Now, with the mixer on low speed, gradually add the dry flour mixture to the wet ingredients. Add it in two or three batches, mixing just until the flour streaks disappear and a soft dough begins to form. It’s incredibly important not to overmix the dough at this stage. Overmixing can develop the gluten in the flour too much, leading to tough cookies rather than the tender, melt-in-your-mouth texture we’re aiming for with these festive Christmas Cookie Pinwheels. As soon as you no longer see dry pockets of flour, stop the mixer. You should have a soft, pliable dough.
Dividing and Coloring the Dough
This is where the magic truly begins for our visually stunning Christmas Cookie Pinwheels! We’ll take our perfectly prepared dough and transform it into the vibrant colors that will make our cookies stand out on any holiday platter. The goal here is even color distribution without overworking the dough.
-
Carefully remove the dough from the mixing bowl. Place it onto a clean, lightly floured surface or a large piece of parchment paper. Divide the dough into two equal portions. You can use a kitchen scale for precision, aiming for roughly half of the total dough weight in each portion, or simply eyeball it if you’re comfortable. One half will remain the beautiful, creamy vanilla color, and the other half will become our festive red dough.
-
Take one half of the dough and gently shape it into a disc. Wrap this disc tightly in plastic wrap. This is your vanilla dough, ready for chilling later. Set it aside.
-
Now, take the remaining half of the dough. Using your fingers or a small spatula, add a few drops of red gel food coloring directly onto the dough. Start with a small amount – perhaps ¼ to ½ teaspoon – as gel colors are very concentrated. You can always add more to achieve your desired shade of festive red for your Christmas Cookie Pinwheels.
-
Working the color into the dough requires a gentle touch. Knead the dough very gently and briefly on a lightly floured surface or using your hands protected by disposable gloves (to avoid staining your hands). Fold the dough over itself repeatedly, pressing and turning, until the red color is completely uniform throughout the entire portion of dough. If you find the color isn’t quite as vibrant as you’d like, add a few more drops of gel coloring and continue kneading until the desired hue is achieved. Be mindful not to over-knead, as this can make the dough tough. The goal is a beautifully consistent, deep red dough, perfect for contrasting with the vanilla in our Christmas Cookie Pinwheels.
-
Once your red dough is perfectly colored, shape it into a disc similar to the vanilla dough. Wrap this red dough disc tightly in plastic wrap as well. Both doughs should now be individually wrapped and ready for the crucial chilling phase.
Chilling the Dough – The Essential Step
Chilling the dough is an absolutely non-negotiable step for successful Christmas Cookie Pinwheels. It’s not just about making the dough easier to handle; it also helps prevent spreading during baking and allows the flavors to meld beautifully. Patience during this stage will be greatly rewarded.
-
Place both the individually wrapped vanilla dough and red dough discs into the refrigerator. Allow them to chill for at least 2 hours. For best results, and to truly ensure they are firm enough for easy handling and neat rolling, I often chill them for 3-4 hours, or even overnight. A well-chilled dough is significantly less sticky, much easier to roll out to an even thickness, and will hold its shape much better when sliced and baked. This firmness is paramount for creating those distinct, clean spirals that define Christmas Cookie Pinwheels.
-
A Quick Tip for Success: When chilling, try to flatten the dough discs slightly into a more rectangular shape (if you know your counter space and rolling method). This can save you a little time later when you go to roll them out, as they’ll already be closer to the final shape we need for layering.
Assembling the Christmas Cookie Pinwheels
This is arguably the most exciting part – watching your two distinct doughs come together to form the iconic spiral pattern of the Christmas Cookie Pinwheels. Precision and a steady hand are helpful here, but don’t worry if it’s not absolutely perfect; the charm of homemade cookies often lies in their unique character!
-
Once your doughs are thoroughly chilled and firm, remove one disc (either vanilla or red) from the refrigerator. Place it on a lightly floured surface or, even better, between two sheets of parchment paper. The parchment paper method is my go-to because it minimizes the need for extra flour, which can toughen the dough, and makes transferring much easier. Using a rolling pin, roll the dough out evenly into a rectangle, aiming for a thickness of about ¼ inch (approximately 0.6 cm). Try to get the edges as straight as possible, but don’t stress too much about perfection at this point. The dimensions of the rectangle should be roughly 10×12 inches, or whatever size allows for a nice, even roll for your Christmas Cookie Pinwheels.
-
Repeat the rolling process with the second dough disc (the color you didn’t roll first). Ensure this second rectangle is as close in size and shape to the first one as possible. Consistency in size is important for an even spiral. If one dough softens too much during rolling, pop it back in the fridge for 10-15 minutes before continuing.
-
Now for the layering! Carefully peel the top sheet of parchment paper from one of your rolled dough rectangles. Then, very gently, invert this dough sheet directly on top of the other rolled dough rectangle. You want the top surface of the second dough to be touching the bottom surface of the first dough, creating a perfect stack. If you rolled between parchment, you can simply peel off the bottom sheet of the top dough and then align it. Press down very gently to ensure the two layers adhere to each other without creating air pockets. You now have a beautiful two-toned rectangle, which is the canvas for our Christmas Cookie Pinwheels.
-
Once the layers are stacked, you might notice some uneven edges. Take a sharp knife or a pizza cutter and carefully trim the long edges of the combined dough rectangle to create clean, straight lines. This will ensure a neat, uniform log when rolled, and ultimately, beautiful circular pinwheels. Don’t worry about the trimmed scraps; you can gently press them together and bake them as “chef’s treats” later!
-
Starting from one of the long sides of the layered dough rectangle, begin to tightly roll the dough into a log. The key word here is “tightly.” A tight roll will prevent gaps and ensure a solid, cohesive spiral pattern in your Christmas Cookie Pinwheels. Apply even pressure as you roll, working slowly and deliberately. If the dough starts to crack, you might need to let it warm up for just a minute or two, or gently press the cracks together as you roll. Continue rolling until you reach the opposite long side, forming a uniform log.
-
Once the log is fully formed, gently press along the seam where the dough ends meet to seal it securely. You want to make sure this seam is closed to maintain the log’s integrity. You can also gently roll the log back and forth a few times on your work surface to smooth it out and ensure it’s perfectly round.
Chilling and Slicing
Another crucial chilling period awaits our dough log. This step firms up the entire structure, making it possible to slice perfect, clean rounds for your Christmas Cookie Pinwheels. Rushing this stage will lead to squashed, misshapen cookies.
-
Wrap the entire dough log tightly in plastic wrap. If you plan to freeze part of it for later, an additional layer of aluminum foil is a good idea. Place the wrapped dough log back into the refrigerator to chill for at least 1-2 hours. Again, for best results and ease of slicing, I often aim for 3-4 hours, or even overnight. A very firm, cold log will yield the cleanest cuts, preserving the beautiful spiral pattern of your Christmas Cookie Pinwheels without distorting them.
-
When you’re ready to bake, preheat your oven to 375°F (190°C). Line several baking sheets with parchment paper or silicone baking mats. This prevents sticking and makes for easier cleanup.
-
Remove the chilled dough log from the refrigerator and unwrap it. Using a very sharp knife (a thin-bladed chef’s knife or a serrated knife works well), carefully slice the log into rounds about ¼ inch (0.6 cm) thick. As you slice, periodically rotate the log a quarter turn to help maintain its round shape and prevent one side from flattening. If your knife is getting sticky, wipe it clean with a damp cloth between slices. You’ll immediately see the gorgeous, distinct red and vanilla spiral patterns emerge – truly a sight to behold as you prepare your Christmas Cookie Pinwheels.
Baking the Christmas Cookie Pinwheels
The moment of truth! Baking these pinwheels will fill your home with the most delightful holiday aromas and reveal their final, charming appearance. Careful attention to baking time is essential to achieve that perfect crisp-tender texture.
-
Arrange the sliced cookie rounds onto the prepared baking sheets, leaving about 1-2 inches of space between each cookie. These cookies don’t spread a tremendous amount, but a little room ensures even baking and prevents them from melding together.
-
Bake one sheet at a time in the preheated oven for 8-11 minutes. The exact baking time can vary depending on your oven and the thickness of your cookies. You’re looking for the edges to be just lightly golden brown and the centers to appear set, but still soft. It’s important not to overbake these Christmas Cookie Pinwheels, as overbaking will result in a dry, hard cookie rather than the tender, buttery treat we desire. Keep a close eye on them, especially during the last few minutes.
-
When they’re done, the aroma of vanilla will be wonderfully prominent, and the red and vanilla spirals will be beautifully defined and slightly puffed. The kitchen will smell absolutely divine, signaling that deliciousness is on its way!
Cooling and Storing
Almost there! Proper cooling ensures your Christmas Cookie Pinwheels maintain their perfect texture, and good storage keeps them fresh for longer so you can enjoy them throughout the festive season.
-
Once baked, carefully remove the baking sheets from the oven. Allow the Christmas Cookie Pinwheels to cool on the baking sheet for about 5 minutes. They are quite delicate when hot, and this brief cooling period on the warm tray allows them to firm up slightly, making them easier to handle without breaking.
-
After 5 minutes, use a thin spatula to gently transfer the cookies to a wire rack to cool completely. Cooling on a wire rack allows air to circulate all around the cookies, preventing them from becoming soggy on the bottom due to residual heat and moisture. Ensure they are fully cooled before storing them to maintain their crispness.
-
Once completely cool, your beautiful Christmas Cookie Pinwheels are ready to be enjoyed! Store them in an airtight container at room temperature for up to 5-7 days. To keep them fresh for longer, you can also freeze the baked cookies. Simply place them in an airtight freezer-safe container or bag for up to 2-3 months. Thaw them at room temperature before serving. They make wonderful gifts, delightful additions to any holiday dessert spread, and are truly a joy to behold and eat!
Conclusion:
So, there you have it! Our journey through crafting these delightful treats comes to a sweet and satisfying end. I truly believe this recipe for our festive pinwheels is an absolute must-try for anyone looking to add a touch of magic and incredible flavor to their holiday season. What makes them so special, you ask? Well, it’s not just their stunning, vibrant swirl that captures the eye, making them an instant showstopper on any dessert table. It’s also their wonderfully tender texture, a perfect balance of crisp edges and a soft, chewy center, paired with that comforting, buttery vanilla flavor that simply screams ‘holiday joy.’ They are surprisingly simple to master, even for novice bakers, offering a rewarding experience with truly impressive results that will have everyone asking for your secret. These aren’t just cookies; they’re edible works of art that encapsulate the warmth and cheer of the holidays, making them a centerpiece of any festive gathering. The sheer joy of seeing those perfectly formed spirals emerge from the oven, fragrant and beautiful, is a reward in itself, promising smiles and satisfied palates all around. They truly embody the spirit of festive baking, combining visual appeal with an irresistible taste that will leave a lasting impression.
Once you pull these beauties from the oven, fragrant and golden, the possibilities for enjoyment are endless. Of course, they are absolutely divine on their own, perhaps with a steaming mug of hot cocoa, a robust cup of coffee, or even a tall glass of cold milk – a classic combination that never disappoints and brings back childhood memories for many. They make for an exquisite addition to any holiday cookie platter, standing out with their unique visual appeal among more traditional cut-outs or drops. Imagine them artfully arranged on a festive tray, ready to impress guests at your next holiday gathering or even as a thoughtful, homemade gift for friends, family, or neighbors. Packaged in a beautiful tin or cellophane bag tied with a ribbon, they convey a personal touch that store-bought treats simply cannot replicate. Don’t forget their potential as a sweet ending to a holiday meal, served alongside a scoop of vanilla bean ice cream or a dollop of freshly whipped cream. The slight warmth from a freshly baked cookie meeting the cool cream is a sensational contrast that truly elevates the experience. Furthermore, consider them as a delightful treat for an afternoon tea, offering a sophisticated yet fun bite that pairs perfectly with your favorite brew. Their festive appearance instantly brightens any setting, making every moment feel a little more special and celebratory. They are the kind of cookie that sparks conversations and creates lasting memories, a true testament to the simple power of homemade goodness.
But why stop there? The beauty of this recipe lies in its incredible versatility, allowing for endless creative variations that cater to every taste and aesthetic preference. For an extra pop of color, consider replacing a portion of the red food coloring with green, creating a more traditional ‘Christmas’ swirl, or even experimenting with blue or purple for a whimsical winter wonderland theme that perfectly matches your holiday decor. You could gently roll the logs in festive sprinkles before slicing and baking, adding a delightful crunch and an extra layer of sparkle that catches the light beautifully. For flavor enthusiasts, a hint of peppermint extract in the red dough, or almond extract in the white, can introduce exciting new dimensions, transforming the classic taste into something uniquely adventurous. A tiny bit of orange or lemon zest could brighten the flavor profile beautifully, adding a zesty kick that cuts through the sweetness. And if you’re feeling particularly indulgent, a quick dip in melted white or dark chocolate after they’ve cooled completely, followed by a sprinkle of crushed candy canes or nuts, will transform them into an even more decadent treat, making them truly irresistible. Truly, the only limit is your imagination and how far you want to take your creative baking journey, ensuring that each batch can be a unique expression of your festive spirit.
Your Festive Baking Adventure Awaits!
Now that you’re armed with all the tips and tricks, I sincerely hope you feel inspired and excited to try your hand at these fantastic Christmas Cookie Pinwheels. I promise you, the joy of rolling out the dough, seeing the vibrant colors swirl together, and finally tasting that perfect, buttery sweetness is an experience not to be missed. There’s something incredibly satisfying about creating something so beautiful and delicious from scratch, knowing every ingredient that goes into it. So, gather your ingredients, put on some festive music, and let the baking begin! Embrace the process, enjoy the aromas that will fill your home, and savor the anticipation of those first warm bites. Once you’ve made them, I would absolutely love to hear about your experience. Did you try a fun variation? What was your favorite part of the process? Did they disappear from the cookie plate faster than you expected? Please, don’t hesitate to share your photos and stories with us in the comments below or tag us on social media. Your culinary adventures truly inspire me, and I can’t wait to see your stunning creations and hear about your triumphs in the kitchen. Happy baking, and may your holidays be filled with warmth, joy, and plenty of delicious, homemade cookies!
Recipe
A delicious recipe
Ingredients
Instructions
Important Information
Nutrition Facts (Per Serving)
It is important to consider this information as approximate and not to use it as definitive health advice.
Allergy Information
Please check ingredients for potential allergens and consult a health professional if in doubt.
Leave a Comment