
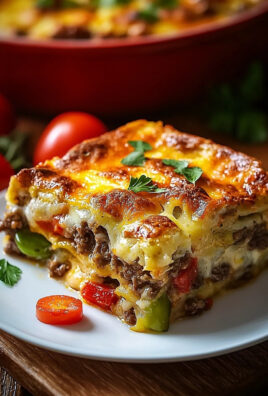
Chicken Puff Pastry, a symphony of flaky, golden crust and savory, creamy filling, is a dish that never fails to impress. Imagine sinking your teeth into layers of buttery puff pastry, yielding to a rich and comforting mixture of tender chicken, vegetables, and a luscious sauce. It’s a culinary hug in every bite!
While the exact origins of combining meat and pastry are somewhat shrouded in history, similar concepts have existed for centuries across various cultures. From savory pies in medieval Europe to empanadas in Latin America, the idea of encasing flavorful fillings in dough is a timeless culinary tradition. This particular iteration, Chicken Puff Pastry, gained popularity as a sophisticated yet approachable dish, perfect for both elegant dinner parties and cozy weeknight meals.
But what is it about chicken puff pastry that makes it so universally loved? The answer lies in its delightful combination of textures and flavors. The crisp, airy puff pastry provides a satisfying contrast to the creamy, savory filling. The chicken, often paired with vegetables like mushrooms, peas, and carrots, offers a balanced and nutritious meal. And let’s not forget the convenience! While it may seem fancy, chicken puff pastry can be surprisingly easy to prepare, especially when using store-bought puff pastry. It’s a guaranteed crowd-pleaser that elevates any occasion.

Ingredients:
- 1 pound boneless, skinless chicken breasts, cooked and shredded
- 1 tablespoon olive oil
- 1 medium onion, finely chopped
- 2 cloves garlic, minced
- 8 ounces cream cheese, softened
- 1/2 cup sour cream
- 1/4 cup mayonnaise
- 1/4 cup chopped fresh parsley
- 1/4 cup chopped fresh chives
- 1 teaspoon dried thyme
- 1/2 teaspoon salt
- 1/4 teaspoon black pepper
- 1/4 teaspoon garlic powder
- 1/4 teaspoon onion powder
- 1/2 cup shredded cheddar cheese
- 1/2 cup shredded mozzarella cheese
- 1 package (14.1 ounces) frozen puff pastry sheets, thawed
- 1 egg, beaten (for egg wash)
- Sesame seeds, for sprinkling (optional)
Preparing the Chicken Filling
Okay, let’s get started with the heart of our chicken puff pastry the delicious filling! This is where all the flavor comes together, so take your time and enjoy the process.
- Cook and Shred the Chicken: If you haven’t already, cook your chicken breasts. You can bake them, poach them, or even use leftover rotisserie chicken. Once cooked, shred the chicken using two forks. You want nice, even shreds so it distributes well throughout the filling. Set aside for now.
- Sauté the Aromatics: Heat the olive oil in a large skillet over medium heat. Add the finely chopped onion and cook until softened and translucent, about 5-7 minutes. This step is crucial for building a flavorful base. Don’t rush it!
- Add the Garlic: Add the minced garlic to the skillet and cook for another minute, until fragrant. Be careful not to burn the garlic, as it can become bitter.
- Combine Cream Cheese and Sour Cream: In a large bowl, combine the softened cream cheese, sour cream, and mayonnaise. Make sure the cream cheese is truly softened, or you’ll end up with lumps. Beat with an electric mixer or whisk until smooth and creamy.
- Incorporate Herbs and Spices: Add the chopped fresh parsley, chopped fresh chives, dried thyme, salt, pepper, garlic powder, and onion powder to the cream cheese mixture. Stir well to combine. These herbs and spices are what will really elevate the flavor of our filling. Feel free to adjust the amounts to your liking!
- Combine Chicken and Cheese: Add the shredded chicken, sautéed onion and garlic mixture, shredded cheddar cheese, and shredded mozzarella cheese to the cream cheese mixture. Stir everything together until well combined. Make sure the chicken is evenly coated with the creamy mixture. Taste and adjust seasonings as needed. You might want to add a pinch more salt or pepper, depending on your preference.
- Chill the Filling (Optional but Recommended): Cover the bowl with plastic wrap and refrigerate the filling for at least 30 minutes. This will help the filling firm up slightly, making it easier to work with when assembling the puff pastries. While not strictly necessary, I highly recommend this step!
Preparing the Puff Pastry
Now, let’s move on to the puff pastry. This is what will give our chicken filling that flaky, golden-brown crust we all love. Working with puff pastry can be a little tricky, but don’t worry, I’ll guide you through it.
- Thaw the Puff Pastry: Remove the puff pastry sheets from the freezer and let them thaw according to the package directions. This usually takes about 30-40 minutes at room temperature. It’s important that the pastry is thawed but still cold. If it gets too warm, it will become sticky and difficult to work with.
- Unfold the Puff Pastry: Once thawed, gently unfold the puff pastry sheets on a lightly floured surface. Be careful not to tear the pastry.
- Cut the Puff Pastry: Using a sharp knife or pizza cutter, cut each puff pastry sheet into equal squares. The size of the squares will depend on how large you want your puff pastries to be. I usually aim for about 3-inch squares. You should get about 9 squares from each sheet.
Assembling the Chicken Puff Pastries
Alright, the moment we’ve been waiting for assembling our chicken puff pastries! This is where all our hard work comes together to create something truly delicious.
- Preheat the Oven: Preheat your oven to 400°F (200°C). Line a baking sheet with parchment paper. This will prevent the puff pastries from sticking and make cleanup a breeze.
- Fill the Puff Pastry Squares: Place a spoonful (about 2-3 tablespoons) of the chicken filling in the center of each puff pastry square. Don’t overfill them, or the filling will spill out during baking.
- Fold the Puff Pastry: There are a few ways you can fold the puff pastry. You can fold them into triangles by bringing two opposite corners together, or you can fold them into rectangles by bringing two opposite sides together. You can also get creative and make other shapes!
- Seal the Edges: Press the edges of the puff pastry together firmly to seal them. You can use a fork to crimp the edges for a decorative touch and to ensure they are well sealed. This is important to prevent the filling from leaking out during baking.
- Place on Baking Sheet: Place the assembled puff pastries on the prepared baking sheet, leaving some space between each one.
- Egg Wash: In a small bowl, beat the egg with a tablespoon of water to create an egg wash. Brush the tops of the puff pastries with the egg wash. This will give them a beautiful golden-brown color and a glossy finish.
- Sprinkle with Sesame Seeds (Optional): If desired, sprinkle the tops of the puff pastries with sesame seeds. This adds a nice visual appeal and a subtle nutty flavor.
Baking the Chicken Puff Pastries
Almost there! Now it’s time to bake our chicken puff pastries to golden-brown perfection. The aroma that will fill your kitchen is simply irresistible!
- Bake: Bake the puff pastries in the preheated oven for 20-25 minutes, or until they are golden brown and puffed up. Keep an eye on them, as baking times may vary depending on your oven.
- Cool Slightly: Remove the puff pastries from the oven and let them cool on the baking sheet for a few minutes before transferring them to a wire rack to cool completely. This will prevent them from becoming soggy.
Serving and Storing
Congratulations, you’ve made delicious chicken puff pastries! Now it’s time to enjoy the fruits of your labor.
- Serve Warm: Serve the chicken puff pastries warm. They are delicious on their own as a snack or appetizer, or you can serve them with a side salad for a light meal.
- Storage: Store any leftover puff pastries in an airtight container in the refrigerator for up to 3 days. Reheat them in the oven or microwave before serving.
Tips and Variations
- Cheese Variations: Feel free to experiment with different types of cheese in the filling. Gruyere, Swiss, or Monterey Jack would all be delicious.
- Vegetable Additions: Add some finely chopped vegetables to the filling, such as mushrooms, bell peppers, or spinach.
- Spice it Up: Add a pinch of red pepper flakes to the filling for a little heat.
- Make Ahead: You can assemble the puff pastries ahead of time and store them in the refrigerator until ready to bake. Just add a few minutes to the baking time.
- Freezing: You can also freeze the unbaked puff pastries. Place them on a baking sheet and freeze until solid, then transfer them to a freezer bag. When ready to bake, bake them directly from frozen, adding a few minutes to the baking time.

Conclusion:
This Chicken Puff Pastry recipe is truly a must-try, and I’m not just saying that! It’s the perfect combination of comforting, savory flavors and satisfying textures, all wrapped up in a beautiful, golden-brown package. Seriously, what’s not to love? The creamy chicken filling, bursting with tender chicken and flavorful vegetables, nestled inside that flaky, buttery puff pastry it’s a symphony of deliciousness that will have everyone coming back for seconds (and maybe even thirds!).
I know that sometimes, trying a new recipe can feel a little daunting, but trust me, this one is surprisingly easy to put together. The steps are straightforward, and the results are absolutely worth the effort. Plus, it’s a fantastic way to use up leftover cooked chicken, making it both delicious and economical.
But the best part? This Chicken Puff Pastry is incredibly versatile! Feel free to get creative with the filling. You could add different vegetables like mushrooms, peas, or asparagus. A sprinkle of your favorite cheese, like Gruyere or Parmesan, would also be a fantastic addition. For a spicier kick, try adding a pinch of red pepper flakes or a dash of hot sauce to the creamy sauce.
Serving suggestions are endless! This makes a wonderful main course for a weeknight dinner, especially when paired with a simple green salad or some roasted vegetables. It’s also elegant enough to serve at a brunch or luncheon. For a more casual presentation, you can cut the puff pastry into individual squares or triangles before baking, creating adorable little chicken puff pastry bites that are perfect for appetizers or parties.
If you’re looking for a truly special and memorable meal, consider serving the Chicken Puff Pastry with a side of creamy mashed potatoes or a light and refreshing cucumber salad. A crisp white wine, like a Sauvignon Blanc or Pinot Grigio, would also complement the flavors beautifully.
I’m so confident that you’ll love this recipe, and I truly encourage you to give it a try. Don’t be afraid to experiment with different variations and make it your own! Cooking should be fun and creative, so let your imagination run wild.
Once you’ve made this amazing Chicken Puff Pastry, I would absolutely love to hear about your experience! Did you make any changes to the recipe? What did you serve it with? What did your family and friends think? Please share your thoughts and photos in the comments below. Your feedback is invaluable, and it helps other readers discover the joy of this delicious dish.
I can’t wait to see your culinary creations! Happy baking, and bon appétit! I hope this becomes a new family favorite for you, just as it has for me. Enjoy the process, savor the flavors, and most importantly, have fun! I’m sure you’ll agree that this Chicken Puff Pastry is a recipe you’ll want to make again and again.
Chicken Puff Pastry: A Delicious & Easy Recipe
Flaky, golden-brown puff pastries filled with a creamy, savory mixture of shredded chicken, cheese, herbs, and spices. Perfect as an appetizer, snack, or light meal!
Ingredients
- 1 pound boneless, skinless chicken breasts, cooked and shredded
- 1 tablespoon olive oil
- 1 medium onion, finely chopped
- 2 cloves garlic, minced
- 8 ounces cream cheese, softened
- 1/2 cup sour cream
- 1/4 cup mayonnaise
- 1/4 cup chopped fresh parsley
- 1/4 cup chopped fresh chives
- 1 teaspoon dried thyme
- 1/2 teaspoon salt
- 1/4 teaspoon black pepper
- 1/4 teaspoon garlic powder
- 1/4 teaspoon onion powder
- 1/2 cup shredded cheddar cheese
- 1/2 cup shredded mozzarella cheese
- 1 package (14.1 ounces) frozen puff pastry sheets, thawed
- 1 egg, beaten (for egg wash)
- Sesame seeds, for sprinkling (optional)
Instructions
- Cook and Shred the Chicken: Cook chicken breasts (bake, poach, or use rotisserie). Shred with two forks and set aside.
- Sauté the Aromatics: Heat olive oil in a large skillet over medium heat. Add chopped onion and cook until softened and translucent, about 5-7 minutes. Add minced garlic and cook for another minute, until fragrant.
- Combine Cream Cheese and Sour Cream: In a large bowl, combine softened cream cheese, sour cream, and mayonnaise. Beat until smooth and creamy.
- Incorporate Herbs and Spices: Add chopped fresh parsley, chopped fresh chives, dried thyme, salt, pepper, garlic powder, and onion powder to the cream cheese mixture. Stir well to combine.
- Combine Chicken and Cheese: Add the shredded chicken, sautéed onion and garlic mixture, shredded cheddar cheese, and shredded mozzarella cheese to the cream cheese mixture. Stir everything together until well combined. Taste and adjust seasonings as needed.
- Chill the Filling (Optional but Recommended): Cover the bowl with plastic wrap and refrigerate the filling for at least 30 minutes.
- Thaw the Puff Pastry: Remove the puff pastry sheets from the freezer and let them thaw according to the package directions.
- Unfold the Puff Pastry: Once thawed, gently unfold the puff pastry sheets on a lightly floured surface.
- Cut the Puff Pastry: Using a sharp knife or pizza cutter, cut each puff pastry sheet into equal squares (about 3-inch squares).
- Preheat the Oven: Preheat your oven to 400°F (200°C). Line a baking sheet with parchment paper.
- Fill the Puff Pastry Squares: Place a spoonful (about 2-3 tablespoons) of the chicken filling in the center of each puff pastry square.
- Fold the Puff Pastry: Fold them into triangles or rectangles.
- Seal the Edges: Press the edges of the puff pastry together firmly to seal them. You can use a fork to crimp the edges for a decorative touch and to ensure they are well sealed.
- Place on Baking Sheet: Place the assembled puff pastries on the prepared baking sheet, leaving some space between each one.
- Egg Wash: In a small bowl, beat the egg with a tablespoon of water to create an egg wash. Brush the tops of the puff pastries with the egg wash.
- Sprinkle with Sesame Seeds (Optional): If desired, sprinkle the tops of the puff pastries with sesame seeds.
- Bake: Bake the puff pastries in the preheated oven for 20-25 minutes, or until they are golden brown and puffed up.
- Cool Slightly: Remove the puff pastries from the oven and let them cool on the baking sheet for a few minutes before transferring them to a wire rack to cool completely.
- Serve Warm: Serve the chicken puff pastries warm.
- Storage: Store any leftover puff pastries in an airtight container in the refrigerator for up to 3 days. Reheat them in the oven or microwave before serving.
Notes
- Cheese Variations: Gruyere, Swiss, or Monterey Jack would all be delicious.
- Vegetable Additions: Add some finely chopped vegetables to the filling, such as mushrooms, bell peppers, or spinach.
- Spice it Up: Add a pinch of red pepper flakes to the filling for a little heat.
- Make Ahead: You can assemble the puff pastries ahead of time and store them in the refrigerator until ready to bake. Just add a few minutes to the baking time.
- Freezing: You can also freeze the unbaked puff pastries. Place them on a baking sheet and freeze until solid, then transfer them to a freezer bag. When ready to bake, bake them directly from frozen, adding a few minutes to the baking time.
- Chilling the filling is recommended for easier handling.
- Ensure puff pastry is thawed but still cold.
- Don’t overfill the puff pastry squares.
- Seal the edges well to prevent filling leakage.

Leave a Comment