
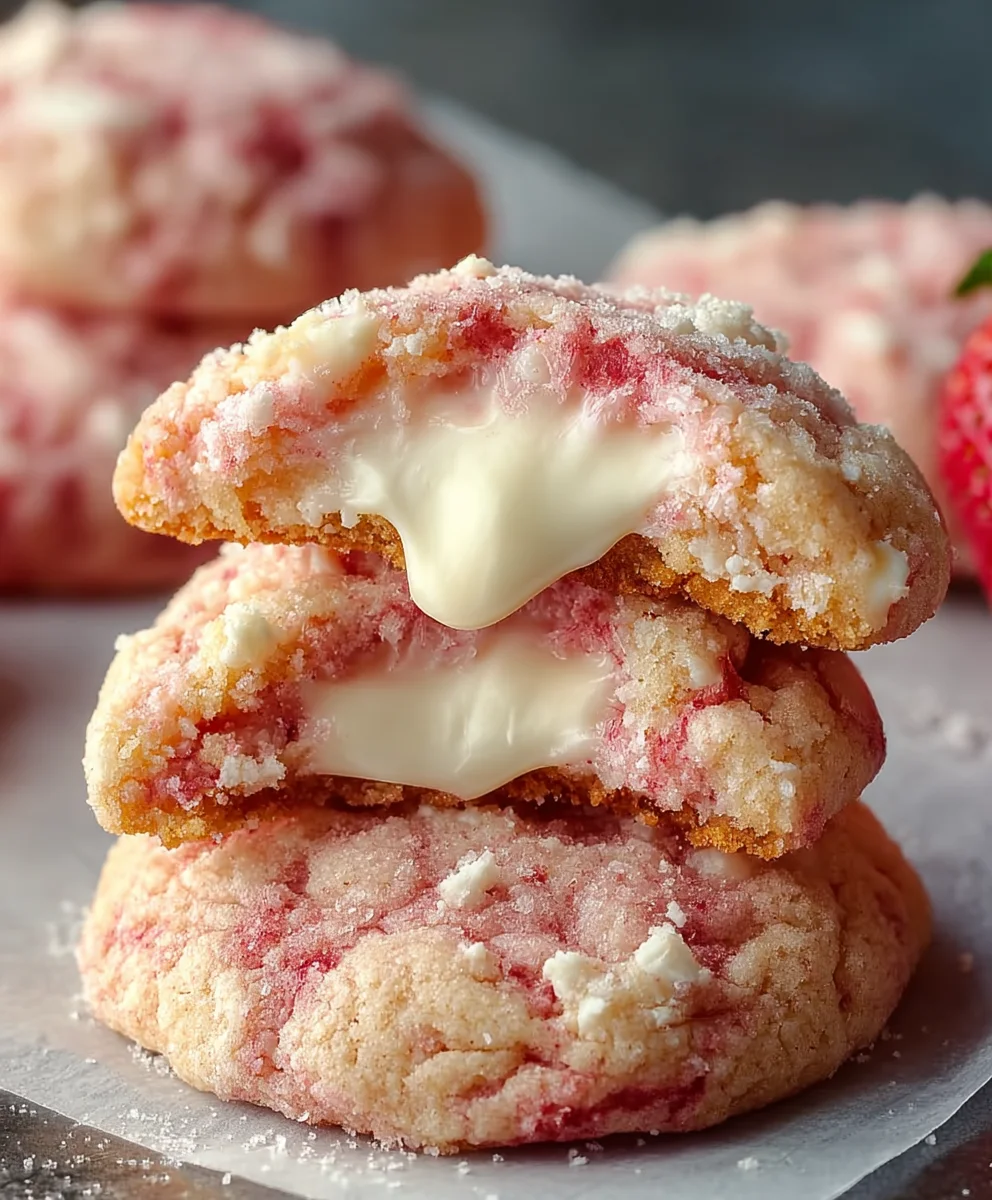
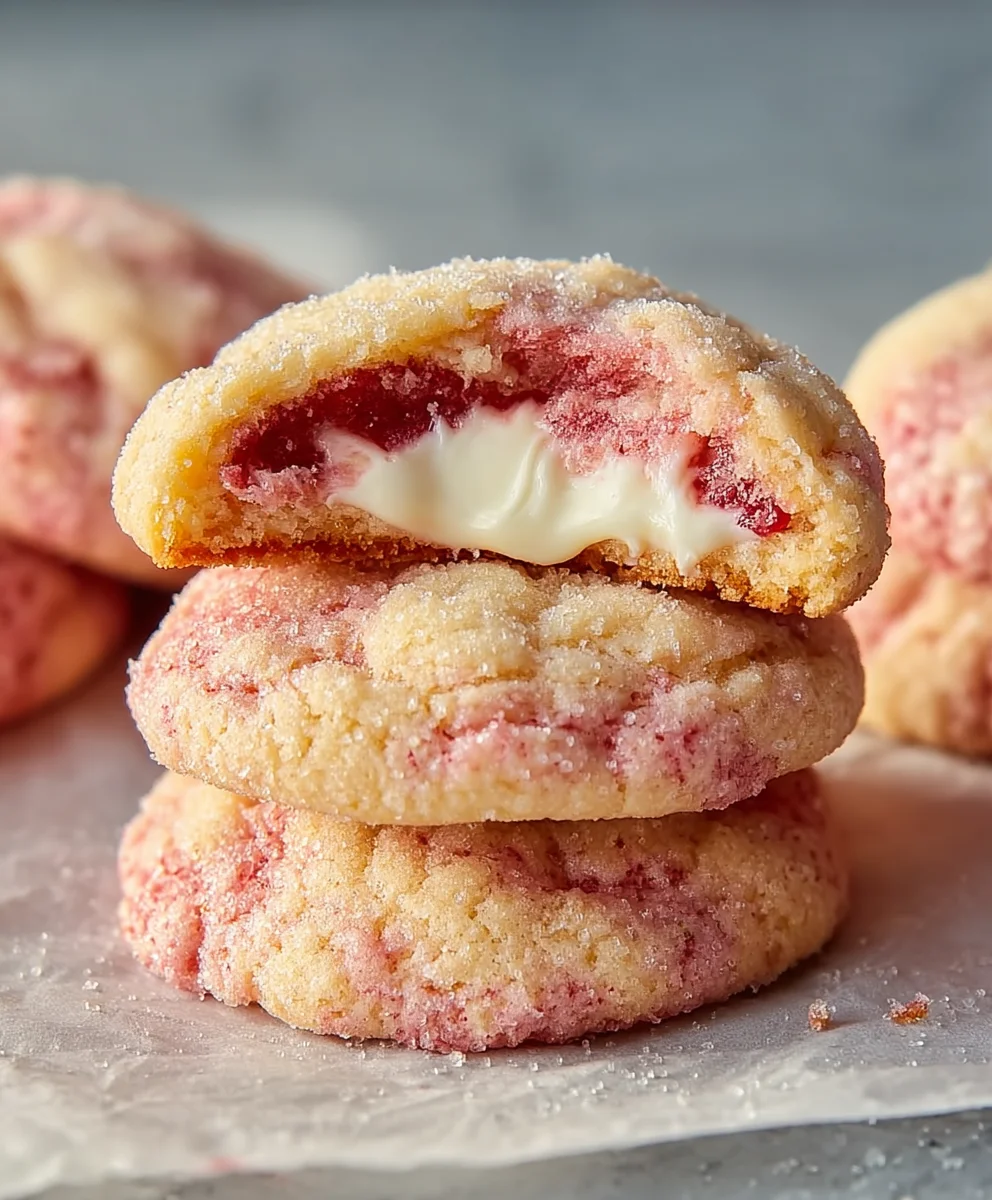
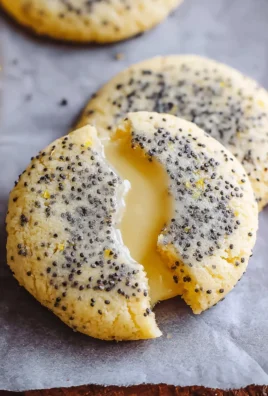
Strawberry Cheesecake Cookies are not just a treat; they are an experience, transforming your favorite luscious dessert into a convenient, delightful bite-sized wonder. Imagine the rich, creamy tang of a classic cheesecake infused with the sweet brightness of fresh strawberries, all nestled within a perfectly soft and chewy cookie. It’s a culinary innovation that truly captures the best of both worlds, offering the elegance of a traditional dessert in a charming, portable package.
The journey of cheesecake itself dates back to ancient Greece, evolving through centuries to become the beloved dessert we know today, while cookies have universally been symbols of comfort and joy. This recipe for Strawberry Cheesecake Cookies masterfully bridges these two beloved legacies, taking the familiar comfort of a cookie and elevating it with the sophisticated, refreshing flavors of a cheesecake.
Why Everyone Falls in Love with These Strawberry Cheesecake Cookies
I’ve found that people instantly fall in love with this dish not only for its incredible taste – the harmonious blend of tart strawberries and smooth, sweet cream cheese – but also for its delightful texture and sheer convenience. They offer the satisfying chewiness of a cookie paired with a melt-in-your-mouth creaminess that is simply irresistible, making them perfect for sharing at gatherings or enjoying as a personal indulgence. Prepare to amaze your taste buds and delight your guests with this unique and unforgettable creation.

Ingredients:
-
For the Luscious Strawberry Swirl:
- 1 cup (about 150g) fresh or frozen strawberries, hulled and quartered (fresh berries will give a brighter flavor, but frozen work perfectly too!)
- 2 tablespoons granulated sugar
- 1 tablespoon lemon juice (freshly squeezed makes a noticeable difference, trust me!)
- 1 teaspoon cornstarch dissolved in 1 tablespoon cold water (this is our little secret for a thick, jammy swirl)
-
For the Rich and Creamy Cheesecake Filling:
- 8 ounces (226g) full-fat cream cheese, softened to room temperature (this is absolutely crucial for a smooth filling!)
- 1/4 cup (50g) granulated sugar
- 1 large egg yolk (just the yolk adds richness without making it too runny)
- 1/2 teaspoon pure vanilla extract (go for the good stuff here!)
- Pinch of salt (it balances all the sweet flavors beautifully)
-
For the Soft and Chewy Cookie Dough:
- 1 1/2 cups (190g) all-purpose flour
- 1/2 teaspoon baking soda
- 1/4 teaspoon salt
- 1/2 cup (113g) unsalted butter, softened to room temperature (again, temperature matters!)
- 1/2 cup (100g) granulated sugar
- 1/4 cup (50g) packed light brown sugar (adds chewiness and a hint of molasses flavor)
- 1 large egg, at room temperature
- 1 teaspoon pure vanilla extract
- 1/4 cup (60ml) buttermilk (if you don’t have buttermilk, you can make your own! Just combine 1/4 cup milk with 1/2 teaspoon lemon juice or white vinegar and let it sit for 5 minutes until it curdles slightly)
- Optional: 1/2 cup white chocolate chips (these add an extra layer of sweetness and texture to our Strawberry Cheesecake Cookies!)
Preparing the Delectable Strawberry Swirl:
Let’s kick things off by creating that vibrant strawberry swirl that will peek through our delicious cookies. This step is super easy and fills your kitchen with the most wonderful aroma!
- Combine Ingredients: In a small saucepan, combine your hulled and quartered strawberries, granulated sugar, and lemon juice. Give it a good stir to ensure everything is well mixed. The sugar will start to draw out the natural juices from the strawberries, which is exactly what we want.
- Simmer to Soften: Place the saucepan over medium heat. Bring the mixture to a gentle simmer, stirring occasionally. Once it starts simmering, reduce the heat to low and let it cook for about 5-7 minutes. You’ll notice the strawberries softening beautifully and breaking down, releasing their sweet juices. Use the back of your spoon to gently mash some of the strawberries against the side of the pan if you prefer a less chunky swirl. I personally love a few small chunks of strawberry in my Strawberry Cheesecake Cookies, so I don’t mash them entirely!
- Thicken the Swirl: Once the strawberries are soft and jammy, give your cornstarch slurry (the cornstarch dissolved in cold water) a quick stir to make sure it’s fully combined, then slowly pour it into the simmering strawberry mixture, stirring constantly. Continue to cook for another 1-2 minutes, stirring, until the mixture visibly thickens to a glossy, jam-like consistency. This thickening step is important, as it prevents the swirl from becoming too watery in the cookies.
- Cool Completely: Remove the saucepan from the heat and transfer the strawberry swirl to a small bowl or a shallow plate. Allow it to cool completely to room temperature. You can even pop it in the refrigerator for about 20-30 minutes to speed up the cooling process. A chilled swirl is much easier to work with when assembling your Strawberry Cheesecake Cookies.
Crafting the Velvety Cheesecake Filling:
This is where the “cheesecake” in our Strawberry Cheesecake Cookies truly shines! A smooth, tangy, and slightly sweet filling is key to making these cookies irresistible. Remember, using room temperature cream cheese is paramount here!
- Prepare the Cream Cheese: In a medium mixing bowl, place your softened, full-fat cream cheese. It should be soft enough to easily press a finger into it. If it’s still cold, microwave it in 10-second intervals, stirring in between, until it’s pliable. Do not skip the softening step! Cold cream cheese will result in a lumpy filling, and nobody wants that in their beautiful Strawberry Cheesecake Cookies.
- Whip Until Smooth: Using an electric mixer (either a stand mixer with a paddle attachment or a hand mixer), beat the cream cheese on medium speed for about 1-2 minutes until it is incredibly smooth and creamy, with no lumps whatsoever. Scrape down the sides of the bowl frequently to ensure everything gets incorporated.
- Add Sugar: Gradually add the granulated sugar to the cream cheese, beating on medium-low speed until it’s just combined. Increase the speed to medium and beat for another minute or so, until the mixture is light and fluffy. The sugar should be fully dissolved.
- Incorporate Egg Yolk and Vanilla: Add the egg yolk, pure vanilla extract, and a pinch of salt to the cream cheese mixture. Beat on low speed until everything is just incorporated. Be careful not to overmix at this stage, as overmixing can incorporate too much air, which might cause the filling to puff up too much and crack during baking. We’re aiming for a dense, creamy filling for our Strawberry Cheesecake Cookies.
- Chill: Cover the bowl with plastic wrap and place it in the refrigerator to chill for at least 30 minutes, or until you’re ready to assemble the cookies. Chilling the filling will make it much firmer and easier to scoop and handle later, preventing it from spreading too much during baking.
Whipping Up the Perfect Cookie Dough Base:
Now for the foundation of our amazing Strawberry Cheesecake Cookies – the soft, chewy cookie dough. This dough is designed to be sturdy enough to hold the filling but still yield a wonderfully tender cookie.
- Whisk Dry Ingredients: In a medium bowl, whisk together the all-purpose flour, baking soda, and salt. Make sure these are well combined. This ensures that the leavening agent is evenly distributed throughout the dough, giving our cookies a consistent rise. Set this aside for a moment.
- Cream Butter and Sugars: In a large mixing bowl, using your electric mixer, cream together the softened unsalted butter, granulated sugar, and light brown sugar on medium speed. Beat for about 2-3 minutes until the mixture is light, fluffy, and pale in color. This creaming process is crucial as it incorporates air into the butter, which contributes to the cookies’ soft texture. Scrape down the sides of the bowl as needed.
- Add Egg and Vanilla: Beat in the room temperature large egg, one at a time, mixing well after each addition. Then, add the pure vanilla extract and beat until just combined. Ensure the egg is fully incorporated before adding the vanilla.
- Alternate Dry Ingredients and Buttermilk: With the mixer on low speed, gradually add about one-third of the dry ingredient mixture to the wet ingredients. Mix until just combined. Then, pour in half of the buttermilk and mix until just incorporated. Repeat this process, adding another third of the dry ingredients, then the remaining buttermilk, and finally the last third of the dry ingredients. The key here is to mix until just combined after each addition. Overmixing the flour will develop the gluten too much, resulting in tough, dry cookies, and we want soft and tender Strawberry Cheesecake Cookies!
- Fold in White Chocolate Chips (Optional): If you’re adding white chocolate chips, gently fold them into the dough by hand using a spatula until they are evenly distributed.
- Chill the Dough: Cover the cookie dough bowl with plastic wrap and refrigerate it for at least 30 minutes. This chilling period is important as it allows the flavors to meld, prevents the cookies from spreading too much during baking, and makes the dough much easier to handle when shaping our Strawberry Cheesecake Cookies.
Assembling Your Irresistible Strawberry Cheesecake Cookies:
This is where all our hard work comes together! The assembly process for these Strawberry Cheesecake Cookies is fun and relatively straightforward, but it requires a little patience and a gentle touch.
- Preheat and Prepare: Preheat your oven to 375°F (190°C). Line two large baking sheets with parchment paper or silicone baking mats. This prevents sticking and makes for easy cleanup.
- Scoop the Cookie Dough: Using a medium cookie scoop (about 1.5 to 2 tablespoons of dough per cookie), scoop out portions of the chilled cookie dough. For each cookie, flatten the dough into a disc in the palm of your hand. It should be about 2-2.5 inches in diameter and about 1/4 inch thick. Create a slight indentation in the center, forming a little “cup” for the filling.
- Fill with Cheesecake: Take your chilled cheesecake filling. Using a small spoon or a mini cookie scoop (about 1 teaspoon to 1.5 teaspoons), place a dollop of the cheesecake filling into the center of each cookie dough disc, right in that indentation you created. Make sure not to overfill, as we want to be able to seal the dough around it.
- Seal the Cookies: Carefully gather the edges of the cookie dough disc around the cheesecake filling, pinching and sealing them at the top to completely enclose the filling. Gently roll the sealed dough between your palms to form a smooth ball. It’s important that the filling is completely encased to prevent it from oozing out during baking.
- Top with Strawberry Swirl: Once you have a perfectly sealed cookie ball, gently press it down slightly onto your prepared baking sheet. Using a small spoon, place a small dollop (about 1/2 teaspoon) of the cooled strawberry swirl directly on top of each cookie. Using a toothpick or the tip of a knife, gently swirl the strawberry jam into the top of the cookie dough for that iconic “cheesecake” look. Don’t press too hard, or you’ll break through the dough.
- Arrange on Baking Sheets: Place the assembled Strawberry Cheesecake Cookies on the prepared baking sheets, leaving about 2 inches between each cookie to allow for spreading. Remember, these will spread a bit, so give them space.
Baking Your Delicious Strawberry Cheesecake Cookies:
The moment of truth! Baking these special Strawberry Cheesecake Cookies requires a little attention to detail to ensure they are perfectly cooked through, with a soft interior and slightly crisp edges.
- Bake in Batches: Place one baking sheet at a time into your preheated oven. Baking one sheet at a time ensures even heat distribution and consistent results for all your Strawberry Cheesecake Cookies.
- Monitor Baking Time: Bake for 10-14 minutes. The exact baking time will depend on your oven and the size of your cookies. You’ll know they’re ready when the edges are lightly golden brown, and the centers are set but still look very soft, almost a little underbaked. The cheesecake filling might puff up slightly in the center, which is perfectly normal. Be careful not to overbake! Overbaked cookies will be dry and hard, and we want soft, chewy Strawberry Cheesecake Cookies.
- Rotate if Necessary: If your oven bakes unevenly, you might want to rotate the baking sheet halfway through the baking time to ensure uniform browning.
- Initial Cooling on Sheet: Once baked, remove the baking sheet from the oven. Allow the Strawberry Cheesecake Cookies to cool on the baking sheet for about 5 minutes. They will be quite delicate right out of the oven, and this short cooling period helps them set up and firm up a bit.
Cooling and Finishing Touches:
Patience, my friends! The cooling process is just as important as the baking process for achieving the perfect texture and allowing the flavors to fully develop in your Strawberry Cheesecake Cookies.
- Transfer to Cooling Rack: After the initial 5 minutes on the baking sheet, carefully transfer the warm Strawberry Cheesecake Cookies to a wire cooling rack to cool completely. Use a thin, wide spatula to avoid breaking them.
- Cool Completely: Allow the cookies to cool completely before enjoying them. This can take anywhere from 30 minutes to an hour, depending on your kitchen’s temperature. Cooling is essential for the cheesecake filling to fully set and for the flavors to meld. If you bite into them too soon, the filling might be too warm and runny. Plus, the texture improves dramatically once they are fully cooled.
- Optional Garnish: For an extra touch of elegance and flavor, you can drizzle a tiny bit more of the leftover strawberry swirl or even a thin glaze of powdered sugar mixed with a tiny bit of milk or lemon juice over the cooled Strawberry Cheesecake Cookies. A sprinkle of finely chopped fresh strawberries or a tiny sprig of fresh mint can also make them look extra special for serving!
Tips for Achieving the Best Strawberry Cheesecake Cookies:
Making delicious Strawberry Cheesecake Cookies is all about paying attention to a few key details. Here are some of my favorite tips to ensure your cookies turn out perfectly every single time, making them a showstopper for any occasion or just a delightful treat for yourself!
- Room Temperature Ingredients are Your Best Friend: I cannot stress this enough! For both the cookie dough and the cheesecake filling, having your butter, cream cheese, and egg at room temperature is absolutely critical. This ensures that all ingredients cream together smoothly and emulsify properly, leading to a perfectly consistent dough and a lump-free, velvety filling. Cold ingredients don’t blend well and can result in a lumpy texture and an uneven bake for your Strawberry Cheesecake Cookies.
- Don’t Overmix the Dough: Once you add the flour, mix only until just combined. Overmixing develops the gluten in the flour, which can lead to tough, dense cookies instead of the soft, tender Strawberry Cheesecake Cookies we’re aiming for. A light hand here makes all the difference.
- Chill, Chill, Chill!: Both the cookie dough and the cheesecake filling benefit immensely from chilling. Chilling the dough prevents excessive spreading in the oven, giving your Strawberry Cheesecake Cookies a nice thickness. Chilling the cheesecake filling makes it much easier to handle and ensures it holds its shape better during baking. If your kitchen is warm, you might even need to chill the assembled cookies for 10-15 minutes before baking.
- Proper Sealing of the Filling: When assembling, make sure you completely enclose the cheesecake filling within the cookie dough. Pinch the edges securely. Any exposed filling can bubble out and burn, detracting from the appearance and texture of your Strawberry Cheesecake Cookies.
- Adjust Baking Time for Your Oven: Every oven is a little different! Keep an eye on your Strawberry Cheesecake Cookies as they bake. They should have lightly golden edges and set centers. If you notice them browning too quickly, you might need to adjust your oven temperature slightly or reduce the baking time for subsequent batches.
- Cool Completely Before Indulging: I know it’s hard to resist, but allowing the Strawberry Cheesecake Cookies to cool completely on a wire rack is vital. This allows the cheesecake filling to fully set and firm up, ensuring that creamy, delicious texture you crave. Warm filling can be a bit too soft and messy.
- Enhance the Strawberry Swirl: For an even more intense strawberry flavor, consider using a high-quality strawberry preserve if you’re short on time, but remember to reduce the sugar slightly if the preserve is already very sweet. A tiny drop of red food coloring can also boost the visual appeal of your swirl, making those Strawberry Cheesecake Cookies look even more vibrant.
- Personalize Your Toppings: While the strawberry swirl is classic, feel free to experiment! A light dusting of powdered sugar once cooled, a sprinkle of finely chopped pistachios for crunch and color, or even a tiny dollop of whipped cream just before serving can elevate your Strawberry Cheesecake Cookies to new heights.
Storing Your Strawberry Cheesecake Cookies:
Once you’ve baked these delightful Strawberry Cheesecake Cookies, you’ll want to ensure they stay fresh and delicious for as long as possible. Proper storage is key to maintaining their wonderful texture and flavor, especially because of the creamy cheesecake filling!
- Room Temperature (Short-Term): If you plan to consume the Strawberry Cheesecake Cookies within a day or two, you can store them in an airtight container at room temperature. However, due to the cream cheese filling, I generally recommend refrigeration for optimal freshness and safety, especially in warmer climates or during warmer months.
- Refrigeration (Recommended): For longer storage and to keep the cheesecake filling at its best, place the cooled Strawberry Cheesecake Cookies in an airtight container and store them in the refrigerator. They will stay fresh and delicious for up to 3-5 days. When storing, you might want to place a piece of parchment paper between layers of cookies if stacking them to prevent sticking.
- Freezing (Long-Term): Yes, you can freeze these delightful Strawberry Cheesecake Cookies! Once they are completely cooled, place them in a single layer on a baking sheet and freeze for about 1-2 hours, or until solid. This “flash freezing” prevents them from sticking together. Once frozen solid, transfer the cookies to a freezer-safe airtight container or a heavy-duty freezer bag. They can be stored in the freezer for up to 1-2 months.
- Thawing Frozen Cookies: To enjoy frozen Strawberry Cheesecake Cookies, simply remove them from the freezer and let them thaw at room temperature for about 1-2 hours, or in the refrigerator overnight. You might find that a quick warm-up in the microwave for 10-15 seconds brings out their fresh-baked goodness even more!
Conclusion:
So, there you have it – my heartfelt ode to a recipe that I truly believe will become a cherished staple in your baking repertoire, one that will gather compliments and create smiles wherever it goes. These aren’t just any ordinary baked goods; they are a delightful fusion, a culinary masterpiece that brings together the best of two beloved desserts into one irresistible package. The soft, chewy cookie base, kissed with a subtle hint of tang from the cream cheese, perfectly complements the vibrant burst of sweet-tart strawberry, all encased in a tender, almost cake-like texture. It’s an experience, really – the kind of treat that elevates an everyday moment into something special. From the very first bite, you’ll understand why these magnificent Strawberry Cheesecake Cookies are an absolute must-try. They offer that quintessential balance of creamy indulgence and fruity freshness that is often sought after but rarely achieved with such effortless grace in a cookie.
I find immense joy in the process of creating these little wonders. The aroma alone, as they bake to golden perfection, is enough to lift spirits and draw everyone into the kitchen with eager anticipation. It’s a scent that promises warmth, comfort, and pure deliciousness. And when they finally emerge, beautifully puffed and subtly browned, cooling on the rack, you just know you’ve created something extraordinary. This recipe is an embodiment of homemade goodness, a testament to the idea that some of the greatest pleasures in life come from simple ingredients transformed with a little love and creativity. It’s approachable enough for beginners, yet yields a result so sophisticated, even seasoned bakers will be impressed. Trust me when I say, once you taste these, you’ll be making them again and again.
Elevate Your Enjoyment: Serving Suggestions & Creative Variations
Now, let’s talk about how to truly maximize your enjoyment of these fantastic cookies. While they are undeniably perfect on their own, perhaps with a tall glass of cold milk, a steaming mug of your favorite coffee, or a refreshing cup of iced tea, their versatility extends much further. Imagine serving them slightly warmed, with a scoop of vanilla bean ice cream, allowing the cookie’s tender chewiness to mingle with the melting creaminess of the ice cream – a true dessert revelation! They also make an exquisite addition to any dessert platter, standing out with their gorgeous pink hue and inviting texture. For a sophisticated touch, consider garnishing with a fresh mint leaf or a dusting of powdered sugar just before serving. They’re also ideal for potlucks, brunches, or simply as a thoughtful gift for friends and family.
But why stop there? The beauty of baking is in the exploration, and this recipe offers a wonderful canvas for your culinary creativity. While strawberries are undeniably delightful, feel free to experiment with other fruits. Imagine the possibilities with fresh raspberries, blueberries, or even a mixed berry medley! For an extra layer of decadence, you could drizzle them with melted white chocolate after they’ve cooled, or fold in some mini white chocolate chips into the dough for a delightful textural surprise. A zest of lemon or orange in the cookie dough could also add a bright, citrusy counterpoint that truly sings. You could even play with the “crust” component – perhaps using different types of crushed biscuits or adding a pinch of cinnamon to the graham cracker crumbs for a spiced twist. Don’t be afraid to make this recipe truly your own; it’s robust enough to handle a little experimentation and still deliver spectacular results.
Your Turn: Bake, Savor, and Share!
Now, my friend, the ball is in your court. I’ve shared my secrets, my passion, and my enthusiasm for this truly remarkable recipe. All that’s left is for you to roll up your sleeves, gather your ingredients, and embark on your own baking adventure. I promise you, the joy of creating these delightful cookies, and the even greater joy of sharing them with loved ones, is an experience not to be missed. There’s something incredibly satisfying about transforming simple components into something so utterly delicious and beautiful with your own hands. Don’t let any hesitation hold you back – the steps are clear, and the outcome is guaranteed to be rewarding.
Once you’ve experienced the magic of these cookies, I would absolutely love to hear about it! Did you stick to the original recipe, or did you venture into your own variations? What was your favorite part of the process? Did they bring smiles to the faces of your family and friends? Your feedback and shared experiences mean the world to me and to our growing community of fellow bakers. So, please, bake your batch, savor every delectable bite, and then come back and share your stories. Tag me, leave a comment, or simply tell me all about your delicious journey. Let’s celebrate the joy of homemade treats together. Happy baking!
Strawberry Cheesecake Cookies
Strawberry Cheesecake Cookies are not just a treat; they are an experience, transforming your favorite luscious dessert into a convenient, delightful bite-sized wonder. Imagine the rich, creamy tang of a classic cheesecake infused with the sweet brightness of fresh strawberries, all nestled within a perfectly soft and chewy cookie. It’s a culinary innovation that truly captures the best of both worlds, offering the elegance of a traditional dessert in a charming, portable package.
Ingredients
-
For the Luscious Strawberry Swirl:
-
1 cup (150g) fresh or frozen strawberries, hulled and quartered
-
2 tablespoons granulated sugar
-
1 tablespoon lemon juice
-
1 teaspoon cornstarch dissolved in 1 tablespoon cold water
-
For the Rich and Creamy Cheesecake Filling:
-
8 ounces (226g) full-fat cream cheese, softened
-
1/4 cup (50g) granulated sugar
-
1 large egg yolk
-
1/2 teaspoon pure vanilla extract
-
Pinch of salt
-
For the Soft and Chewy Cookie Dough:
-
1 1/2 cups (190g) all-purpose flour
-
1/2 teaspoon baking soda
-
1/4 teaspoon salt
-
1/2 cup (113g) unsalted butter, softened
-
1/2 cup (100g) granulated sugar
-
1/4 cup (50g) packed light brown sugar
-
1 large egg, at room temperature
-
1 teaspoon pure vanilla extract
-
1/4 cup (60ml) buttermilk (or milk + 1/2 tsp lemon juice or white vinegar)
-
Optional: 1/2 cup white chocolate chips
Instructions
-
Step 1
Combine 1 cup hulled and quartered strawberries, 2 tbsp granulated sugar, and 1 tbsp lemon juice in a small saucepan. Simmer over medium-low heat for 5-7 minutes until strawberries soften. Stir in 1 tsp cornstarch dissolved in 1 tbsp cold water; cook 1-2 minutes until thickened to a jam-like consistency. Transfer to a bowl and cool completely. (For the brightest pink, a drop of gel food coloring can be added to the swirl mixture.) -
Step 2
In a medium bowl, beat 8 oz softened full-fat cream cheese with an electric mixer until very smooth. Gradually add 1/4 cup granulated sugar; beat until light and fluffy. Mix in 1 large egg yolk, 1/2 tsp pure vanilla extract, and a pinch of salt until just combined. Do not overmix. Cover and chill for at least 30 minutes; ensure the filling is very firm from chilling for easier handling. (Do not rush this chilling time, the filling should be very firm.) -
Step 3
In a medium bowl, whisk together 1 1/2 cups all-purpose flour, 1/2 tsp baking soda, and 1/4 tsp salt. In a large mixing bowl, cream 1/2 cup softened unsalted butter with 1/2 cup granulated sugar and 1/4 cup packed light brown sugar until light and fluffy (2-3 minutes). Beat in 1 large egg, then 1 tsp pure vanilla extract. Alternately add the dry ingredients and 1/4 cup buttermilk, beginning and ending with dry ingredients, mixing on low speed until just combined after each addition. Do not overmix. Fold in 1/2 cup white chocolate chips, if using. Cover and chill dough for at least 30 minutes. -
Step 4
Preheat oven to 375°F (190°C). Line two large baking sheets with parchment paper. Scoop out 1.5-2 tablespoons of chilled cookie dough, flatten into a 2-2.5 inch disc, and create a slight indentation. Place 1-1.5 teaspoons of chilled cheesecake filling into the center. Carefully gather the dough edges and pinch to completely enclose the filling, forming a smooth ball. Gently press each cookie ball onto the prepared baking sheet. Place about 1/2 teaspoon of cooled strawberry swirl on top of each cookie, gently swirling with a toothpick or knife. -
Step 5
Bake one baking sheet at a time for 10-14 minutes, or until the edges are lightly golden brown and the centers are set but still look soft. Do not overbake. Remove from oven and let cool on the baking sheet for 5 minutes before carefully transferring to a wire rack to cool completely. Cooling completely is essential for the cheesecake filling to fully set.
Important Information
Nutrition Facts (Per Serving)
It is important to consider this information as approximate and not to use it as definitive health advice.
Allergy Information
Please check ingredients for potential allergens and consult a health professional if in doubt.
Leave a Comment