
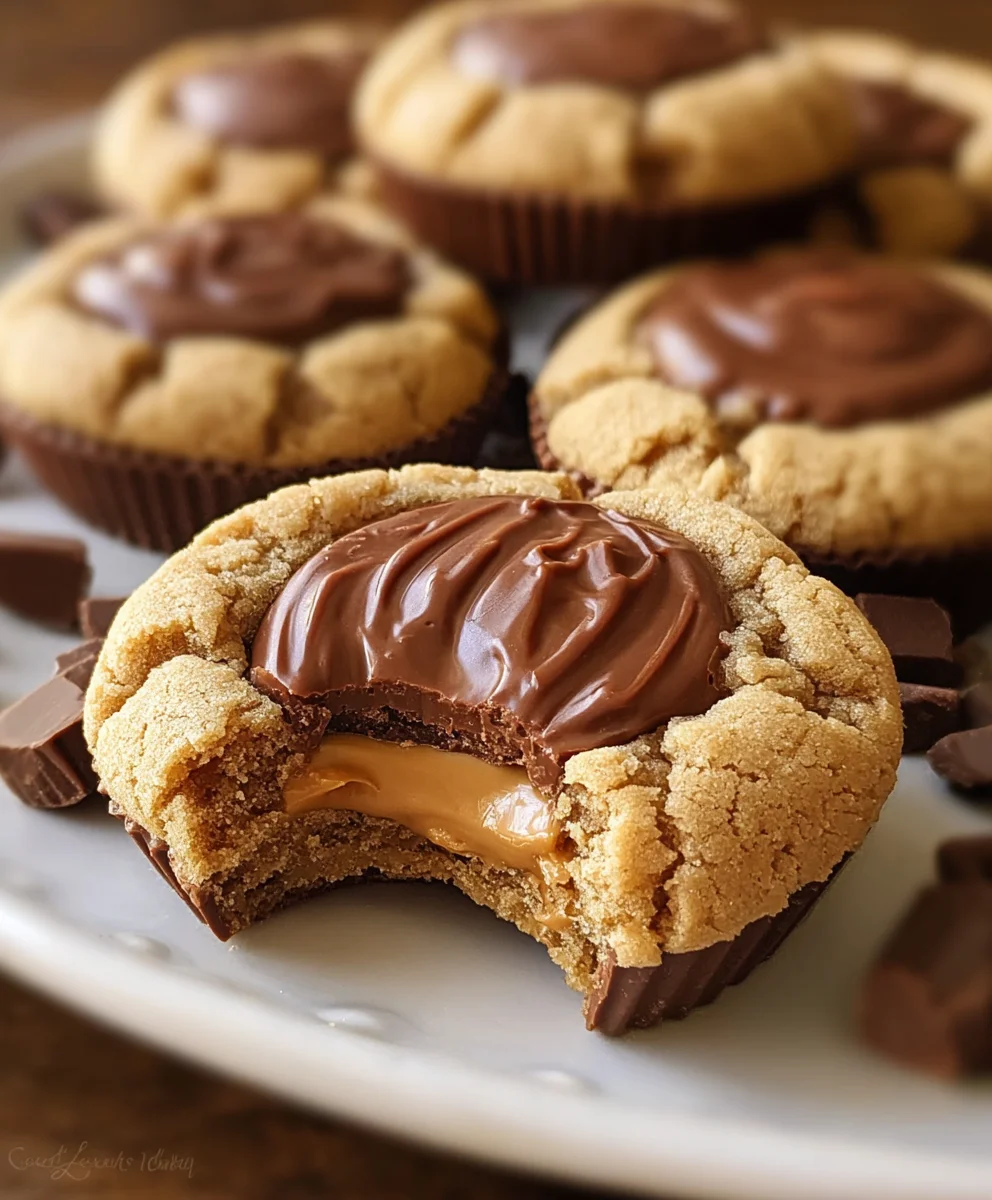
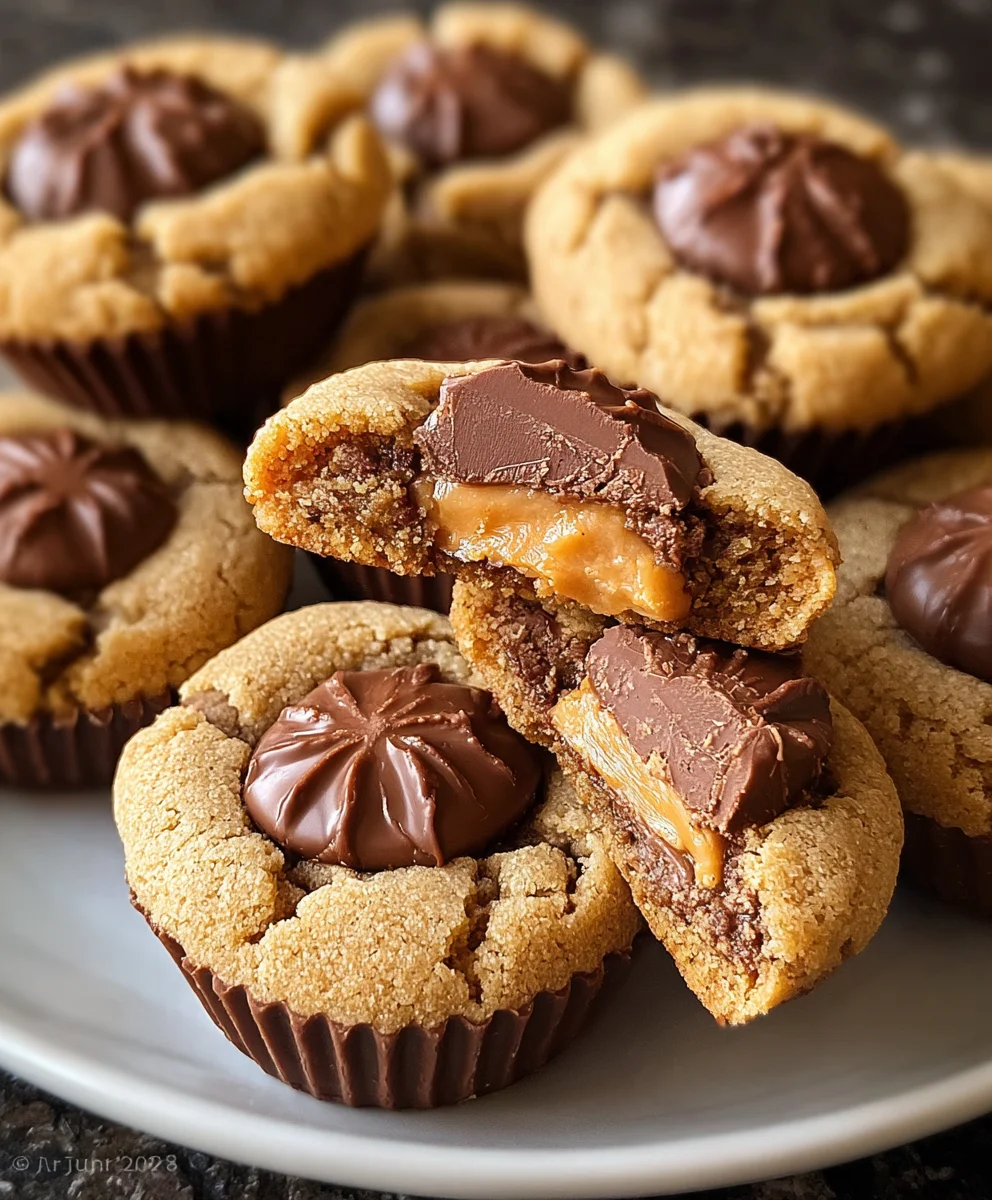
Reeses Peanut Butter Cup Cookies are more than just a dessert; they are a delightful culinary experience that masterfully blends two of America’s most beloved treats into one irresistible package. Imagine a soft, chewy peanut butter cookie, still warm from the oven, cradling a perfectly melted, creamy Reese’s Peanut Butter Cup right in its heart. It’s a symphony of sweet and salty, rich and comforting, that promises to bring a smile to anyone’s face.
For generations, the combination of peanut butter and chocolate has held a special place in our hearts, with Reese’s Peanut Butter Cups themselves becoming an iconic symbol of this perfect pairing. This recipe takes that cherished duo to an exciting new level, transforming it into a homemade sensation that’s surprisingly easy to achieve. People adore these cookies not only for their phenomenal taste – the luxurious blend of nutty peanut butter and smooth, sweet chocolate – but also for their incredible texture: a tender cookie giving way to that gooey, molten candy center. They offer a nostalgic trip down memory lane while delivering an innovative twist on a classic. I find myself constantly reaching for another of these incredible Reeses Peanut Butter Cup Cookies, and I’m confident you will too.

Ingredients:
- 1 cup (2 sticks) unsalted butter, softened to room temperature
- 1 cup granulated sugar
- 1 cup packed light brown sugar
- 1 cup creamy peanut butter (I always recommend a classic, non-natural brand like Jif or Skippy for the best texture in these cookies – the natural varieties tend to separate oil too much)
- 2 large eggs, also at room temperature
- 2 teaspoons pure vanilla extract
- 2 ½ cups all-purpose flour
- 1 teaspoon baking soda
- ½ teaspoon salt
- Approximately 36-48 mini Reese’s Peanut Butter Cups, unwrapped (you’ll need one for each cookie, so plan accordingly based on how large you make them! I often buy a few bags to be safe.)
- Optional: Flaky sea salt for sprinkling (a wonderful counterpoint to the sweetness!)
- Optional: About ¼ cup extra granulated sugar for rolling, if you like a little sparkle and crisp edge.
Preparing Your Workspace and Ingredients (Mise en Place)
- Before I even think about mixing, I always take a few moments to get everything ready. Trust me, it makes the baking process so much smoother and more enjoyable. First, I preheat my oven to 375°F (190°C). Having the oven ready to go means no waiting around once your dough is perfect.
- Next, I line several large baking sheets with parchment paper. This step is a lifesaver for preventing sticking and makes cleanup a breeze. If you don’t have parchment paper, a silicone baking mat works just as well.
- Now, for the main event of prep: unwrap all those glorious mini Reese’s Peanut Butter Cups! This is a crucial step that you absolutely do not want to skip. Trying to unwrap them with sticky dough hands later is a recipe for frustration. Get them all ready and set aside in a bowl within easy reach. For me, this is often the task I assign to a helpful family member or friend.
- I also take a moment to ensure my butter and eggs are at proper room temperature. This is really important for achieving that wonderfully creamy, light texture in our cookie dough. Cold ingredients don’t emulsify properly with the sugars and fats, which can lead to a denser, less uniform cookie. I usually take them out of the fridge about 30-60 minutes before I plan to bake.
- Measure out all your dry ingredients – flour, baking soda, and salt – into a separate bowl. Similarly, measure your sugars and peanut butter. Having everything pre-measured means you can just flow from one step to the next without interruption.
Mixing the Dry Ingredients
- In a medium-sized bowl, I gently whisk together my all-purpose flour, baking soda, and salt. This step is crucial for ensuring that the leavening agents are evenly distributed throughout the dough, which means every bite of our Reeses Peanut Butter Cup Cookies will be perfectly risen and uniformly delicious. It prevents any pockets of baking soda that could leave a bitter taste. Set this bowl aside for a moment; we’ll come back to it soon.
Creaming the Wet Ingredients (Butter, Sugars, Peanut Butter)
- Now, let’s get to the heart of the cookie dough: the wet ingredients. In the bowl of a stand mixer fitted with the paddle attachment (or using a large bowl and a handheld electric mixer), I combine my softened unsalted butter, granulated sugar, and light brown sugar.
- I cream these together on medium speed for about 2-3 minutes, or until the mixture is light, fluffy, and noticeably paler in color. This process incorporates air into the butter and sugar, which is fundamental for creating a tender, chewy cookie texture. Don’t rush this step! It’s the foundation of a great cookie.
- Next, I add the creamy peanut butter to the butter and sugar mixture. I beat this on medium speed for another 1-2 minutes, scraping down the sides of the bowl as needed. You want everything to be thoroughly combined and look homogenous. The mixture will be wonderfully creamy and fragrant at this point – try not to sneak a spoonful just yet!
- With the mixer on low speed, I add the eggs one at a time, beating well after each addition until just combined. Overmixing the eggs can sometimes lead to a tougher cookie.
- Finally, I stir in the pure vanilla extract. Vanilla really amplifies all the other flavors, giving these Reeses Peanut Butter Cup Cookies a depth that’s simply irresistible. Give it a quick mix until it’s just incorporated.
Combining Wet and Dry
- With the wet ingredients beautifully combined, it’s time to bring in our dry mixture. I add the flour mixture to the wet ingredients in two or three additions, mixing on low speed after each addition until just combined. The key here is not to overmix! Overmixing develops the gluten in the flour, which can lead to tough, dry cookies. As soon as you no longer see streaks of dry flour, stop the mixer. I often finish the last few stirs by hand with a spatula to ensure I don’t overwork the dough.
- The dough for these Reeses Peanut Butter Cup Cookies should be wonderfully thick, soft, and slightly sticky. If your kitchen is particularly warm, or if you prefer a firmer dough for rolling, you can chill the dough in the refrigerator for 20-30 minutes. This isn’t always necessary but can make handling a bit easier.
Forming and Preparing the Cookies for Baking
- Now comes the fun part – shaping our delightful cookies! Using a cookie scoop (I prefer a 1.5 to 2-tablespoon capacity scoop for consistent sizing) or simply rolling with my hands, I scoop out portions of dough. I roll each portion into a smooth ball. For truly uniform cookies, try to make each ball roughly the same size.
- If you’re using the optional extra granulated sugar, this is when you’d roll each dough ball in the sugar to lightly coat it. This gives the cookies a lovely sparkly finish and a slightly crispier edge.
- I place the rolled dough balls about 2 inches apart on my prepared baking sheets. Remember, these cookies will spread a bit, so giving them enough room is important for preventing them from merging into one giant cookie blob.
- For the classic “Reeses Peanut Butter Cup Cookies” look, I wait to add the Reese’s Cup until after the cookies have baked for a few minutes. This prevents the chocolate from burning or sinking too deep into the dough during baking. I find it results in a prettier, more prominent peanut butter cup.
Baking the “Reeses Peanut Butter Cup Cookies”
- I carefully place one baking sheet into my preheated 375°F (190°C) oven.
- I bake the cookies for 6-8 minutes, or until the edges are just set and lightly golden, but the centers still look very soft and slightly underbaked. This is the magic moment!
- After 6-8 minutes, I quickly remove the baking sheet from the oven. Immediately, I gently press one unwrapped mini Reese’s Peanut Butter Cup into the center of each warm cookie. The heat of the cookie will slightly melt the peanut butter cup, making it nestle perfectly into place.
- Once the Reese’s cups are in, I pop the baking sheet back into the oven for another 2-4 minutes, just until the cookies are fully set around the edges and the Reese’s cup looks beautifully melty and glossy. The total baking time will be about 8-12 minutes, depending on your oven and the size of your cookies. Keep an eye on them! You want them just baked through, not overly brown.
- For those who love a sweet and salty combination, right after removing the cookies from the oven for the second time, I sometimes sprinkle a tiny pinch of flaky sea salt over the top of each warm, melty Reese’s Peanut Butter Cup. It really elevates the flavor.
- I rotate my baking sheets halfway through the total baking time if I’m using multiple sheets or if my oven tends to bake unevenly. This ensures all my Reeses Peanut Butter Cup Cookies achieve that perfect golden-brown hue.
Finishing Touches and Cooling
- Once baked to perfection, I remove the baking sheets from the oven. This next step is very important for the structure of your Reeses Peanut Butter Cup Cookies: Allow the cookies to cool on the baking sheet for about 5-10 minutes. They are quite delicate when hot, and letting them set up on the sheet prevents them from falling apart when you move them. During this time, the residual heat will continue to cook them slightly and the Reese’s cup will fully melt into a delicious, gooey pool.
- After this initial cooling period on the baking sheet, I carefully transfer the cookies to a wire rack to cool completely. This allows air to circulate around them, preventing the bottoms from becoming soggy and ensuring a perfectly tender-chewy texture throughout.
- While it’s incredibly tempting to devour these warm and gooey, cooling them completely allows the flavors to meld and the texture to fully develop. These Reeses Peanut Butter Cup Cookies are absolutely divine when enjoyed slightly warm, but they are equally wonderful once fully cooled.
- Once completely cool, I store any leftover cookies in an airtight container at room temperature for up to 3-4 days. Though, honestly, they rarely last that long in my house! Enjoy every single bite of these homemade delights!
Conclusion:
And there you have it, my friends – the grand finale to a baking adventure that promises to bring unparalleled joy to your taste buds and a wave of nostalgia to your soul. If you’ve followed along, you already know the magic that happens when you combine that perfect, chewy cookie base with the irresistible combination of chocolate and peanut butter from a beloved candy. But let me truly reiterate why this particular recipe isn’t just another cookie; it’s an absolute game-changer, a dessert that transcends the ordinary and enters the realm of legendary home baking. I’m talking about a cookie so profoundly satisfying, so utterly delicious, that it will elicit gasps of delight and immediate requests for the recipe every single time you serve it. These aren’t just treats; they’re edible hugs, baked with love and guaranteed to put a smile on anyone’s face.
What makes these cookies a non-negotiable addition to your baking repertoire, you ask? It’s the impeccable balance. The rich, tender crumb of the cookie itself, often boasting a subtle hint of brown sugar and vanilla, creates the ideal canvas. Then, the star of the show, the surprise of the melted, gooey Reese’s peanut butter cup nestled right in the center, offers that iconic, salty-sweet peanut butter punch perfectly complemented by the creamy milk chocolate. Each bite is a symphony of textures – a slightly crisp edge, a soft, chewy interior, and then the molten core that just melts in your mouth. It’s truly an experience, a moment of pure, unadulterated bliss that makes all the effort worthwhile. Trust me when I say that the aroma alone, as these bake, is enough to gather everyone in your household around the oven, eagerly anticipating the moment they emerge, golden brown and utterly divine. You’ll quickly discover why these Reeses Peanut Butter Cup Cookies are destined to become a staple in your baking repertoire, a recipe you’ll return to again and again.
Now, while these cookies are absolutely phenomenal enjoyed straight from the cooling rack (and honestly, who can resist?), I love to get creative with how I serve them or even introduce subtle variations to keep things exciting. For an immediate treat, nothing beats them still slightly warm, perhaps with a tall, frosty glass of milk – it’s a classic pairing for a reason! Imagine hosting a cozy movie night; a plate of these cookies, still radiating warmth, will be the undisputed star. For an elevated dessert experience, consider serving them alongside a scoop of premium vanilla bean ice cream. The contrast between the warm, rich cookie and the cold, creamy ice cream is simply heavenly. You could even make ice cream sandwiches by gently pressing a scoop of ice cream between two slightly cooled cookies – a dangerously delicious endeavor!
Feeling a little adventurous with variations? Before baking, a sprinkle of flaky sea salt on top of each cookie can dramatically enhance the chocolate and peanut butter flavors, adding a sophisticated edge. For a festive touch during holidays, you might experiment with using different seasonal Reese’s cups, if available, or even pressing a few festive sprinkles into the top of the dough before baking. Another fun idea is to drizzle a little melted white chocolate or even some extra melted peanut butter over the cooled cookies for an extra layer of decadence and visual appeal. Or, if you want to dial up the chocolate factor even further, fold in a handful of mini chocolate chips into the cookie dough itself before wrapping it around the Reese’s cup. The possibilities for personalizing these delightful treats are truly endless, limited only by your imagination and the contents of your pantry. They are robust enough to handle minor tweaks, yet perfect in their original form.
So, my dear fellow bakers, I implore you: don’t just read about this recipe – make it! Clear your schedule, gather your ingredients, and prepare for a truly rewarding baking session. The satisfaction of pulling these perfect cookies from your oven, knowing you’ve created something so utterly delicious, is immense. And the joy you’ll bring to family and friends as they bite into these masterpieces? Absolutely priceless. Once you’ve embarked on this delicious journey, I genuinely want to hear all about it. What were your favorite parts of the process? Did you try any fun variations? How quickly did they disappear from the plate? Please, share your experiences, your successes, and even your funny baking anecdotes. Your feedback and stories are what make this community so vibrant and inspiring. Let’s spread the cookie love far and wide!
Best Reese’s Peanut Butter Cup Cookies Recipe Ever!
Soft and chewy peanut butter cookies with a melted Reese’s Peanut Butter Cup in the center. This irresistible treat blends sweet and salty, rich and comforting flavors, perfect for any occasion. Simple to make and loved by all.
Ingredients
-
1 cup (2 sticks) unsalted butter, softened
-
1 cup granulated sugar
-
1 cup packed light brown sugar
-
1 cup creamy peanut butter
-
2 large eggs
-
2 teaspoons pure vanilla extract
-
2 ½ cups all-purpose flour
-
1 teaspoon baking soda
-
½ teaspoon salt
-
36-48 mini Reese’s Peanut Butter Cups, unwrapped
-
Optional: Flaky sea salt
-
Optional: ¼ cup extra granulated sugar for rolling
Instructions
-
Step 1
Preheat oven to 375°F (190°C) and line baking sheets with parchment paper. Unwrap all mini Reese’s Peanut Butter Cups and ensure butter and eggs are at room temperature. -
Step 2
In a medium bowl, whisk together flour, baking soda, and salt. -
Step 3
In a stand mixer, cream softened butter, granulated sugar, and brown sugar until light and fluffy (2-3 min). Add peanut butter and beat until combined (1-2 min). -
Step 4
Add eggs one at a time, then stir in vanilla extract. Mix until just combined. -
Step 5
Gradually add the dry flour mixture to the wet ingredients, mixing on low speed until just combined. Do not overmix. -
Step 6
Scoop dough into 1.5-2 tablespoon balls, optionally rolling in extra granulated sugar. Place balls 2 inches apart on prepared baking sheets. -
Step 7
Bake for 6-8 minutes until edges are set. Remove from oven and immediately press one unwrapped mini Reese’s Peanut Butter Cup into the center of each warm cookie. -
Step 8
Return to oven and bake for another 2-4 minutes, until cookies are fully set and Reese’s cups are melty. Optionally, sprinkle with flaky sea salt. -
Step 9
Cool cookies on the baking sheet for 5-10 minutes before transferring to a wire rack to cool completely. Store leftovers in an airtight container at room temperature.
Important Information
Nutrition Facts (Per Serving)
It is important to consider this information as approximate and not to use it as definitive health advice.
Allergy Information
Please check ingredients for potential allergens and consult a health professional if in doubt.

Leave a Comment